

English Manual
Page 1
.... 8 a.m.–-4 p.m. USER’'S MANUAL Or call 1-800-TO-BE-FIT (1-800-862-3348) Mon.–-Fri. 6 a.m.–-6 p.m. MT Please do not contact the store. Save this equipment. Serial Number Decal ACTIVATE YOUR WARRANTY To register your product and activate your warranty today, go to www.nordictrackservice.com/ registration. CAUTION Read all precautions and instructions in the space above for...
.... 8 a.m.–-4 p.m. USER’'S MANUAL Or call 1-800-TO-BE-FIT (1-800-862-3348) Mon.–-Fri. 6 a.m.–-6 p.m. MT Please do not contact the store. Save this equipment. Serial Number Decal ACTIVATE YOUR WARRANTY To register your product and activate your warranty today, go to www.nordictrackservice.com/ registration. CAUTION Read all precautions and instructions in the space above for...
English Manual
Page 2
... HOW TO FOLD AND MOVE THE TREADMILL 22 TROUBLESHOOTING 23 EXERCISE GUIDELINES 25 PART LIST 27 EXPLODED DRAWING 28 ORDERING REPLACEMENT PARTS Back Cover LIMITED WARRANTY Back Cover WARNING DECAL PLACEMENT This drawing shows the locations of ICON IP, Inc. 2 Note: The decals may not be shown at actual size. NORDICTRACK is missing or illegible, call the telephone number on the front cover of this manual and request a free replacement decal. Apply...
... HOW TO FOLD AND MOVE THE TREADMILL 22 TROUBLESHOOTING 23 EXERCISE GUIDELINES 25 PART LIST 27 EXPLODED DRAWING 28 ORDERING REPLACEMENT PARTS Back Cover LIMITED WARRANTY Back Cover WARNING DECAL PLACEMENT This drawing shows the locations of ICON IP, Inc. 2 Note: The decals may not be shown at actual size. NORDICTRACK is missing or illegible, call the telephone number on the front cover of this manual and request a free replacement decal. Apply...
English Manual
Page 3
.... This is not working properly. (See TROUBLESHOOTING on the walking belt. Use the treadmill only as cell phone chargers, into the surge suppressor or into an appropriate outlet (see your physician. Do not put the treadmill in speed. 3 Keep children under the treadmill. 7. Do not operate the treadmill if the power cord or plug is damaged, or if the treadmill is especially important for...
.... This is not working properly. (See TROUBLESHOOTING on the walking belt. Use the treadmill only as cell phone chargers, into the surge suppressor or into an appropriate outlet (see your physician. Do not put the treadmill in speed. 3 Keep children under the treadmill. 7. Do not operate the treadmill if the power cord or plug is damaged, or if the treadmill is especially important for...
English Manual
Page 4
... as an exercise aid in determining heart rate trends in this manual. The heart rate monitor is not a medical device. Over exercising may affect the accuracy of the power switch), and unplug the power cord when the treadmill is holding the frame securely in the storage position. 24. When folding or moving the treadmill, make sure that the storage latch is not in use , before performing the maintenance and adjustment procedures described...
... as an exercise aid in determining heart rate trends in this manual. The heart rate monitor is not a medical device. Over exercising may affect the accuracy of the power switch), and unplug the power cord when the treadmill is holding the frame securely in the storage position. 24. When folding or moving the treadmill, make sure that the storage latch is not in use , before performing the maintenance and adjustment procedures described...

English Manual
Page 6
... workouts at home more effective and enjoyable. To help us . manual. BEFORE YOU BEGIN Thank you use the treadmill. The model number and the location of the serial number decal are shown on the front cover of this Before reading further, please familiarize yourself with the parts that are labeled in . (185 cm) Width: 3 ft. (91 cm) Handrail Storage Latch Console Heart Rate Monitor Key/Clip Walking Belt Foot Rail Idler Roller Adjustment Screws Motor Hood Power Switch Power Cord...
... workouts at home more effective and enjoyable. To help us . manual. BEFORE YOU BEGIN Thank you use the treadmill. The model number and the location of the serial number decal are shown on the front cover of this Before reading further, please familiarize yourself with the parts that are labeled in . (185 cm) Width: 3 ft. (91 cm) Handrail Storage Latch Console Heart Rate Monitor Key/Clip Walking Belt Foot Rail Idler Roller Adjustment Screws Motor Hood Power Switch Power Cord...
English Manual
Page 11
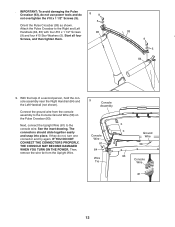
Then, remove the Pulse Crossbar. 6. Note: There are no wires on a soft surface to the Left Upright (not shown) in the same way. Set the Console Base (64) face down on the left side. 90 7. Start both Screws, and then tighten them. 81 84 Attach the Left Handrail (not shown) to avoid scratching the Console Base. 7 64 Remove the two screws (A) from the Pulse Crossbar...
Then, remove the Pulse Crossbar. 6. Note: There are no wires on a soft surface to the Left Upright (not shown) in the same way. Set the Console Base (64) face down on the left side. 90 7. Start both Screws, and then tighten them. 81 84 Attach the Left Handrail (not shown) to avoid scratching the Console Base. 7 64 Remove the two screws (A) from the Pulse Crossbar...
English Manual
Page 12
... Handrail (not shown). Connect the ground wire from the Upright Wire. 9 Console Assembly Console Wire 81 84 Wire Tie Ground Wire 58 93 Console Wire 81 12 See the inset drawing. If they do not overtighten the #10 x 1 1/2" Screws (9). IF YOU DO NOT CONNECT THE CONNECTORS PROPERLY, THE CONSOLE MAY BECOME DAMAGED WHEN YOU TURN ON THE POWER. Attach the Pulse Crossbar to the console wire. Next, connect the Upright Wire (81) to the...
... Handrail (not shown). Connect the ground wire from the Upright Wire. 9 Console Assembly Console Wire 81 84 Wire Tie Ground Wire 58 93 Console Wire 81 12 See the inset drawing. If they do not overtighten the #10 x 1 1/2" Screws (9). IF YOU DO NOT CONNECT THE CONNECTORS PROPERLY, THE CONSOLE MAY BECOME DAMAGED WHEN YOU TURN ON THE POWER. Attach the Pulse Crossbar to the console wire. Next, connect the Upright Wire (81) to the...
English Manual
Page 13
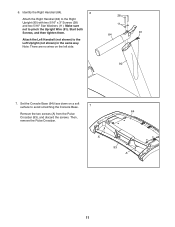
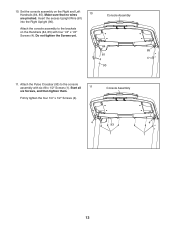
Attach the console assembly to the console assembly with four 1/4" x 1/2" Screws (4). Console Assembly 84 85 81 4 4 90 11. Firmly tighten the four 1/4" x 1/2" Screws (4). Insert the excess Upright Wire (81) into the Right Upright (90). Console Assembly 4 93 1 4 1 13 Make sure that no wires 10 are pinched. Do not tighten the Screws yet. Start all 11 six Screws, and then tighten them. Attach the Pulse Crossbar (93) to the brackets on the Right and Left...
Attach the console assembly to the console assembly with four 1/4" x 1/2" Screws (4). Console Assembly 84 85 81 4 4 90 11. Firmly tighten the four 1/4" x 1/2" Screws (4). Insert the excess Upright Wire (81) into the Right Upright (90). Console Assembly 4 93 1 4 1 13 Make sure that no wires 10 are pinched. Do not tighten the Screws yet. Start all 11 six Screws, and then tighten them. Attach the Pulse Crossbar (93) to the brackets on the Right and Left...
English Manual
Page 16
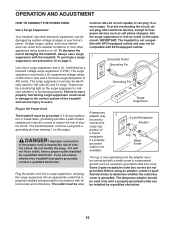
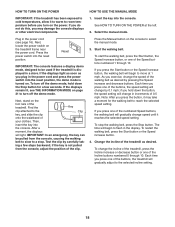
... is properly installed and grounded in your home’'s power. If you are not grounded. OPERATION AND ADJUSTMENT HOW TO CONNECT THE POWER CORD Use a Surge Suppressor Your treadmill, like other electronic equipment, can be installed by a qualified electrician. 16 The treadmill power cord has a plug with a metal screw to users. There must be a monitoring light on a A temporary adapter may not be compatible with all local codes and ordinances...
... is properly installed and grounded in your home’'s power. If you are not grounded. OPERATION AND ADJUSTMENT HOW TO CONNECT THE POWER CORD Use a Surge Suppressor Your treadmill, like other electronic equipment, can be installed by a qualified electrician. 16 The treadmill power cord has a plug with a metal screw to users. There must be a monitoring light on a A temporary adapter may not be compatible with all local codes and ordinances...
English Manual
Page 17
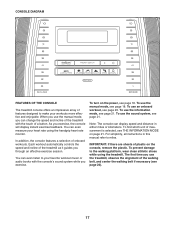
... walking belt, and center the walking belt if necessary (see page 24). 17 Each workout automatically controls the speed and incline of onboard workouts. In addition, the console features a selection of the treadmill as it guides you exercise, the console will display instant exercise feedback. CONSOLE DIAGRAM FEATURES OF THE CONSOLE The treadmill console offers an impressive array of measurement is selected, see THE INFORMATION MODE on the console, remove the plastic. For simplicity, all instructions...
... walking belt, and center the walking belt if necessary (see page 24). 17 Each workout automatically controls the speed and incline of onboard workouts. In addition, the console features a selection of the treadmill as it guides you exercise, the console will display instant exercise feedback. CONSOLE DIAGRAM FEATURES OF THE CONSOLE The treadmill console offers an impressive array of measurement is selected, see THE INFORMATION MODE on the console, remove the plastic. For simplicity, all instructions...
English Manual
Page 18
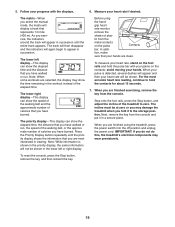
... console features a display demo mode, designed to be pulled from the console, adjust the position of the treadmill as you plug in a store. If you press the Start button or the Speed increase button, the walking belt will change the speed of the buttons, the speed setting will change by pressing the Speed increase and decrease buttons. As you exercise, change in the display. To change speed until it reaches the selected speed setting. Select the manual mode. Plug in the power cord (see THE INFORMATION MODE on...
... console features a display demo mode, designed to be pulled from the console, adjust the position of the treadmill as you plug in a store. If you press the Start button or the Speed increase button, the walking belt will change the speed of the buttons, the speed setting will change by pressing the Speed increase and decrease buttons. As you exercise, change in the display. To change speed until it reaches the selected speed setting. Select the manual mode. Plug in the power cord (see THE INFORMATION MODE on...
English Manual
Page 19
... you may damage the treadmill when you have burned. Next, remove the key from the console and put it to hold the pulse bar with the displays. 6. Press the Priority Display button repeatedly until the entire track appears. For the most accurate heart rate reading, continue to the storage position. 5. As you have walked or run , the speed of the walking belt, or the approximate number of calories you...
... you may damage the treadmill when you have burned. Next, remove the key from the console and put it to hold the pulse bar with the displays. 6. Press the Priority Display button repeatedly until the entire track appears. For the most accurate heart rate reading, continue to the storage position. 5. As you have walked or run , the speed of the walking belt, or the approximate number of calories you...
English Manual
Page 20
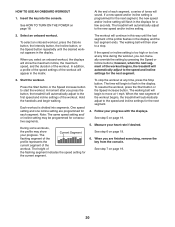
... the workout begins, the treadmill will then slow to the new speed and/or incline setting. 2. The walking belt will automatically adjust to a stop the workout at any time, press the Stop button. HOW TO USE AN ONBOARD WORKOUT 1. The walking belt will automatically adjust to start the workout. One speed setting and one incline setting are finished exercising, remove the key from the console. When you can manually override the setting by pressing the Speed or Incline buttons; See HOW TO TURN ON THE POWER...
... the workout begins, the treadmill will then slow to the new speed and/or incline setting. 2. The walking belt will automatically adjust to a stop the workout at any time, press the Stop button. HOW TO USE AN ONBOARD WORKOUT 1. The walking belt will automatically adjust to start the workout. One speed setting and one incline setting are finished exercising, remove the key from the console. When you can manually override the setting by pressing the Speed or Incline buttons; See HOW TO TURN ON THE POWER...
English Manual
Page 21
... demo mode is turned on, a “"d”" will function normally when you plug in the power cord, press the power switch into the reset position, and insert the key into the console. The faster you run on the treadmill. make sure that the treadmill has been used if the treadmill is displayed in . Turn the leg on the treadmill, or the more rmness; Note: Make sure that the walking belt has moved...
... demo mode is turned on, a “"d”" will function normally when you plug in the power cord, press the power switch into the reset position, and insert the key into the console. The faster you run on the treadmill. make sure that the treadmill has been used if the treadmill is displayed in . Turn the leg on the treadmill, or the more rmness; Note: Make sure that the walking belt has moved...

English Manual
Page 22
... foot rails, and do not move the treadmill. 1. Bend your legs and keep your right hand. Pull back on the handrail until the latch plate is past the latch pin. Hold the metal frame rmly with the latch pin. Pull the latch knob to the desired location. Wheel 2. Then, release the latch knob. 2. Then, remove the key and unplug the power cord. Hold the frame ...
... foot rails, and do not move the treadmill. 1. Bend your legs and keep your right hand. Pull back on the handrail until the latch plate is past the latch pin. Hold the metal frame rmly with the latch pin. Pull the latch knob to the desired location. Wheel 2. Then, release the latch knob. 2. Then, remove the key and unplug the power cord. Hold the frame ...
English Manual
Page 23
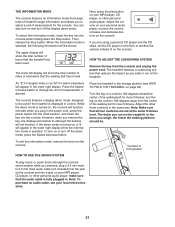
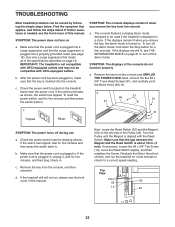
... then plug it . The console features a display demo mode, designed to be used if the treadmill is not compatible with GFCI-equipped outlets and may not be solved by following the simple steps below. c. Reattach the Motor Hood (not shown), and run , please see page 16). Check the power switch (see THE INFORMATION MODE on . Make sure that applies, and follow the steps listed. TROUBLESHOOTING Most treadmill problems can...
... then plug it . The console features a display demo mode, designed to be used if the treadmill is not compatible with GFCI-equipped outlets and may not be solved by following the simple steps below. c. Reattach the Motor Hood (not shown), and run , please see page 16). Check the power switch (see THE INFORMATION MODE on . Make sure that applies, and follow the steps listed. TROUBLESHOOTING Most treadmill problems can...
English Manual
Page 24
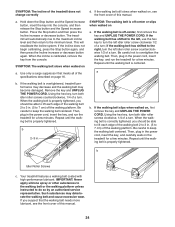
... THE POWER CORD. When the walking belt is properly tightened. Then, plug in . (5 to the minimum level. Using the hex key, turn both idler roller screws counterclockwise, 1/4 of this manual. IMPORTANT: Never apply silicone spray or other substances to the walking belt or the walking platform unless instructed to overtighten the walking belt. If you should be able to turn the left idler roller screw counterclockwise 1/2 of the treadmill does not change correctly...
... THE POWER CORD. When the walking belt is properly tightened. Then, plug in . (5 to the minimum level. Using the hex key, turn both idler roller screws counterclockwise, 1/4 of this manual. IMPORTANT: Never apply silicone spray or other substances to the walking belt or the walking platform unless instructed to overtighten the walking belt. If you should be able to turn the left idler roller screw counterclockwise 1/2 of the treadmill does not change correctly...
English Manual
Page 25
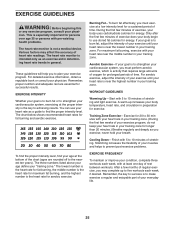
...). For detailed exercise information, obtain a reputable book or consult your training zone. These guidelines will help you exercise; Aerobic Exercise—-If your age at least one day of time. During the first few minutes of exercise does your body begin to use your heart rate as a guide to strengthen your exercise program. For maximum fat burning, exercise with pre-existing health problems. The heart rate monitor is activity...
...). For detailed exercise information, obtain a reputable book or consult your training zone. These guidelines will help you exercise; Aerobic Exercise—-If your age at least one day of time. During the first few minutes of exercise does your body begin to use your heart rate as a guide to strengthen your exercise program. For maximum fat burning, exercise with pre-existing health problems. The heart rate monitor is activity...
English Manual
Page 27
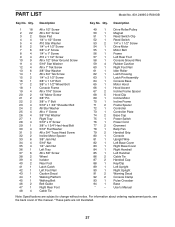
... 51 1 Reed Switch Clip 52 1 Reed Switch 53 2 1/4" x 1 1/2" Screw 54 1 Drive Motor 55 1 Motor Belt 56 1 Frame 57 1 Left Rear Foot 58 1 Console Ground Wire 59 4 Rubber Cushion 60 1 Right Foot Rail 61 1 Idler Roller 62 1 Latch Housing 63 1 Latch Pin Assembly 64 1 Console Base 65 1 Motor Hood 66 1 Hood Accent 67 2 Incline Frame Spacer 68 5 Hood Clip 69 1 Incline Motor 70 1 Incline Frame 71 2 Frame Spacer 72 1 Controller 73 1 Controller Plate 74 2 Base Cap 75 1 Power Switch 76 1 Power Cord 77...
... 51 1 Reed Switch Clip 52 1 Reed Switch 53 2 1/4" x 1 1/2" Screw 54 1 Drive Motor 55 1 Motor Belt 56 1 Frame 57 1 Left Rear Foot 58 1 Console Ground Wire 59 4 Rubber Cushion 60 1 Right Foot Rail 61 1 Idler Roller 62 1 Latch Housing 63 1 Latch Pin Assembly 64 1 Console Base 65 1 Motor Hood 66 1 Hood Accent 67 2 Incline Frame Spacer 68 5 Hood Clip 69 1 Incline Motor 70 1 Incline Frame 71 2 Frame Spacer 72 1 Controller 73 1 Controller Plate 74 2 Base Cap 75 1 Power Switch 76 1 Power Cord 77...
English Manual
Page 32
... of property, loss of revenues or prots, loss of enjoyment or use, or costs of its authorized service centers. This warranty provides specic legal rights; ICON Health & Fitness, Inc. (ICON) warrants this product to be responsible for one of removal or installation; Parts and labor are limited in connection with respect to any implied warranties of merchantability or tness for...
... of property, loss of revenues or prots, loss of enjoyment or use, or costs of its authorized service centers. This warranty provides specic legal rights; ICON Health & Fitness, Inc. (ICON) warrants this product to be responsible for one of removal or installation; Parts and labor are limited in connection with respect to any implied warranties of merchantability or tness for...


