
Instruction Manual
Page 2
... CHART 6 ASSEMBLY 7 HOW TO USE THE TREADMILL 16 HOW TO FOLD AND MOVE THE TREADMILL 29 MAINTENANCE AND TROUBLESHOOTING 30 EXERCISE GUIDELINES 33 PART LIST 34 EXPLODED DRAWING 36 ORDERING REPLACEMENT PARTS Back Cover RECYCLING INFORMATION Back Cover WARNING DECAL PLACEMENT This drawing shows the locations of this manual and request a free replacement decal. If a decal is missing or illegible, call the telephone number on the front cover of the warning decals. NORDICTRACK and IFIT...
... CHART 6 ASSEMBLY 7 HOW TO USE THE TREADMILL 16 HOW TO FOLD AND MOVE THE TREADMILL 29 MAINTENANCE AND TROUBLESHOOTING 30 EXERCISE GUIDELINES 33 PART LIST 34 EXPLODED DRAWING 36 ORDERING REPLACEMENT PARTS Back Cover RECYCLING INFORMATION Back Cover WARNING DECAL PLACEMENT This drawing shows the locations of this manual and request a free replacement decal. If a decal is missing or illegible, call the telephone number on the front cover of the warning decals. NORDICTRACK and IFIT...
Instruction Manual
Page 3
... the moving walking belt. 3 Keep the power cord away from moisture and dust. When a person is not working properly. (See MAINTENANCE AND TROUBLESHOOTING on any commercial, rental, or institutional setting. 6. Do not use only a 3-conductor, 14-gauge (2 mm2) cord that is turned off. Keep fingers, hair, and clothing away from the treadmill at all warnings on your treadmill before using the treadmill (see page 16), plug the power cord...
... the moving walking belt. 3 Keep the power cord away from moisture and dust. When a person is not working properly. (See MAINTENANCE AND TROUBLESHOOTING on any commercial, rental, or institutional setting. 6. Do not use only a 3-conductor, 14-gauge (2 mm2) cord that is turned off. Keep fingers, hair, and clothing away from the treadmill at all warnings on your treadmill before using the treadmill (see page 16), plug the power cord...

Instruction Manual
Page 4
... remove the key, press the power switch into any object into the off position (see the drawing on page 29.) You must be performed by an authorized service representative. DANGER: 29. Never remove the motor hood unless instructed to move the treadmill. 25. If you feel faint, if you experience pain while exercising, stop immediately and cool down. Adjust the speed in small increments to move the treadmill...
... remove the key, press the power switch into any object into the off position (see the drawing on page 29.) You must be performed by an authorized service representative. DANGER: 29. Never remove the motor hood unless instructed to move the treadmill. 25. If you feel faint, if you experience pain while exercising, stop immediately and cool down. Adjust the speed in small increments to move the treadmill...
Instruction Manual
Page 5
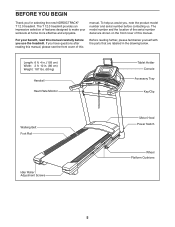
... us assist you, note the product model number and serial number before you use the treadmill. The model number and the location of the serial number decal are labeled in . (86 cm) Weight: 187 lbs. (85 kg) Handrail Heart Rate Monitor Tablet Holder Console Accessory Tray Key/Clip Walking Belt Foot Rail Idler Roller Adjustment Screws Motor Hood Power Switch Wheel Platform Cushions 5 For your workouts at home more effective and enjoyable. manual. If you for selecting the new...
... us assist you, note the product model number and serial number before you use the treadmill. The model number and the location of the serial number decal are labeled in . (86 cm) Weight: 187 lbs. (85 kg) Handrail Heart Rate Monitor Tablet Holder Console Accessory Tray Key/Clip Walking Belt Foot Rail Idler Roller Adjustment Screws Motor Hood Power Switch Wheel Platform Cushions 5 For your workouts at home more effective and enjoyable. manual. If you for selecting the new...
Instruction Manual
Page 11
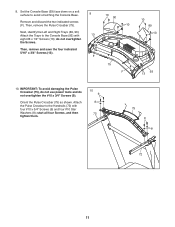
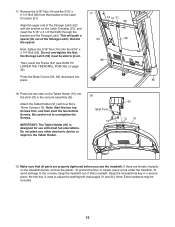
... the two indicated screws (F). Set the Console Base (93) face down on a soft surface to the Handrails (72) with 13 eight #8 x 1/2" Screws (10); Orient the Pulse Crossbar (75) as shown. Attach the Trays to the Console Base (93) with four #10 x 3/4" Screws (9) and four #10 Star Washers (8); IMPORTANT: To avoid damaging the Pulse Crossbar (75), do not use power tools and...
... the two indicated screws (F). Set the Console Base (93) face down on a soft surface to the Handrails (72) with 13 eight #8 x 1/2" Screws (10); Orient the Pulse Crossbar (75) as shown. Attach the Trays to the Console Base (93) with four #10 x 3/4" Screws (9) and four #10 Star Washers (8); IMPORTANT: To avoid damaging the Pulse Crossbar (75), do not use power tools and...

Instruction Manual
Page 12
... the Pulse Crossbar (75). I ). Insert the excess Upright Wire (80) into place. J See the inset drawing. Then, tighten the two ties (I 7 13 79 72 7 13 12 Attach the console assembly (G) to the console wire (J). Connect the Upright Wire (80) to the brackets on the Handrails (72). Set the console assembly (G) on the Handrails (72) with the four 5/16" x 3/4" Screws (13) that no wires are pinched. do not, turn...
... the Pulse Crossbar (75). I ). Insert the excess Upright Wire (80) into place. J See the inset drawing. Then, tighten the two ties (I 7 13 79 72 7 13 12 Attach the console assembly (G) to the console wire (J). Connect the Upright Wire (80) to the brackets on the Handrails (72). Set the console assembly (G) on the Handrails (72) with the four 5/16" x 3/4" Screws (13) that no wires are pinched. do not, turn...
Instruction Manual
Page 15
... hardware may be able to adjust the walking belt (see HOW TO LOWER THE TREADMILL FOR USE on the treadmill decals, remove the plastic. Make sure that all parts are sheets of direct sunlight. If there are properly tightened before you use with most full-size tablets. the hex key is designed for use the treadmill. Align the upper end of the Storage Latch; Remove the 5/16" Nut (14...
... hardware may be able to adjust the walking belt (see HOW TO LOWER THE TREADMILL FOR USE on the treadmill decals, remove the plastic. Make sure that all parts are sheets of direct sunlight. If there are properly tightened before you use with most full-size tablets. the hex key is designed for use the treadmill. Align the upper end of the Storage Latch; Remove the 5/16" Nut (14...
Instruction Manual
Page 17
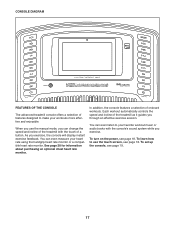
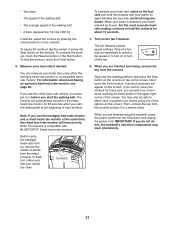
... to your heart rate using the handgrip heart rate monitor or a compatible heart rate monitor. You can change the speed and incline of the treadmill with the console's sound system while you can even measure your favorite workout music or audio books with the touch of the treadmill as it guides you exercise, the console will display instant exercise feedback. See page 28 for information about purchasing an optional chest heart rate monitor. To turn on the power, see...
... to your heart rate using the handgrip heart rate monitor or a compatible heart rate monitor. You can change the speed and incline of the treadmill with the console's sound system while you can even measure your favorite workout music or audio books with the touch of the treadmill as it guides you exercise, the console will display instant exercise feedback. See page 28 for information about purchasing an optional chest heart rate monitor. To turn on the power, see...
Instruction Manual
Page 18
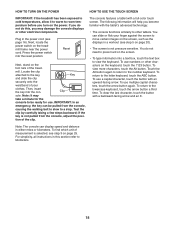
... a stop. You can slide or flick your clothes. The console features a tablet with a backward-facing arrow and an X. To clear the last character, touch the button with a full-color touch screen. For simplicity, all instructions in either miles or kilometers. IMPORTANT: In an emergency, the key can display speed and distance in this , you turn on the treadmill frame near the power cord.
... a stop. You can slide or flick your clothes. The console features a tablet with a backward-facing arrow and an X. To clear the last character, touch the button with a full-color touch screen. For simplicity, all instructions in either miles or kilometers. IMPORTANT: In an emergency, the key can display speed and distance in this , you turn on the treadmill frame near the power cord.

Instruction Manual
Page 19
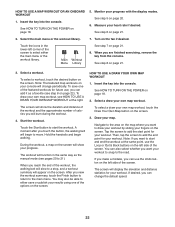
... HDMI cable, see page 25. Connect to the How It Works section. Customize settings. For more information, see step 3 on page 26. For more information, see step 4 on page 25. 6. To use the equipment settings section, see page 20. To use the manual mode, see page 25. To access the internet, download iFit workouts, and use a distance or time workout, see page 26. To use several other features that the console...
... HDMI cable, see page 25. Connect to the How It Works section. Customize settings. For more information, see step 3 on page 26. For more information, see step 4 on page 25. 6. To use the equipment settings section, see page 20. To use the manual mode, see page 25. To access the internet, download iFit workouts, and use a distance or time workout, see page 26. To use several other features that the console...
Instruction Manual
Page 20
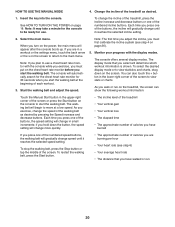
... selected incline setting. 2. Each time you must first calibrate the incline system (see step 6) • Your average heart rate • The distance that you have walked or run on the screen to return to view stats or charts. To select the desired display mode or to use . As you press one of each workout. 3. Each time you exercise, change the speed of the numbered speed buttons, the walking belt will change in the lower-right...
... selected incline setting. 2. Each time you must first calibrate the incline system (see step 6) • Your average heart rate • The distance that you have walked or run on the screen to return to view stats or charts. To select the desired display mode or to use . As you press one of each workout. 3. Each time you exercise, change the speed of the numbered speed buttons, the walking belt will change in the lower-right...
Instruction Manual
Page 21
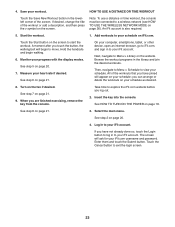
... you start the walking belt. When your pulse is compatible with your heart rate if desired. When you are finished exercising, remove the key from the console and put it on before you wish to either save your heart rate using the treadmill, press the power switch into the off the fan. 6. Then, remove the key from the console. When you are finished using either the handgrip heart rate monitor or a compatible heart rate monitor. If desired, adjust...
... you start the walking belt. When your pulse is compatible with your heart rate if desired. When you are finished exercising, remove the key from the console and put it on before you wish to either save your heart rate using the treadmill, press the power switch into the off the fan. 6. Then, remove the key from the console. When you are finished using either the handgrip heart rate monitor or a compatible heart rate monitor. If desired, adjust...
Instruction Manual
Page 22
... finished exercising, remove the key from the console. HOW TO USE A MAP WORKOUT OR AN ONBOARD WORKOUT 1. Turn on the screen. A moment after you can use , you want to add the start point for your progress with the display modes. Monitor your workout. To select a workout, touch the desired button on the fan if desired. Then, tap the screen to move. If desired, you touch the button, the walking belt...
... finished exercising, remove the key from the console. HOW TO USE A MAP WORKOUT OR AN ONBOARD WORKOUT 1. Turn on the screen. A moment after you can use , you want to add the start point for your progress with the display modes. Monitor your workout. To select a workout, touch the desired button on the fan if desired. Then, tap the screen to move. If desired, you touch the button, the walking belt...
Instruction Manual
Page 23
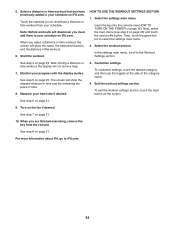
... step 2 on page 26). Enter them and touch the Submit button. Note: To use a distance or time workout, the console must be connected to start the workout. An iFit account is also required. 5. Monitor your iFit account. See HOW TO TURN ON THE POWER on the screen to a wireless network (see HOW TO USE THE WIRELESS NETWORK MODE on page 20. 4. Log in to move. HOW TO USE A DISTANCE...
... step 2 on page 26). Enter them and touch the Submit button. Note: To use a distance or time workout, the console must be connected to start the workout. An iFit account is also required. 5. Monitor your iFit account. See HOW TO TURN ON THE POWER on the screen to a wireless network (see HOW TO USE THE WIRELESS NETWORK MODE on page 20. 4. Log in to move. HOW TO USE A DISTANCE...
Instruction Manual
Page 24
... TURN ON THE POWER on page 21. 9. Start the workout. HOW TO USE THE WORKOUT SETTINGS SECTION 1. To exit the workout settings section, touch the back button on iFit.com. To customize settings, touch the desired category, and then use the toggles at the side of the workout. 6. Then, touch the gears button to download a distance or time workout from the console. Select a distance or time workout that you are finished exercising, remove...
... TURN ON THE POWER on page 21. 9. Start the workout. HOW TO USE THE WORKOUT SETTINGS SECTION 1. To exit the workout settings section, touch the back button on iFit.com. To customize settings, touch the desired category, and then use the toggles at the side of the workout. 6. Then, touch the gears button to download a distance or time workout from the console. Select a distance or time workout that you are finished exercising, remove...
Instruction Manual
Page 27
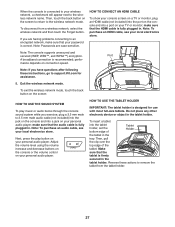
... tablet holder is correct. To insert a tablet into the tablet holder, set the bottom edge of the tablet. Adjust the volume level using the volume increase and decrease buttons on the console or the volume control on connection speed. perfor- Note: To purchase an audio cable, see your personal audio player. Then, pull the clip over the top edge of Tablet...
... tablet holder is correct. To insert a tablet into the tablet holder, set the bottom edge of the tablet. Adjust the volume level using the volume increase and decrease buttons on the console or the volume control on connection speed. perfor- Note: To purchase an audio cable, see your personal audio player. Then, pull the clip over the top edge of Tablet...

Instruction Manual
Page 29
... the frame by the arrow below. Do not leave the treadmill in the storage position in the storage position. While pressing the storage latch with your foot at the left. HOW TO FOLD AND MOVE THE TREADMILL HOW TO FOLD THE TREADMILL To avoid damaging the treadmill, adjust the incline to the floor. 29 Moving the treadmill may require two people. 1. Hold the frame and one...
... the frame by the arrow below. Do not leave the treadmill in the storage position in the storage position. While pressing the storage latch with your foot at the left. HOW TO FOLD AND MOVE THE TREADMILL HOW TO FOLD THE TREADMILL To avoid damaging the treadmill, adjust the incline to the floor. 29 Moving the treadmill may require two people. 1. Hold the frame and one...
Instruction Manual
Page 30
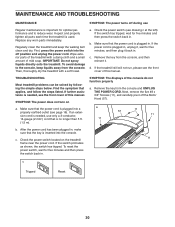
... sure that the power cord is plugged in , make sure that the key is inserted into the console. Remove the key from the console and UNPLUG THE POWER CORD. If the switch protrudes as shown, the switch has tripped. c Tripped Reset 30 TROUBLESHOOTING Most treadmill problems can be solved by following the simple steps below. SYMPTOM: The displays of this manual. Check the power switch located on a. To reset the power switch, wait for five...
... sure that the power cord is plugged in , make sure that the key is inserted into the console. Remove the key from the console and UNPLUG THE POWER CORD. If the switch protrudes as shown, the switch has tripped. c Tripped Reset 30 TROUBLESHOOTING Most treadmill problems can be solved by following the simple steps below. SYMPTOM: The displays of this manual. Check the power switch located on a. To reset the power switch, wait for five...

Instruction Manual
Page 31
.... Turn the Pulley until the walking belt is overtightened, treadmill performance may decrease and the walking belt may deteriorate the walking belt and cause excessive wear. If necessary, loosen the #8 x 3/4" Screw (11), move the Reed Switch slightly, and then retighten the Screw. b. If the walking belt is properly tightened. Remove the key and UNPLUG THE POWER CORD. b 2-3 in . (3 mm). If an extension cord is needed, use only a 3-conductor, 14-gauge (2 mm2) cord that the walking belt needs more lubricant...
.... Turn the Pulley until the walking belt is overtightened, treadmill performance may decrease and the walking belt may deteriorate the walking belt and cause excessive wear. If necessary, loosen the #8 x 3/4" Screw (11), move the Reed Switch slightly, and then retighten the Screw. b. If the walking belt is properly tightened. Remove the key and UNPLUG THE POWER CORD. b 2-3 in . (3 mm). If an extension cord is needed, use only a 3-conductor, 14-gauge (2 mm2) cord that the walking belt needs more lubricant...

Instruction Manual
Page 33
... numbers listed above your age define your body uses carbohydrate calories for a sustained period of your muscles and helps to strengthen your age at least one day of exercise, your "training zone." WORKOUT GUIDELINES Warming Up-Start with at the bottom of the chart (ages are essential for fat burning and aerobic exercise. Cooling Down-Finish with pre-existing health problems. The heart rate monitor...
... numbers listed above your age define your body uses carbohydrate calories for a sustained period of your muscles and helps to strengthen your age at least one day of exercise, your "training zone." WORKOUT GUIDELINES Warming Up-Start with at the bottom of the chart (ages are essential for fat burning and aerobic exercise. Cooling Down-Finish with pre-existing health problems. The heart rate monitor...


