
English Manual
Page 2
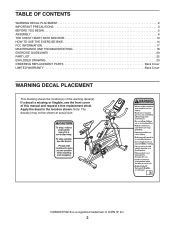
Note: The decal(s) may not be shown at actual size. NORDICTRACK is missing or illegible, see the front cover of this manual and request a free replacement decal. If a decal is a registered trademark of the warning decal(s). ... PRECAUTIONS 3 BEFORE YOU BEGIN 5 ASSEMBLY 6 THE CHEST HEART RATE MONITOR 13 HOW TO USE THE EXERCISE BIKE 14 FCC INFORMATION 17 MAINTENANCE AND TROUBLESHOOTING 18 EXERCISE GUIDELINES 20 PART LIST 22 EXPLODED DRAWING 23 ORDERING REPLACEMENT PARTS Back Cover LIMITED WARRANTY Back Cover WARNING DECAL PLACEMENT This drawing shows the location(s) of ICON...
Note: The decal(s) may not be shown at actual size. NORDICTRACK is missing or illegible, see the front cover of this manual and request a free replacement decal. If a decal is a registered trademark of the warning decal(s). ... PRECAUTIONS 3 BEFORE YOU BEGIN 5 ASSEMBLY 6 THE CHEST HEART RATE MONITOR 13 HOW TO USE THE EXERCISE BIKE 14 FCC INFORMATION 17 MAINTENANCE AND TROUBLESHOOTING 18 EXERCISE GUIDELINES 20 PART LIST 22 EXPLODED DRAWING 23 ORDERING REPLACEMENT PARTS Back Cover LIMITED WARRANTY Back Cover WARNING DECAL PLACEMENT This drawing shows the location(s) of ICON...

English Manual
Page 3
... that all users of the exercise bike are adequately informed of clearance around the exercise bike. 7. Do not put the exercise bike in this manual. 3. the pedals will continue to prevent the flywheel from the exercise bike at least 2 ft. (0.6 m) of all parts regularly. If you feel faint or...stop the flywheel quickly, press the resistance knob downward. 15. Before beginning any worn parts immediately. 8. It is the responsibility of the owner to protect the floor or carpet. The exercise bike should not be used by or through the use only. Be careful when mounting and ...
... that all users of the exercise bike are adequately informed of clearance around the exercise bike. 7. Do not put the exercise bike in this manual. 3. the pedals will continue to prevent the flywheel from the exercise bike at least 2 ft. (0.6 m) of all parts regularly. If you feel faint or...stop the flywheel quickly, press the resistance knob downward. 15. Before beginning any worn parts immediately. 8. It is the responsibility of the owner to protect the floor or carpet. The exercise bike should not be used by or through the use only. Be careful when mounting and ...

English Manual
Page 5
... this manual carefully before you , note the product model number and serial number before contacting us assist you use the exercise bike. Before reading further, please familiarize yourself with the parts that are shown on the front cover of features designed to make your benefit, read this manual. If you for increasing..., and toning the body. For your workouts at home more effective and enjoyable. To help us . Cycling is an effective exercise for selecting the new NORDICTRACK® GX 5.5 SPORT exercise bike.
... this manual carefully before you , note the product model number and serial number before contacting us assist you use the exercise bike. Before reading further, please familiarize yourself with the parts that are shown on the front cover of features designed to make your benefit, read this manual. If you for increasing..., and toning the body. For your workouts at home more effective and enjoyable. To help us . Cycling is an effective exercise for selecting the new NORDICTRACK® GX 5.5 SPORT exercise bike.

English Manual
Page 6
...M5 x 20mm Screws (57). 2 Remove the shipping bracket (not shown) from the rear of the packing materials until you nish all parts in a cleared area and remove the packing materials. Go to www.nordictrackservice.com/ registration on your computer and register 1 your product. •...bracket. ASSEMBLY •• Assembly requires two persons. •• Place all assembly steps. •• Left parts are marked “"L”" or “"Left”" and right parts are marked “"R”" or “"Right.”" In addition to the Frame (1) with two M8 x 40mm ...
...M5 x 20mm Screws (57). 2 Remove the shipping bracket (not shown) from the rear of the packing materials until you nish all parts in a cleared area and remove the packing materials. Go to www.nordictrackservice.com/ registration on your computer and register 1 your product. •...bracket. ASSEMBLY •• Assembly requires two persons. •• Place all assembly steps. •• Left parts are marked “"L”" or “"Left”" and right parts are marked “"R”" or “"Right.”" In addition to the Frame (1) with two M8 x 40mm ...
English Manual
Page 8
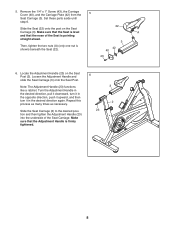
... desired direction, pull it downward, turn it in the opposite direction, push it upward, and then turn it in the desired direction again. 5. Set these parts aside until step 6. Loosen the Adjustment Handle and 6 slide the Seat Carriage (3) onto the Seat Post. Remove the 1/4" x 1" Screw (43), the Carriage Cover (40), and...
... desired direction, pull it downward, turn it in the opposite direction, push it upward, and then turn it in the desired direction again. 5. Set these parts aside until step 6. Loosen the Adjustment Handle and 6 slide the Seat Carriage (3) onto the Seat Post. Remove the 1/4" x 1" Screw (43), the Carriage Cover (40), and...

English Manual
Page 10
... (19). Locate the Adjustment Handle (23) on the Handlebar Post (4). Note: The Adjustment Handle (23) functions like a ratchet. See step 6 for an explanation. Set these parts aside until step 10. 42 40 63 19 10. Slide the Handlebar Carriage (19) to the Reed Switch Wire (61). 9. Orient the Handlebar (5) assembly as...
... (19). Locate the Adjustment Handle (23) on the Handlebar Post (4). Note: The Adjustment Handle (23) functions like a ratchet. See step 6 for an explanation. Set these parts aside until step 10. 42 40 63 19 10. Slide the Handlebar Carriage (19) to the Reed Switch Wire (61). 9. Orient the Handlebar (5) assembly as...

English Manual
Page 12
... the Left Pedal (38) counterclockwise into the Frame (1) and the Chain Guard (14). 14 Identify the Right Pedal (35). Note: Extra parts may be included. Slide the Console (48) onto the Handlebar (5). Have a second person hold the Console (48) near the Handlebar (5). After the exercise... bike is assembled, inspect it to protect the floor. 12 Place a mat beneath the exercise bike to make sure that it is assembled correctly and that all parts are properly tightened before you use the exercise...
... the Left Pedal (38) counterclockwise into the Frame (1) and the Chain Guard (14). 14 Identify the Right Pedal (35). Note: Extra parts may be included. Slide the Console (48) onto the Handlebar (5). Have a second person hold the Console (48) near the Handlebar (5). After the exercise... bike is assembled, inspect it to protect the floor. 12 Place a mat beneath the exercise bike to make sure that it is assembled correctly and that all parts are properly tightened before you use the exercise...

English Manual
Page 17
... that to which can radiate radio frequency energy and, if not installed and used in accordance with the limits for a Class B digital device, pursuant to part 15 of the following measures: •• Reorient or relocate the receiving antenna. •• Increase the separation between the equipment and the receiver. •...
... that to which can radiate radio frequency energy and, if not installed and used in accordance with the limits for a Class B digital device, pursuant to part 15 of the following measures: •• Reorient or relocate the receiving antenna. •• Increase the separation between the equipment and the receiver. •...
English Manual
Page 18
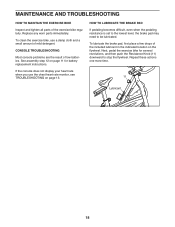
... of the included lubricant in the indicated location on the flywheel. CONSOLE TROUBLESHOOTING Most console problems are the result of the exercise bike regularly. HOW TO LUBRICATE THE BRAKE PAD If pedaling becomes difficult, even when the pedaling resistance is set to the lowest level...stop the flywheel. MAINTENANCE AND TROUBLESHOOTING HOW TO MAINTAIN THE EXERCISE BIKE Inspect and tighten all parts of low batteries. Replace any worn parts immediately. See assembly step 12 on page 13. To clean the exercise bike, use the chest heart rate monitor, see TROUBLESHOOTING on page ...
... of the included lubricant in the indicated location on the flywheel. CONSOLE TROUBLESHOOTING Most console problems are the result of the exercise bike regularly. HOW TO LUBRICATE THE BRAKE PAD If pedaling becomes difficult, even when the pedaling resistance is set to the lowest level...stop the flywheel. MAINTENANCE AND TROUBLESHOOTING HOW TO MAINTAIN THE EXERCISE BIKE Inspect and tighten all parts of low batteries. Replace any worn parts immediately. See assembly step 12 on page 13. To clean the exercise bike, use the chest heart rate monitor, see TROUBLESHOOTING on page ...
English Manual
Page 20
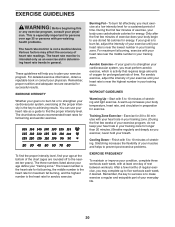
... five workouts each week, with 5 to 10 minutes of exercise, your training zone. Remember, the key to success is to make exercise a regular and enjoyable part of your “"training zone.”" The lowest number is the heart rate for fat burning, the middle number is the heart rate for maximum...
... five workouts each week, with 5 to 10 minutes of exercise, your training zone. Remember, the key to success is to make exercise a regular and enjoyable part of your “"training zone.”" The lowest number is the heart rate for fat burning, the middle number is the heart rate for maximum...
English Manual
Page 22
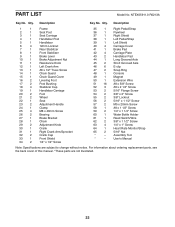
... 2 3/8" x 1 1/2" Screw 63 4 1/4" x 1" Screw 64 1 Heart Rate Monitor/Strap 65 2 5/16" Nut * –- User’'s Manual Note: Specifications are not illustrated. 22 Assembly Tool * –- PART LIST Model No. For information about ordering replacement parts, see the back cover of this manual. *These parts are subject to change without notice. NTEX05911.0 R0213A Key No.
... 2 3/8" x 1 1/2" Screw 63 4 1/4" x 1" Screw 64 1 Heart Rate Monitor/Strap 65 2 5/16" Nut * –- User’'s Manual Note: Specifications are not illustrated. 22 Assembly Tool * –- PART LIST Model No. For information about ordering replacement parts, see the back cover of this manual. *These parts are subject to change without notice. NTEX05911.0 R0213A Key No.
English Manual
Page 24
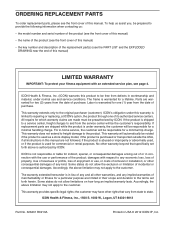
...be responsible for a minimal handling charge. If the product is shipped to a service center, freight charges to the customer. If replacement parts are shipped while the product is under this manual) LIMITED WARRANTY IMPORTANT: To protect your fitness equipment with respect to provide the following ... name of the product (see the front cover of this manual) •• the key number and description of the replacement part(s) (see the PART LIST and the EXPLODED DRAWING near the end of this warranty is limited to the original purchaser (customer). This warranty does not extend...
...be responsible for a minimal handling charge. If the product is shipped to a service center, freight charges to the customer. If replacement parts are shipped while the product is under this manual) LIMITED WARRANTY IMPORTANT: To protect your fitness equipment with respect to provide the following ... name of the product (see the front cover of this manual) •• the key number and description of the replacement part(s) (see the PART LIST and the EXPLODED DRAWING near the end of this warranty is limited to the original purchaser (customer). This warranty does not extend...


