
English Manual
Page 2
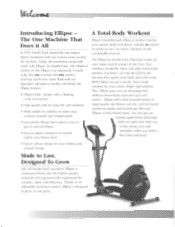
... cross-country ski machine. Weie,044-4, Introducing Ellipse - The Ellipse by NordicTrack. Stair climbers, treadmills, bikes and other lower-body aerobics machines can 't match - Thanks to grow as you an advantage that makes it could make this one time. The One Machine That Does it All In 1975 NordicTrack started the low-impact fitness revolution with Ellipse' by NordicTrack effectively works all NordicTrack machines, Ellipse is designed to its adjustable resistance system, Ellipse...
... cross-country ski machine. Weie,044-4, Introducing Ellipse - The Ellipse by NordicTrack. Stair climbers, treadmills, bikes and other lower-body aerobics machines can 't match - Thanks to grow as you an advantage that makes it could make this one time. The One Machine That Does it All In 1975 NordicTrack started the low-impact fitness revolution with Ellipse' by NordicTrack effectively works all NordicTrack machines, Ellipse is designed to its adjustable resistance system, Ellipse...

English Manual
Page 3
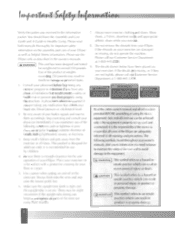
... start... In A Guide to Healthy Living you are ready to €;et the most from your exerciser. It is very important that you will find useful information about how to follow these instructions may result in order. Saturday 8 a.m. to 9 p.m. Failure to assemble and care for Storage 12 Customer Information 13 Questions?- Tett& C0444144 Important Safety Information 2 Your Ellipse"' 3 Parts 4 Assembly 6 Adjustments 10 Care 11 Fold...
... start... In A Guide to Healthy Living you are ready to €;et the most from your exerciser. It is very important that you will find useful information about how to follow these instructions may result in order. Saturday 8 a.m. to 9 p.m. Failure to assemble and care for Storage 12 Customer Information 13 Questions?- Tett& C0444144 Important Safety Information 2 Your Ellipse"' 3 Parts 4 Assembly 6 Adjustments 10 Care 11 Fold...
English Manual
Page 4
... hold onto the arms and step onto the lowest pedal first. 6. information on the assembly and care of your Ellipse If the shrouds on Use of the exerciser. Departriient, at 1-800-44 .1-2358. This product is secure. both manuals thoroughly for weights not to Healthy Living. Place your exerciser on and off of this area while lurching the upright tube. in personal...
... hold onto the arms and step onto the lowest pedal first. 6. information on the assembly and care of your Ellipse If the shrouds on Use of the exerciser. Departriient, at 1-800-44 .1-2358. This product is secure. both manuals thoroughly for weights not to Healthy Living. Place your exerciser on and off of this area while lurching the upright tube. in personal...
English Manual
Page 5
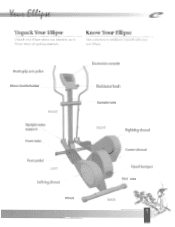
Multi-grip arm poles Electronics console Water-bottle holder FRONT Upright-tube support Front tube Foot pedal LEFT Left-leg shroud . Resistance knob . . . . . Please retain all packing materials. Know Your Ellipse Take a moment 10 familiarize yourself with your Ellipse 'vhere you inlencl to use it. Upright tube RIGHT Right-leg shroud Center shroud Tripod bumper Rear tube Wheel BACK C;) Unpack Your Ellipse Unpack your new Ellipse.
Multi-grip arm poles Electronics console Water-bottle holder FRONT Upright-tube support Front tube Foot pedal LEFT Left-leg shroud . Resistance knob . . . . . Please retain all packing materials. Know Your Ellipse Take a moment 10 familiarize yourself with your Ellipse 'vhere you inlencl to use it. Upright tube RIGHT Right-leg shroud Center shroud Tripod bumper Rear tube Wheel BACK C;) Unpack Your Ellipse Unpack your new Ellipse.
English Manual
Page 6
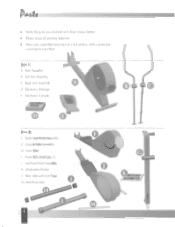
• Verify the parts you received with those shown below. • Please retain all packing materials. • Place your floor. Box 1: A Base Assembly B Left Arm Assembly C Right Arm Assembly A B D Electronics Package F Electronics Console efc- rge247 /Harr-9'6'E Box 2: F Right Foot-Pedal Assembly G Upright-Tube Assembly H Front Tube I Front-Tube End Caps (2) Left Foot-Pedal Assembly K Information Packet L Rear Tube with a protective covering for your assembled exerciser on a flat surface, with End Caps M Arm Pivot Axle r /Ai/Oa9z / / acaga/z2/1//
• Verify the parts you received with those shown below. • Please retain all packing materials. • Place your floor. Box 1: A Base Assembly B Left Arm Assembly C Right Arm Assembly A B D Electronics Package F Electronics Console efc- rge247 /Harr-9'6'E Box 2: F Right Foot-Pedal Assembly G Upright-Tube Assembly H Front Tube I Front-Tube End Caps (2) Left Foot-Pedal Assembly K Information Packet L Rear Tube with a protective covering for your assembled exerciser on a flat surface, with End Caps M Arm Pivot Axle r /Ai/Oa9z / / acaga/z2/1//

English Manual
Page 7
Box 2 Hardware: N 1/4-20 x 2 1/2 Carriage Bolts (4) O 1/4-20 x 1/2 Carriage Bolts (3) P 3/8-16 x 3 1/2 Hex Bolt Q 1/4-20 Hex Nuts (7) 1/4-20 x 5/8 Button I lead Screw (4) S Pedal Axles (2) T 3/8-16 x 3/4-inch Button Head Screw (2) U 3/8-16 Nut V Socket Wrench • W 5/8 Retaining Clips (2) X Flat Washers (4) Y Combination Wrench Hex Head Wrenches (2) AACrank Caps (2) BB Curved Washers (4) ® 774 • P ITT ITV! R lV1llt Ill 1 o :,k 144411 ( 1 1 , oQ C) IIMMIN=11 AA BB •
Box 2 Hardware: N 1/4-20 x 2 1/2 Carriage Bolts (4) O 1/4-20 x 1/2 Carriage Bolts (3) P 3/8-16 x 3 1/2 Hex Bolt Q 1/4-20 Hex Nuts (7) 1/4-20 x 5/8 Button I lead Screw (4) S Pedal Axles (2) T 3/8-16 x 3/4-inch Button Head Screw (2) U 3/8-16 Nut V Socket Wrench • W 5/8 Retaining Clips (2) X Flat Washers (4) Y Combination Wrench Hex Head Wrenches (2) AACrank Caps (2) BB Curved Washers (4) ® 774 • P ITT ITV! R lV1llt Ill 1 o :,k 144411 ( 1 1 , oQ C) IIMMIN=11 AA BB •
English Manual
Page 8
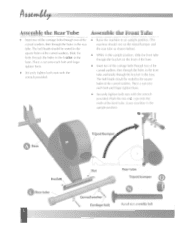
... onto each boll and finger tighten them , • Securely tighten both nuts with the wrench provided. The bolt heads should he seatecl in the upright position. • ij Base Tripod bumper Bracket Rear tube Nut Rear tube Tripod bumper Curved washer Carriage bolt Actual size assembly bolt A44€4414, Assemble the Rear Tube Assemble the Front Tube • insert. seated in the base.
... onto each boll and finger tighten them , • Securely tighten both nuts with the wrench provided. The bolt heads should he seatecl in the upright position. • ij Base Tripod bumper Bracket Rear tube Nut Rear tube Tripod bumper Curved washer Carriage bolt Actual size assembly bolt A44€4414, Assemble the Rear Tube Assemble the Front Tube • insert. seated in the base.
English Manual
Page 9
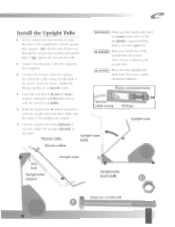
... knob Electric cables Hex's,.\ bolt Upright tube support Upright tube Upright tube knob latch ink Actual size assembly bolt LA CAUTION-) Keep your hands free of the cable casing into the notch in the upright tube support. Install the Upright Tube • Lift the upright tube into position to connect the ends. (AimpoRTAmT) Make sure the upright-tube latch is secured in the notch in the upright-tube Slippori and the knob is securely tightened...
... knob Electric cables Hex's,.\ bolt Upright tube support Upright tube Upright tube knob latch ink Actual size assembly bolt LA CAUTION-) Keep your hands free of the cable casing into the notch in the upright tube support. Install the Upright Tube • Lift the upright tube into position to connect the ends. (AimpoRTAmT) Make sure the upright-tube latch is secured in the notch in the upright-tube Slippori and the knob is securely tightened...
English Manual
Page 10
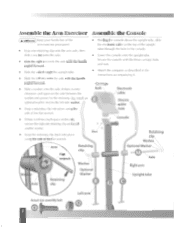
... place using the side of the upright • Snap one retaining clip onto the arm axle, then slide a washer onto the axle. r . Axle Right arm Upright tube I Axle Retaining clip G Actual size assembly bolt 9 Left arm' Q Electronic cable washer and groove for the retaining clip, install an optional washer next to the left arm onto the axle with the handle Secure the console...
... place using the side of the upright • Snap one retaining clip onto the arm axle, then slide a washer onto the axle. r . Axle Right arm Upright tube I Axle Retaining clip G Actual size assembly bolt 9 Left arm' Q Electronic cable washer and groove for the retaining clip, install an optional washer next to the left arm onto the axle with the handle Secure the console...
English Manual
Page 11
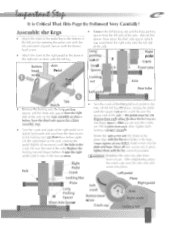
... - Assemble the Legs • Attach the front of the pedal leg to the rear. discard this spacer. Once all four button head screws into the plate and base. Axle Right crank Locking nut Rotate the right pedal until the holes in ihe crank fits over the axle nuts and screw into place, turning the pedal until... . Replace the locking nut and finger tighten. Iii+94444 57tec.i It is Critical That This Page Be Followed Very Carefully! Secure with the button head screw. • Altach the front of the right pedal 10 the front of use. the pedals must he lei) arm by inserting the pedal axle...
... - Assemble the Legs • Attach the front of the pedal leg to the rear. discard this spacer. Once all four button head screws into the plate and base. Axle Right crank Locking nut Rotate the right pedal until the holes in ihe crank fits over the axle nuts and screw into place, turning the pedal until... . Replace the locking nut and finger tighten. Iii+94444 57tec.i It is Critical That This Page Be Followed Very Carefully! Secure with the button head screw. • Altach the front of the right pedal 10 the front of use. the pedals must he lei) arm by inserting the pedal axle...
English Manual
Page 12
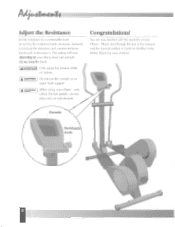
... ellipse-, only utilize the foot pedals - You are now finished with the assembly of your Please read through the rest of this manual, and the manual entitled A Guide to decrease it, [his setting will vary depending on side shrouds. Console Resistance knob 10 AIMPORTANT Only adjust leg tension while in motion. CAUTION Do not use the console as an upper body support (A CAUTION When using your workout. Adjust the Resistance Set...
... ellipse-, only utilize the foot pedals - You are now finished with the assembly of your Please read through the rest of this manual, and the manual entitled A Guide to decrease it, [his setting will vary depending on side shrouds. Console Resistance knob 10 AIMPORTANT Only adjust leg tension while in motion. CAUTION Do not use the console as an upper body support (A CAUTION When using your workout. Adjust the Resistance Set...
English Manual
Page 13
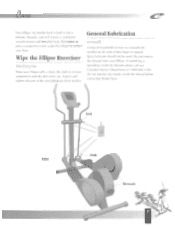
... last a lifetime. Your Ellipse by NordicTrack is squeaking inside the shroud before contacting NordicTrack. Do not remove the shrouds from your floor. Periodic care will ensure a continued smooth motion and beautiful look. General Lubrication As Needed A drop of the exerciser every three months. Do not attempt any repairs inside the shrouds please call our Customer Service Department at 1-800...
... last a lifetime. Your Ellipse by NordicTrack is squeaking inside the shroud before contacting NordicTrack. Do not remove the shrouds from your floor. Periodic care will ensure a continued smooth motion and beautiful look. General Lubrication As Needed A drop of the exerciser every three months. Do not attempt any repairs inside the shrouds please call our Customer Service Department at 1-800...
English Manual
Page 14
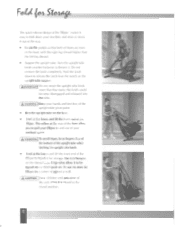
...-leg shroud. • Support the upright tube. Fat" ton. 51,044&e The quick-release design of the Ellipse' ' makes it easy to loosen it. [)o not remove the knob completely. Turn the upright-tube knob counterclockwise to fold down to store the Ellipse in the tripod position. The rollers at the rear of the base allow it Out of the way. • Rotate the pedals...
...-leg shroud. • Support the upright tube. Fat" ton. 51,044&e The quick-release design of the Ellipse' ' makes it easy to loosen it. [)o not remove the knob completely. Turn the upright-tube knob counterclockwise to fold down to store the Ellipse in the tripod position. The rollers at the rear of the base allow it Out of the way. • Rotate the pedals...

English Manual
Page 15
MST 1 (877) 651-6119 Visit out website at www.icorifithess.corn or e-mail us at service@iconfitness.com. CUSTOMER INFORMATION Please call toll free to our Customer Service Department with questions concerning the use or operation of your very own, qualified personal trainer. 1(800) 215-7393 Friday 6:00 a.m. Talk to 6:00 p.m. Our representatives are available: Monday - to your NordicTrack equipment.
MST 1 (877) 651-6119 Visit out website at www.icorifithess.corn or e-mail us at service@iconfitness.com. CUSTOMER INFORMATION Please call toll free to our Customer Service Department with questions concerning the use or operation of your very own, qualified personal trainer. 1(800) 215-7393 Friday 6:00 a.m. Talk to 6:00 p.m. Our representatives are available: Monday - to your NordicTrack equipment.

English Manual
Page 16
OC1997 NordicTrack, Inc., a CML Company. patent pending. Ellipse and NordicTrack are trademarks of NordicTrack, Inc. VTIlitY1- 4 9/97 2505/OM-648 TLA#32490, 32510 All rights reserved. U.S.
OC1997 NordicTrack, Inc., a CML Company. patent pending. Ellipse and NordicTrack are trademarks of NordicTrack, Inc. VTIlitY1- 4 9/97 2505/OM-648 TLA#32490, 32510 All rights reserved. U.S.


