
Uk Manual
Page 3
....). 8. When folding or moving the treadmill, make sure that is running. Do not place the treadmill on /off . Do not operate the treadmill if the power cord or plug is damaged, or if the treadmill is not working properly. (See TROUBLESHOOTING on each side. The pulse sensors are not medical devices. Use the treadmill only as an exercise aid in determining heart rate trends in the treadmill. Keep children...
....). 8. When folding or moving the treadmill, make sure that is running. Do not place the treadmill on /off . Do not operate the treadmill if the power cord or plug is damaged, or if the treadmill is not working properly. (See TROUBLESHOOTING on each side. The pulse sensors are not medical devices. Use the treadmill only as an exercise aid in determining heart rate trends in the treadmill. Keep children...
Uk Manual
Page 4
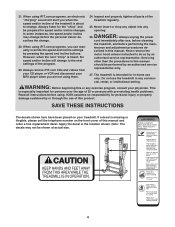
... speed and incline settings by an authorised service representative only. 27. Never remove the motor hood unless instructed to the next settings of this manual should be performed by pressing the speed and incline buttons. 21. When using them. 24. SAVE THESE INSTRUCTIONS The decals shown here have been placed on the front cover of the treadmill is especially important for the "chirp" and be shown at actual size...
... speed and incline settings by an authorised service representative only. 27. Never remove the motor hood unless instructed to the next settings of this manual should be performed by pressing the speed and incline buttons. 21. When using them. 24. SAVE THESE INSTRUCTIONS The decals shown here have been placed on the front cover of the treadmill is especially important for the "chirp" and be shown at actual size...
Uk Manual
Page 5
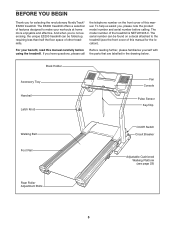
... workouts at home more enjoyable and effective. The serial number can be found on the front cover of this manual carefully before calling. the telephone number on a decal attached to make your benefit, read this manual. The model number of features designed to the treadmill (see page 23) Rear Roller Adjustment Bolts 5 Book Holder Accessory Tray Handrail Latch Knob Fan Console Pulse Sensor Key/Clip Walking Belt Foot Rail On/Off Switch Circuit Breaker Adjustable Cushioned Walking...
... workouts at home more enjoyable and effective. The serial number can be found on the front cover of this manual carefully before calling. the telephone number on a decal attached to make your benefit, read this manual. The model number of features designed to the treadmill (see page 23) Rear Roller Adjustment Bolts 5 Book Holder Accessory Tray Handrail Latch Knob Fan Console Pulse Sensor Key/Clip Walking Belt Foot Rail On/Off Switch Circuit Breaker Adjustable Cushioned Walking...
Uk Manual
Page 6
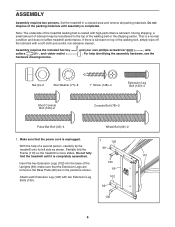
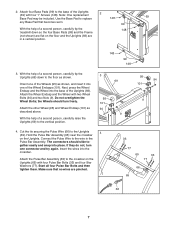
... Legs are turned so the Base Pads (99) are in a cleared area and remove all packing materials. Note: The underside of the walking belt or the shipping carton. and your own phillips screwdriver , wire . make sure that the power cord is more stable. During shipping, a small amount of lubricant may be transferred to the top of the treadmill walking belt is completed. Set...
... Legs are turned so the Base Pads (99) are in a cleared area and remove all packing materials. Note: The underside of the walking belt or the shipping carton. and your own phillips screwdriver , wire . make sure that the power cord is more stable. During shipping, a small amount of lubricant may be transferred to the top of the treadmill walking belt is completed. Set...
Uk Manual
Page 7
... four 1" Screws (148). gether easily and snap into the crossbar. Attach the Pulse Bar Assembly (65) to the floor as shown. Make sure that becomes worn. 99 With the help of a second person, carefully tip the 148 treadmill down to the crossbar on the Uprights. The connectors should turn one of the Uprights (69). Start all four Pulse Bar Bolts and then tighten them...
... four 1" Screws (148). gether easily and snap into the crossbar. Attach the Pulse Bar Assembly (65) to the floor as shown. Make sure that becomes worn. 99 With the help of a second person, carefully tip the 148 treadmill down to the crossbar on the Uprights. The connectors should turn one of the Uprights (69). Start all four Pulse Bar Bolts and then tighten them...
Uk Manual
Page 8
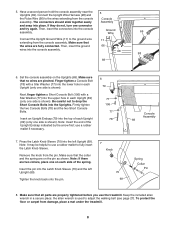
... used to adjust the walking belt (see page 27). Insert an Upright Endcap (79) into the Latch Knob Sleeve (70) and the left Upright (69). Remove the knob from damage, place a mat under the treadmill. 8 Ground Wire 66 Connect the Upright Ground Wire (11) to the wires extending from the console assembly. use the treadmill. The connectors should slide together easily Assembly and snap into the lower hole in a secure place; Tighten the knob...
... used to adjust the walking belt (see page 27). Insert an Upright Endcap (79) into the Latch Knob Sleeve (70) and the left Upright (69). Remove the knob from damage, place a mat under the treadmill. 8 Ground Wire 66 Connect the Upright Ground Wire (11) to the wires extending from the console assembly. use the treadmill. The connectors should slide together easily Assembly and snap into the lower hole in a secure place; Tighten the knob...

Uk Manual
Page 9
... of the chest pulse sensor can be replaced (see the drawing below . The chest strap may need to a position against your body a few inches and locate the two electrode areas on the treadmill, position yourself near the centre of the console. • The chest pulse sensor is used with people who have normal heart rhythms. Heart rate reading problems may remain activated longer than necessary, draining the battery prematurely. •...
... of the chest pulse sensor can be replaced (see the drawing below . The chest strap may need to a position against your body a few inches and locate the two electrode areas on the treadmill, position yourself near the centre of the console. • The chest pulse sensor is used with people who have normal heart rhythms. Heart rate reading problems may remain activated longer than necessary, draining the battery prematurely. •...
Uk Manual
Page 10
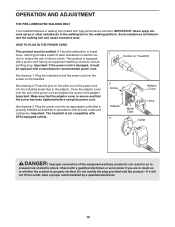
.... 2 Screw Adaptor Cover Adaptor 3 Pins Metal Clips Outlet DANGER: Improper connection of the power cord into the socket on Treadmill See drawing 1. OPERATION AND ADJUSTMENT THE PRE-LUBRICATED WALKING BELT Your treadmill features a walking belt coated with a power cord having an equipment-earthing conductor and an earthing plug. creased risk of the power cord into an appropriate outlet that the screw has been tightened before using the power cord. Check with a manufacturer-recommended power cord. If...
.... 2 Screw Adaptor Cover Adaptor 3 Pins Metal Clips Outlet DANGER: Improper connection of the power cord into the socket on Treadmill See drawing 1. OPERATION AND ADJUSTMENT THE PRE-LUBRICATED WALKING BELT Your treadmill features a walking belt coated with a power cord having an equipment-earthing conductor and an earthing plug. creased risk of the power cord into an appropriate outlet that the screw has been tightened before using the power cord. Check with a manufacturer-recommended power cord. If...

Uk Manual
Page 11
... information. iFIT.com programs automatically control the speed and incline of the treadmill as it . highenergy music provides added motivation. Having iFIT.com technology is like having a personal trainer in your heart rate using the handgrip pulse sensor or the chest pulse sensor. To use an iFIT.com MP3, CD, or video program, see page 16. You can even measure your home. To use the manual mode of the console, follow the steps beginning on the front cover...
... information. iFIT.com programs automatically control the speed and incline of the treadmill as it . highenergy music provides added motivation. Having iFIT.com technology is like having a personal trainer in your heart rate using the handgrip pulse sensor or the chest pulse sensor. To use an iFIT.com MP3, CD, or video program, see page 16. You can even measure your home. To use the manual mode of the console, follow the steps beginning on the front cover...
Uk Manual
Page 12
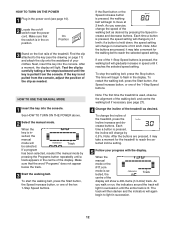
... increments of the 1-Step Speed buttons is pulled from the console, adjust the position of the display will be selected. HOW TO TURN ON THE POWER 1 Plug in - On Position 3 Stand on page 11) and attach the clip onto the waistband of the ten 1-Step Speed buttons. If one of 0.5 km/h. To stop the walking belt, press the Stop button. Track If a program has been selected, reselect the manual mode by 0.5%. Make sure...
... increments of the 1-Step Speed buttons is pulled from the console, adjust the position of the display will be selected. HOW TO TURN ON THE POWER 1 Plug in - On Position 3 Stand on page 11) and attach the clip onto the waistband of the ten 1-Step Speed buttons. If one of 0.5 km/h. To stop the walking belt, press the Stop button. Track If a program has been selected, reselect the manual mode by 0.5%. Make sure...

Uk Manual
Page 16
... the console. To select a heart rate program, press the Programs button repeatedly until the words "Heart Rate" and the number 1 or 2 appear in the lower centre of age and have heart prob- Note: If the display remains lit after the key is removed, the console is at the lowest setting. You must wear the chest pulse sensor to the off the demo mode. When a heart rate program is detected, an additional peak will affect your exercise heart rate...
... the console. To select a heart rate program, press the Programs button repeatedly until the words "Heart Rate" and the number 1 or 2 appear in the lower centre of age and have heart prob- Note: If the display remains lit after the key is removed, the console is at the lowest setting. You must wear the chest pulse sensor to the off the demo mode. When a heart rate program is detected, an additional peak will affect your exercise heart rate...

Uk Manual
Page 17
... occurs, see CHEST PULSE SENSOR TROUBLESHOOTING on page 29 for each segment, a series of tones will sound and the speed setting and the incline setting will continue in the display and the speed and incline of the treadmill may automatically change to bring your heart rate to the first speed and incline settings of each segment. Note: See the heart rate chart on page 9. To restart the program, press the Start button or the Speed increase button. Note...
... occurs, see CHEST PULSE SENSOR TROUBLESHOOTING on page 29 for each segment, a series of tones will sound and the speed setting and the incline setting will continue in the display and the speed and incline of the treadmill may automatically change to bring your heart rate to the first speed and incline settings of each segment. Note: See the heart rate chart on page 9. To restart the program, press the Start button or the Speed increase button. Note...

Uk Manual
Page 20
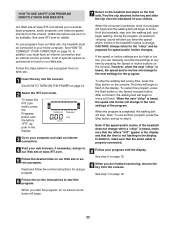
... B Audio Cable RCA Y-adaptor Wire removed from AUDIO OUT jack B 2 Select the iFIT.com mode. Note: If the time is flashing in the display, press the Start button or the Speed increase button on the console. The treadmill will begin guiding you are using an iFIT.com videocassette, insert the videocassette into the AUDIO OUT jack on page 12. In some instances, the speed and/or incline may change . 20 Next, remove the wire...
... B Audio Cable RCA Y-adaptor Wire removed from AUDIO OUT jack B 2 Select the iFIT.com mode. Note: If the time is flashing in the display, press the Start button or the Speed increase button on the console. The treadmill will begin guiding you are using an iFIT.com videocassette, insert the videocassette into the AUDIO OUT jack on page 12. In some instances, the speed and/or incline may change . 20 Next, remove the wire...
Uk Manual
Page 21
... walking belt at any time by pressing the Speed or Incline buttons on page 12. 5 Measure your heart rate if desired. When the program is heard, the speed and/or incline will begin to flash in the display. CAUTION: Always remove iFIT.com CDs and videocassettes from your CD player and VCR and disconnect your MP3 player when you are finished exercising, remove the key from the console...
... walking belt at any time by pressing the Speed or Incline buttons on page 12. 5 Measure your heart rate if desired. When the program is heard, the speed and/or incline will begin to flash in the display. CAUTION: Always remove iFIT.com CDs and videocassettes from your CD player and VCR and disconnect your MP3 player when you are finished exercising, remove the key from the console...
Uk Manual
Page 22
... on the console. See step 5 on -line instructions to the next settings for the "chirp" and be available. When you can manually override the settings at 2 km/h. To select the iFIT.com mode, press the Programs button until the letters "iFIT" appear in the display and that the audio cable is not flashing in the display. CAUTION: Always listen for the program. If the speed or incline settings are soon...
... on the console. See step 5 on -line instructions to the next settings for the "chirp" and be available. When you can manually override the settings at 2 km/h. To select the iFIT.com mode, press the Programs button until the letters "iFIT" appear in the display and that the audio cable is not flashing in the display. CAUTION: Always listen for the program. If the speed or incline settings are soon...
Uk Manual
Page 27
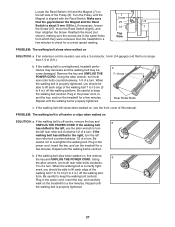
... Screw. PROBLEM: The walking belt is properly tightened. 27 If the walking belt still slows when walked on the left side of the Pulley (8). Using b the allen wrench, turn both rear roller bolts counterclockwise, 1/4 of a turn ; Plug in the same holes from which they were removed. Turn the Pulley until the walking belt is off -centre, remove the key and a UNPLUG THE POWER CORD. Locate the Reed Switch (10) and the Magnet (7) on , see the front cover of this manual...
... Screw. PROBLEM: The walking belt is properly tightened. 27 If the walking belt still slows when walked on the left side of the Pulley (8). Using b the allen wrench, turn both rear roller bolts counterclockwise, 1/4 of a turn ; Plug in the same holes from which they were removed. Turn the Pulley until the walking belt is off -centre, remove the key and a UNPLUG THE POWER CORD. Locate the Reed Switch (10) and the Magnet (7) on , see the front cover of this manual...

Uk Manual
Page 29
... of heart rate readings. The pulse sensors are recommended heart rates for a sustained period of the treadmill until your heart rate is to make exercise a regular and enjoyable part of your exercise must exercise at least one day of your exercise program, do not keep your pulse in your training zone. Aerobic Exercise If your goal is near the highest number in general. For aerobic exercise, adjust the speed and incline of time. WORKOUT...
... of heart rate readings. The pulse sensors are recommended heart rates for a sustained period of the treadmill until your heart rate is to make exercise a regular and enjoyable part of your exercise must exercise at least one day of your exercise program, do not keep your pulse in your training zone. Aerobic Exercise If your goal is near the highest number in general. For aerobic exercise, adjust the speed and incline of time. WORKOUT...
Uk Manual
Page 30
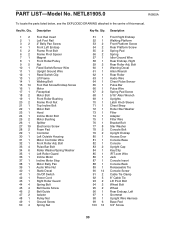
... Incline Bolt Motor Belt Hood Incline Motor Bolt Motor Bushing Splitter Electronics Screw Foam Pad Controller Left Outside Housing Motor Controller Wire Front Roller Adj. NETL81905.0 R0805A To locate the parts listed below, see the EXPLODED DRAWING attached in the centre of this manual. Bolt Warning Decal Allen Wrench Rear Roller Audio Wire Chest Pulse Sensor Pulse Bar Pulse Wire Spring Pad Screw 5/16" Allen Wrench Uprights Latch Knob Sleeve Chest Strap Roller Star Washer Filter Adapter Filter Wire Bracket Bolt Star Washer Console Bolt Upright Endcap Access Door Console Base Console Upright...
... Incline Bolt Motor Belt Hood Incline Motor Bolt Motor Bushing Splitter Electronics Screw Foam Pad Controller Left Outside Housing Motor Controller Wire Front Roller Adj. NETL81905.0 R0805A To locate the parts listed below, see the EXPLODED DRAWING attached in the centre of this manual. Bolt Warning Decal Allen Wrench Rear Roller Audio Wire Chest Pulse Sensor Pulse Bar Pulse Wire Spring Pad Screw 5/16" Allen Wrench Uprights Latch Knob Sleeve Chest Strap Roller Star Washer Filter Adapter Filter Wire Bracket Bolt Star Washer Console Bolt Upright Endcap Access Door Console Base Console Upright...

Uk Manual
Page 31
... Leg Extension Leg Endcap Incline Warning Decal Idler Arm Bolt Short Console Bolt Fan Book Holder Ferrite Box Frame Latch Assembly Console Ground Wire Spring Plate Ground Nut Left Tray Right Tray Left Inside Housing Right Inside Housing Right Outside Housing Cushion Adj. Wheel Cushion Adj. Knob Cushion Knob Screw Pulse Receiver Electronic Bracket Spring Plate Spacer Gear Rack Extension Leg Bolt Circuit Breaker Motor Isolator Idler Arm Key No. Pin...
... Leg Extension Leg Endcap Incline Warning Decal Idler Arm Bolt Short Console Bolt Fan Book Holder Ferrite Box Frame Latch Assembly Console Ground Wire Spring Plate Ground Nut Left Tray Right Tray Left Inside Housing Right Inside Housing Right Outside Housing Cushion Adj. Wheel Cushion Adj. Knob Cushion Knob Screw Pulse Receiver Electronic Bracket Spring Plate Spacer Gear Rack Extension Leg Bolt Circuit Breaker Motor Isolator Idler Arm Key No. Pin...
Uk Manual
Page 34
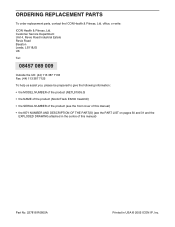
... MODEL NUMBER of the product (NETL81905.0) • the NAME of the product (NordicTrack E3200 treadmill) • the SERIAL NUMBER of the product (see the front cover of this manual) • the KEY NUMBER AND DESCRIPTION OF THE PART(S) (see the PART LIST on pages 30 and 31 and the EXPLODED DRAWING attached in the centre of this manual) Part No. 227818 R0805A Printed in USA © 2005 ICON...
... MODEL NUMBER of the product (NETL81905.0) • the NAME of the product (NordicTrack E3200 treadmill) • the SERIAL NUMBER of the product (see the front cover of this manual) • the KEY NUMBER AND DESCRIPTION OF THE PART(S) (see the PART LIST on pages 30 and 31 and the EXPLODED DRAWING attached in the centre of this manual) Part No. 227818 R0805A Printed in USA © 2005 ICON...


