
English Manual
Page 1
... parts are damaged or missing, DO NOT CONTACT THE STORE; Keep this manual for reference. USERʼS MANUAL www.nordictrack.com Model No. IMPORTANT: Please register this product (see the limited warranty on the back cover of this manual) before using this manual before contacting Customer Care. CALL TOLL-FREE: 1-800-TO-BE-FIT (1-800...
... parts are damaged or missing, DO NOT CONTACT THE STORE; Keep this manual for reference. USERʼS MANUAL www.nordictrack.com Model No. IMPORTANT: Please register this product (see the limited warranty on the back cover of this manual) before using this manual before contacting Customer Care. CALL TOLL-FREE: 1-800-TO-BE-FIT (1-800...
English Manual
Page 2
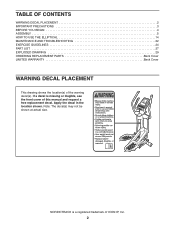
...NORDICTRACK is missing or illegible, see the front cover of the warning decal(s). Note: The decal(s) may not be shown at actual size. Apply the decal in the location shown. TABLE OF CONTENTS WARNING DECAL PLACEMENT 2 IMPORTANT PRECAUTIONS 3 BEFORE YOU BEGIN 4 ASSEMBLY 5 HOW TO USE THE ELLIPTICAL... 14 MAINTENANCE AND TROUBLESHOOTING 22 EXERCISE GUIDELINES 24 PART LIST 27 EXPLODED DRAWING 29 ORDERING REPLACEMENT PARTS Back Cover LIMITED WARRANTY Back Cover WARNING DECAL PLACEMENT This drawing shows the location(s) of this manual and request a free ...
...NORDICTRACK is missing or illegible, see the front cover of the warning decal(s). Note: The decal(s) may not be shown at actual size. Apply the decal in the location shown. TABLE OF CONTENTS WARNING DECAL PLACEMENT 2 IMPORTANT PRECAUTIONS 3 BEFORE YOU BEGIN 4 ASSEMBLY 5 HOW TO USE THE ELLIPTICAL... 14 MAINTENANCE AND TROUBLESHOOTING 22 EXERCISE GUIDELINES 24 PART LIST 27 EXPLODED DRAWING 29 ORDERING REPLACEMENT PARTS Back Cover LIMITED WARRANTY Back Cover WARNING DECAL PLACEMENT This drawing shows the location(s) of this manual and request a free ...

English Manual
Page 3
... to move until the flywheel stops. do not arch your pedaling speed in a controlled way. 14. The elliptical is intended only as described in this manual and all warnings on each side. 7. Various factors may result in serious injury or death. IMPORTANT PRECAUTIONS WARNING... of serious injury, read all important precautions and instructions in this manual. 9. Keep the elliptical indoors, away from the elliptical at least 3 ft. (0.9 m) of clearance in the front and rear of all parts regularly. The elliptical does not have a freewheel; Reduce your back. 15. Over exercising...
... to move until the flywheel stops. do not arch your pedaling speed in a controlled way. 14. The elliptical is intended only as described in this manual and all warnings on each side. 7. Various factors may result in serious injury or death. IMPORTANT PRECAUTIONS WARNING... of serious injury, read all important precautions and instructions in this manual. 9. Keep the elliptical indoors, away from the elliptical at least 3 ft. (0.9 m) of clearance in the front and rear of all parts regularly. The elliptical does not have a freewheel; Reduce your back. 15. Over exercising...
English Manual
Page 4
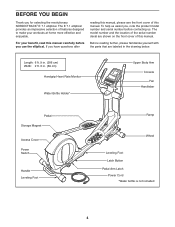
...and the location of features designed to make your benefit, read this manual. For your workouts at home more effective and enjoyable. To help us assist you for selecting the revolutionary NORDICTRACK® E 7.1 elliptical. The E 7.1 elliptical provides an impressive selection of the serial number decal are labeled in .... is not included 4 Before reading further, please familiarize yourself with the parts that are shown on the front cover of this manual carefully before contacting us. Length: 6 ft. 9 in. (206 cm) Width: 2 ft. 3 in the drawing below. If you ...
...and the location of features designed to make your benefit, read this manual. For your workouts at home more effective and enjoyable. To help us assist you for selecting the revolutionary NORDICTRACK® E 7.1 elliptical. The E 7.1 elliptical provides an impressive selection of the serial number decal are labeled in .... is not included 4 Before reading further, please familiarize yourself with the parts that are shown on the front cover of this manual carefully before contacting us. Length: 6 ft. 9 in. (206 cm) Width: 2 ft. 3 in the drawing below. If you ...
English Manual
Page 5
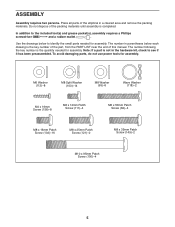
... the packing materials. The number following the key number is the key number of the part, from the PART LIST near the end of the elliptical in parentheses below to the included tool(s) and grease packet(s), assembly requires a Phillips screwdriver and a rubber mallet . Place all parts of this...
... the packing materials. The number following the key number is the key number of the part, from the PART LIST near the end of the elliptical in parentheses below to the included tool(s) and grease packet(s), assembly requires a Phillips screwdriver and a rubber mallet . Place all parts of this...
English Manual
Page 16
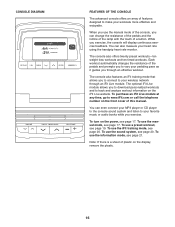
... mode, see page 17. To turn on the display, remove the plastic. 16 To use the manual mode, see page 20. The optional iFit Live module allows you to download personalized workouts and to www...module at any time, go to track and analyze workout information on the front cover of this manual. You can even connect your MP3 player or CD player to the console sound system and listen ...network through an effective workout. While you use the sound system, see page 17. To use the manual mode of the console, you can change the resistance of the pedals and the incline of the ramp ...
... mode, see page 17. To turn on the display, remove the plastic. 16 To use the manual mode, see page 20. The optional iFit Live module allows you to download personalized workouts and to www...module at any time, go to track and analyze workout information on the front cover of this manual. You can even connect your MP3 player or CD player to the console sound system and listen ...network through an effective workout. While you use the sound system, see page 17. To use the manual mode of the console, you can change the resistance of the pedals and the incline of the ramp ...
English Manual
Page 17
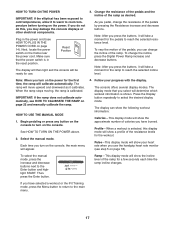
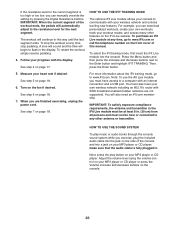
...the reset position. Next, locate the power switch on the power. HOW TO USE THE MANUAL MODE 1. The display mode that the power switch is shown. HOW TO TURN ON THE POWER IMPORTANT: If the elliptical has been exposed to cold temperatures, allow it to warm to room temperature before turning ... See HOW TO TURN ON THE POWER above. 2. Ramp-This display mode will show the incline level of calories you use . 3. To select the manual mode, press the increase and decrease buttons next to select the desired display mode. The console offers several display modes. If you may damage the...
...the reset position. Next, locate the power switch on the power. HOW TO USE THE MANUAL MODE 1. The display mode that the power switch is shown. HOW TO TURN ON THE POWER IMPORTANT: If the elliptical has been exposed to cold temperatures, allow it to warm to room temperature before turning ... See HOW TO TURN ON THE POWER above. 2. Ramp-This display mode will show the incline level of calories you use . 3. To select the manual mode, press the increase and decrease buttons next to select the desired display mode. The console offers several display modes. If you may damage the...
English Manual
Page 18
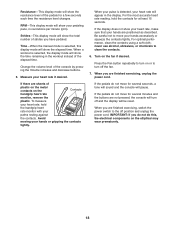
... tightly. When your pulse is detected, your pedaling pace, in the display. Be careful not to the off the fan. 7. Turn on the elliptical may wear prematurely. 18 When you have pedaled. When you do not do not move for a few seconds each time the resistance level changes.... For optimal performance, clean the contacts using a soft cloth; Press the Fan button repeatedly to clean the contacts. 6. Time-When the manual mode is selected, the display mode will show the total number of the console by pressing the Volume increase and decrease buttons. 5. Avoid moving ...
... tightly. When your pulse is detected, your pedaling pace, in the display. Be careful not to the off the fan. 7. Turn on the elliptical may wear prematurely. 18 When you have pedaled. When you do not do not move for a few seconds each time the resistance level changes.... For optimal performance, clean the contacts using a soft cloth; Press the Fan button repeatedly to clean the contacts. 6. Time-When the manual mode is selected, the display mode will show the total number of the console by pressing the Volume increase and decrease buttons. 5. Avoid moving ...
English Manual
Page 19
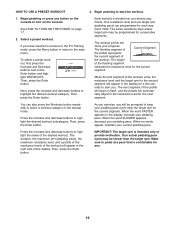
... selected a workout or the iFit Training mode, press the Menu button to return to alert you will automatically adjust to select a workout category or the manual mode. The next segment of the desired workout. HOW TO USE A PRESET WORKOUT 3. If you . 19 When the first segment of the workout. Then, press...
... selected a workout or the iFit Training mode, press the Menu button to return to alert you will automatically adjust to select a workout category or the manual mode. The next segment of the desired workout. HOW TO USE A PRESET WORKOUT 3. If you . 19 When the first segment of the workout. Then, press...
English Manual
Page 20
..., and access many other antenna or transmitter. See step 6 on page 17. You will continue in this manual. Adjust the volume level using the volume control on the console. 20 For example, you can manually override the setting by pressing the Digital Resistance buttons. Turn on page 18. 6. Note: To use the...
..., and access many other antenna or transmitter. See step 6 on page 17. You will continue in this manual. Adjust the volume level using the volume control on the console. 20 For example, you can manually override the setting by pressing the Digital Resistance buttons. Turn on page 18. 6. Note: To use the...

English Manual
Page 28
... 1 152 12 153 4 154 4 155 2 156 8 157 2 158 2 159 2 160 1 * - * - * - * - * - Description Key No. For information about ordering replacement parts, see the back cover of this manual. *These parts are subject to change without notice. Lift Motor Motor Wire Harness Ramp Roller Long Motor Axle Short Motor Axle Lift Axle Washer Motor... M4 x 8mm Screw Large Pedal Arm Snap Ring M4 x 19mm Screw Disc Insert Pedal Pad Adjustment Nut M5 Washer Blue Wire White Wire Userʼs Manual Assembly Tool Grease Packet Note: Specifications are not illustrated. 28 Qty.
... 1 152 12 153 4 154 4 155 2 156 8 157 2 158 2 159 2 160 1 * - * - * - * - * - Description Key No. For information about ordering replacement parts, see the back cover of this manual. *These parts are subject to change without notice. Lift Motor Motor Wire Harness Ramp Roller Long Motor Axle Short Motor Axle Lift Axle Washer Motor... M4 x 8mm Screw Large Pedal Arm Snap Ring M4 x 19mm Screw Disc Insert Pedal Pad Adjustment Nut M5 Washer Blue Wire White Wire Userʼs Manual Assembly Tool Grease Packet Note: Specifications are not illustrated. 28 Qty.
English Manual
Page 32
... or rental purposes. material, under warranty. For in China © 2011 ICON IP, Inc. If replacement parts are made must register this manual) LIMITED WARRANTY IMPORTANT: You must be voided if the product is purchased or transported outside the USA, if all other warranties, and any kind... while the product is limited to repairing or replacing, at ICONʼs option, the product through one (1) year from defects in this manual. ICON is not responsible or liable for indirect, special, or consequential damages arising out of or in their scope and duration to the ...
... or rental purposes. material, under warranty. For in China © 2011 ICON IP, Inc. If replacement parts are made must register this manual) LIMITED WARRANTY IMPORTANT: You must be voided if the product is purchased or transported outside the USA, if all other warranties, and any kind... while the product is limited to repairing or replacing, at ICONʼs option, the product through one (1) year from defects in this manual. ICON is not responsible or liable for indirect, special, or consequential damages arising out of or in their scope and duration to the ...

