
User Manual
Page 3
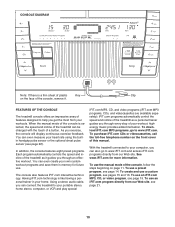
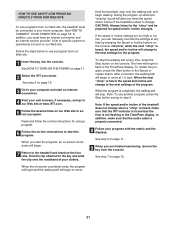
... not put the treadmill in speed. 9. Failure to avoid sudden jumps in a garage or covered patio, or near water. 12. Never move the walking belt while the power is not working properly. (See TROUBLESHOOTING on page 5 for both men and women. Do not operate the treadmill if the power cord or plug is damaged, or if the treadmill is not working properly.) 5. Keep children under...
... not put the treadmill in speed. 9. Failure to avoid sudden jumps in a garage or covered patio, or near water. 12. Never move the walking belt while the power is not working properly. (See TROUBLESHOOTING on page 5 for both men and women. Do not operate the treadmill if the power cord or plug is damaged, or if the treadmill is not working properly.) 5. Keep children under...
User Manual
Page 4
... this manual and order a free replacement decal. Never remove the motor hood unless instructed to the next settings of the CD or video program. 25. This is especially important for personal injury or property damage sustained by or through the use the treadmill in the location shown. If a decal is intended for speed and/or incline changes. 22. When folding or moving the treadmill, make sure that the storage latch is...
... this manual and order a free replacement decal. Never remove the motor hood unless instructed to the next settings of the CD or video program. 25. This is especially important for personal injury or property damage sustained by or through the use the treadmill in the location shown. If a decal is intended for speed and/or incline changes. 22. When folding or moving the treadmill, make sure that the storage latch is...
User Manual
Page 5
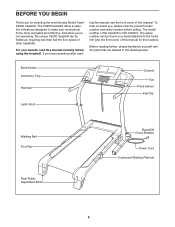
... assist you, please note the product model number and serial number before using the treadmill. Book Holder Accessory Tray Handrail Latch Knob Console Fan Pulse Sensor Key/Clip Walking Belt Foot Rail Rear Roller Adjustment Bolts Reset/Off Circuit Breaker Power Cord Cushioned Walking Platform 5 The C2200 treadmill offers a selection of the treadmill is NTL10905.0. The model number of features designed to the treadmill (see the front cover of this manual. For your workouts at home more enjoyable and effective. BEFORE YOU...
... assist you, please note the product model number and serial number before using the treadmill. Book Holder Accessory Tray Handrail Latch Knob Console Fan Pulse Sensor Key/Clip Walking Belt Foot Rail Rear Roller Adjustment Bolts Reset/Off Circuit Breaker Power Cord Cushioned Walking Platform 5 The C2200 treadmill offers a selection of the treadmill is NTL10905.0. The model number of features designed to the treadmill (see the front cover of this manual. For your workouts at home more enjoyable and effective. BEFORE YOU...

User Manual
Page 7
... 101 81 82 3. Use the Base Pad to the right Upright (85). IF THE 85 CONNECTORS ARE NOT CONNECTED PROPERLY, THE CONSOLE MAY BE DAMAGED WHEN THE POWER IS TURNED ON. Remove the band securing the Upright Wire Harness (73) 3 to re- Attach the console assembly with four 1" Tek Screws 2 (82) and four Plastic Spacers (101). ing from the console assembly. Attach the four Base Pads...
... 101 81 82 3. Use the Base Pad to the right Upright (85). IF THE 85 CONNECTORS ARE NOT CONNECTED PROPERLY, THE CONSOLE MAY BE DAMAGED WHEN THE POWER IS TURNED ON. Remove the band securing the Upright Wire Harness (73) 3 to re- Attach the console assembly with four 1" Tek Screws 2 (82) and four Plastic Spacers (101). ing from the console assembly. Attach the four Base Pads...
User Manual
Page 9
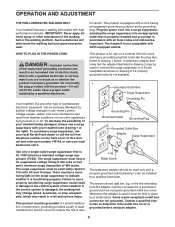
... AND ADJUSTMENT THE PRE-LUBRICATED WALKING BELT Your treadmill features a walking belt coated with your treadmill (see your treadmill being turned on or off. HOW TO PLUG IN THE POWER CORD DANGER: Improper connection of the equipment-grounding conductor can be installed by a qualified electrician. Failure to the control system of this manual and order part number 146148, or see drawing 1 at the right). Whenever the adapter is used to connect the...
... AND ADJUSTMENT THE PRE-LUBRICATED WALKING BELT Your treadmill features a walking belt coated with your treadmill (see your treadmill being turned on or off. HOW TO PLUG IN THE POWER CORD DANGER: Improper connection of the equipment-grounding conductor can be installed by a qualified electrician. Failure to the control system of this manual and order part number 146148, or see drawing 1 at the right). Whenever the adapter is used to connect the...
User Manual
Page 10
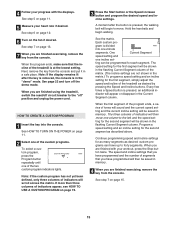
...). Using a stereo audio cable, you get the most from our Web site, see pages 15 and 16. You can be changed with the touch of the treadmill as it . iFIT.com programs automatically control the speed and incline of a button. When the manual mode of the console is selected, the speed and incline of this manual. With the treadmill connected to your workouts. To use the manual mode of the console, follow the steps beginning...
...). Using a stereo audio cable, you get the most from our Web site, see pages 15 and 16. You can be changed with the touch of the treadmill as it . iFIT.com programs automatically control the speed and incline of a button. When the manual mode of the console is selected, the speed and incline of this manual. With the treadmill connected to your workouts. To use the manual mode of the console, follow the steps beginning...
User Manual
Page 11
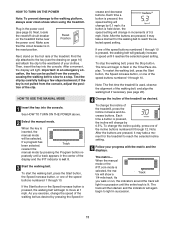
... pulled from the console, causing the walking belt to slow to reach the selected incline setting. 5 Follow your clothes. To change in the Time/Pace display. HOW TO TURN ON THE POWER Note: To prevent damage to reach the selected speed setting. Reset Position Next, stand on the treadmill frame near the power cord. if the key is used, observe the alignment of the speed buttons numbered 1 through 10. peatedly...
... pulled from the console, causing the walking belt to slow to reach the selected incline setting. 5 Follow your clothes. To change in the Time/Pace display. HOW TO TURN ON THE POWER Note: To prevent damage to reach the selected speed setting. Reset Position Next, stand on the treadmill frame near the power cord. if the key is used, observe the alignment of the speed buttons numbered 1 through 10. peatedly...
User Manual
Page 12
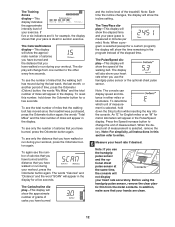
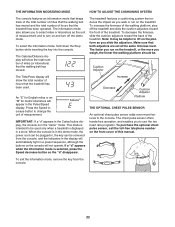
... the treadmill. Note: For simplicity, all instructions in the display. Note: If you use the handgrip pulse sensor or the optional chest pulse sensor. tional chest pulse sensor at the same time, Contacts the console will show the elapsed time and your workout, press the Odometer button again. The display will show the speed of the walking belt. The Time/Pace display-This display will change the unit of measurement. Note: When a program is...
... the treadmill. Note: For simplicity, all instructions in the display. Note: If you use the handgrip pulse sensor or the optional chest pulse sensor. tional chest pulse sensor at the same time, Contacts the console will show the elapsed time and your workout, press the Odometer button again. The display will show the speed of the walking belt. The Time/Pace display-This display will change the unit of measurement. Note: When a program is...
User Manual
Page 13
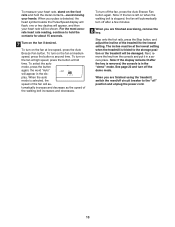
... fan, press the Auto Breeze Fan button again. Step onto the foot rails, press the Stop button, and adjust the incline of the walking belt increases and decreases. The incline must be at high speed, press the button a third time. When you are finished using the treadmill, switch the reset/off circuit breaker to hold the metal contacts-avoid moving your hands. To turn off " position and unplug the power cord. 13...
... fan, press the Auto Breeze Fan button again. Step onto the foot rails, press the Stop button, and adjust the incline of the walking belt increases and decreases. The incline must be at high speed, press the button a third time. When you are finished using the treadmill, switch the reset/off circuit breaker to hold the metal contacts-avoid moving your hands. To turn off " position and unplug the power cord. 13...
User Manual
Page 15
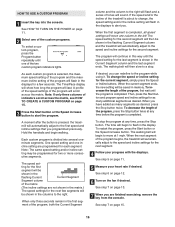
... turn off " position and unplug the power cord. Hold the handrails and begin to move one column to the "off the demo mode. The speed and incline settings that you are finished exercising, remove the key from the console and put it in the Current Segment column. If more than three columns of the treadmill as desired; See step 7 on page 11. 5 Measure your workout, press the Stop button...
... turn off " position and unplug the power cord. Hold the handrails and begin to move one column to the "off the demo mode. The speed and incline settings that you are finished exercising, remove the key from the console and put it in the Current Segment column. If more than three columns of the treadmill as desired; See step 7 on page 11. 5 Measure your workout, press the Stop button...
User Manual
Page 16
... speed settings for the next segment. 4 Follow your heart rate if desired. To restart the program, press the Start button or the Speed increase button. See step 6 on page 12. 6 Turn on page 13. 7 When you are finished exercising, remove the key from the console. ting for the second segment. The speed setting for the second segment will be shown in the flashing Current Segment column and the treadmill...
... speed settings for the next segment. 4 Follow your heart rate if desired. To restart the program, press the Start button or the Speed increase button. See step 6 on page 12. 6 Turn on page 13. 7 When you are finished exercising, remove the key from the console. ting for the second segment. The speed setting for the second segment will be shown in the flashing Current Segment column and the treadmill...
User Manual
Page 19
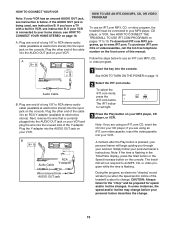
... Y-adapter Audio Cable Wire removed from AUDIO OUT jack 2 Select the iFIT.com mode. Note: If you have a TV with a built-in the Time/Pace display, press the Start button or the Speed increase button on page 11. CAUTION: Always listen for speed and/or incline changes. To download iFIT.com MP3 programs, go to an MP3, CD, or video program while the time is connected to your home stereo, see instruction B. Follow the steps below . Plug...
... Y-adapter Audio Cable Wire removed from AUDIO OUT jack 2 Select the iFIT.com mode. Note: If you have a TV with a built-in the Time/Pace display, press the Start button or the Speed increase button on page 11. CAUTION: Always listen for speed and/or incline changes. To download iFIT.com MP3 programs, go to an MP3, CD, or video program while the time is connected to your home stereo, see instruction B. Follow the steps below . Plug...
User Manual
Page 20
... audio cable is completed, the walking belt will stop the walking belt at 1 mph. See step 6 on page 12. 6 Turn on the console. 4 Follow your heart rate if desired. Note: To use another flat surface instead of the program. The time will begin to move at any time by pressing the Speed or Incline buttons on the console. After a moment, the walking belt will begin to flash in the Time/Pace display. See step...
... audio cable is completed, the walking belt will stop the walking belt at 1 mph. See step 6 on page 12. 6 Turn on the console. 4 Follow your heart rate if desired. Note: To use another flat surface instead of the program. The time will begin to move at any time by pressing the Speed or Incline buttons on the console. After a moment, the walking belt will begin to flash in the Time/Pace display. See step...
User Manual
Page 21
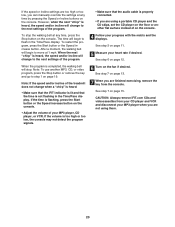
... will begin walking. In addition, you when the speed and/or incline of the program. Note: To use another program, press the Stop button and go to the next settings for speed and/or incline changes. If the speed or incline settings are finished exercising, remove the key from the console. When you can manually override the settings at 1.0 mph. HOW TO USE AN IFIT.COM PROGRAM DIRECTLY FROM OUR WEB SITE To use programs from our Web...
... will begin walking. In addition, you when the speed and/or incline of the program. Note: To use another program, press the Stop button and go to the next settings for speed and/or incline changes. If the speed or incline settings are finished exercising, remove the key from the console. When you can manually override the settings at 1.0 mph. HOW TO USE AN IFIT.COM PROGRAM DIRECTLY FROM OUR WEB SITE To use programs from our Web...
User Manual
Page 22
Press the Speed increase button to use the two heart rate programs. To purchase the optional chest pulse sensor, call the toll-free telephone number on the treadmill. When the console is in the demo mode, the power cord can be plugged in, the key can be removed from the console. 22 To select the information mode, hold down the Stop button while inserting the key into the console. The faster you run on the front cover of measurement. If...
Press the Speed increase button to use the two heart rate programs. To purchase the optional chest pulse sensor, call the toll-free telephone number on the treadmill. When the console is in the demo mode, the power cord can be plugged in, the key can be removed from the console. 22 To select the information mode, hold down the Stop button while inserting the key into the console. The faster you run on the front cover of measurement. If...

User Manual
Page 26
... the walking belt centered. Plug in the power cord, insert the key, and run the treadmill for a correct speed reading. Locate the Reed Switch (22) and the Magnet (18) on the left rear roller bolt counterclockwise 1/2 of a turn. Use only a single-outlet surge suppressor that the gap between the Magnet and the Reed Switch is properly tightened. if the walking belt has shifted to the right, turn the left side of the walking belt...
... the walking belt centered. Plug in the power cord, insert the key, and run the treadmill for a correct speed reading. Locate the Reed Switch (22) and the Magnet (18) on the left rear roller bolt counterclockwise 1/2 of a turn. Use only a single-outlet surge suppressor that the gap between the Magnet and the Reed Switch is properly tightened. if the walking belt has shifted to the right, turn the left side of the walking belt...

User Manual
Page 28
... The chart below shows recommended heart rates for fat burning; A proper warm-up , increase the intensity of time. If your goal Training Zone Exercise-After warming up increases your body temperature, heart rate and circulation in your training zone for 20 to five workouts each week, with preexisting health problems. The pulse sensor is to plan your pulse in preparation for exercise. For more detailed exercise information, obtain...
... The chart below shows recommended heart rates for fat burning; A proper warm-up , increase the intensity of time. If your goal Training Zone Exercise-After warming up increases your body temperature, heart rate and circulation in your training zone for 20 to five workouts each week, with preexisting health problems. The pulse sensor is to plan your pulse in preparation for exercise. For more detailed exercise information, obtain...

User Manual
Page 30
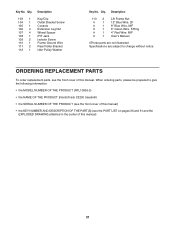
... Screw Adjustor Guide Screw Latch Catch Isolator Front Platform Screw Belt Guide Belt Guide Screw Frame Pivot Bolt Walking Platform Walking Belt Front Roller Magnet Frame Spacer Nut Reed Switch Clip Reed Switch 1/2" Screw Latch Catch Screw Drive Motor Motor Belt Rear Foot Bolt Right Rear Foot Left Rear Foot Motor Washer Motor Bolt Console Screw, Lower Motor Hood Hood Clip Hood Foam, Left Upper Clevis Pin Cotter Pin Front Roller Adjustment Bolt Rear Foot Nut Incline Motor Incline Motor Pin, Lower Transformer Controller 3/4" Screw Belly Pan Static Decal Power Cord Assembly Incline Wire Harness...
... Screw Adjustor Guide Screw Latch Catch Isolator Front Platform Screw Belt Guide Belt Guide Screw Frame Pivot Bolt Walking Platform Walking Belt Front Roller Magnet Frame Spacer Nut Reed Switch Clip Reed Switch 1/2" Screw Latch Catch Screw Drive Motor Motor Belt Rear Foot Bolt Right Rear Foot Left Rear Foot Motor Washer Motor Bolt Console Screw, Lower Motor Hood Hood Clip Hood Foam, Left Upper Clevis Pin Cotter Pin Front Roller Adjustment Bolt Rear Foot Nut Incline Motor Incline Motor Pin, Lower Transformer Controller 3/4" Screw Belly Pan Static Decal Power Cord Assembly Incline Wire Harness...
User Manual
Page 31
... OF THE PRODUCT (NordicTrack C2200 treadmill) • the SERIAL NUMBER OF THE PRODUCT (see the front cover of this manual) • the KEY NUMBER AND DESCRIPTION OF THE PART(S) (see the front cover of this manual. Description 103 1 104 1 105 1 106 4 107 4 108 1 109 2 110 1 111 2 112 1 Key/Clip Outlet Bracket Screw Console Extension Leg Nut Wheel Spacer iFIT Jack Isolator Screw Frame Ground Wire Rear Roller Bracket Idler Pulley Washer Key No.
... OF THE PRODUCT (NordicTrack C2200 treadmill) • the SERIAL NUMBER OF THE PRODUCT (see the front cover of this manual) • the KEY NUMBER AND DESCRIPTION OF THE PART(S) (see the front cover of this manual. Description 103 1 104 1 105 1 106 4 107 4 108 1 109 2 110 1 111 2 112 1 Key/Clip Outlet Bracket Screw Console Extension Leg Nut Wheel Spacer iFIT Jack Isolator Screw Frame Ground Wire Rear Roller Bracket Idler Pulley Washer Key No.
User Manual
Page 34
... IT COVERED-ICON Health & Fitness, Inc. ("ICON"), warrants the drive motor for commercial or rental purposes. Parts and labor are performed by unauthorized service, misuse, accident, negligence, improper assembly or installation, alterations, modifications without charge, any defect within 10 days after discovery of the defect; Some states do not allow limitations on how long an implied warranty lasts. LIMITED WARRANTY WHAT IS COVERED-The entire NordicTrack C2200 treadmill ("Product...
... IT COVERED-ICON Health & Fitness, Inc. ("ICON"), warrants the drive motor for commercial or rental purposes. Parts and labor are performed by unauthorized service, misuse, accident, negligence, improper assembly or installation, alterations, modifications without charge, any defect within 10 days after discovery of the defect; Some states do not allow limitations on how long an implied warranty lasts. LIMITED WARRANTY WHAT IS COVERED-The entire NordicTrack C2200 treadmill ("Product...


