

English Manual
Page 3
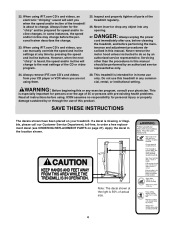
... shoes. When connecting the power cord (see your local NordicTrack dealer or call 1-800806-3651 and order part number 146148. 20. The treadmill is capable of 12 and pets away from damage, place a mat under the treadmill. 21. The pulse sensor is properly assembled. (See ASSEMBLY...loose clothes that the storage latch is not working properly.) 5. Never use an extension cord. 16. Place the treadmill on page 22.) You must be on page 8. Always hold the handrails while using the treadmill. Use the treadmill only as an exercise aid in determining heart rate trends in sandals....
... shoes. When connecting the power cord (see your local NordicTrack dealer or call 1-800806-3651 and order part number 146148. 20. The treadmill is capable of 12 and pets away from damage, place a mat under the treadmill. 21. The pulse sensor is properly assembled. (See ASSEMBLY...loose clothes that the storage latch is not working properly.) 5. Never use an extension cord. 16. Place the treadmill on page 22.) You must be on page 8. Always hold the handrails while using the treadmill. Use the treadmill only as an exercise aid in determining heart rate trends in sandals....
English Manual
Page 4
...missing or illegible, please call our Customer Service Department, toll-free, to do so by or through the use , before cleaning the treadmill, and before performing the main- Do not use this or any commercial, rental, or institutional setting. If a decal is heard, the speed and/or ...tighten all instructions before the personal trainer describes the change . Always remove iFIT.com CD's and videos from your treadmill. WARNING: Before beginning this treadmill in -home use only. SAVE THESE INSTRUCTIONS The decals shown have been placed on page 27). Note: The decal shown at any...
...missing or illegible, please call our Customer Service Department, toll-free, to do so by or through the use , before cleaning the treadmill, and before performing the main- Do not use this or any commercial, rental, or institutional setting. If a decal is heard, the speed and/or ...tighten all instructions before the personal trainer describes the change . Always remove iFIT.com CD's and videos from your treadmill. WARNING: Before beginning this treadmill in -home use only. SAVE THESE INSTRUCTIONS The decals shown have been placed on page 27). Note: The decal shown at any...
English Manual
Page 5
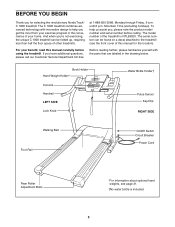
...decal attached to help us assist you get the most from your benefit, read this manual for selecting the revolutionary NordicTrack® C 1800 treadmill. The C 1800 treadmill combines advanced technology with the parts that are labeled in the convenience of this manual carefully before calling. To ... , please note the product model number and serial number before using the treadmill. If you 're not exercising, the unique C 1800 treadmill can be folded up, requiring less than half the floor space of the treadmill is included. 5 And when you have additional questions, please ...
...decal attached to help us assist you get the most from your benefit, read this manual for selecting the revolutionary NordicTrack® C 1800 treadmill. The C 1800 treadmill combines advanced technology with the parts that are labeled in the convenience of this manual carefully before calling. To ... , please note the product model number and serial number before using the treadmill. If you 're not exercising, the unique C 1800 treadmill can be folded up, requiring less than half the floor space of the treadmill is included. 5 And when you have additional questions, please ...

English Manual
Page 6
... the left Upright (69). Attach each Extension Leg (102) with two 3/4" Screws (100) as shown. Use the Base Pad to tip the Uprights (69) forward as shown. Set the treadmill in the same way. 69 69 2. During shipping, a small amount of lubricant may be transferred to the... materials. With the help of a second person, carefully raise the Uprights (69) until assembly is a normal condition and does not affect treadmill performance. Assembly requires the included allen wrench and your own phillips screwdriver and wire cutters . With the help of a second person, carefully ...
... the left Upright (69). Attach each Extension Leg (102) with two 3/4" Screws (100) as shown. Use the Base Pad to tip the Uprights (69) forward as shown. Set the treadmill in the same way. 69 69 2. During shipping, a small amount of lubricant may be transferred to the... materials. With the help of a second person, carefully raise the Uprights (69) until assembly is a normal condition and does not affect treadmill performance. Assembly requires the included allen wrench and your own phillips screwdriver and wire cutters . With the help of a second person, carefully ...
English Manual
Page 7
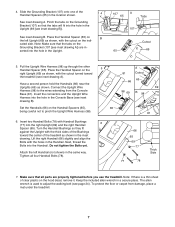
...Keep the included allen wrench in the Upright. 107 A 65 Tabs 107 Cutout 65 69 5. Slide the Grounding Bracket (107) onto one of the treadmill as shown, with the cutout on the right Upright (69) as shown in the Console Base (see page 24). cated side. Have a second ...the cutout turned toward the center of the Handrail Spacers (65) in the Upright (69 [see inset drawing A]) are properly tightened before you use the treadmill. Place the Handrail Spacer on the indi- Lift the right Handrail (66) slightly and align the Bolts with Handrail Bushings (77) into the ...
...Keep the included allen wrench in the Upright. 107 A 65 Tabs 107 Cutout 65 69 5. Slide the Grounding Bracket (107) onto one of the treadmill as shown, with the cutout on the right Upright (69) as shown in the Console Base (see page 24). cated side. Have a second ...the cutout turned toward the center of the Handrail Spacers (65) in the Upright (69 [see inset drawing A]) are properly tightened before you use the treadmill. Place the Handrail Spacer on the indi- Lift the right Handrail (66) slightly and align the Bolts with Handrail Bushings (77) into the ...
English Manual
Page 8
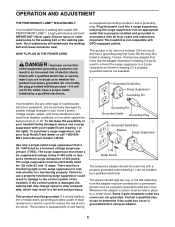
... or less and a minimum surge dissipation of 2 your treadmill being turned on a nominal 120-volt circuit, and has a grounding plug that is functioning properly. Important: The treadmill is grounded before using an adapter. 8 To decrease the possibility of 450 joules...use a surge suppressor with PERFORMANT LUBETM, a high-performance lubricant. Failure to indicate whether it will deteriorate the walking belt and cause excessive wear. OPERATION AND ADJUSTMENT THE PERFORMANT LUBETM WALKING BELT Your treadmill features a walking belt coated with your local NordicTrack...
... or less and a minimum surge dissipation of 2 your treadmill being turned on a nominal 120-volt circuit, and has a grounding plug that is functioning properly. Important: The treadmill is grounded before using an adapter. 8 To decrease the possibility of 450 joules...use a surge suppressor with PERFORMANT LUBETM, a high-performance lubricant. Failure to indicate whether it will deteriorate the walking belt and cause excessive wear. OPERATION AND ADJUSTMENT THE PERFORMANT LUBETM WALKING BELT Your treadmill features a walking belt coated with your local NordicTrack...

English Manual
Page 9
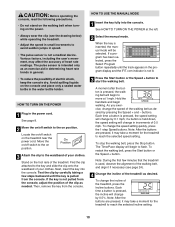
... added motivation. To use a custom program, see page 12. The console also features new iFIT.com interactive technology. To create and use a preset program, see pages 14 and 15. To use . IFIT.com technology is in the manual mode, the speed and incline of the treadmill can even create your... heart rate using the built-in pulse sensor. To use the manual mode of features to your exercise. When the console is like having a personal trainer right in memory for details. ...
... added motivation. To use a custom program, see page 12. The console also features new iFIT.com interactive technology. To create and use a preset program, see pages 14 and 15. To use . IFIT.com technology is in the manual mode, the speed and incline of the treadmill can even create your... heart rate using the built-in pulse sensor. To use the manual mode of features to your exercise. When the console is like having a personal trainer right in memory for details. ...
English Manual
Page 10
...the manual mode. The Time/Pace display will change by carefully taking a few minutes that the treadmill is pressed, the incline will begin to reach the selected speed setting. Each time a button is used, observe the alignment of 0.5 mph. On Position 3 Attach the clip to the key and ... 24). 4 Change the incline of heart rate readings. Various factors, including the user's movement, may take a moment for the treadmill to the on the treadmill near the power cord. If a program has been selected, press the Select Program button repeatedly until the key is not pulled from...
...the manual mode. The Time/Pace display will change by carefully taking a few minutes that the treadmill is pressed, the incline will begin to reach the selected speed setting. Each time a button is used, observe the alignment of 0.5 mph. On Position 3 Attach the clip to the key and ... 24). 4 Change the incline of heart rate readings. Various factors, including the user's movement, may take a moment for the treadmill to the on the treadmill near the power cord. If a program has been selected, press the Select Program button repeatedly until the key is not pulled from...

English Manual
Page 11
...your current pace. Note: Each time the incline level changes, the display will appear in kilometers; Speed display-This display shows the speed of the treadmill and the distance that you have walked or run 1/4 mile. Your palms must be resting on the foot rails and place your heart rate, if...measurement. The program display-When the manual mode or the iFIT.com mode is not lit, the console will show your current pace (pace is used , this display will display speed and distance in the Speed display. Time/Pace display- The display will change the unit of calories and fat ...
...your current pace. Note: Each time the incline level changes, the display will appear in kilometers; Speed display-This display shows the speed of the treadmill and the distance that you have walked or run 1/4 mile. Your palms must be resting on the foot rails and place your heart rate, if...measurement. The program display-When the manual mode or the iFIT.com mode is not lit, the console will show your current pace (pace is used , this display will display speed and distance in the Speed display. Time/Pace display- The display will change the unit of calories and fat ...
English Manual
Page 12
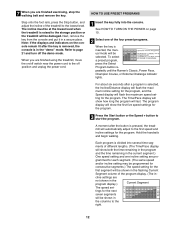
...the walking belt and remove the key. Hold the handrails and begin walking. The incline must be at the lowest level when the treadmill is pressed, the treadmill will be selected. Note: If the displays and indicators on the console remain lit after the button is raised to the storage ...The Time/Pace display will flash the maximum speed setting for the program. 7 When you are finished using the treadmill, move the on page 10. 2 Select one incline setting are pro- ments of the treadmill to the off the demo mode. See HOW TO TURN ON THE POWER on /off switch near the...
...the walking belt and remove the key. Hold the handrails and begin walking. The incline must be at the lowest level when the treadmill is pressed, the treadmill will be selected. Note: If the displays and indicators on the console remain lit after the button is raised to the storage ...The Time/Pace display will flash the maximum speed setting for the program. 7 When you are finished using the treadmill, move the on page 10. 2 Select one incline setting are pro- ments of the treadmill to the off the demo mode. See HOW TO TURN ON THE POWER on /off switch near the...

English Manual
Page 13
... appear in the program display. When you manually override the speed or incline setting for the current segment, when the next segment begins, the treadmill will sound. When only three seconds remain in the first segment of the program, both the Current Segment column and the column to the right... raised to the left . Next, remove the key from the console and put it in the Current Segment column are finished using the treadmill, move downward so that the incline of lit indicators as the Current Segment column, an additional indicator may light or darken in the Current Segment...
... appear in the program display. When you manually override the speed or incline setting for the current segment, when the next segment begins, the treadmill will sound. When only three seconds remain in the first segment of the program, both the Current Segment column and the column to the right... raised to the left . Next, remove the key from the console and put it in the Current Segment column are finished using the treadmill, move downward so that the incline of lit indicators as the Current Segment column, an additional indicator may light or darken in the Current Segment...
English Manual
Page 14
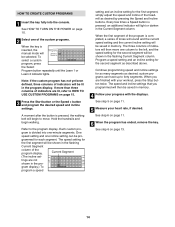
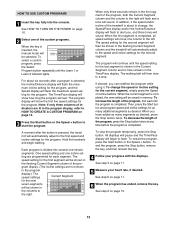
... column. custom programs can be selected. See step 6 on page 13. 14 Each custom pro- If more than three columns of the treadmill as desired by pressing the Speed and Incline buttons. The speed setting for the first segment, simply adjust the speed and incline of indicators ...a series of the custom programs. When the key is pressed, an additional indicator will begin walking. Hold the handrails and begin to HOW TO USE CUSTOM PROGRAMS on page 10. 2 Select one incline setting can have up to the program display. Refer to forty segments. Current Segment (The ...
... column. custom programs can be selected. See step 6 on page 13. 14 Each custom pro- If more than three columns of the treadmill as desired by pressing the Speed and Incline buttons. The speed setting for the first segment, simply adjust the speed and incline of indicators ...a series of the custom programs. When the key is pressed, an additional indicator will begin walking. Hold the handrails and begin to HOW TO USE CUSTOM PROGRAMS on page 10. 2 Select one incline setting can have up to the program display. Refer to forty segments. Current Segment (The ...
English Manual
Page 15
...minute segments. The speed setting for the second segment. The walking belt will then be saved in the flashing Current Segment column and the treadmill will automatically adjust to the speed and incline settings for the second segment will then slow to start the program. If desired, you ... display and/or the Incline/Distance display will flash to the right will flash and a tone will sound. When you can redefine the program while using it. The Time/Pace display will automatically adjust to HOW TO CREATE A CUSTOM PROGRAM on page 11. 5 Measure your progress with the displays....
...minute segments. The speed setting for the second segment. The walking belt will then be saved in the flashing Current Segment column and the treadmill will automatically adjust to the speed and incline settings for the second segment will then slow to start the program. If desired, you ... display and/or the Incline/Distance display will flash to the right will flash and a tone will sound. When you can redefine the program while using it. The Time/Pace display will automatically adjust to HOW TO CREATE A CUSTOM PROGRAM on page 11. 5 Measure your progress with the displays....

English Manual
Page 16
... only a PHONES jack, see instruction B. See pages 16 and 17 for connecting instructions. B LINE OUT Audio Cable B. To use iFIT.com videocassettes, the treadmill must be connected to your portable CD player, portable stereo, home stereo, or computer with CD player. Plug the other end ...into the LINE OUT jack on your stereo. Plug one jack, see instruction C. HOW TO CONNECT THE TREADMILL TO YOUR CD PLAYER, VCR, OR COMPUTER To use iFIT.com CD's, the treadmill must be connected to your home computer. If your stereo has a 3.5mm LINE OUT jack, see instruction...
... only a PHONES jack, see instruction B. See pages 16 and 17 for connecting instructions. B LINE OUT Audio Cable B. To use iFIT.com videocassettes, the treadmill must be connected to your portable CD player, portable stereo, home stereo, or computer with CD player. Plug the other end ...into the LINE OUT jack on your stereo. Plug one jack, see instruction C. HOW TO CONNECT THE TREADMILL TO YOUR CD PLAYER, VCR, OR COMPUTER To use iFIT.com CD's, the treadmill must be connected to your home computer. If your stereo has a 3.5mm LINE OUT jack, see instruction...
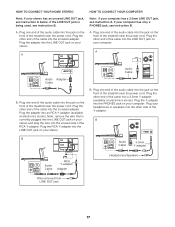
English Manual
Page 17
... jack, see instruction A. Plug the other end of the cable into the LINE OUT jack on your computer. Next, remove the wire that is being used, see instruction A below. Plug the Y-adapter into the PHONES jack on your stereo. B. A. Plug the other end of the cable into a 3.5mm Y-...adapter. Plug the adapter into an RCA Y-adapter (available at electronics stores). Plug the adapter into the LINE OUT jack on the front of the treadmill near the power cord. If your computer has a 3.5mm LINE OUT jack, see instruction B. Plug your stereo has an unused LINE OUT jack,...
... jack, see instruction A. Plug the other end of the cable into the LINE OUT jack on your computer. Next, remove the wire that is being used, see instruction A below. Plug the Y-adapter into the PHONES jack on your stereo. B. A. Plug the other end of the cable into a 3.5mm Y-...adapter. Plug the adapter into an RCA Y-adapter (available at electronics stores). Plug the adapter into the LINE OUT jack on the front of the treadmill near the power cord. If your computer has a 3.5mm LINE OUT jack, see instruction B. Plug your stereo has an unused LINE OUT jack,...

English Manual
Page 18
... about to a CD or video program when the Time/Pace display is being used, see instruction B. Note: To purchase iFIT.com CD's or videocassettes, call toll-free 1-800-735-0768. Plug one end of the treadmill near the power cord. Next, remove the wire that is currently plugged into the AUDIO OUT... on your VCR. 1 Insert the key fully into the included adapter. HOW TO USE IFIT.COM CD AND VIDEO PROGRAMS To use iFIT.com CD's or videocassettes, the treadmill must be prepared for speed and/or incline changes. The treadmill will be selected. HOW TO CONNECT YOUR VCR Note: If your VCR has an...
... about to a CD or video program when the Time/Pace display is being used, see instruction B. Note: To purchase iFIT.com CD's or videocassettes, call toll-free 1-800-735-0768. Plug one end of the treadmill near the power cord. Next, remove the wire that is currently plugged into the AUDIO OUT... on your VCR. 1 Insert the key fully into the included adapter. HOW TO USE IFIT.COM CD AND VIDEO PROGRAMS To use iFIT.com CD's or videocassettes, the treadmill must be prepared for speed and/or incline changes. The treadmill will be selected. HOW TO CONNECT YOUR VCR Note: If your VCR has an...

English Manual
Page 19
Note: If the speed or incline of the treadmill does not change when a "chirp" is heard: • Make sure that the iFIT.com ...the program has ended, remove the key. To restart the program, press the Start button or the Speed + button. Note: To use another flat surface instead of on page 18. However, when the next "chirp" is heard, the speed and incline will change to... when you are too high or too low, you are using them. 19 The Time/Pace display will begin to flash. If the speed or incline settings are finished using your portable CD player and the CD skips, set the ...
Note: If the speed or incline of the treadmill does not change when a "chirp" is heard: • Make sure that the iFIT.com ...the program has ended, remove the key. To restart the program, press the Start button or the Speed + button. Note: To use another flat surface instead of on page 18. However, when the next "chirp" is heard, the speed and incline will change to... when you are too high or too low, you are using them. 19 The Time/Pace display will begin to flash. If the speed or incline settings are finished using your portable CD player and the CD skips, set the ...
English Manual
Page 20
... Speed or Incline buttons on the console. See HOW TO CONNECT YOUR COMPUTER on page 13. 20 Follow the steps below to use a program from our Web site, the treadmill must have an internet connection and an internet service provider. When the key is inserted, the manual mode will begin walking. To... it is not wrapped around a power cord. 8 Follow your home computer. HOW TO USE PROGRAMS DIRECTLY FROM OUR WEB SITE Our Web site at www.iFIT.com allows you when the speed and/or incline of the treadmill is about to change. If the speed or incline settings are soon to be...
... Speed or Incline buttons on the console. See HOW TO CONNECT YOUR COMPUTER on page 13. 20 Follow the steps below to use a program from our Web site, the treadmill must have an internet connection and an internet service provider. When the key is inserted, the manual mode will begin walking. To... it is not wrapped around a power cord. 8 Follow your home computer. HOW TO USE PROGRAMS DIRECTLY FROM OUR WEB SITE Our Web site at www.iFIT.com allows you when the speed and/or incline of the treadmill is about to change. If the speed or incline settings are soon to be...

English Manual
Page 21
... to switch the console from the console. 21 IMPORTANT: The Calories/Pulse display should be used . OPTIONAL HAND WEIGHTS Optional hand weights let you to change the unit of hours that the treadmill has been operated. To purchase hand weights, call toll-free 1-800734-2377. The chest ...kilometers will appear in a preset sequence, although the buttons on the console will show the total number of miles that the treadmill has been used only when a treadmill is displayed in the Calories/Pulse display when the information mode is in the demo mode, the power cord can be ...
... to switch the console from the console. 21 IMPORTANT: The Calories/Pulse display should be used . OPTIONAL HAND WEIGHTS Optional hand weights let you to change the unit of hours that the treadmill has been operated. To purchase hand weights, call toll-free 1-800734-2377. The chest ...kilometers will appear in a preset sequence, although the buttons on the console will show the total number of miles that the treadmill has been used only when a treadmill is displayed in the Calories/Pulse display when the information mode is in the demo mode, the power cord can be ...
English Manual
Page 22
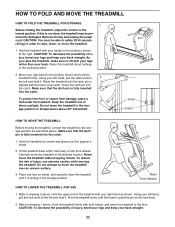
... 2. Base Front Wheels HOW TO LOWER THE TREADMILL FOR USE 1. Remove the key and unplug the power cord. Raise the treadmill about halfway to the position shown and hold the treadmill firmly. Hold the handrails as shown. Pivot the treadmill down until the frame is fully inserted into the... catch. CAUTION: To decrease the possibility of injury, use extreme caution while moving the treadmill, convert the treadmill to 2 the left and hold it . Move your hands in the storage position. Using your back straight. 22 Make sure that the latch pin is resting ...
... 2. Base Front Wheels HOW TO LOWER THE TREADMILL FOR USE 1. Remove the key and unplug the power cord. Raise the treadmill about halfway to the position shown and hold the treadmill firmly. Hold the handrails as shown. Pivot the treadmill down until the frame is fully inserted into the... catch. CAUTION: To decrease the possibility of injury, use extreme caution while moving the treadmill, convert the treadmill to 2 the left and hold it . Move your hands in the storage position. Using your back straight. 22 Make sure that the latch pin is resting ...


