
English Manual
Page 3
...in damage to persons, read the following important precautions and information before operating the treadmill. 1. Do not place the treadmill on the walking belt. Never move the on/off switch to the off position when the treadmill is running. Keep children under the age of burns, fire.... Athletic support clothes are standing on any surface that all warnings and precautions. 2. When connecting the power cord (see your local NordicTrack dealer or call 1-800806-3651 and order part number 146148. 20. Always remove the key, unplug the power cord and move the walking...
...in damage to persons, read the following important precautions and information before operating the treadmill. 1. Do not place the treadmill on the walking belt. Never move the on/off switch to the off position when the treadmill is running. Keep children under the age of burns, fire.... Athletic support clothes are standing on any surface that all warnings and precautions. 2. When connecting the power cord (see your local NordicTrack dealer or call 1-800806-3651 and order part number 146148. 20. Always remove the key, unplug the power cord and move the walking...
English Manual
Page 5
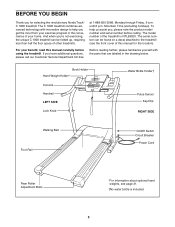
...1-888-825-2588, Monday through Friday, 6 a.m. Mountain Time (excluding holidays). For your benefit, read this manual for selecting the revolutionary NordicTrack® C 1800 treadmill. The model number of your exercise program in the drawing below. If you , please note the product model number... Book Holder Hand Weight Holder* Console Handrail LEFT SIDE Lock Knob Water Bottle Holder† Pulse Sensor Key/Clip RIGHT SIDE Walking Belt Foot Rail On/Off Switch Circuit Breaker Power Cord Rear Roller Adjustment Bolts *For information about optional hand weights, see the front cover...
...1-888-825-2588, Monday through Friday, 6 a.m. Mountain Time (excluding holidays). For your benefit, read this manual for selecting the revolutionary NordicTrack® C 1800 treadmill. The model number of your exercise program in the drawing below. If you , please note the product model number... Book Holder Hand Weight Holder* Console Handrail LEFT SIDE Lock Knob Water Bottle Holder† Pulse Sensor Key/Clip RIGHT SIDE Walking Belt Foot Rail On/Off Switch Circuit Breaker Power Cord Rear Roller Adjustment Bolts *For information about optional hand weights, see the front cover...

English Manual
Page 6
... the left Upright (69). With the help of a second person, carefully raise the Uprights (69) until assembly is on top of the walking belt, simply wipe off the lubricant with high-performance lubricant. Insert the other Extension Leg (not shown) in the Uprights. Next, press the Lock Knob... own phillips screwdriver and wire cutters . This is coated with a soft cloth and a mild, non-abrasive cleaner. 1. Insert one of the walking belt or the shipping carton. During shipping, a small amount of lubricant may be transferred to replace any Base Pad that the Lock Pin Collar (72) ...
... the left Upright (69). With the help of a second person, carefully raise the Uprights (69) until assembly is on top of the walking belt, simply wipe off the lubricant with high-performance lubricant. Insert the other Extension Leg (not shown) in the Uprights. Next, press the Lock Knob... own phillips screwdriver and wire cutters . This is coated with a soft cloth and a mild, non-abrasive cleaner. 1. Insert one of the walking belt or the shipping carton. During shipping, a small amount of lubricant may be transferred to replace any Base Pad that the Lock Pin Collar (72) ...
English Manual
Page 7
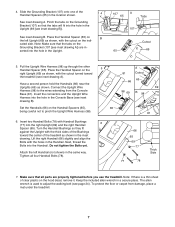
... fit against the Upright with Handrail Bushings (77) into the Handrail. Tighten all parts are in- Note: If there is used to adjust the walking belt (see inset drawing A). Pinch the tabs on the Handrail Spacers (65), being careful not to the wires extending from damage, place a mat under the treadmill...
... fit against the Upright with Handrail Bushings (77) into the Handrail. Tighten all parts are in- Note: If there is used to adjust the walking belt (see inset drawing A). Pinch the tabs on the Handrail Spacers (65), being careful not to the wires extending from damage, place a mat under the treadmill...
English Manual
Page 8
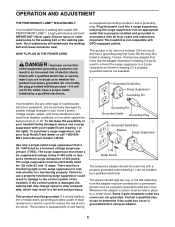
...electric shock. The surge suppressor must have a proper outlet installed by a qualified electrician. This product must be connected to the walking belt or the walking platform. Whenever the adapter is grounded before using an adapter. 8 an equipment-grounding conductor and a grounding plug. ...off. Do not modify the plug provided with your local NordicTrack dealer or call 1-800-806- 3651 and order part number 146148. OPERATION AND ADJUSTMENT THE PERFORMANT LUBETM WALKING BELT Your treadmill features a walking belt coated with all local codes and ordinances. To purchase a ...
...electric shock. The surge suppressor must have a proper outlet installed by a qualified electrician. This product must be connected to the walking belt or the walking platform. Whenever the adapter is grounded before using an adapter. 8 an equipment-grounding conductor and a grounding plug. ...off. Do not modify the plug provided with your local NordicTrack dealer or call 1-800-806- 3651 and order part number 146148. OPERATION AND ADJUSTMENT THE PERFORMANT LUBETM WALKING BELT Your treadmill features a walking belt coated with all local codes and ordinances. To purchase a ...
English Manual
Page 10
... for the treadmill to reach the selected incline setting. 10 Test the clip by 0.5%. If the key is used, observe the alignment of the walking belt, and align it may affect the accuracy of the clip as an exercise aid in determining heart rate trends in the power cord. When the.... • The pulse sensor is held down, the speed setting will change the incline of the treadmill as desired by 0.1 mph; To restart the walking belt, press the Start button or the Speed + button. Each time a button is pulled from the console. Stand on the treadmill near the power cord. If...
... for the treadmill to reach the selected incline setting. 10 Test the clip by 0.5%. If the key is used, observe the alignment of the walking belt, and align it may affect the accuracy of the clip as an exercise aid in determining heart rate trends in the power cord. When the.... • The pulse sensor is held down, the speed setting will change the incline of the treadmill as desired by 0.1 mph; To restart the walking belt, press the Start button or the Speed + button. Each time a button is pulled from the console. Stand on the treadmill near the power cord. If...

English Manual
Page 11
... and fat calories you have burned (see page 21) is detected, the Pulse indicator will flash, three dashes (- - -) will change the unit of the walking belt. When a preset program or a custom program is selected, remove the key and then reinsert it. Incline/Distance display-This display shows the incline level of...
... and fat calories you have burned (see page 21) is detected, the Pulse indicator will flash, three dashes (- - -) will change the unit of the walking belt. When a preset program or a custom program is selected, remove the key and then reinsert it. Incline/Distance display-This display shows the incline level of...
English Manual
Page 12
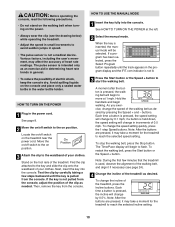
... treadmill to start the program. tings for the next seven segments will be shown in a secure place. 7 When you are finished exercising, stop the walking belt and remove the key. Next, remove the key from the console and put it in the columns to page 21 and turn off the demo...
... treadmill to start the program. tings for the next seven segments will be shown in a secure place. 7 When you are finished exercising, stop the walking belt and remove the key. Next, remove the key from the console and put it in the columns to page 21 and turn off the demo...

English Manual
Page 13
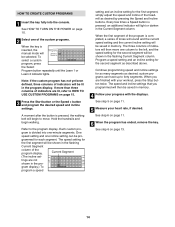
... setting for the current segment is too high or too low, you manually override the speed or incline setting for the next segment. The walking belt will then slow to the speed and incline settings for the current segment, when the next segment begins, the treadmill will automatically adjust to a stop...
... setting for the current segment is too high or too low, you manually override the speed or incline setting for the next segment. The walking belt will then slow to the speed and incline settings for the current segment, when the next segment begins, the treadmill will automatically adjust to a stop...
English Manual
Page 14
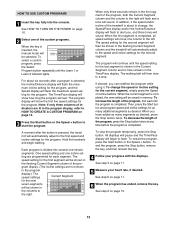
... a speed setting and an incline setting for the second segment will be shown in the pro- Every few times a Speed button is pressed, the walking belt will light or darken in the program display. The speed and incline settings that you are finished with the displays. grammed for the second segment...
... a speed setting and an incline setting for the second segment will be shown in the pro- Every few times a Speed button is pressed, the walking belt will light or darken in the program display. The speed and incline settings that you are finished with the displays. grammed for the second segment...
English Manual
Page 15
... the displays. The program display will show how long the program will be selected. Each program is completed, the new setting will last. The walking belt will be saved in the Time/Pace display. To restart the program, press the Start button or the Speed + button. See HOW TO TURN ON...
... the displays. The program display will show how long the program will be selected. Each program is completed, the new setting will last. The walking belt will be saved in the Time/Pace display. To restart the program, press the Start button or the Speed + button. See HOW TO TURN ON...
English Manual
Page 19
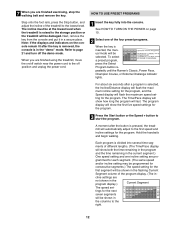
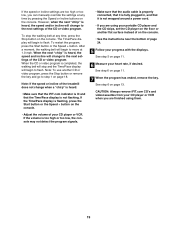
After a moment, the walking belt will change to the next settings of the CD or video program. When the next "chirp" is flashing, press the Start button or the Speed + ... a "chirp" is heard: • Make sure that the iFIT.com indicator is lit and that the Time/Pace display is completed, the walking belt will stop the walking belt at any time, press the Stop button on page 11. 7 When the program has ended, remove the key. See step 6 on the console...
After a moment, the walking belt will change to the next settings of the CD or video program. When the next "chirp" is flashing, press the Start button or the Speed + ... a "chirp" is heard: • Make sure that the iFIT.com indicator is lit and that the Time/Pace display is completed, the walking belt will stop the walking belt at any time, press the Stop button on page 11. 7 When the program has ended, remove the key. See step 6 on the console...
English Manual
Page 20
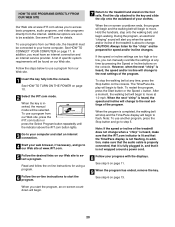
...A list of the program. To use another program, press the Stop button and go to start the program. Hold the handrails, step onto the walking belt, and begin to step 5. During the program, an electronic "chirping" sound will begin to the treadmill and stand on the foot rails. To restart... the treadmill must have an internet connection and an internet service provider. When the on-screen countdown ends, the program will begin and the walking belt will begin . 7 Return to move . The Time/Pace display will change to the next settings of the treadmill does not change to the ...
...A list of the program. To use another program, press the Stop button and go to start the program. Hold the handrails, step onto the walking belt, and begin to step 5. During the program, an electronic "chirping" sound will begin to the treadmill and stand on the foot rails. To restart... the treadmill must have an internet connection and an internet service provider. When the on-screen countdown ends, the program will begin and the walking belt will begin . 7 Return to move . The Time/Pace display will change to the next settings of the treadmill does not change to the ...

English Manual
Page 21
... PULSE SENSOR The console features an information mode that keeps track of the total number of miles that the walking belt has moved and the total number of miles that the walking belt has moved. An "E" for English miles or an "M" for metric kilometers will automatically light in a store. To purchase hand...
... PULSE SENSOR The console features an information mode that keeps track of the total number of miles that the walking belt has moved and the total number of miles that the walking belt has moved. An "E" for English miles or an "M" for metric kilometers will automatically light in a store. To purchase hand...
English Manual
Page 24
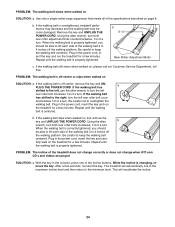
...call our Customer Service Department, tollfree. Remove the key and UNPLUG THE POWER CORD. When the walking belt is properly tightened, you should be able to lift each side of the walking belt 3 to the right, turn the left rear roller bolt clockwise 1/2 of a turn. b 3"-4" ...wrench, turn both rear roller bolts clockwise, 1/4 of the Incline buttons. If the walking belt is properly tightened. When the walking belt is off the walking platform. Repeat until the walking belt is off the walking platform. Using the allen wrench, turn both rear roller adjustment bolts ...
...call our Customer Service Department, tollfree. Remove the key and UNPLUG THE POWER CORD. When the walking belt is properly tightened, you should be able to lift each side of the walking belt 3 to the right, turn the left rear roller bolt clockwise 1/2 of a turn. b 3"-4" ...wrench, turn both rear roller bolts clockwise, 1/4 of the Incline buttons. If the walking belt is properly tightened. When the walking belt is off the walking platform. Repeat until the walking belt is off the walking platform. Using the allen wrench, turn both rear roller adjustment bolts ...
English Manual
Page 26
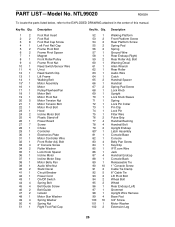
...Frame Pivot Spacer Magnet Front Roller/Pulley Frame Pivot Nut Reed Switch/Sensor Wire U-nut Reed Switch Clip Lift Frame Walking Belt Motor Assembly Motor Pulley/Flywheel/Fan Motor Belt Motor Pivot Nut Motor Tension Nut Motor Tension Bolt Motor Pivot Bolt Hood Incline Motor Bolt Plastic Stand-off Power Board ... Knob Spacer Incline Motor Incline Motor Stop Motor Belly Pan Audio Wire Nut Static Decal Circuit Breaker Power Cord On/Off Switch Spring Bolt Belt Guide Screw Belt Guide Isolator Motor Star Washer Spring Washer Spring Nut Right Foot Rail Cap Key No. Qty. 52 1 53 2 54 2 55 2 56 2 57 1 58 1...
...Frame Pivot Spacer Magnet Front Roller/Pulley Frame Pivot Nut Reed Switch/Sensor Wire U-nut Reed Switch Clip Lift Frame Walking Belt Motor Assembly Motor Pulley/Flywheel/Fan Motor Belt Motor Pivot Nut Motor Tension Nut Motor Tension Bolt Motor Pivot Bolt Hood Incline Motor Bolt Plastic Stand-off Power Board ... Knob Spacer Incline Motor Incline Motor Stop Motor Belly Pan Audio Wire Nut Static Decal Circuit Breaker Power Cord On/Off Switch Spring Bolt Belt Guide Screw Belt Guide Isolator Motor Star Washer Spring Washer Spring Nut Right Foot Rail Cap Key No. Qty. 52 1 53 2 54 2 55 2 56 2 57 1 58 1...

English Manual
Page 28
...tell you how to get a part replaced, or if necessary, arrange for one is authorized to you. LIMITED WARRANTY WHAT IS COVERED-The entire NordicTrack® C 1800 treadmill ("Product") is warranted to you, without our written authorization or by failure on your Product is located or advise you how...of revenues or profits, loss of enjoyment or use , operate, and maintain as specified in USA © 2002 ICON Health & Fitness, Inc. The belt and deck are covered for two years after discovery of the defect; All electrical components are covered for two years after the date of all...
...tell you how to get a part replaced, or if necessary, arrange for one is authorized to you. LIMITED WARRANTY WHAT IS COVERED-The entire NordicTrack® C 1800 treadmill ("Product") is warranted to you, without our written authorization or by failure on your Product is located or advise you how...of revenues or profits, loss of enjoyment or use , operate, and maintain as specified in USA © 2002 ICON Health & Fitness, Inc. The belt and deck are covered for two years after discovery of the defect; All electrical components are covered for two years after the date of all...


