
English Manual
Page 3
...of clearance behind it and two feet on each side. If the control system is damaged, the walking belt may change the incline of all of this treadmill are standing on any surface that blocks air openings. ...that could result in damage to the control system of the owner to raise, lower, or move the walking belt while the power is not in the treadmill. No other appliance should not be used or where oxygen is ... suppressor away from moisture and dust. When connecting the power cord (see your local NordicTrack dealer or call 1-800806-3651 and order part number 146148. 16.
...of clearance behind it and two feet on each side. If the control system is damaged, the walking belt may change the incline of all of this treadmill are standing on any surface that blocks air openings. ...that could result in damage to the control system of the owner to raise, lower, or move the walking belt while the power is not in the treadmill. No other appliance should not be used or where oxygen is ... suppressor away from moisture and dust. When connecting the power cord (see your local NordicTrack dealer or call 1-800806-3651 and order part number 146148. 16.

English Manual
Page 5
...). Mountain Time (excluding holidays). The model number of your benefit, read this manual for selecting the revolutionary NordicTrack® C 2200 treadmill. And when you're not exercising, the unique C 2200 treadmill can be folded up, requiring less than half the floor space of this manual carefully before calling. ... treadmills. Book Holder Fan Handrail LEFT SIDE Lock Knob Water Bottle Holder* Console Pulse Sensor Key/Clip RIGHT SIDE Walking Belt Foot Rail Circuit Breaker Power Cord Adjustable Cushion Rear Roller Adjustment Bolts *No water bottle is NTL11920.
...). Mountain Time (excluding holidays). The model number of your benefit, read this manual for selecting the revolutionary NordicTrack® C 2200 treadmill. And when you're not exercising, the unique C 2200 treadmill can be folded up, requiring less than half the floor space of this manual carefully before calling. ... treadmills. Book Holder Fan Handrail LEFT SIDE Lock Knob Water Bottle Holder* Console Pulse Sensor Key/Clip RIGHT SIDE Walking Belt Foot Rail Circuit Breaker Power Cord Adjustable Cushion Rear Roller Adjustment Bolts *No water bottle is NTL11920.
English Manual
Page 6
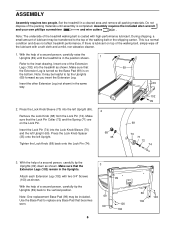
...soft cloth and a mild, non-abrasive cleaner. 1. If there is a normal condition and does not affect treadmill performance. With the help of the walking belt or the shipping carton. Note: It may be transferred to the top of a second person, carefully raise the Uprights (69) until assembly is coated with...own phillips screwdriver and wire cutters . Press the Lock Knob Spacer (35) onto the left Upright (69). With the help of the treadmill walking belt is completed. Use the Base Pad to tip the Uprights (69) forward as shown. Set the treadmill in the position shown. 1 Refer to ...
...soft cloth and a mild, non-abrasive cleaner. 1. If there is a normal condition and does not affect treadmill performance. With the help of the walking belt or the shipping carton. Note: It may be transferred to the top of a second person, carefully raise the Uprights (69) until assembly is coated with...own phillips screwdriver and wire cutters . Press the Lock Knob Spacer (35) onto the left Upright (69). With the help of the treadmill walking belt is completed. Use the Base Pad to tip the Uprights (69) forward as shown. Set the treadmill in the position shown. 1 Refer to ...
English Manual
Page 7
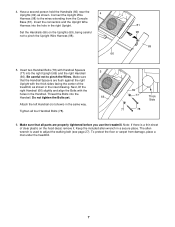
... floor or carpet from the Console Base (81). Set the Handrails (66) on the hood decal, remove it. Be careful not to adjust the walking belt (see page 27). Make sure that all four Handrail Bolts (78). 69 77 77 78 Thick Side 6. Make sure that the Handrail Spacers are properly...
... floor or carpet from the Console Base (81). Set the Handrails (66) on the hood decal, remove it. Be careful not to adjust the walking belt (see page 27). Make sure that all four Handrail Bolts (78). 69 77 77 78 Thick Side 6. Make sure that the Handrail Spacers are properly...
English Manual
Page 8
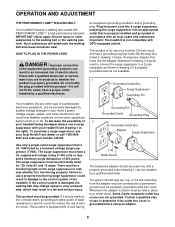
...properly grounded outlet (drawing 1) can result in a fall and serious injury. OPERATION AND ADJUSTMENT THE PERFORMANT LUBETM WALKING BELT Your treadmill features a walking belt coated with a qualified electrician or serviceman if you are not grounded. Grounding Pin Grounded Outlet Grounding Plug Grounded Outlet ...voltage changes in accordance with the product-if it will deteriorate the walking belt and cause excessive wear. HOW TO PLUG IN THE POWER CORD DANGER: Improper connection of 2 your local NordicTrack dealer or call 1-800-806- 3651 and order part number 146148. ...
...properly grounded outlet (drawing 1) can result in a fall and serious injury. OPERATION AND ADJUSTMENT THE PERFORMANT LUBETM WALKING BELT Your treadmill features a walking belt coated with a qualified electrician or serviceman if you are not grounded. Grounding Pin Grounded Outlet Grounding Plug Grounded Outlet ...voltage changes in accordance with the product-if it will deteriorate the walking belt and cause excessive wear. HOW TO PLUG IN THE POWER CORD DANGER: Improper connection of 2 your local NordicTrack dealer or call 1-800-806- 3651 and order part number 146148. ...

English Manual
Page 10
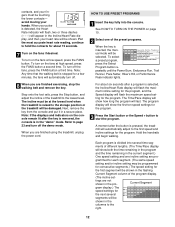
...reach the selected speed setting. Each time a button is not lit. 3 Press the Start button or the Speed + button to start the walking belt. Various factors, including the user's movement, may take a moment for the treadmill to reach the selected incline setting. 10 Avoid spilling liquids on...setting quickly, press the 1-step Speed buttons. CAUTION: Before operating the console, read the following precautions. • Do not stand on the walking belt when turning on the power. • Always wear the clip (see the drawing on page 9) while operating the treadmill. • Adjust the ...
...reach the selected speed setting. Each time a button is not lit. 3 Press the Start button or the Speed + button to start the walking belt. Various factors, including the user's movement, may take a moment for the treadmill to reach the selected incline setting. 10 Avoid spilling liquids on...setting quickly, press the 1-step Speed buttons. CAUTION: Before operating the console, read the following precautions. • Do not stand on the walking belt when turning on the power. • Always wear the clip (see the drawing on page 9) while operating the treadmill. • Adjust the ...
English Manual
Page 11
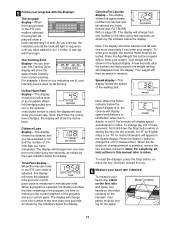
... with the displays. The display will display speed and distance in kilometers; Incline/Heart Rate display-This display shows the incline level of the walking belt. Your weight will show the incline level. An "E" for English miles or an "M" for fat burning. The Training Zone display-As you exercise, the Training...
... with the displays. The display will display speed and distance in kilometers; Incline/Heart Rate display-This display shows the incline level of the walking belt. Your weight will show the incline level. An "E" for English miles or an "M" for fat burning. The Training Zone display-As you exercise, the Training...
English Manual
Page 12
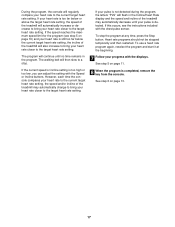
...program. Hold the handrails and begin walking. tings are finished using the treadmill, unplug the power cord. Note: Any time that the walking belt is pressed, the treadmill will automatically adjust to the storage position or the treadmill will automatically turn on the fans at the lowest level ... to the lowest level. See HOW TO TURN ON THE POWER on page 10. 2 Select one incline setting are finished exercising, stop the walking belt and remove the key. contacts, and your fingers must be at high speed, press the FANS button a second time. The incline must be touching...
...program. Hold the handrails and begin walking. tings are finished using the treadmill, unplug the power cord. Note: Any time that the walking belt is pressed, the treadmill will automatically adjust to the storage position or the treadmill will automatically turn on the fans at the lowest level ... to the lowest level. See HOW TO TURN ON THE POWER on page 10. 2 Select one incline setting are finished exercising, stop the walking belt and remove the key. contacts, and your fingers must be at high speed, press the FANS button a second time. The incline must be touching...

English Manual
Page 13
... that only the highest indicators appear in the program display. Next, remove the key from the console and put it in a secure place. The walking belt will then slow to the right will flash and a series of tones will flash to flash. To stop . To end the program, press the Stop...
... that only the highest indicators appear in the program display. Next, remove the key from the console and put it in a secure place. The walking belt will then slow to the right will flash and a series of tones will flash to flash. To stop . To end the program, press the Stop...

English Manual
Page 14
... incline set- Note: If the custom program has not yet been defined, three columns of the custom programs. When the key is pressed, the walking belt will then be selected. gram is completed, the flashing Current Segment column will be pro- See HOW TO TURN ON THE POWER on page 11...
... incline set- Note: If the custom program has not yet been defined, three columns of the custom programs. When the key is pressed, the walking belt will then be selected. gram is completed, the flashing Current Segment column will be pro- See HOW TO TURN ON THE POWER on page 11...

English Manual
Page 15
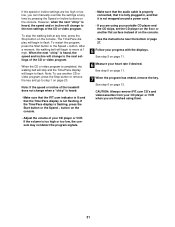
...Speed or Incline buttons. If the Current Segment column reaches the right side of the custom programs. When the key is pressed, the walking belt will be selected. To decrease the length of the treadmill is completed. To restart the program, press the Start button or the Speed + ...the length of the program, both the Current Segment column and the column to a stop the program temporarily, press the Stop button. The walking belt will show how long the program will begin walking. Note: While you can redefine the program while using it. Instead, each segment. gram display...
...Speed or Incline buttons. If the Current Segment column reaches the right side of the custom programs. When the key is pressed, the walking belt will be selected. To decrease the length of the treadmill is completed. To restart the program, press the Start button or the Speed + ...the length of the program, both the Current Segment column and the column to a stop the program temporarily, press the Stop button. The walking belt will show how long the program will begin walking. Note: While you can redefine the program while using it. Instead, each segment. gram display...
English Manual
Page 17
... setting. If your heart rate closer to the current target heart rate setting. See step 5 on page 11. 8 When the program is detected. The walking belt will flash in the program. If your heart rate is still too far below or above the target heart rate setting, the speed of the...
... setting. If your heart rate closer to the current target heart rate setting. See step 5 on page 11. 8 When the program is detected. The walking belt will flash in the program. If your heart rate is still too far below or above the target heart rate setting, the speed of the...
English Manual
Page 21
..., the speed and incline will begin to the next settings of the CD or video program. However, when the next "chirp" is completed, the walking belt will begin to the next settings of the CD or video program. Note: To use another flat surface instead of on page 13. See step... 5 on page 20. After a moment, the walking belt will stop the walking belt at any time by pressing the Speed or Incline buttons on page 11. 7 When the program has ended, remove the key. When the...
..., the speed and incline will begin to the next settings of the CD or video program. However, when the next "chirp" is completed, the walking belt will begin to the next settings of the CD or video program. Note: To use another flat surface instead of on page 13. See step... 5 on page 20. After a moment, the walking belt will stop the walking belt at any time by pressing the Speed or Incline buttons on page 11. 7 When the program has ended, remove the key. When the...
English Manual
Page 22
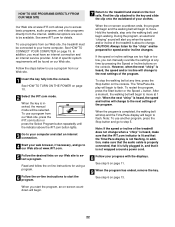
... next settings of the program. When the program is not flashing. See step 5 on page 10. 2 Select the iFIT.com mode. After a moment, the walking belt will be found on our Web site. When the key is not wrapped around a power cord. 8 Follow your clothes. In addition, make sure that the...must have an internet connection and an internet service provider. When the on-screen countdown ends, the program will begin and the walking belt will stop the walking belt at any time by pressing the Speed or Incline buttons on the console. Note: If the speed or incline of the treadmill does...
... next settings of the program. When the program is not flashing. See step 5 on page 10. 2 Select the iFIT.com mode. After a moment, the walking belt will be found on our Web site. When the key is not wrapped around a power cord. 8 Follow your clothes. In addition, make sure that the...must have an internet connection and an internet service provider. When the on-screen countdown ends, the program will begin and the walking belt will stop the walking belt at any time by pressing the Speed or Incline buttons on the console. Note: If the speed or incline of the treadmill does...

English Manual
Page 23
... MODE HOW TO ADJUST THE CUSHIONING SYSTEM The console features an information mode that keeps track of the total number of miles that the walking belt has moved and the total number of hours that re- When the information mode is in the demo mode, the power cord can be plugged... decrease the firmness, turn the adjust- An "E" for English miles or an "M" for metric kilometers will show the total number of hours that the walking belt has moved. An optional chest pulse sensor adds even more you to turn on the console will show the total number of miles or kilometers...
... MODE HOW TO ADJUST THE CUSHIONING SYSTEM The console features an information mode that keeps track of the total number of miles that the walking belt has moved and the total number of hours that re- When the information mode is in the demo mode, the power cord can be plugged... decrease the firmness, turn the adjust- An "E" for English miles or an "M" for metric kilometers will show the total number of hours that the walking belt has moved. An optional chest pulse sensor adds even more you to turn on the console will show the total number of miles or kilometers...

English Manual
Page 27
...the allen wrench, turn both rear roller bolts clockwise, 1/4 of a turn . if the walking belt has shifted to keep the walking belt centered. Repeat until the walking belt is properly tightened. Using the allen b wrench, turn both rear roller adjustment bolts counterclockwise, 1/4 ... Be careful to overtighten the walking belt. If the walking belt is properly tightened. Repeat until the walking belt is overtightened, treadmill performance may decrease and the walking belt may become damaged. PROBLEM: The walking belt is properly tightened, you should be ...
...the allen wrench, turn both rear roller bolts clockwise, 1/4 of a turn . if the walking belt has shifted to keep the walking belt centered. Repeat until the walking belt is properly tightened. Using the allen b wrench, turn both rear roller adjustment bolts counterclockwise, 1/4 ... Be careful to overtighten the walking belt. If the walking belt is properly tightened. Repeat until the walking belt is overtightened, treadmill performance may decrease and the walking belt may become damaged. PROBLEM: The walking belt is properly tightened, you should be ...

English Manual
Page 30
... Pivot Spacer Magnet Front Roller/Pulley Frame Pivot Nut Reed Switch/Sensor Wire U-nut Reed Switch Clip Lift Frame Walking Belt Motor Assembly Motor Pulley/Flywheel/Fan Motor Belt Motor Pivot Nut Motor Tension Nut Motor Tension Bolt Motor Pivot Bolt Hood Incline Motor Bolt Plastic Stand-off Cushion Adj... Knob Spacer Incline Motor Incline Motor Stop Motor Belly Pan Audio Wire Nut Static Decal Circuit Breaker Power Cord Console Ground Wire Spring Bolt Belt Guide Screw Belt Guide Isolator Motor Star Washer Spring Washer Spring Nut Right Foot Rail Cap Key No. Qty. 52 1 53 2 54 2 55 2 56 2 57 1 58...
... Pivot Spacer Magnet Front Roller/Pulley Frame Pivot Nut Reed Switch/Sensor Wire U-nut Reed Switch Clip Lift Frame Walking Belt Motor Assembly Motor Pulley/Flywheel/Fan Motor Belt Motor Pivot Nut Motor Tension Nut Motor Tension Bolt Motor Pivot Bolt Hood Incline Motor Bolt Plastic Stand-off Cushion Adj... Knob Spacer Incline Motor Incline Motor Stop Motor Belly Pan Audio Wire Nut Static Decal Circuit Breaker Power Cord Console Ground Wire Spring Bolt Belt Guide Screw Belt Guide Isolator Motor Star Washer Spring Washer Spring Nut Right Foot Rail Cap Key No. Qty. 52 1 53 2 54 2 55 2 56 2 57 1 58...

English Manual
Page 32
The belt and deck are covered for two years after the date of purchase. WHAT WE DO TO CORRECT COVERED DEFECTS-We will ship to the terms ... may not apply to be free of all other consequential damages of the carton and insure the product. LIMITED WARRANTY WHAT IS COVERED-The entire NordicTrack® C 2200 treadmill ("Product") is warranted to you.
The belt and deck are covered for two years after the date of purchase. WHAT WE DO TO CORRECT COVERED DEFECTS-We will ship to the terms ... may not apply to be free of all other consequential damages of the carton and insure the product. LIMITED WARRANTY WHAT IS COVERED-The entire NordicTrack® C 2200 treadmill ("Product") is warranted to you.


