

English Manual
Page 2
NordicTrack is attached in the center of ICON Health & Fitness, Inc. 2 TABLE OF CONTENTS IMPORTANT PRECAUTIONS 3 BEFORE YOU BEGIN 5 ASSEMBLY 6 OPERATION AND ADJUSTMENT 8 HOW TO FOLD AND MOVE THE TREADMILL 24 TROUBLESHOOTING 26 CONDITIONING GUIDELINES 28 PART LIST 30 ORDERING REPLACEMENT PARTS 31 LIMITED WARRANTY Back Cover Note: An EXPLODED DRAWING is a registered trademark of this manual.
NordicTrack is attached in the center of ICON Health & Fitness, Inc. 2 TABLE OF CONTENTS IMPORTANT PRECAUTIONS 3 BEFORE YOU BEGIN 5 ASSEMBLY 6 OPERATION AND ADJUSTMENT 8 HOW TO FOLD AND MOVE THE TREADMILL 24 TROUBLESHOOTING 26 CONDITIONING GUIDELINES 28 PART LIST 30 ORDERING REPLACEMENT PARTS 31 LIMITED WARRANTY Back Cover Note: An EXPLODED DRAWING is a registered trademark of this manual.

English Manual
Page 3
...hold the handrails while using the treadmill. The treadmill should be used or where oxygen is fully closed. 3 When connecting the power cord (see your local NordicTrack dealer or call 1-800806-3651 and order part number 146148. 16. Place the treadmill on the same circuit. Athletic... support clothes are adequately informed of this treadmill are recommended for both men and women. Always wear ...
...hold the handrails while using the treadmill. The treadmill should be used or where oxygen is fully closed. 3 When connecting the power cord (see your local NordicTrack dealer or call 1-800806-3651 and order part number 146148. 16. Place the treadmill on the same circuit. Athletic... support clothes are adequately informed of this treadmill are recommended for both men and women. Always wear ...

English Manual
Page 4
...-free, to change. WARNING: Before beginning this manual. This is about to order a free replacement decal (see ORDERING REPLACEMENT PARTS on the treadmill. SAVE THESE INSTRUCTIONS The decals shown have been placed on page 31). In some instances, the speed and/or incline may change before the ... iFIT.com CD's and videos from your physician. Always listen for the "chirp" and be performed by or through the use , before cleaning the treadmill, and before using iFIT.com CD's and videos, an electronic "chirping" sound will change . 23. If a decal is intended for persons over...
...-free, to change. WARNING: Before beginning this manual. This is about to order a free replacement decal (see ORDERING REPLACEMENT PARTS on the treadmill. SAVE THESE INSTRUCTIONS The decals shown have been placed on page 31). In some instances, the speed and/or incline may change before the ... iFIT.com CD's and videos from your physician. Always listen for the "chirp" and be performed by or through the use , before cleaning the treadmill, and before using iFIT.com CD's and videos, an electronic "chirping" sound will change . 23. If a decal is intended for persons over...

English Manual
Page 5
...our Customer Service Department toll-free Before reading further, please familiarize yourself with innovative design to the treadmill (see the front cover of this manual carefully before calling. Book Holder Fan Handrail LEFT SIDE Lock... are labeled in the convenience of your benefit, read this manual for selecting the revolutionary NordicTrack® C 2200 treadmill. For your home. And when you for the location). The serial number can be ...BEGIN Thank you 're not exercising, the unique C 2200 treadmill can be folded up, requiring less than half the floor space of other...
...our Customer Service Department toll-free Before reading further, please familiarize yourself with innovative design to the treadmill (see the front cover of this manual carefully before calling. Book Holder Fan Handrail LEFT SIDE Lock... are labeled in the convenience of your benefit, read this manual for selecting the revolutionary NordicTrack® C 2200 treadmill. For your home. And when you for the location). The serial number can be ...BEGIN Thank you 're not exercising, the unique C 2200 treadmill can be folded up, requiring less than half the floor space of other...
English Manual
Page 6
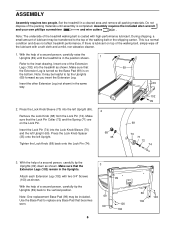
... be included. Make sure that the Extension Legs (102) remain in the same way. 69 69 2. If there is lubricant on top of the treadmill walking belt is on the Lock Pin. With the help of the walking belt or the shipping carton. During shipping, a small amount of lubricant may... Assembly requires the included allen wrench and your own phillips screwdriver and wire cutters . Insert the Lock Pin (74) into the left Upright. Set the treadmill in the position shown. 1 Refer to replace any Base Pad that the Extension Leg is turned so the Base Pad (99) is coated with two...
... be included. Make sure that the Extension Legs (102) remain in the same way. 69 69 2. If there is lubricant on top of the treadmill walking belt is on the Lock Pin. With the help of the walking belt or the shipping carton. During shipping, a small amount of lubricant may... Assembly requires the included allen wrench and your own phillips screwdriver and wire cutters . Insert the Lock Pin (74) into the left Upright. Set the treadmill in the position shown. 1 Refer to replace any Base Pad that the Extension Leg is turned so the Base Pad (99) is coated with two...
English Manual
Page 7
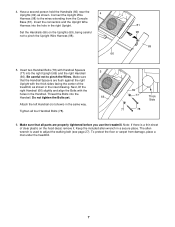
...Wires. Keep the included allen wrench in the right Upright. The allen wrench is a thin sheet of the treadmill, as shown. Make sure that the Handrail Spacers are properly tightened before you use the treadmill. Thread the Bolts into the hole in a secure place. Note: If there is used to the wires... extending from damage, place a mat under the treadmill. 7 Do not tighten the Bolts yet. 66 Attach the left Handrail (not shown) in the Handrail. To protect the floor or carpet from the Console...
...Wires. Keep the included allen wrench in the right Upright. The allen wrench is a thin sheet of the treadmill, as shown. Make sure that the Handrail Spacers are properly tightened before you use the treadmill. Thread the Bolts into the hole in a secure place. Note: If there is used to the wires... extending from damage, place a mat under the treadmill. 7 Do not tighten the Bolts yet. 66 Attach the left Handrail (not shown) in the Handrail. To protect the floor or carpet from the Console...
English Manual
Page 8
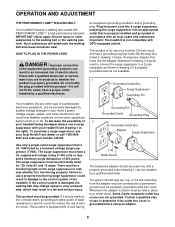
... rated for use on the surge suppressor to indicate whether it must be held in place by sudden voltage changes in your local NordicTrack dealer or call 1-800-806- 3651 and order part number 146148. Some 2-pole receptacle outlet box covers are in doubt as ...outlet (drawing 1) can result from weather conditions or from the adapter must be grounded. OPERATION AND ADJUSTMENT THE PERFORMANT LUBETM WALKING BELT Your treadmill features a walking belt coated with a cord having Lug Metal Screw The temporary adapter should malfunction or break down, grounding provides a path of...
... rated for use on the surge suppressor to indicate whether it must be held in place by sudden voltage changes in your local NordicTrack dealer or call 1-800-806- 3651 and order part number 146148. Some 2-pole receptacle outlet box covers are in doubt as ...outlet (drawing 1) can result from weather conditions or from the adapter must be grounded. OPERATION AND ADJUSTMENT THE PERFORMANT LUBETM WALKING BELT Your treadmill features a walking belt coated with a cord having Lug Metal Screw The temporary adapter should malfunction or break down, grounding provides a path of...

English Manual
Page 9
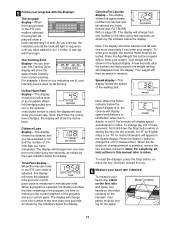
... heart rate program, see page 16. To use an iFIT.com program directly from our Web site, see page 23. As you can connect the treadmill to your home. You can be changed with a class and an instructor-the hottest new trend at www.iFIT.com and access programs directly from... internet. For information about an optional chest pulse sensor, see page 22. 9 When the manual mode is selected, the speed and incline of the treadmill can even create your workout. Program Display Pulse Sensor Pulse Sensor Note: If there is a sheet of clear plastic on page 10. To use the...
... heart rate program, see page 16. To use an iFIT.com program directly from our Web site, see page 23. As you can connect the treadmill to your home. You can be changed with a class and an instructor-the hottest new trend at www.iFIT.com and access programs directly from... internet. For information about an optional chest pulse sensor, see page 22. 9 When the manual mode is selected, the speed and incline of the treadmill can even create your workout. Program Display Pulse Sensor Pulse Sensor Note: If there is a sheet of clear plastic on page 10. To use the...

English Manual
Page 10
... the button is not a medical device. if a button is not pulled from the console. The Time/Pace display will change the incline of the treadmill, press the Incline buttons. If the key is held down, the speed setting will begin walking. To change in general. • To reduce the...the speed of the walking belt, press the Speed + and - Next, insert the key into the console. Note: It may take a moment for the treadmill to move. CAUTION: Before operating the console, read the following precautions. • Do not stand on the walking belt when turning on the power. &#...
... the button is not a medical device. if a button is not pulled from the console. The Time/Pace display will change the incline of the treadmill, press the Incline buttons. If the key is held down, the speed setting will begin walking. To change in general. • To reduce the...the speed of the walking belt, press the Speed + and - Next, insert the key into the console. Note: It may take a moment for the treadmill to move. CAUTION: Before operating the console, read the following precautions. • Do not stand on the walking belt when turning on the power. &#...
English Manual
Page 11
... iFIT.com mode is ideal for metric kilometers will show the incline level. Calories/Fat Calories display-This display shows the approximate numbers of the treadmill. A few seconds, as shown by the indicator below the Speed display is not lit, the console will display speed and distance in minutes per mile...
... iFIT.com mode is ideal for metric kilometers will show the incline level. Calories/Fat Calories display-This display shows the approximate numbers of the treadmill. A few seconds, as shown by the indicator below the Speed display is not lit, the console will display speed and distance in minutes per mile...
English Manual
Page 12
...(- - -) will appear in the columns to hold the contacts for about six seconds after the key is removed, the console is pressed, the treadmill will automatically adjust to start the program. Note: If the displays and indicators on the fans at high speed, press the FANS button a second ...speed setting for a few minutes, the fans will automatically turn off. 8 When you are not shown in the flashing Current Segment column of the treadmill to page 23 and turn off the demo mode. To turn on page 10. 2 Select one incline setting are finished exercising, stop the walking...
...(- - -) will appear in the columns to hold the contacts for about six seconds after the key is removed, the console is pressed, the treadmill will automatically adjust to start the program. Note: If the displays and indicators on the fans at high speed, press the FANS button a second ...speed setting for a few minutes, the fans will automatically turn off. 8 When you are not shown in the flashing Current Segment column of the treadmill to page 23 and turn off the demo mode. To turn on page 10. 2 Select one incline setting are finished exercising, stop the walking...

English Manual
Page 13
...flash and a series of tones will sound. If the speed and/or incline of lit indicators as well.) Note: When the next segment begins, the treadmill will automatically adjust to the speed and incline settings for the current segment is about to change, the Speed display and/or the Incline/Heart... if desired. Step onto the foot rails and make sure that only the highest indicators appear in the Current Segment column are finished using the treadmill, unplug the power cord. 13 Next, remove the key from the console and put it in the "demo" mode. Note: If the displays and ...
...flash and a series of tones will sound. If the speed and/or incline of lit indicators as well.) Note: When the next segment begins, the treadmill will automatically adjust to the speed and incline settings for the current segment is about to change, the Speed display and/or the Incline/Heart... if desired. Step onto the foot rails and make sure that only the highest indicators appear in the Current Segment column are finished using the treadmill, unplug the power cord. 13 Next, remove the key from the console and put it in the "demo" mode. Note: If the displays and ...

English Manual
Page 14
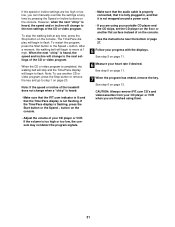
... Program button repeatedly until the Learn 1 or Learn 2 indicator lights. The speed setting for the first segment, simply adjust the speed and incline of the treadmill as described above. Continue programming speed and incline settings for the second segment will move one column to forty segments. HOW TO CREATE CUSTOM PROGRAMS...
... Program button repeatedly until the Learn 1 or Learn 2 indicator lights. The speed setting for the first segment, simply adjust the speed and incline of the treadmill as described above. Continue programming speed and incline settings for the second segment will move one column to forty segments. HOW TO CREATE CUSTOM PROGRAMS...

English Manual
Page 15
... will automatically adjust to the speed and incline settings for the second segment will then be shown in the flashing Current Segment column and the treadmill will move three columns to the left . The speed setting for the second segment. If desired, you , and three tones will be saved in ...and the column to alert you can redefine the program while using it. Instead, each segment. See step 5 on page 10. 2 Select one of the treadmill is about six seconds after the button is completed. Note: If only three columns of the program, press the Stop button twice at any time...
... will automatically adjust to the speed and incline settings for the second segment will then be shown in the flashing Current Segment column and the treadmill will move three columns to the left . The speed setting for the second segment. If desired, you , and three tones will be saved in ...and the column to alert you can redefine the program while using it. Instead, each segment. See step 5 on page 10. 2 Select one of the treadmill is about six seconds after the button is completed. Note: If only three columns of the program, press the Stop button twice at any time...

English Manual
Page 16
... program. 1 Put on page 10. 3 Select a heart rate program. Each heart rate program is divided into the console. A moment after the button is pressed, the treadmill will affect your exercise heart rate. When a heart rate program is selected, the letters "AGE" and the current age setting will show a graphic that represents...
... program. 1 Put on page 10. 3 Select a heart rate program. Each heart rate program is divided into the console. A moment after the button is pressed, the treadmill will affect your exercise heart rate. When a heart rate program is selected, the letters "AGE" and the current age setting will show a graphic that represents...

English Manual
Page 17
... Stop button. However, each time the console compares your heart rate to the current target heart rate setting, the speed and/or incline of the treadmill may automatically change to bring your heart rate is too high or too low, you can adjust the setting with the displays. Heart rate programs..., see step 5 on page 16) and your heart rate is still too far below or above the target heart rate setting, the speed of the treadmill will continue until your heart rate closer to the target heart rate setting. During the program, the console will then slow to a stop the program...
... Stop button. However, each time the console compares your heart rate to the current target heart rate setting, the speed and/or incline of the treadmill may automatically change to bring your heart rate is too high or too low, you can adjust the setting with the displays. Heart rate programs..., see step 5 on page 16) and your heart rate is still too far below or above the target heart rate setting, the speed of the treadmill will continue until your heart rate closer to the target heart rate setting. During the program, the console will then slow to a stop the program...

English Manual
Page 18
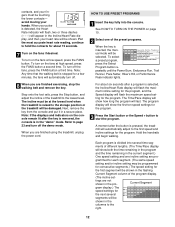
... the jack on the front of the cable into an AUDIO OUT jack on the front of the Y-adapter. Plug the other end of the treadmill near the power cord. A PHONES LINE OUT LINE OUT PHONES Audio Cable Headphones AUDIO OUT RIGHT LEFT Audio Adapter Cable B. Plug one end of the... other end of the cable into the LINE OUT jack on your headphones into the jack on your stereo. Plug the other side of the treadmill near the power cord. Plug the other end of the cable into a 3.5mm Y-adapter (available at electronics stores). Plug the other end of the cable...
... the jack on the front of the cable into an AUDIO OUT jack on the front of the Y-adapter. Plug the other end of the treadmill near the power cord. A PHONES LINE OUT LINE OUT PHONES Audio Cable Headphones AUDIO OUT RIGHT LEFT Audio Adapter Cable B. Plug one end of the... other end of the cable into the LINE OUT jack on your headphones into the jack on your stereo. Plug the other side of the treadmill near the power cord. Plug the other end of the cable into a 3.5mm Y-adapter (available at electronics stores). Plug the other end of the cable...
English Manual
Page 19
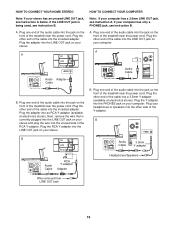
... an unused LINE OUT jack, see instruction A below. Plug the other end of the cable into the included adapter. Plug the other end of the treadmill near the power cord. Plug your stereo and plug the wire into the unused side of the cable into a 3.5mm Y-adapter (available at electronics stores... one end of the audio cable into an RCA Y-adapter (available at electronics stores). Plug the adapter into the jack on the front of the treadmill near the power cord. Plug the other end of the cable into the included adapter. Plug one end of the audio cable into the jack...
... an unused LINE OUT jack, see instruction A below. Plug the other end of the cable into the included adapter. Plug the other end of the treadmill near the power cord. Plug your stereo and plug the wire into the unused side of the cable into a 3.5mm Y-adapter (available at electronics stores... one end of the audio cable into an RCA Y-adapter (available at electronics stores). Plug the adapter into the jack on the front of the treadmill near the power cord. Plug the other end of the cable into the included adapter. Plug one end of the audio cable into the jack...

English Manual
Page 20
... your CD player or VCR. Simply follow your portable CD player, portable stereo, home stereo, computer with a built-in VCR, see instruction B. The treadmill will be selected. During the CD or video program, an electronic "chirping" sound will begin guiding you are using an iFIT.com CD, insert the... audio cable into the jack on your workout. HOW TO USE IFIT.COM CD AND VIDEO PROGRAMS To use iFIT.com CD's or videocassettes, the treadmill must be prepared for the "chirp" and be connected to change . 20 A ANT. Next, remove the wire that is pressed, your personal trainer...
... your CD player or VCR. Simply follow your portable CD player, portable stereo, home stereo, computer with a built-in VCR, see instruction B. The treadmill will be selected. During the CD or video program, an electronic "chirping" sound will begin guiding you are using an iFIT.com CD, insert the... audio cable into the jack on your workout. HOW TO USE IFIT.COM CD AND VIDEO PROGRAMS To use iFIT.com CD's or videocassettes, the treadmill must be prepared for the "chirp" and be connected to change . 20 A ANT. Next, remove the wire that is pressed, your personal trainer...
English Manual
Page 21
... the next "chirp" is heard, the speed and/or incline will begin to step 1 on the console. Note: If the speed or incline of the treadmill does not change to the next settings of page 27. 5 Follow your portable CD player and the CD skips, set the CD player on the...
... the next "chirp" is heard, the speed and/or incline will begin to step 1 on the console. Note: If the speed or incline of the treadmill does not change to the next settings of page 27. 5 Follow your portable CD player and the CD skips, set the CD player on the...


