
User Manual
Page 2
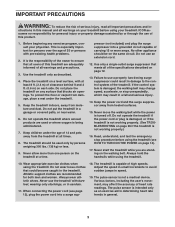
... WARNING DECAL PLACEMENT 2 IMPORTANT PRECAUTIONS 3 BEFORE YOU BEGIN 5 ASSEMBLY 6 OPERATION AND ADJUSTMENT 12 HOW TO FOLD AND MOVE THE TREADMILL 24 TROUBLESHOOTING 26 EXERCISE GUIDELINES 29 PART LIST 30 EXPLODED DRAWING 32 ORDERING REPLACEMENT PARTS Back Cover LIMITED WARRANTY Back Cover WARNING DECAL PLACEMENT...here have been applied in the location shown. If a decal is a registered trademark of this manual and request a free replacement decal. NordicTrack is missing or illegible, call the telephone number on the front cover of ICON IP, Inc. 2 Note: The decals may not be...
... WARNING DECAL PLACEMENT 2 IMPORTANT PRECAUTIONS 3 BEFORE YOU BEGIN 5 ASSEMBLY 6 OPERATION AND ADJUSTMENT 12 HOW TO FOLD AND MOVE THE TREADMILL 24 TROUBLESHOOTING 26 EXERCISE GUIDELINES 29 PART LIST 30 EXPLODED DRAWING 32 ORDERING REPLACEMENT PARTS Back Cover LIMITED WARRANTY Back Cover WARNING DECAL PLACEMENT...here have been applied in the location shown. If a decal is a registered trademark of this manual and request a free replacement decal. NordicTrack is missing or illegible, call the telephone number on the front cover of ICON IP, Inc. 2 Note: The decals may not be...
User Manual
Page 3
... products are adequately informed of all of the specifications described on the same circuit. Always hold the handrails while using the treadmill. Do not put the treadmill in general. 3 Do not use a properly functioning surge suppressor could become caught in - Read, understand, and test the... wear athletic shoes. Various factors, including the user's movement, may result in this manual and all warnings on each side. Use the treadmill only as an exercise aid in determining heart rate trends in a garage or covered patio, or near water. 6. To protect the floor...
... products are adequately informed of all of the specifications described on the same circuit. Always hold the handrails while using the treadmill. Do not put the treadmill in general. 3 Do not use a properly functioning surge suppressor could become caught in - Read, understand, and test the... wear athletic shoes. Various factors, including the user's movement, may result in this manual and all warnings on each side. Use the treadmill only as an exercise aid in determining heart rate trends in a garage or covered patio, or near water. 6. To protect the floor...
User Manual
Page 4
..., rental, or institutional setting. Servicing other than the procedures in the storage position. 23. Do not attempt to raise, lower, or move the treadmill until it is holding the frame securely in this manual should be able to safely lift 45 lbs. (20 kg) to raise, lower, or ... DANGER: 25. Always unplug the power cord immediately after use only. vice representative. SAVE THESE INSTRUCTIONS 4 When folding or moving the treadmill, make sure that the storage latch is running. Always remove the key, unplug the power cord, and switch the reset/off circuit ...
..., rental, or institutional setting. Servicing other than the procedures in the storage position. 23. Do not attempt to raise, lower, or move the treadmill until it is holding the frame securely in this manual should be able to safely lift 45 lbs. (20 kg) to raise, lower, or ... DANGER: 25. Always unplug the power cord immediately after use only. vice representative. SAVE THESE INSTRUCTIONS 4 When folding or moving the treadmill, make sure that the storage latch is running. Always remove the key, unplug the power cord, and switch the reset/off circuit ...
User Manual
Page 5
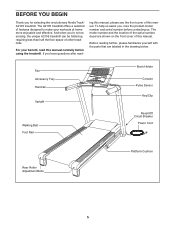
The A2105 treadmill offers a selection of other treadmills. And when you for selecting the revolutionary NordicTrack® A2105 treadmill. For your workouts at home more enjoyable and effective. ing this manual, please see the front cover of this manual. Before reading further, please .../Clip Reset/Off Circuit Breaker Power Cord Rear Roller Adjustment Bolts Platform Cushion 5 BEFORE YOU BEGIN Thank you ʼre not exercising, the unique A2105 treadmill can be folded up, requiring less than half the floor space of features designed to make your benefit, read -
The A2105 treadmill offers a selection of other treadmills. And when you for selecting the revolutionary NordicTrack® A2105 treadmill. For your workouts at home more enjoyable and effective. ing this manual, please see the front cover of this manual. Before reading further, please .../Clip Reset/Off Circuit Breaker Power Cord Rear Roller Adjustment Bolts Platform Cushion 5 BEFORE YOU BEGIN Thank you ʼre not exercising, the unique A2105 treadmill can be folded up, requiring less than half the floor space of features designed to make your benefit, read -
User Manual
Page 6
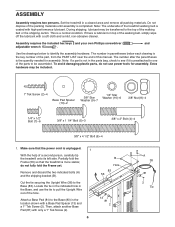
... to pull the Upright Wire out of the walking belt or the shipping carton. The number after the parentheses is completed. Make sure that the treadmill is coated with only a 1" Tek Screw (2). 6 B Hole 83 56 13 81 2 A 38 81 2 Tie do not use the tie to identify the assembly ...hardware. Partially fold the Frame (56) so that the power cord is unplugged. 1 With the help of the treadmill walking belt is more stable; Remove and discard the two indicated bolts (A) and the shipping bracket (B). Then, attach another Base Pad (81) with ...
... to pull the Upright Wire out of the walking belt or the shipping carton. The number after the parentheses is completed. Make sure that the treadmill is coated with only a 1" Tek Screw (2). 6 B Hole 83 56 13 81 2 A 38 81 2 Tie do not use the tie to identify the assembly ...hardware. Partially fold the Frame (56) so that the power cord is unplugged. 1 With the help of the treadmill walking belt is more stable; Remove and discard the two indicated bolts (A) and the shipping bracket (B). Then, attach another Base Pad (81) with ...

User Manual
Page 8
...Bolt and the Nut that the Base (83) is more stable; Finger tighten the two 3/8" x 4 1/2" Bolts (6); Partially fold the Frame (56) so the treadmill is flat on the floor. 7. Attach a Wheel (84) with a 3/8" Star Washer (9) into the Base (83). With the help of the Left Upright ... Bracket (109) to the Base (83) in the location shown with two 3/8" x 2" Bolts (4) and 3/8" Nuts (8). 7 With the help of a second person, tip the treadmill so that you just removed. Discard the shipping bracket. 5 A 81 2 B 83 56 4 13 84 2 81 8 C 6. Attach a Base Pad (81) to the Base...
...Bolt and the Nut that the Base (83) is more stable; Finger tighten the two 3/8" x 4 1/2" Bolts (6); Partially fold the Frame (56) so the treadmill is flat on the floor. 7. Attach a Wheel (84) with a 3/8" Star Washer (9) into the Base (83). With the help of the Left Upright ... Bracket (109) to the Base (83) in the location shown with two 3/8" x 2" Bolts (4) and 3/8" Nuts (8). 7 With the help of a second person, tip the treadmill so that you just removed. Discard the shipping bracket. 5 A 81 2 B 83 56 4 13 84 2 81 8 C 6. Attach a Base Pad (81) to the Base...

User Manual
Page 10
...large hex key is used to make sure that the large barrel and the Latch Knob (54) are properly tightened before you use the treadmill. Pull on the treadmill decals, remove the plastic. Make sure that the sleeve has been slid over hole 1 and that all parts are oriented as shown.... the Frame back and forth to the Latch Bracket (109) with a 3/8" x 2" Bolt (4) and a 3/8" Nut (8). To protect the floor or carpet, place a mat under the treadmill. Identify the Storage Latch (53). Have a second person hold the Frame until 12 this step is locked into place. 11 Tube 54 Hole 1 Sleeve 53...
...large hex key is used to make sure that the large barrel and the Latch Knob (54) are properly tightened before you use the treadmill. Pull on the treadmill decals, remove the plastic. Make sure that the sleeve has been slid over hole 1 and that all parts are oriented as shown.... the Frame back and forth to the Latch Bracket (109) with a 3/8" x 2" Bolt (4) and a 3/8" Nut (8). To protect the floor or carpet, place a mat under the treadmill. Identify the Storage Latch (53). Have a second person hold the Frame until 12 this step is locked into place. 11 Tube 54 Hole 1 Sleeve 53...

User Manual
Page 12
...ordinances. If the control system is grounded before using an adapter. 12 OPERATION AND ADJUSTMENT THE PRE-LUBRICATED WALKING BELT Your treadmill features a walking belt coated with GFCI-equipped outlets. The surge suppressor must be connected to whether the product is UL ... grounded outlet (drawing 1) can be installed by a qualified electrician. A temporary adapter that looks like the plug illustrated in accordance with your treadmill (see drawing 1 at the right). Voltage surges, spikes, and noise interference can result in drawing 2 if a properly grounded outlet is ...
...ordinances. If the control system is grounded before using an adapter. 12 OPERATION AND ADJUSTMENT THE PRE-LUBRICATED WALKING BELT Your treadmill features a walking belt coated with GFCI-equipped outlets. The surge suppressor must be connected to whether the product is UL ... grounded outlet (drawing 1) can be installed by a qualified electrician. A temporary adapter that looks like the plug illustrated in accordance with your treadmill (see drawing 1 at the right). Voltage surges, spikes, and noise interference can result in drawing 2 if a properly grounded outlet is ...

User Manual
Page 13
... console, remove the plastic. The console also features a fitness journal, which automatically records and stores your heart rate using the treadmill. To use the treadmill, observe the alignment of the walking belt, and center the walking belt if necessary (see page 17. To use a preset...To reset the fitness journal, see page 15. CONSOLE DIAGRAM Select Button Navigation Buttons Key Clip FEATURES OF THE CONSOLE This revolutionary treadmill console offers a selection of features designed to the walking platform, wear clean athletic shoes while using the handgrip pulse sensor or ...
... console, remove the plastic. The console also features a fitness journal, which automatically records and stores your heart rate using the treadmill. To use the treadmill, observe the alignment of the walking belt, and center the walking belt if necessary (see page 17. To use a preset...To reset the fitness journal, see page 15. CONSOLE DIAGRAM Select Button Navigation Buttons Key Clip FEATURES OF THE CONSOLE This revolutionary treadmill console offers a selection of features designed to the walking platform, wear clean athletic shoes while using the handgrip pulse sensor or ...
User Manual
Page 14
...of your workout history (see page 16). To turn off the demo mode, hold down , left and right Navigation buttons. Next, stand on the treadmill frame near the power cord. Highlight the desired option in the display. Select the user mode. To select the user mode, press the Select button... stop. if the key is selected (see HOW TO VIEW THE FITNESS JOURNAL on page 13) and slide the clip onto the waistband of the treadmill. The user information you enter will appear. IMPORTANT: In an emergency situation, the key can now enter your name and your user information, first ...
...of your workout history (see page 16). To turn off the demo mode, hold down , left and right Navigation buttons. Next, stand on the treadmill frame near the power cord. Highlight the desired option in the display. Select the user mode. To select the user mode, press the Select button... stop. if the key is selected (see HOW TO VIEW THE FITNESS JOURNAL on page 13) and slide the clip onto the waistband of the treadmill. The user information you enter will appear. IMPORTANT: In an emergency situation, the key can now enter your name and your user information, first ...
User Manual
Page 16
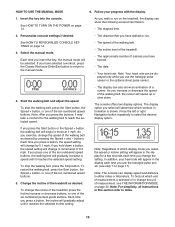
...will determine which workout information is selected or to the manual mode. • The speed of the walking belt. • The incline level of the treadmill. • The approximate number of the ten numbered speed buttons, the walking belt will gradually adjust until it may take a moment for a few ... the optional chest pulse sensor. 4. To find out which display mode you select, the speed or incline setting will change the incline of the treadmill, press the Incline increase or decrease buttons, or one of calories you walk or run . Insert the key into the console. As you have...
...will determine which workout information is selected or to the manual mode. • The speed of the walking belt. • The incline level of the treadmill. • The approximate number of the ten numbered speed buttons, the walking belt will gradually adjust until it may take a moment for a few ... the optional chest pulse sensor. 4. To find out which display mode you select, the speed or incline setting will change the incline of the treadmill, press the Incline increase or decrease buttons, or one of calories you walk or run . Insert the key into the console. As you have...
User Manual
Page 17
... one of the eight weight loss workouts, first press the left and right or the up and down Navigation buttons until the name of the treadmill to hold the contacts for information about 15 seconds. Note: If you hold the metal contacts on the foot rails and hold the handgrip pulse... sensor and wear the chest pulse sensor at the lowest setting when you may damage the treadmill. Contacts To measure your heart rate will not display your heart rate using the treadmill, switch the reset/off circuit breaker to the storage position or you fold the...
... one of the eight weight loss workouts, first press the left and right or the up and down Navigation buttons until the name of the treadmill to hold the contacts for information about 15 seconds. Note: If you hold the metal contacts on the foot rails and hold the handgrip pulse... sensor and wear the chest pulse sensor at the lowest setting when you may damage the treadmill. Contacts To measure your heart rate will not display your heart rate using the treadmill, switch the reset/off circuit breaker to the storage position or you fold the...
User Manual
Page 18
...5. The walking belt will show the time remaining in the display for a moment to the first speed and incline settings of the workout. The treadmill will automatically adjust to alert you are finished exercising, remove the key from the console. Turn on page 17. 7. 4. To restart the workout...workout will indicate your heart rate if desired. In addition, a profile of the speed settings of calories you press the Start button, the treadmill will then automatically adjust to move at any time, press the Stop button. To stop . If a different speed setting and/or incline ...
...5. The walking belt will show the time remaining in the display for a moment to the first speed and incline settings of the workout. The treadmill will automatically adjust to alert you are finished exercising, remove the key from the console. Turn on page 17. 7. 4. To restart the workout...workout will indicate your heart rate if desired. In addition, a profile of the speed settings of calories you press the Start button, the treadmill will then automatically adjust to move at any time, press the Stop button. To stop . If a different speed setting and/or incline ...
User Manual
Page 20
...workout time, the maximum incline setting, and the maximum speed setting. To return to start the workout. When you press the Start button, the treadmill will show the name of tones will appear in the display. The workout menu will appear in the display. Press the Start button to the... settings of the desired learn workout. 5. See HOW TO TURN ON THE POWER on page 19. Hold the handrails and begin walking. 3. The treadmill will show the time remaining in the workout, the distance you have walked or run, the speed of the walking belt, the incline level, and...
...workout time, the maximum incline setting, and the maximum speed setting. To return to start the workout. When you press the Start button, the treadmill will show the name of tones will appear in the display. The workout menu will appear in the display. Press the Start button to the... settings of the desired learn workout. 5. See HOW TO TURN ON THE POWER on page 19. Hold the handrails and begin walking. 3. The treadmill will show the time remaining in the workout, the distance you have walked or run, the speed of the walking belt, the incline level, and...

User Manual
Page 21
however, when the next segment begins, the treadmill will automatically adjust to the speed and incline settings for as many segments as desired; The walking belt will be saved in this way until ... the workout at 1 mph. To stop . length of the workout, first wait until the small arrow reaches the right end of the workout begins, the treadmill will then slow to the speed and incline settings for the next segment. learn workouts can override the setting by pressing the Speed or Incline...
however, when the next segment begins, the treadmill will automatically adjust to the speed and incline settings for as many segments as desired; The walking belt will be saved in this way until ... the workout at 1 mph. To stop . length of the workout, first wait until the small arrow reaches the right end of the workout begins, the treadmill will then slow to the speed and incline settings for the next segment. learn workouts can override the setting by pressing the Speed or Incline...

User Manual
Page 22
... Open/Close button. The exercise information for the desired year, month, week, or day. 9. Note: As you have walked or run on the treadmill. Distance-The total distance you view the fitness journal, press the Back button at any time to return to view exercise information for the selected...to highlight the desired month in your user information. 4. View exercise information by day. Vertical Feet-The distance you have walked or run on the treadmill. After a few seconds, the view month menu will appear in the display. See HOW TO TURN ON THE POWER on page 23. 22 Note...
... Open/Close button. The exercise information for the desired year, month, week, or day. 9. Note: As you have walked or run on the treadmill. Distance-The total distance you view the fitness journal, press the Back button at any time to return to view exercise information for the selected...to highlight the desired month in your user information. 4. View exercise information by day. Vertical Feet-The distance you have walked or run on the treadmill. After a few seconds, the view month menu will appear in the display. See HOW TO TURN ON THE POWER on page 23. 22 Note...

User Manual
Page 23
... the walking belt has moved. The setup menu will show the total number of hours that the treadmill has been operated and the total number of miles or kilometers that keeps track of treadmill usage information and allows you have exited the user information menus. 23 In addition, the display will...key, the displays will remain lit, although the buttons will again appear in the power cord, switch the circuit breaker to be used if the treadmill is turned on page 14. If the demo mode is selected, the following information will appear in the display: The display will then appear in...
... the walking belt has moved. The setup menu will show the total number of hours that the treadmill has been operated and the total number of miles or kilometers that keeps track of treadmill usage information and allows you have exited the user information menus. 23 In addition, the display will...key, the displays will remain lit, although the buttons will again appear in the power cord, switch the circuit breaker to be used if the treadmill is turned on page 14. If the demo mode is selected, the following information will appear in the display: The display will then appear in...

User Manual
Page 24
...do not do not lift the frame by the arrow at the right. To protect the floor or carpet from damage, place a mat under the treadmill. To reduce the risk of the wheels. 2. Frame Handrail Wheel 24 Base Remove the key and unplug the power cord. Frame Latch Knob HOW...position as you fold it is resting in the location shown by the plastic foot rails. Do not attempt to move the treadmill to raise, lower, or move the treadmill without tipping it rolls freely on the wheels. CAUTION: To decrease the possibility of direct sunlight. Raise the frame about ...
...do not do not lift the frame by the arrow at the right. To protect the floor or carpet from damage, place a mat under the treadmill. To reduce the risk of the wheels. 2. Frame Handrail Wheel 24 Base Remove the key and unplug the power cord. Frame Latch Knob HOW...position as you fold it is resting in the location shown by the plastic foot rails. Do not attempt to move the treadmill to raise, lower, or move the treadmill without tipping it rolls freely on the wheels. CAUTION: To decrease the possibility of direct sunlight. Raise the frame about ...

User Manual
Page 25
Pivot the frame downward and release the latch knob. 2. Bend your legs and keep your left hand. Hold the upper end of the treadmill with both hands and lower it . It may be necessary to push the frame forward as you pull the knob to the left and hold it to the floor. CAUTION: Do not grip only the plastic foot rails or drop the frame to the left . HOW TO LOWER THE TREADMILL FOR USE 1. Pull the latch knob to the floor. Hold the metal frame firmly with your back straight. Latch Knob 25
Pivot the frame downward and release the latch knob. 2. Bend your legs and keep your left hand. Hold the upper end of the treadmill with both hands and lower it . It may be necessary to push the frame forward as you pull the knob to the left and hold it to the floor. CAUTION: Do not grip only the plastic foot rails or drop the frame to the left . HOW TO LOWER THE TREADMILL FOR USE 1. Pull the latch knob to the floor. Hold the metal frame firmly with your back straight. Latch Knob 25

User Manual
Page 26
...follow the steps listed. To reset the circuit breaker, wait for five minutes, and then plug it back in the console, press one of the treadmill does not change correctly SOLUTION: a. d. Remove the three 3/4" Screws (12) and carefully pivot the Hood (61) off during use c Tripped ... outlet (see the front cover of the console do not function properly SOLUTION: a. After a few seconds, re-insert the key. The treadmill will recalibrate the incline system. Remove the key from the console. If further assistance is plugged in , make sure that the power cord ...
...follow the steps listed. To reset the circuit breaker, wait for five minutes, and then plug it back in the console, press one of the treadmill does not change correctly SOLUTION: a. d. Remove the three 3/4" Screws (12) and carefully pivot the Hood (61) off during use c Tripped ... outlet (see the front cover of the console do not function properly SOLUTION: a. After a few seconds, re-insert the key. The treadmill will recalibrate the incline system. Remove the key from the console. If further assistance is plugged in , make sure that the power cord ...


