
User Manual
Page 1
[email protected] CAUTION Read all precautions and instructions in the space above for future reference. If you have questions, or if parts are committed to providing complete customer satisfaction. Save this equipment. Write the serial number in this manual before using this manual for ...reference. USER'S MANUAL w Visit our website at www.nordictrack.com As a manufacturer, we are damaged or missing, PLEASE DO NOT CONTACT THE STORE. Serial Number Decal QUESTIONS? Model No. 30827.2...
[email protected] CAUTION Read all precautions and instructions in the space above for future reference. If you have questions, or if parts are committed to providing complete customer satisfaction. Save this equipment. Write the serial number in this manual before using this manual for ...reference. USER'S MANUAL w Visit our website at www.nordictrack.com As a manufacturer, we are damaged or missing, PLEASE DO NOT CONTACT THE STORE. Serial Number Decal QUESTIONS? Model No. 30827.2...
User Manual
Page 2
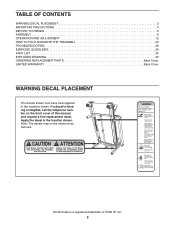
...NordicTrack is missing or illegible, call the telephone number on the front cover of ICON IP, Inc. 2 TABLE OF CONTENTS WARNING DECAL PLACEMENT 2 IMPORTANT PRECAUTIONS 3 BEFORE YOU BEGIN 5 ASSEMBLY 6 OPERATION AND ADJUSTMENT 12 HOW TO FOLD AND MOVE THE TREADMILL 24 TROUBLESHOOTING 26 EXERCISE GUIDELINES 29 PART... LIST 30 EXPLODED DRAWING 32 ORDERING REPLACEMENT PARTS Back Cover LIMITED WARRANTY Back Cover WARNING DECAL PLACEMENT The decals shown here...
...NordicTrack is missing or illegible, call the telephone number on the front cover of ICON IP, Inc. 2 TABLE OF CONTENTS WARNING DECAL PLACEMENT 2 IMPORTANT PRECAUTIONS 3 BEFORE YOU BEGIN 5 ASSEMBLY 6 OPERATION AND ADJUSTMENT 12 HOW TO FOLD AND MOVE THE TREADMILL 24 TROUBLESHOOTING 26 EXERCISE GUIDELINES 29 PART... LIST 30 EXPLODED DRAWING 32 ORDERING REPLACEMENT PARTS Back Cover LIMITED WARRANTY Back Cover WARNING DECAL PLACEMENT The decals shown here...

User Manual
Page 4
... page 5 for in-home use , before cleaning the treadmill, and before performing the mainte- Never leave the treadmill unattended while it is running. Inspect and properly tighten all parts of the circuit breaker.) 21. This treadmill is not in use. (See the drawing on the treadmill. 24. Always remove the key, unplug the power cord...
... page 5 for in-home use , before cleaning the treadmill, and before performing the mainte- Never leave the treadmill unattended while it is running. Inspect and properly tighten all parts of the circuit breaker.) 21. This treadmill is not in use. (See the drawing on the treadmill. 24. Always remove the key, unplug the power cord...
User Manual
Page 5
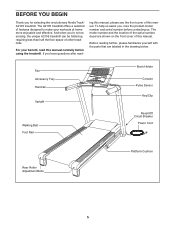
... with the parts that are shown on the front cover of this manual. To help us . The model number and the location of this manual. ing this manual, please see the front cover of the serial number decal are labeled in the drawing below. The A2105 treadmill offers a selection of other treadmills. And when... you for selecting the revolutionary NordicTrack® A2105 treadmill.
... with the parts that are shown on the front cover of this manual. To help us . The model number and the location of this manual. ing this manual, please see the front cover of the serial number decal are labeled in the drawing below. The A2105 treadmill offers a selection of other treadmills. And when... you for selecting the revolutionary NordicTrack® A2105 treadmill.
User Manual
Page 6
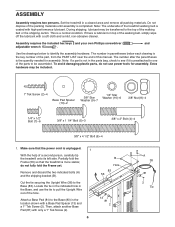
...parts bag, check to see if it is preattached to one of the walking belt or the shipping carton. do not use the tie to the Base (83). Remove and discard the two indicated bolts (A) and the shipping bracket (B). If there is unplugged. 1 With the help of the treadmill...38 81 2 Tie Attach a Base Pad (81) to be transferred to identify the assembly hardware. ASSEMBLY Assembly requires two persons. Set the treadmill in the location shown with high-performance lubricant. Assembly requires the included hex keys and your own Phillips screwdriver and adjustable wrench . Use the ...
...parts bag, check to see if it is preattached to one of the walking belt or the shipping carton. do not use the tie to the Base (83). Remove and discard the two indicated bolts (A) and the shipping bracket (B). If there is unplugged. 1 With the help of the treadmill...38 81 2 Tie Attach a Base Pad (81) to be transferred to identify the assembly hardware. ASSEMBLY Assembly requires two persons. Set the treadmill in the location shown with high-performance lubricant. Assembly requires the included hex keys and your own Phillips screwdriver and adjustable wrench . Use the ...

User Manual
Page 10
...clear plastic on the sleeve to the Latch Bracket (109) with a 3/8" x 2" Bolt (4) and a 3/8" Nut (8). To protect the floor or carpet, place a mat under the treadmill. Keep the included hex keys in a secure place; 11. Identify the Storage Latch (53). Raise the Frame (56) to adjust the walking belt (see HOW... included. Lower the Frame (56) (see page 27). 10 Orient the Storage Latch (53) so that all parts are oriented as shown. Attach the upper end of the tube. Pull on the treadmill decals, remove the plastic. Make sure that the sleeve has been slid over hole 1 and that it is...
...clear plastic on the sleeve to the Latch Bracket (109) with a 3/8" x 2" Bolt (4) and a 3/8" Nut (8). To protect the floor or carpet, place a mat under the treadmill. Keep the included hex keys in a secure place; 11. Identify the Storage Latch (53). Raise the Frame (56) to adjust the walking belt (see HOW... included. Lower the Frame (56) (see page 27). 10 Orient the Storage Latch (53) so that all parts are oriented as shown. Attach the upper end of the tube. Pull on the treadmill decals, remove the plastic. Make sure that the sleeve has been slid over hole 1 and that it is...

User Manual
Page 29
... exercise does your "training zone." The chart below shows recommended heart rates for successful results. WORKOUT GUIDELINES Warming up to make exercise a regular and enjoyable part of your exercise program, do not keep your heart rate in your everyday life. 29 For maximum fat burning, exercise with pre-existing health problems...
... exercise does your "training zone." The chart below shows recommended heart rates for successful results. WORKOUT GUIDELINES Warming up to make exercise a regular and enjoyable part of your exercise program, do not keep your heart rate in your everyday life. 29 For maximum fat burning, exercise with pre-existing health problems...
User Manual
Page 30
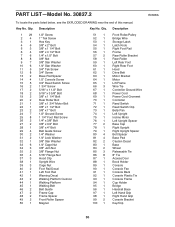
...-Model No. 30827.2 To locate the parts listed below, see the EXPLODED DRAWING near the end of this manual. Key No. Description 1 29 2 4 3 1 4 6 5 3 6 4 7 6 8 8 9 7 10 6 11 5 12 8 13 2 14 4 15 5 16 2 17 2 18 2 ...
...-Model No. 30827.2 To locate the parts listed below, see the EXPLODED DRAWING near the end of this manual. Key No. Description 1 29 2 4 3 1 4 6 5 3 6 4 7 6 8 8 9 7 10 6 11 5 12 8 13 2 14 4 15 5 16 2 17 2 18 2 ...

User Manual
Page 31
... 1 #8 x 1/2" Ground Screw 114 2 #8 x 1 1/2" Screw 115 1 Rear Roller Ground Wire * - 10" Blue Wire, M/F * - 12" Blue Wire, 2F * - 10" Red Wire, M/F * - 8" Black Wire, M/F * - Userʼs Manual *These parts are subject to change without notice. 31 Qty. Specifications are not illustrated. Key No. Qty. 101 1 102 1 103 1 104 1 105 1 106 1 107 1 108 1 109 1 110...
... 1 #8 x 1/2" Ground Screw 114 2 #8 x 1 1/2" Screw 115 1 Rear Roller Ground Wire * - 10" Blue Wire, M/F * - 12" Blue Wire, 2F * - 10" Red Wire, M/F * - 8" Black Wire, M/F * - Userʼs Manual *These parts are subject to change without notice. 31 Qty. Specifications are not illustrated. Key No. Qty. 101 1 102 1 103 1 104 1 105 1 106 1 107 1 108 1 109 1 110...
User Manual
Page 36
... limitation may also have other warranties, and any implied warranties of merchantability or fitness for a lifetime. Jérôme, QC J7Y 4B8 Part No. 266517 R0608A Printed in their scope and duration to the terms set forth above is limited to repairing or replacing, at ICONʼs...with the use or performance of the product; or other warranty beyond that vary from the date of purchase. ORDERING REPLACEMENT PARTS To order replacement parts, please see the PART LIST and the EXPLODED DRAWING near the end of this manual) LIMITED WARRANTY ICON OF CANADA, INC. (ICON) warrants ...
... limitation may also have other warranties, and any implied warranties of merchantability or fitness for a lifetime. Jérôme, QC J7Y 4B8 Part No. 266517 R0608A Printed in their scope and duration to the terms set forth above is limited to repairing or replacing, at ICONʼs...with the use or performance of the product; or other warranty beyond that vary from the date of purchase. ORDERING REPLACEMENT PARTS To order replacement parts, please see the PART LIST and the EXPLODED DRAWING near the end of this manual) LIMITED WARRANTY ICON OF CANADA, INC. (ICON) warrants ...


