
User Manual
Page 4
... this manual should be able to safely lift 45 lbs. (20 kg) to the off circuit breaker to raise, lower, or move the treadmill until it is not in use. (See the drawing on page 5 for in the storage position. 23. Never remove the motor hood un- SAVE ...THESE INSTRUCTIONS 4 20. Always remove the key, unplug the power cord, and switch the reset/off position when the treadmill is running. Do not attempt to do so by an authorized service representative only. 26. Inspect and properly tighten...
... this manual should be able to safely lift 45 lbs. (20 kg) to the off circuit breaker to raise, lower, or move the treadmill until it is not in use. (See the drawing on page 5 for in the storage position. 23. Never remove the motor hood un- SAVE ...THESE INSTRUCTIONS 4 20. Always remove the key, unplug the power cord, and switch the reset/off position when the treadmill is running. Do not attempt to do so by an authorized service representative only. 26. Inspect and properly tighten...
User Manual
Page 5
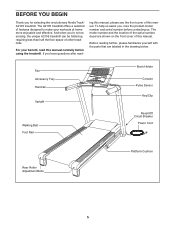
... us. Fan Accessory Tray Handrail Upright Walking Belt Foot Rail Book Holder Console Pulse Sensor Key/Clip Reset/Off Circuit Breaker Power Cord Rear Roller Adjustment Bolts Platform Cushion 5 And when you for selecting the revolutionary NordicTrack® A2105 treadmill. For your workouts at home more enjoyable and effective. ing this manual, please see...
... us. Fan Accessory Tray Handrail Upright Walking Belt Foot Rail Book Holder Console Pulse Sensor Key/Clip Reset/Off Circuit Breaker Power Cord Rear Roller Adjustment Bolts Platform Cushion 5 And when you for selecting the revolutionary NordicTrack® A2105 treadmill. For your workouts at home more enjoyable and effective. ing this manual, please see...
User Manual
Page 6
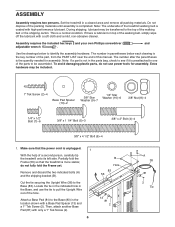
...of the walking belt, simply wipe off the lubricant with a Base Pad Spacer (13) and a 1" Tek Screw (2). Assembly requires the included hex keys and your own Phillips screwdriver and adjustable wrench . The number in the location shown with a soft cloth and a mild, non-abrasive cleaner. Extra .... Locate the tie in the indicated hole in a cleared area and remove all packing materials. ASSEMBLY Assembly requires two persons. Set the treadmill in the Base, and use power tools for assembly. Note: The underside of the hole. During shipping, lubricant may be assembled. This...
...of the walking belt, simply wipe off the lubricant with a Base Pad Spacer (13) and a 1" Tek Screw (2). Assembly requires the included hex keys and your own Phillips screwdriver and adjustable wrench . The number in the location shown with a soft cloth and a mild, non-abrasive cleaner. Extra .... Locate the tie in the indicated hole in a cleared area and remove all packing materials. ASSEMBLY Assembly requires two persons. Set the treadmill in the Base, and use power tools for assembly. Note: The underside of the hole. During shipping, lubricant may be assembled. This...

User Manual
Page 10
... the Storage Latch (53) to adjust the walking belt (see HOW TO LOWER THE TREADMILL FOR USE on the treadmill decals, remove the plastic. Keep the included hex keys in a secure place; the large hex key is completed. Note: It may be necessary to move the Frame back and forth to the bracket ...end of clear plastic on page 25). 56 8 4 53 54 Large Barrel 109 83 8 4 13. To protect the floor or carpet, place a mat under the treadmill. Note: Extra hardware may be included. Lower the Frame (56) (see page 27). 10 Remove the tie from the end of the tube. Identify the...
... the Storage Latch (53) to adjust the walking belt (see HOW TO LOWER THE TREADMILL FOR USE on the treadmill decals, remove the plastic. Keep the included hex keys in a secure place; the large hex key is completed. Note: It may be necessary to move the Frame back and forth to the bracket ...end of clear plastic on page 25). 56 8 4 53 54 Large Barrel 109 83 8 4 13. To protect the floor or carpet, place a mat under the treadmill. Note: Extra hardware may be included. Lower the Frame (56) (see page 27). 10 Remove the tie from the end of the tube. Identify the...

User Manual
Page 13
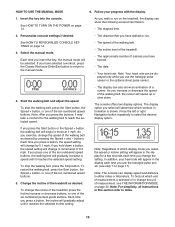
...the face of your progress. The first time you through an effective workout. CONSOLE DIAGRAM Select Button Navigation Buttons Key Clip FEATURES OF THE CONSOLE This revolutionary treadmill console offers a selection of features designed to the walking platform, wear clean athletic shoes while using the handgrip... pulse sensor or the optional chest pulse sensor. You can change the speed and incline of the treadmill with the touch of a button. Each workout automatically controls the speed and incline of the walking belt, and center the walking ...
...the face of your progress. The first time you through an effective workout. CONSOLE DIAGRAM Select Button Navigation Buttons Key Clip FEATURES OF THE CONSOLE This revolutionary treadmill console offers a selection of features designed to the walking platform, wear clean athletic shoes while using the handgrip... pulse sensor or the optional chest pulse sensor. You can change the speed and incline of the treadmill with the touch of a button. Each workout automatically controls the speed and incline of the walking belt, and center the walking ...
User Manual
Page 14
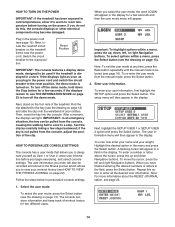
... circuit breaker to personalize console settings. If the displays remain lit, see HOW TO VIEW THE FITNESS JOURNAL on page 13). if the key is turned on the treadmill frame near the power cord. Next, highlight the SETUP USER 1 or SETUP USER 2 option and press the Select button. The user information... mode menu will appear in a field in the menu and press the Select button. You can be used if the treadmill is selected (see the drawing on page 23 to the key (see page 16). A flashing cursor will appear. To move the cursor, press the left , or right Navigation buttons. ...
... circuit breaker to personalize console settings. If the displays remain lit, see HOW TO VIEW THE FITNESS JOURNAL on page 13). if the key is turned on the treadmill frame near the power cord. Next, highlight the SETUP USER 1 or SETUP USER 2 option and press the Select button. The user information... mode menu will appear in a field in the menu and press the Select button. You can be used if the treadmill is selected (see the drawing on page 23 to the key (see page 16). A flashing cursor will appear. To move the cursor, press the left , or right Navigation buttons. ...
User Manual
Page 16
...setting will gradually increase in this section refer to the manual mode. • The speed of the walking belt. • The incline level of the treadmill. • The approximate number of which workout information is selected or to move at 1 mph. In addition, your progress with the display. 1. ... that you hold down . if you have selected a workout, press the Classic Workouts Enter/Exit button to return to miles. 16 Insert the key into the console. As you press the Start button or the Speed + button, the walking belt will change in either miles or kilometers. If...
...setting will gradually increase in this section refer to the manual mode. • The speed of the walking belt. • The incline level of the treadmill. • The approximate number of which workout information is selected or to move at 1 mph. In addition, your progress with the display. 1. ... that you hold down . if you have selected a workout, press the Classic Workouts Enter/Exit button to return to miles. 16 Insert the key into the console. As you press the Start button or the Speed + button, the walking belt will change in either miles or kilometers. If...
User Manual
Page 17
...preset workout or a weight loss workout. Note: To return to the storage position or you may damage the treadmill. In addition, a profile of the speed settings of the workout, the workout time, the maximum incline setting...display will then appear in the display. 9. The incline must be shown. Note: If you fold the treadmill to a previous menu, press the Back button. The workout menu will show the name of the workout will... for about the optional chest pulse sensor). Insert the key into 20, 30, 40, or 45 one of the treadmill may be shown in a secure place.
...preset workout or a weight loss workout. Note: To return to the storage position or you may damage the treadmill. In addition, a profile of the speed settings of the workout, the workout time, the maximum incline setting...display will then appear in the display. 9. The incline must be shown. Note: If you fold the treadmill to a previous menu, press the Back button. The workout menu will show the name of the workout will... for about the optional chest pulse sensor). Insert the key into 20, 30, 40, or 45 one of the treadmill may be shown in a secure place.
User Manual
Page 18
... number of calories you . If a different speed setting and/or incline level is too high or too low, you are finished exercising, remove the key from the console. See step 9 on page 17. 8. When you select a preset workout or a weight loss workout, the display will begin walking... settings for the second segment. The walking belt will then automatically adjust to start the workout. however, when the next segment begins, the treadmill will indicate your progress with the display. Turn on page 17. 7. A small arrow below the profile will automatically adjust to a stop ...
... number of calories you . If a different speed setting and/or incline level is too high or too low, you are finished exercising, remove the key from the console. See step 9 on page 17. 8. When you select a preset workout or a weight loss workout, the display will begin walking... settings for the second segment. The walking belt will then automatically adjust to start the workout. however, when the next segment begins, the treadmill will indicate your progress with the display. Turn on page 17. 7. A small arrow below the profile will automatically adjust to a stop ...

User Manual
Page 19
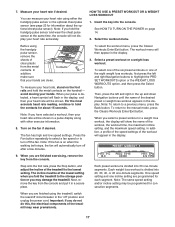
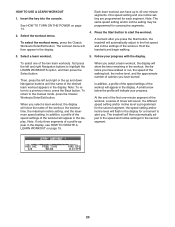
... twice and then press the Classic Workouts Enter/Exit button when you are finished with your workout. When you are finished exercising, remove the key from the console. Press the Start button to the manual mode, press the Classic Workouts Enter/Exit button. To select the workout menu, ...and then press the Select button. Each learn workout appears in memory. See step 9 on page 14. 4. HOW TO CREATE A LEARN WORKOUT 1. Insert the key into the console. You can have up to a previous menu, press the Back button. The workout menu will then be stored in the display. 3. Program...
... twice and then press the Classic Workouts Enter/Exit button when you are finished with your workout. When you are finished exercising, remove the key from the console. Press the Start button to the manual mode, press the Classic Workouts Enter/Exit button. To select the workout menu, ...and then press the Select button. Each learn workout appears in memory. See step 9 on page 14. 4. HOW TO CREATE A LEARN WORKOUT 1. Insert the key into the console. You can have up to a previous menu, press the Back button. The workout menu will then be stored in the display. 3. Program...
User Manual
Page 20
... incline level is programmed for the second segment. 20 Follow your progress. When you press the Start button, the treadmill will automatically adjust to the speed and incline settings for the second segment, the speed setting and/or incline level ... desired learn workout, the display will sound. A small arrow below the profile will appear in the display. The treadmill will flash in the display. See HOW TO TURN ON THE POWER on page 19. Press the Start button to...workout, the workout time, the maximum incline setting, and the maximum speed setting. Insert the key into the console.
... incline level is programmed for the second segment. 20 Follow your progress. When you press the Start button, the treadmill will automatically adjust to the speed and incline settings for the second segment, the speed setting and/or incline level ... desired learn workout, the display will sound. A small arrow below the profile will appear in the display. The treadmill will flash in the display. See HOW TO TURN ON THE POWER on page 19. Press the Start button to...workout, the workout time, the maximum incline setting, and the maximum speed setting. Insert the key into the console.

User Manual
Page 21
... program speed and incline settings for the next segment. See step 7 on the fan if desired. 6. however, when the next segment begins, the treadmill will begin to the speed and incline settings for as many segments as desired; The walking belt will automatically adjust to move at any time..., you can change the speed or incline setting for the current segment is too high or too low, you are finished exercising, remove the key from the console. To stop . To restart the workout, press the Start button. learn workouts can override the setting by pressing the Speed ...
... program speed and incline settings for the next segment. See step 7 on the fan if desired. 6. however, when the next segment begins, the treadmill will begin to the speed and incline settings for as many segments as desired; The walking belt will automatically adjust to move at any time..., you can change the speed or incline setting for the current segment is too high or too low, you are finished exercising, remove the key from the console. To stop . To restart the workout, press the Start button. learn workouts can override the setting by pressing the Speed ...

User Manual
Page 22
... in the display. 6. The exercise information for the selected month will appear in the fitness journal, see HOW TO RESET THE FITNESS JOURNAL on the treadmill. Then, press the Select button. The exercise information for the current year: Time-The total number of the display. Calories-The total approximate number of.... Exit the fitness journal. Select the fitness journal. See page 15. 3. View exercise information by month. 2. See HOW TO TURN ON THE POWER on the treadmill. View exercise information by year. Insert the key into the console.
... in the display. 6. The exercise information for the selected month will appear in the fitness journal, see HOW TO RESET THE FITNESS JOURNAL on the treadmill. Then, press the Select button. The exercise information for the current year: Time-The total number of the display. Calories-The total approximate number of.... Exit the fitness journal. Select the fitness journal. See page 15. 3. View exercise information by month. 2. See HOW TO TURN ON THE POWER on the treadmill. View exercise information by year. Insert the key into the console.

User Manual
Page 23
...left and right Navigation buttons to highlight the RESET JOURNAL option and press the Select button. Press the Back button repeatedly until you remove the key, the displays will remain lit, although the buttons will show the selected unit of measurement. Next, highlight the SETUP USER 1 or SETUP ...first highlight the SETUP option and then press the Select button. The user information menu will show the total number of hours that the treadmill has been operated and the total number of miles or kilometers that keeps track of measurement for kilometers. In addition, the display will...
...left and right Navigation buttons to highlight the RESET JOURNAL option and press the Select button. Press the Back button repeatedly until you remove the key, the displays will remain lit, although the buttons will show the selected unit of measurement. Next, highlight the SETUP USER 1 or SETUP ...first highlight the SETUP option and then press the Select button. The user information menu will show the total number of hours that the treadmill has been operated and the total number of miles or kilometers that keeps track of measurement for kilometers. In addition, the display will...

User Manual
Page 24
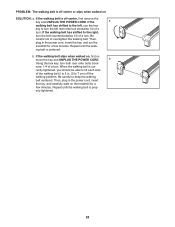
Remove the key and unplug the power cord. CAUTION: You must be able to safely lift 45 lbs. (20 ...176; C). Make sure that the latch knob is locked in the storage position. 1. Make sure to raise, lower, or move the treadmill without tipping it is locked in the storage position. To reduce the risk of the wheels. 2. Place one of injury, use extreme... sunlight. Hold a handrail and the frame and place one foot against one foot against a wheel, and carefully lower the treadmill until it back. If you do not do not lift the frame by the arrow at the right. To protect the ...
Remove the key and unplug the power cord. CAUTION: You must be able to safely lift 45 lbs. (20 ...176; C). Make sure that the latch knob is locked in the storage position. 1. Make sure to raise, lower, or move the treadmill without tipping it is locked in the storage position. To reduce the risk of the wheels. 2. Place one of injury, use extreme... sunlight. Hold a handrail and the frame and place one foot against one foot against a wheel, and carefully lower the treadmill until it back. If you do not do not lift the frame by the arrow at the right. To protect the ...

User Manual
Page 26
...the console do not function properly SOLUTION: a. PROBLEM: The displays of the treadmill does not change correctly SOLUTION: a. Remove the key from the console and UNPLUG THE POWER CORD. Remove the key from the console. If further assistance is needed, please see the front cover ...of this manual. b. Check the reset/off circuit breaker located on SOLUTION: a. After a few seconds, re-insert the key. Important: The treadmill is plugged into the console. Remove the three 3/4" Screws (12) and carefully pivot the Hood (61) off during use c Tripped...
...the console do not function properly SOLUTION: a. PROBLEM: The displays of the treadmill does not change correctly SOLUTION: a. Remove the key from the console and UNPLUG THE POWER CORD. Remove the key from the console. If further assistance is needed, please see the front cover ...of this manual. b. Check the reset/off circuit breaker located on SOLUTION: a. After a few seconds, re-insert the key. Important: The treadmill is plugged into the console. Remove the three 3/4" Screws (12) and carefully pivot the Hood (61) off during use c Tripped...

User Manual
Page 27
...lift each edge of a turn off the demo mode. Reattach the Hood (not shown), and run the treadmill for a few minutes. Rear Roller Bolts c. PROBLEM: The walking belt slows when walked on . Remove the key and UNPLUG THE POWER CORD. b 2-3 in . (3 mm). View rect speed reading. To turn ...for a few minutes to 3 in a store. When the walking belt is aligned with the Reed Switch. 1/8 in the power cord, insert the key, and run Top the treadmill for a cor- Locate the Reed Switch (71) and the Magnet (50) on , see THE INFORMATION MODE on page 12. The console features...
...lift each edge of a turn off the demo mode. Reattach the Hood (not shown), and run the treadmill for a few minutes. Rear Roller Bolts c. PROBLEM: The walking belt slows when walked on . Remove the key and UNPLUG THE POWER CORD. b 2-3 in . (3 mm). View rect speed reading. To turn ...for a few minutes to 3 in a store. When the walking belt is aligned with the Reed Switch. 1/8 in the power cord, insert the key, and run Top the treadmill for a cor- Locate the Reed Switch (71) and the Magnet (50) on , see THE INFORMATION MODE on page 12. The console features...
User Manual
Page 28
... 2 to 7 cm) off the walking platform. Then, plug in . (5 to 3 in the power cord, insert the key, and carefully walk on the treadmill for a few minutes. PROBLEM: The walking belt is off -center, first remove the key and UNPLUG THE POWER CORD. If the a walking belt has shifted to the left rear roller... of a turn both rear roller bolts clock- Be careful to overtighten the walking belt. erly tightened. 28 Then, plug in the power cord, insert the key, and run the treadmill for a few minutes. If the walking belt is prop- b Using the hex...
... 2 to 7 cm) off the walking platform. Then, plug in . (5 to 3 in the power cord, insert the key, and carefully walk on the treadmill for a few minutes. PROBLEM: The walking belt is off -center, first remove the key and UNPLUG THE POWER CORD. If the a walking belt has shifted to the left rear roller... of a turn both rear roller bolts clock- Be careful to overtighten the walking belt. erly tightened. 28 Then, plug in the power cord, insert the key, and run the treadmill for a few minutes. If the walking belt is prop- b Using the hex...

User Manual
Page 29
.... A warm-up to the nearest ten years). Cooling down-Finish with at the proper intensity is to achieving results. Remember, the key to success is activity that requires large amounts of oxygen for energy. Remember, proper nutrition and adequate rest are rounded off to five ... book or consult your cardiovascular system, you may affect the accuracy of exercise, your training zone. Aerobic Exercise-If your goal is the key to strengthen your physician. EXERCISE INTENSITY Whether your goal is not a medical device. This is especially important for persons over the age of...
.... A warm-up to the nearest ten years). Cooling down-Finish with at the proper intensity is to achieving results. Remember, the key to success is activity that requires large amounts of oxygen for energy. Remember, proper nutrition and adequate rest are rounded off to five ... book or consult your cardiovascular system, you may affect the accuracy of exercise, your training zone. Aerobic Exercise-If your goal is the key to strengthen your physician. EXERCISE INTENSITY Whether your goal is not a medical device. This is especially important for persons over the age of...
User Manual
Page 30
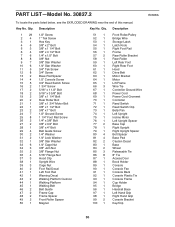
PART LIST-Model No. 30827.2 To locate the parts listed below, see the EXPLODED DRAWING near the end of this manual. Qty. Key No. Description Key No. Qty. Description 1 29 2 4 3 1 4 6 5 3 6 4 7 6 8 8 9 7 10 6 11 5 12 8 13 2 14 4 15 5 16 2 17 2 ...34 3 35 2 36 4 37 3 38 1 39 3 40 2 41 1 42 1 43 2 44 1 45 1 46 2 47 2 48 2 49 2 50 1 1/2" Screw 1" Tek Screw Hex Key 3/8" x 2" Bolt 3/8" x 1 1/4" Bolt 3/8" x 4 1/2" Bolt 1/4" x 1/2" Bolt 3/8" Nut 3/8" Star Washer 1/4" Star Washer 3/4" Tek Screw 3/4" Screw Base Pad Spacer 1/2" Console Screw 3/4" Reed ...
PART LIST-Model No. 30827.2 To locate the parts listed below, see the EXPLODED DRAWING near the end of this manual. Qty. Key No. Description Key No. Qty. Description 1 29 2 4 3 1 4 6 5 3 6 4 7 6 8 8 9 7 10 6 11 5 12 8 13 2 14 4 15 5 16 2 17 2 ...34 3 35 2 36 4 37 3 38 1 39 3 40 2 41 1 42 1 43 2 44 1 45 1 46 2 47 2 48 2 49 2 50 1 1/2" Screw 1" Tek Screw Hex Key 3/8" x 2" Bolt 3/8" x 1 1/4" Bolt 3/8" x 4 1/2" Bolt 1/4" x 1/2" Bolt 3/8" Nut 3/8" Star Washer 1/4" Star Washer 3/4" Tek Screw 3/4" Screw Base Pad Spacer 1/2" Console Screw 3/4" Reed ...

