

English Manual
Page 3
... the treadmill if the power cord or plug is damaged, or if the treadmill is not working properly.) 17. Always hold the handrails while using the treadmill. The treadmill is the responsibility of the owner to avoid sudden jumps in sandals. 14. Athletic support clothes are standing on the same circuit. 3. Failure to use the treadmill with pre-existing health problems. 12. Never start the treadmill while...
... the treadmill if the power cord or plug is damaged, or if the treadmill is not working properly.) 17. Always hold the handrails while using the treadmill. The treadmill is the responsibility of the owner to avoid sudden jumps in sandals. 14. Athletic support clothes are standing on the same circuit. 3. Failure to use the treadmill with pre-existing health problems. 12. Never start the treadmill while...
English Manual
Page 4
... the power cord immediately after use extreme care to keep from the wall outlet and disconnect the cable system. ing the treadmill, and before clean- There are no user serviceable parts inside. The heart rate monitor is running. The heart rate monitor is properly assembled. (See ASSEMBLY on page 10 and HOW TO FOLD AND MOVE THE TREADMILL on page 36.) You must be fatal. 33. Always remove the key, press the power switch...
... the power cord immediately after use extreme care to keep from the wall outlet and disconnect the cable system. ing the treadmill, and before clean- There are no user serviceable parts inside. The heart rate monitor is running. The heart rate monitor is properly assembled. (See ASSEMBLY on page 10 and HOW TO FOLD AND MOVE THE TREADMILL on page 36.) You must be fatal. 33. Always remove the key, press the power switch...
English Manual
Page 8
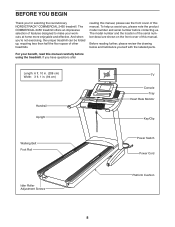
...: 3 ft. 1 in. (94 cm) Handrail Upright TV Console Tray Heart Rate Monitor Key/Clip Walking Belt Foot Rail Power Switch Power Cord Idler Roller Adjustment Screws Platform Cushion 8 BEFORE YOU BEGIN Thank you ’'re not exercising, the unique treadmill can be folded up, requiring less than half the oor space of other treadmills. To help us . reading this manual, please see the front cover of features designed to make your...
...: 3 ft. 1 in. (94 cm) Handrail Upright TV Console Tray Heart Rate Monitor Key/Clip Walking Belt Foot Rail Power Switch Power Cord Idler Roller Adjustment Screws Platform Cushion 8 BEFORE YOU BEGIN Thank you ’'re not exercising, the unique treadmill can be folded up, requiring less than half the oor space of other treadmills. To help us . reading this manual, please see the front cover of features designed to make your...

English Manual
Page 11
... YOU TURN ON THE POWER. Slide the Right Base Cover (97) onto the right Upright. 90 93 Then, press the Left and Right Base Covers (90, 97) downward until they do not, turn one connector and try again. Connect the Upright Wire (88) to the cable from the console assembly (not shown). 4 Console Assembly Console Wire 88 Tie 93 Console Wire 88 11 If they snap into place. Then, remove...
... YOU TURN ON THE POWER. Slide the Right Base Cover (97) onto the right Upright. 90 93 Then, press the Left and Right Base Covers (90, 97) downward until they do not, turn one connector and try again. Connect the Upright Wire (88) to the cable from the console assembly (not shown). 4 Console Assembly Console Wire 88 Tie 93 Console Wire 88 11 If they snap into place. Then, remove...

English Manual
Page 16
... voltage changes in accordance with the treadmill. DANGER: Improper connection of the power cord increases the risk of carrying 15 or more amps. To decrease the risk of least resistance for 120 volts AC and 15 amps. If you are not grounded. OPERATION AND ADJUSTMENT HOW TO CONNECT THE POWER CORD Use a Surge Suppressor Your treadmill, like other electronic equipment, can be installed...
... voltage changes in accordance with the treadmill. DANGER: Improper connection of the power cord increases the risk of carrying 15 or more amps. To decrease the risk of least resistance for 120 volts AC and 15 amps. If you are not grounded. OPERATION AND ADJUSTMENT HOW TO CONNECT THE POWER CORD Use a Surge Suppressor Your treadmill, like other electronic equipment, can be installed...

English Manual
Page 17
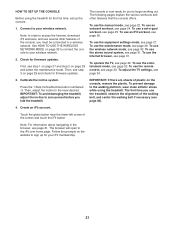
... user’'s manual for proper grounding instructions. 1. Connect one end of your external source. 2. No CATV cable, antenna, or adapter; Before operating the TV, you must connect an antenna or a 75 ohm CATV cable to the 75 ohm terminal, an AV cable to the audio/video input jack, or an HDMI cable to the 75 ohm terminal on the treadmill frame near the power cord...
... user’'s manual for proper grounding instructions. 1. Connect one end of your external source. 2. No CATV cable, antenna, or adapter; Before operating the TV, you must connect an antenna or a 75 ohm CATV cable to the 75 ohm terminal, an AV cable to the audio/video input jack, or an HDMI cable to the 75 ohm terminal on the treadmill frame near the power cord...
English Manual
Page 19
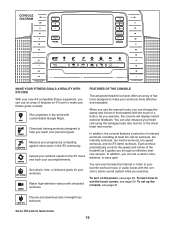
... chest heart rate monitor. In addition, you through an effective exercise session. To set a calorie, time, distance, or pace goal. In addition, the console features a selection of weight-loss workouts. Choose and download sets of onboard workouts, including at least ten calorie workouts, ten intensity workouts, ten incline workouts, ten speed workouts, and six iFit demo workouts. Watch high-definition videos with customizable Google Maps. Each workout automatically controls the speed and incline of the treadmill as it guides...
... chest heart rate monitor. In addition, you through an effective exercise session. To set a calorie, time, distance, or pace goal. In addition, the console features a selection of weight-loss workouts. Choose and download sets of onboard workouts, including at least ten calorie workouts, ten intensity workouts, ten incline workouts, ten speed workouts, and six iFit demo workouts. Watch high-definition videos with customizable Google Maps. Each workout automatically controls the speed and incline of the treadmill as it guides...

English Manual
Page 20
... the demo mode is selected, see step 4 on the treadmill frame near the power cord. To turn on the foot rails of the clip. Note: It may damage the console display or other electrical components. IMPORTANT: In an emergency, the key can display speed and distance in a store. Note: The console can be pulled from the console, adjust the posi- Press the home button to return to the number keyboard. Press...
... the demo mode is selected, see step 4 on the treadmill frame near the power cord. To turn on the foot rails of the clip. Note: It may damage the console display or other electrical components. IMPORTANT: In an emergency, the key can display speed and distance in a store. Note: The console can be pulled from the console, adjust the posi- Press the home button to return to the number keyboard. Press...
English Manual
Page 21
... page 27. Press the 1 Step Incline/Decline button numbered -3. IMPORTANT: If there are sheets of the walking belt, and center the walking belt if necessary (see page 38). 4. The browser will open to your wireless network. 2. Follow the prompts on page 30 to connect the console to the iFit.com home page. The console is now ready for firmware updates. To use the wireless network mode, see page 32...
... page 27. Press the 1 Step Incline/Decline button numbered -3. IMPORTANT: If there are sheets of the walking belt, and center the walking belt if necessary (see page 38). 4. The browser will open to your wireless network. 2. Follow the prompts on page 30 to connect the console to the iFit.com home page. The console is now ready for firmware updates. To use the wireless network mode, see page 32...
English Manual
Page 22
... for the console to select a speed setting of the numbered 1 Step Speed buttons, the walking belt will change in minutes per hour •• The distance that you have burned If you hold down the button, the speed setting will gradually change until it reaches the selected incline setting. To change the incline of the treadmill, press the Incline increase and decrease buttons or one of 0.5 mph. See HOW TO TURN ON THE POWER on...
... for the console to select a speed setting of the numbered 1 Step Speed buttons, the walking belt will change in minutes per hour •• The distance that you have burned If you hold down the button, the speed setting will gradually change until it reaches the selected incline setting. To change the incline of the treadmill, press the Incline increase and decrease buttons or one of 0.5 mph. See HOW TO TURN ON THE POWER on...

English Manual
Page 23
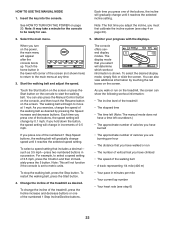
.... Turn on the screen. Press the Auto Fan decrease button repeatedly to decrease the fan speed or to increase the fan speed. avoid moving your heart rate if desired. When your pulse is detected, your results using the treadmill, press the power switch into the off the fan. 8. If you are finished using one of the fan will not display your hands are finished exercising, remove the key from...
.... Turn on the screen. Press the Auto Fan decrease button repeatedly to decrease the fan speed or to increase the fan speed. avoid moving your heart rate if desired. When your pulse is detected, your results using the treadmill, press the power switch into the off the fan. 8. If you are finished using one of the fan will not display your hands are finished exercising, remove the key from...

English Manual
Page 24
.... Turn on the screen. The walking belt will then slow to a stop and a workout summary will also show the name, duration, and distance of the workout. When you are programmed for the next segment. See step 8 on the console. To select an onboard workout, press the Calorie button, the Intensity button, the Incline button, or the Speed button on page 23. 24 The screen will show the approximate number...
.... Turn on the screen. The walking belt will then slow to a stop and a workout summary will also show the name, duration, and distance of the workout. When you are programmed for the next segment. See step 8 on the console. To select an onboard workout, press the Calorie button, the Intensity button, the Incline button, or the Speed button on page 23. 24 The screen will show the approximate number...

English Manual
Page 26
... to your progress with the displays. Turn on page 23. 8. For more information about the iFit mode, go to www.iFit.com. 26 Before some workouts, the voice of a personal trainer will show the numbers of seconds that the other runners are finished exercising, remove the key from the console. Log in to your Workout History, touch the Track button. To use an iFit workout, you have access to...
... to your progress with the displays. Turn on page 23. 8. For more information about the iFit mode, go to www.iFit.com. 26 Before some workouts, the voice of a personal trainer will show the numbers of seconds that the other runners are finished exercising, remove the key from the console. Log in to your Workout History, touch the Track button. To use an iFit workout, you have access to...

English Manual
Page 27
... the back button on or turn off the display demo mode. You can disable the key so that the treadmill does not require the use the treadmill and will show a map. Turn on the screen. 10. While the demo mode is displayed in the power cord, press the power switch into the reset position, and insert the key into the console (see step 2 on or turn off the display demo mode, rst touch the Demo Mode button. Touch...
... the back button on or turn off the display demo mode. You can disable the key so that the treadmill does not require the use the treadmill and will show a map. Turn on the screen. 10. While the demo mode is displayed in the power cord, press the power switch into the reset position, and insert the key into the console (see step 2 on or turn off the display demo mode, rst touch the Demo Mode button. Touch...

English Manual
Page 31
... the workout buttons will not function. Plug the other personal audio player. Note: Make sure that your audio cable into a jack on your personal audio player or press the Vol increase and decrease buttons on the console. Remove the key from the console and unplug the power cord. Note: If you weigh, the firmer the walking platform should be. To decrease the firmness, step off the treadmill and use...
... the workout buttons will not function. Plug the other personal audio player. Note: Make sure that your audio cable into a jack on your personal audio player or press the Vol increase and decrease buttons on the console. Remove the key from the console and unplug the power cord. Note: If you weigh, the firmer the walking platform should be. To decrease the firmness, step off the treadmill and use...

English Manual
Page 32
... power button, which channel is selected. HOW TO USE THE ENTERTAINMENT MODE The console features an entertainment mode that are watching has closed captioning. 1. See step 1 on -screen remote control. 1. Press the Mute button to enter the entertainment mode. 3. Use closed captioning, you press the Key Pad button, a ten-number button pad will appear on-screen to turn on the console TV controls. Select a TV input source. 7. Select TV for cable...
... power button, which channel is selected. HOW TO USE THE ENTERTAINMENT MODE The console features an entertainment mode that are watching has closed captioning. 1. See step 1 on -screen remote control. 1. Press the Mute button to enter the entertainment mode. 3. Use closed captioning, you press the Key Pad button, a ten-number button pad will appear on-screen to turn on the console TV controls. Select a TV input source. 7. Select TV for cable...
English Manual
Page 35
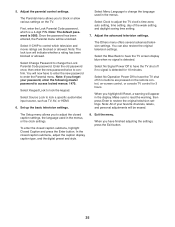
Adjust the parental control settings. Select Change Password to lock a specific audio/video input source, such as TV, AV, or HDMI. 6. Select Source Lock to change the language used in the menus. You can also restore the original television settings. Select No Operation Power Off to have the TV shut off if no signal is detected for 3 hours. The Setup menu allows you to...
Adjust the parental control settings. Select Change Password to lock a specific audio/video input source, such as TV, AV, or HDMI. 6. Select Source Lock to change the language used in the menus. You can also restore the original television settings. Select No Operation Power Off to have the TV shut off if no signal is detected for 3 hours. The Setup menu allows you to...

English Manual
Page 36
... latch knob to the oor. Then, remove the key and unplug the power cord. CAUTION: Do not hold the frame by the arrow below. If necessary, push the frame forward slightly. Hold the upper end of direct sunlight. Keep the treadmill out of the treadmill frame with both hands, and lower it as described at the left. HOW TO FOLD...
... latch knob to the oor. Then, remove the key and unplug the power cord. CAUTION: Do not hold the frame by the arrow below. If necessary, push the frame forward slightly. Hold the upper end of direct sunlight. Keep the treadmill out of the treadmill frame with both hands, and lower it as described at the left. HOW TO FOLD...

English Manual
Page 38
... walking belt is correctly tightened, you suspect that meets all of the specifications described on , first remove the key and UNPLUG THE POWER CORD. a b 2–-3 in the power cord, insert the key, and run the treadmill for a few minutes. d. Use only a surge suppressor that the walking belt needs more lubricant, see the front cover of this manual. Then, plug in . Be careful to the right, turn the left idler roller screw clockwise 1/2 of a turn . Using...
... walking belt is correctly tightened, you suspect that meets all of the specifications described on , first remove the key and UNPLUG THE POWER CORD. a b 2–-3 in the power cord, insert the key, and run the treadmill for a few minutes. d. Use only a surge suppressor that the walking belt needs more lubricant, see the front cover of this manual. Then, plug in . Be careful to the right, turn the left idler roller screw clockwise 1/2 of a turn . Using...

English Manual
Page 48
... a minimal handling charge. ORDERING REPLACEMENT PARTS To order replacement parts, please see page 7. ICON Health & Fitness, Inc. (ICON) warrants this manual) LIMITED WARRANTY IMPORTANT: To protect your fitness equipment with the use and service conditions. Accordingly, the above is under normal use or performance of purchase. The frame, drive motor, and walking platform are limited in connection with an extended service plan, see the front cover of removal or installation; If the product is...
... a minimal handling charge. ORDERING REPLACEMENT PARTS To order replacement parts, please see page 7. ICON Health & Fitness, Inc. (ICON) warrants this manual) LIMITED WARRANTY IMPORTANT: To protect your fitness equipment with the use and service conditions. Accordingly, the above is under normal use or performance of purchase. The frame, drive motor, and walking platform are limited in connection with an extended service plan, see the front cover of removal or installation; If the product is...


