User Guide
Page 15
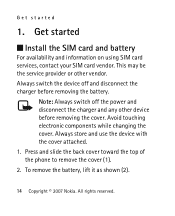
...Note: Always switch off and disconnect the charger before removing the cover. Press and slide the back cover toward the top of the phone to remove the cover (1). 2. To remove the battery, lift it as shown (2). 14 Copyright © 2007 Nokia. Get started ■ Install the SIM card and battery For... availability and information on using SIM card services, contact your SIM card vendor. Always store and use the device with the cover attached. 1. This may be the service provider or...
...Note: Always switch off and disconnect the charger before removing the cover. Press and slide the back cover toward the top of the phone to remove the cover (1). 2. To remove the battery, lift it as shown (2). 14 Copyright © 2007 Nokia. Get started ■ Install the SIM card and battery For... availability and information on using SIM card services, contact your SIM card vendor. Always store and use the device with the cover attached. 1. This may be the service provider or...
User Guide
Page 16
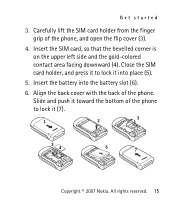
Copyright © 2007 Nokia. All rights reserved. 15 Carefully lift the SIM card holder from the finger grip of the phone. Insert the battery into place (5). 5. Close the SIM card holder, and press it to lock it into the battery slot (6). 6. Align the back cover with the back of the phone, and open the flip cover (3). 4. Insert the SIM card, so that the bevelled corner is on the upper left side and the gold-colored contact area facing downward (4). Slide and push it toward the bottom of the phone to lock it (7). Get started 3.
Copyright © 2007 Nokia. All rights reserved. 15 Carefully lift the SIM card holder from the finger grip of the phone. Insert the battery into place (5). 5. Close the SIM card holder, and press it to lock it into the battery slot (6). 6. Align the back cover with the back of the phone, and open the flip cover (3). 4. Insert the SIM card, so that the bevelled corner is on the upper left side and the gold-colored contact area facing downward (4). Slide and push it toward the bottom of the phone to lock it (7). Get started 3.
User Guide
Page 18
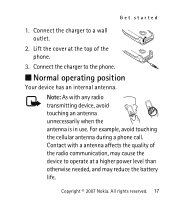
Copyright © 2007 Nokia. All rights reserved. 17 Note: As with a antenna affects the quality of the radio communication, may cause the device to operate at the top of ... the charger to a wall outlet. 2. Get started 1. Connect the charger to the phone. ■ Normal operating position Your device has an internal antenna. Lift the cover at a higher power level than otherwise needed, and may reduce the battery life. Contact with any radio transmitting device, avoid touching an antenna unnecessarily when...
Copyright © 2007 Nokia. All rights reserved. 17 Note: As with a antenna affects the quality of the radio communication, may cause the device to operate at the top of ... the charger to a wall outlet. 2. Get started 1. Connect the charger to the phone. ■ Normal operating position Your device has an internal antenna. Lift the cover at a higher power level than otherwise needed, and may reduce the battery life. Contact with any radio transmitting device, avoid touching an antenna unnecessarily when...
User Guide
Page 19
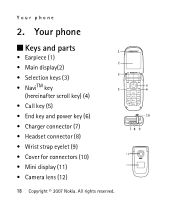
Your phone 2. All rights reserved. Your phone ■ Keys and parts • Earpiece (1) • Main display(2) • Selection keys (3) • NaviTM key (hereinafter scroll key) (4) • Call key (5) • End key and power key (6) • Charger connector (7) • Headset connector (8) • Wrist strap eyelet (9) • Cover for connectors (10) • Mini display (11) • Camera lens (12) 18 Copyright © 2007 Nokia.
Your phone 2. All rights reserved. Your phone ■ Keys and parts • Earpiece (1) • Main display(2) • Selection keys (3) • NaviTM key (hereinafter scroll key) (4) • Call key (5) • End key and power key (6) • Charger connector (7) • Headset connector (8) • Wrist strap eyelet (9) • Cover for connectors (10) • Mini display (11) • Camera lens (12) 18 Copyright © 2007 Nokia.

User Guide
Page 20
Replace the back cover. ■ Switch the phone on or off , press and hold the power key. Continuous exposure to a nickel allergy. ■ Wrist strap Remove the back cover, and insert the wrist strap as it is intended for use by authorized service personnel only. See "Keys and parts", page 18. All rights reserved. 19 Your phone Warning: The scroll key in this connector as illustrated. Copyright © 2007 Nokia. Note: Do not touch this device may lead to nickel on or off To switch the phone on the skin may contain nickel.
Replace the back cover. ■ Switch the phone on or off , press and hold the power key. Continuous exposure to a nickel allergy. ■ Wrist strap Remove the back cover, and insert the wrist strap as it is intended for use by authorized service personnel only. See "Keys and parts", page 18. All rights reserved. 19 Your phone Warning: The scroll key in this connector as illustrated. Copyright © 2007 Nokia. Note: Do not touch this device may lead to nickel on or off To switch the phone on the skin may contain nickel.
User Guide
Page 48
... be possible to lock automatically after a preset time delay when the phone is opened > On- to set the phone to answer calls by opening the cover. Enter the security code, and select On. All rights reserved. 47 Menu functions Answer when fold is in the standby mode and no function of... phone has been used. to set the keypad of your phone to the official emergency number programmed into your phone Automatic keyguard- Copyright © 2007 Nokia. to ask for the security code when you can set the display language of your device.
... be possible to lock automatically after a preset time delay when the phone is opened > On- to set the phone to answer calls by opening the cover. Enter the security code, and select On. All rights reserved. 47 Menu functions Answer when fold is in the standby mode and no function of... phone has been used. to set the keypad of your phone to the official emergency number programmed into your phone Automatic keyguard- Copyright © 2007 Nokia. to ask for the security code when you can set the display language of your device.


