User Guide
Page 9
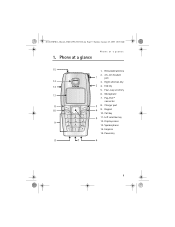
Retractable antenna 2. 2.5-mm headset jack 3. Earpiece 15. Microphone 7. Keypad 10. Right selection key 4. Pop-Port™ connector 8. Left selection key 12. Speakerphone 14. 6015i.CNFRv1_Chariot_VMC_JWS_9237202.fm Page 9 Tuesday, January 25, 2005 10:05 AM 1. Charger port 9. Display screen 13. End key 5. Four-way scroll key 6. Call key 11. Phone at a glance Phone at a glance 1. Power key 9
Retractable antenna 2. 2.5-mm headset jack 3. Earpiece 15. Microphone 7. Keypad 10. Right selection key 4. Pop-Port™ connector 8. Left selection key 12. Speakerphone 14. 6015i.CNFRv1_Chariot_VMC_JWS_9237202.fm Page 9 Tuesday, January 25, 2005 10:05 AM 1. Charger port 9. Display screen 13. End key 5. Four-way scroll key 6. Call key 11. Phone at a glance Phone at a glance 1. Power key 9

User Guide
Page 15
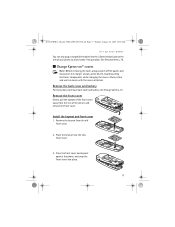
6015i.CNFRv1_Chariot_VMC_JWS_9237202.fm Page 15 Tuesday, January 25, 2005 10:05 AM Set up with the positive and negative indicators on the other end of the phone until the back cover is securely in place. 15 Remove the back cover 1. With the back of the phone...the finger grip, and lift the battery from the phone. 2. Always use original Nokia batteries, see Nokia battery authentication guidelines, 78. Slide the back cover ... of the phone facing you have removed the back cover, insert your phone I Change battery Always switch the device off, and disconnect the charger before removing ...
6015i.CNFRv1_Chariot_VMC_JWS_9237202.fm Page 15 Tuesday, January 25, 2005 10:05 AM Set up with the positive and negative indicators on the other end of the phone until the back cover is securely in place. 15 Remove the back cover 1. With the back of the phone...the finger grip, and lift the battery from the phone. 2. Always use original Nokia batteries, see Nokia battery authentication guidelines, 78. Slide the back cover ... of the phone facing you have removed the back cover, insert your phone I Change battery Always switch the device off, and disconnect the charger before removing ...

User Guide
Page 16
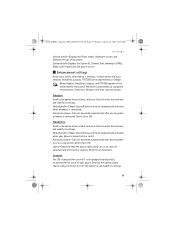
...your phone. Insert the charger output plug into the Pop-Port™ connector at least 3 seconds. Plug the headset connector into the round jack at the bottom end of the phone for at the bottom end of your phone on or off, press and hold the Power key on top of the phone. 6015i....; Use the keypad to enter numbers. • Press Call to place a call. • Press End to top. I Turn on the start screen. 2. Plug the charger into a standard ac outlet. 2. Position the headset on the display or before any calls can make, answer, and end calls as an enhancement. (See Enhancements...
...your phone. Insert the charger output plug into the Pop-Port™ connector at least 3 seconds. Plug the headset connector into the round jack at the bottom end of the phone for at the bottom end of your phone on or off, press and hold the Power key on top of the phone. 6015i....; Use the keypad to enter numbers. • Press Call to place a call. • Press End to top. I Turn on the start screen. 2. Plug the charger into a standard ac outlet. 2. Position the headset on the display or before any calls can make, answer, and end calls as an enhancement. (See Enhancements...
User Guide
Page 17
... Enhancements, 76. Remove the keymat from the rest of your phone You can also plug a compatible headset into the 2.5mm headset jack on ™ covers Note: Before removing the cover, always switch off the power, and disconnect the charger and any other device. I Change Xpress-on the side of... the device, and remove the front cover. 6015i.CNFRv1_Chariot_VMC_JWS_9237202.fm Page 17 Tuesday, January 25, 2005 10:05 AM Set up your phone to remove back cover and battery, see Change...
... Enhancements, 76. Remove the keymat from the rest of your phone You can also plug a compatible headset into the 2.5mm headset jack on ™ covers Note: Before removing the cover, always switch off the power, and disconnect the charger and any other device. I Change Xpress-on the side of... the device, and remove the front cover. 6015i.CNFRv1_Chariot_VMC_JWS_9237202.fm Page 17 Tuesday, January 25, 2005 10:05 AM Set up your phone to remove back cover and battery, see Change...
User Guide
Page 59
...The LPS-4 Loopset (for use with your phone. I Enhancement settings At the start screen, select Menu > Settings > Enhancement settings > Headset, Handsfree, Loopset, TTY/TDD (carrier dependent), or Charger. Select On or Off. 6015i.CNFRv1_Chariot_VMC_JWS_9237202.fm Page 59 Tuesday, January 25..., 2005 10:05 AM Settings Version details-Displays the Phone model, Hardware version, and Software version of your choice, and ...
...The LPS-4 Loopset (for use with your phone. I Enhancement settings At the start screen, select Menu > Settings > Enhancement settings > Headset, Handsfree, Loopset, TTY/TDD (carrier dependent), or Charger. Select On or Off. 6015i.CNFRv1_Chariot_VMC_JWS_9237202.fm Page 59 Tuesday, January 25..., 2005 10:05 AM Settings Version details-Displays the Phone model, Hardware version, and Software version of your choice, and ...

User Guide
Page 61
6015i.CNFRv1_Chariot_VMC_JWS_9237202.fm Page 61 Tuesday, January 25, 2005 10:05 AM Settings 2. Press Call to answer the call 1. When phone lock is activated, Phone locked is locked, calls still may be automatically activated when your phone is connected to the official emergency number programed into your phone.... I Security settings Phone lock The phone lock feature protects your conversation on . 61 Charger Scroll to shut off the phone lock feature. • Lock now-Immediately turns on the phone lock feature. • On power up-Turns on the phone lock feature after several...
6015i.CNFRv1_Chariot_VMC_JWS_9237202.fm Page 61 Tuesday, January 25, 2005 10:05 AM Settings 2. Press Call to answer the call 1. When phone lock is activated, Phone locked is locked, calls still may be automatically activated when your phone is connected to the official emergency number programed into your phone.... I Security settings Phone lock The phone lock feature protects your conversation on . 61 Charger Scroll to shut off the phone lock feature. • Lock now-Immediately turns on the phone lock feature. • On power up-Turns on the phone lock feature after several...

User Guide
Page 78
..., the amount of time that the phone is not an authentic original Nokia battery, you are estimates only and depend on and in digital mode, and many other factors. In digital mode: Standby time-Up to the place of purchase. 78 6015i.CNFRv1_Chariot_VMC_JWS_9237202.fm Page 78 Tuesday, January ... and inspect the hologram label using the ACP-7U charger. I Standby and talk times Battery talk and standby times are getting an original Nokia battery, purchase it to 3.75 hours using the following steps. The amount of time a phone is not a total assurance of the authenticity of ...
..., the amount of time that the phone is not an authentic original Nokia battery, you are estimates only and depend on and in digital mode, and many other factors. In digital mode: Standby time-Up to the place of purchase. 78 6015i.CNFRv1_Chariot_VMC_JWS_9237202.fm Page 78 Tuesday, January ... and inspect the hologram label using the ACP-7U charger. I Standby and talk times Battery talk and standby times are getting an original Nokia battery, purchase it to 3.75 hours using the following steps. The amount of time a phone is not a total assurance of the authenticity of ...

User Manual
Page 5
... 42 Tone settings 42 Enhancement settings 42 Headset 43 Handsfree 43 Loopset 43 Charger 43 Security settings 43 Restrict calls 43 Activate or deactivate phone lock ... 44 Allow numbers when phone locked. 44 Call the allowed phone number.... 45 Lock code 45 Security code 45 Voice privacy 46 Network 46...notes 60 Discard notes 60 Calculator 60 Currency converter 61 Countdown timer 61 Set the countdown timer 61 Change the time 62 Copyright © 2004 Nokia. Gallery (Menu 5 49 Open the gallery 49 View folders 49 10.Games (Menu 6 50 Play a game 50 Game settings 50 Game ...
... 42 Tone settings 42 Enhancement settings 42 Headset 43 Handsfree 43 Loopset 43 Charger 43 Security settings 43 Restrict calls 43 Activate or deactivate phone lock ... 44 Allow numbers when phone locked. 44 Call the allowed phone number.... 45 Lock code 45 Security code 45 Voice privacy 46 Network 46...notes 60 Discard notes 60 Calculator 60 Currency converter 61 Countdown timer 61 Set the countdown timer 61 Change the time 62 Copyright © 2004 Nokia. Gallery (Menu 5 49 Open the gallery 49 View folders 49 10.Games (Menu 6 50 Play a game 50 Game settings 50 Game ...

User Manual
Page 16
... antenna performance and the battery life. ■ Battery Always switch the device off, and disconnect the charger before removing the battery. 6 Copyright © 2004 Nokia. Avoiding contact with the antenna affects call quality and may cause the phone to operate at a higher power level than otherwise needed. Set up your shoulder. All rights...
... antenna performance and the battery life. ■ Battery Always switch the device off, and disconnect the charger before removing the battery. 6 Copyright © 2004 Nokia. Avoiding contact with the antenna affects call quality and may cause the phone to operate at a higher power level than otherwise needed. Set up your shoulder. All rights...

User Manual
Page 18
... for information.) 8 Copyright © 2004 Nokia. To turn your phone on or off 1. Set up your phone. Position the headset on top of your phone Charge the battery 1. You can be purchased with your phone to top. If the battery is completely discharged, it may be made. 2. Plug the charger into the round jack at least...
... for information.) 8 Copyright © 2004 Nokia. To turn your phone on or off 1. Set up your phone. Position the headset on top of your phone Charge the battery 1. You can be purchased with your phone to top. If the battery is completely discharged, it may be made. 2. Plug the charger into the round jack at least...

User Manual
Page 19
... the rest of the front cover away from the old front cover. Copyright © 2004 Nokia. Place the keymat into the finger grip, and lift the battery from its compartment. 2. ...All rights reserved. 9 Remove the back cover With the back of the phone. Install the keymat and front cover 1. Remove the battery After you , push down on ™...; covers Note: Before removing the cover, always switch off the power, and disconnect the charger and any other device. Avoid touching electronic components while changing the covers. Always store and use ...
... the rest of the front cover away from the old front cover. Copyright © 2004 Nokia. Place the keymat into the finger grip, and lift the battery from its compartment. 2. ...All rights reserved. 9 Remove the back cover With the back of the phone. Install the keymat and front cover 1. Remove the battery After you , push down on ™...; covers Note: Before removing the cover, always switch off the power, and disconnect the charger and any other device. Avoid touching electronic components while changing the covers. Always store and use ...

User Manual
Page 52
...> Display brightness. 2. All rights reserved. Settings (Menu 4) Banner Banner is used after a custom time (up to a compatible enhancement. If your phone display. 1. In the standby mode, select Menu > Settings > Display settings > Banner > Default or Personalise. You can change the brightness of your ... page 34 for more information on , the screen saver is activated when no function of the phone is a network service. In the standby mode, select Menu > Settings > Enhancement settings > Headset, Text phone, Handsfree, Loopset, or Charger. 42 Copyright © 2004 Nokia.
...> Display brightness. 2. All rights reserved. Settings (Menu 4) Banner Banner is used after a custom time (up to a compatible enhancement. If your phone display. 1. In the standby mode, select Menu > Settings > Display settings > Banner > Default or Personalise. You can change the brightness of your ... page 34 for more information on , the screen saver is activated when no function of the phone is a network service. In the standby mode, select Menu > Settings > Enhancement settings > Headset, Text phone, Handsfree, Loopset, or Charger. 42 Copyright © 2004 Nokia.

User Manual
Page 53
... to a car kit. Default profile-Choose the profile you wish to be automatically activated when your phone is connected to the charger. Lights-Choose to keep the phone lights always on , or to enter the submenu and modify its settings. Scroll to the option ...of your Settings (Menu 4) choice, and press Select to shut off automatically after several seconds. Automatic answer-Calls are restricted, calls still may be possible Copyright © 2004 Nokia...
... to a car kit. Default profile-Choose the profile you wish to be automatically activated when your phone is connected to the charger. Lights-Choose to keep the phone lights always on , or to enter the submenu and modify its settings. Scroll to the option ...of your Settings (Menu 4) choice, and press Select to shut off automatically after several seconds. Automatic answer-Calls are restricted, calls still may be possible Copyright © 2004 Nokia...

User Manual
Page 78
.... Never use . Do not short-circuit the battery. Temperature extremes can affect the ability of the battery. Use only Nokia approved batteries, and recharge your pocket or purse. All rights reserved. Reference information 16. Reference information This section provides information...is powered by a rechargeable battery. If left unused, a fully charged battery will reduce the capacity and lifetime of your phone's batteries, enhancements, chargers, safety guidelines and technical information. Do not leave the battery connected to keep the battery between 15°C and 25&#...
.... Never use . Do not short-circuit the battery. Temperature extremes can affect the ability of the battery. Use only Nokia approved batteries, and recharge your pocket or purse. All rights reserved. Reference information 16. Reference information This section provides information...is powered by a rechargeable battery. If left unused, a fully charged battery will reduce the capacity and lifetime of your phone's batteries, enhancements, chargers, safety guidelines and technical information. Do not leave the battery connected to keep the battery between 15°C and 25&#...

User Manual
Page 79
... information This section provides information about battery charging times with the Standard Charger (ACP-7), the Mobile Charger (ACP-12), talktimes, and standby times. ACP-12 ACP-7 tions...exposed, and many other factors. Function Talk time Standby time Digital 3.7 hours 12 days Charger op- Do not dispose of batteries according to local regulations. Please recycle when possible. ...information Talk and standby times Operation times are estimates only and depend on signal strength, phone use, network conditions, features used, battery age and condition (including charging habits), ...
... information This section provides information about battery charging times with the Standard Charger (ACP-7), the Mobile Charger (ACP-12), talktimes, and standby times. ACP-12 ACP-7 tions...exposed, and many other factors. Function Talk time Standby time Digital 3.7 hours 12 days Charger op- Do not dispose of batteries according to local regulations. Please recycle when possible. ...information Talk and standby times Operation times are estimates only and depend on signal strength, phone use, network conditions, features used, battery age and condition (including charging habits), ...


