
User Guide
Page 4
Get started 13 Install the SIM card and battery 13 Charge the battery 15 Switch on the Web 12 1. Write text 23 4. Call functions 21 Make and answer a call 21 Loudspeaker 22 Voice messages 22 3. Contents Contents For your safety 6 General information 11 Access codes 11 Shared memory 11 Nokia support on and off 16 Keys and parts 17 Shortcuts in the standby mode 18 Lock the keypad 19 2. Menu functions 25 Messages 25 Contacts...29 Call register 31 Settings ...33 4
Get started 13 Install the SIM card and battery 13 Charge the battery 15 Switch on the Web 12 1. Write text 23 4. Call functions 21 Make and answer a call 21 Loudspeaker 22 Voice messages 22 3. Contents Contents For your safety 6 General information 11 Access codes 11 Shared memory 11 Nokia support on and off 16 Keys and parts 17 Shortcuts in the standby mode 18 Lock the keypad 19 2. Menu functions 25 Messages 25 Contacts...29 Call register 31 Settings ...33 4
User Guide
Page 8
BACK-UP COPIES Remember to do so. 8 Give your safety ENHANCEMENTS AND BATTERIES Use only approved enhancements and batteries. CONNECTING TO OTHER DEVICES When connecting to the start screen. Press the end key as many times as needed to clear the display and return ... or keep a written record of all important information stored in service. Do not end the call key. Do not connect incompatible products. WATER-RESISTANCE Your phone is switched on and in your phone. EMERGENCY CALLS Ensure the phone is not water-resistant.
BACK-UP COPIES Remember to do so. 8 Give your safety ENHANCEMENTS AND BATTERIES Use only approved enhancements and batteries. CONNECTING TO OTHER DEVICES When connecting to the start screen. Press the end key as many times as needed to clear the display and return ... or keep a written record of all important information stored in service. Do not end the call key. Do not connect incompatible products. WATER-RESISTANCE Your phone is switched on and in your phone. EMERGENCY CALLS Ensure the phone is not water-resistant.

User Guide
Page 13
This phone is facing downward (4). Press the release button, and slide the back cover to lock it (1). For availability and information on the upper right side and the gold-colored contact area is intended for use with the BL-5C battery. 1. This may be the service provider, network ...card holder from the finger grip of small children. Keep all SIM cards out of the reach of the phone (3). Lift the battery, and remove it (2). 2. 1. Get started Get started ■ Install the SIM card and battery Always switch the device off and disconnect the charger before removing the...
This phone is facing downward (4). Press the release button, and slide the back cover to lock it (1). For availability and information on the upper right side and the gold-colored contact area is intended for use with the BL-5C battery. 1. This may be the service provider, network ...card holder from the finger grip of small children. Keep all SIM cards out of the reach of the phone (3). Lift the battery, and remove it (2). 2. 1. Get started Get started ■ Install the SIM card and battery Always switch the device off and disconnect the charger before removing the...

User Guide
Page 14
Get started 3. Avoid touching electronic components while changing the covers. Always store and use the device with the covers attached. 14 Note: Always switch off the power and disconnect the charger and any other device before removing the covers. Replace the battery and back cover (6, 7).
Get started 3. Avoid touching electronic components while changing the covers. Always store and use the device with the covers attached. 14 Note: Always switch off the power and disconnect the charger and any other device before removing the covers. Replace the battery and back cover (6, 7).
User Guide
Page 15
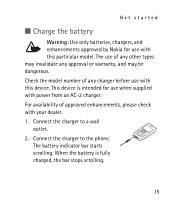
... fully charged, the bar stops scrolling. 15 Connect the charger to the phone. Check the model number of any approval or warranty, and may invalidate any charger before use with this device. The battery indicator bar starts scrolling. The use of approved enhancements, please check with ...power from an AC-2 charger. For availability of any other types may be dangerous. Get started ■ Charge the battery Warning: Use only batteries, chargers, and enhancements approved by Nokia for use when supplied with your dealer. 1. Connect the charger to a wall outlet. 2. When the...
... fully charged, the bar stops scrolling. 15 Connect the charger to the phone. Check the model number of any approval or warranty, and may invalidate any charger before use with this device. The battery indicator bar starts scrolling. The use of approved enhancements, please check with ...power from an AC-2 charger. For availability of any other types may be dangerous. Get started ■ Charge the battery Warning: Use only batteries, chargers, and enhancements approved by Nokia for use when supplied with your dealer. 1. Connect the charger to a wall outlet. 2. When the...
User Guide
Page 16
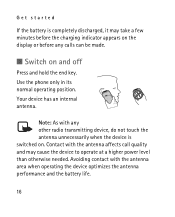
Use the phone only in its normal operating position. Contact with the antenna affects call quality and may take a few minutes before the charging indicator appears on the ... with any calls can be made. ■ Switch on . Note: As with the antenna area when operating the device optimizes the antenna performance and the battery life. 16 Get started If the battery is switched on and off Press and hold the end key.
Use the phone only in its normal operating position. Contact with the antenna affects call quality and may take a few minutes before the charging indicator appears on the ... with any calls can be made. ■ Switch on . Note: As with the antenna area when operating the device optimizes the antenna performance and the battery life. 16 Get started If the battery is switched on and off Press and hold the end key.
User Guide
Page 17
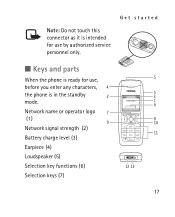
Get started Note: Do not touch this connector as it is intended for use by authorized service personnel only. ■ Keys and parts When the phone is ready for use, before you enter any characters, the phone is in the standby mode. Network name or operator logo (1) Network signal strength (2) Battery charge level (3) Earpiece (4) Loudspeaker (5) Selection key functions (6) Selection keys (7) 17
Get started Note: Do not touch this connector as it is intended for use by authorized service personnel only. ■ Keys and parts When the phone is ready for use, before you enter any characters, the phone is in the standby mode. Network name or operator logo (1) Network signal strength (2) Battery charge level (3) Earpiece (4) Loudspeaker (5) Selection key functions (6) Selection keys (7) 17
User Guide
Page 34
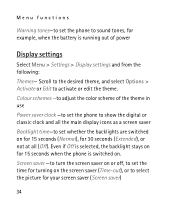
... Warning tones-to set the phone to sound tones, for example, when the battery is switched on the screen saver (Time-out), or to select the picture for your screen saver (Screen saver) 34 Even if Off is selected, the backlight stays on for 15 seconds when the phone is running out of... the theme in use Power saver clock -to set the phone to...
... Warning tones-to set the phone to sound tones, for example, when the battery is switched on the screen saver (Time-out), or to select the picture for your screen saver (Screen saver) 34 Even if Off is selected, the backlight stays on for 15 seconds when the phone is running out of... the theme in use Power saver clock -to set the phone to...
User Guide
Page 35
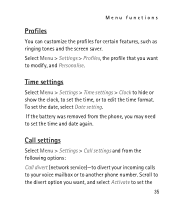
...format. To set the time, or to set the time and date again. Scroll to the divert option you may need to another phone number. If the battery was removed from the following options: Call divert (network service)-to divert your incoming calls to your voice mailbox or to set the... can customize the profiles for certain features, such as ringing tones and the screen saver. Call settings Select Menu > Settings > Call settings and from the phone, you want to set the date, select Date setting. Time settings Select Menu > Settings > Time settings > Clock to hide or show the clock,...
...format. To set the time, or to set the time and date again. Scroll to the divert option you may need to another phone number. If the battery was removed from the following options: Call divert (network service)-to divert your incoming calls to your voice mailbox or to set the... can customize the profiles for certain features, such as ringing tones and the screen saver. Call settings Select Menu > Settings > Call settings and from the phone, you want to set the date, select Date setting. Time settings Select Menu > Settings > Time settings > Clock to hide or show the clock,...
User Guide
Page 45
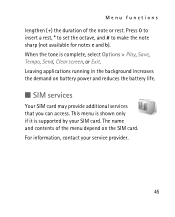
... your SIM card. When the tone is supported by your service provider. 45 Menu functions lengthen (+) the duration of the menu depend on battery power and reduces the battery life. ■ SIM services Your SIM card may provide additional services that you can access. This menu is shown only if it is...
... your SIM card. When the tone is supported by your service provider. 45 Menu functions lengthen (+) the duration of the menu depend on battery power and reduces the battery life. ■ SIM services Your SIM card may provide additional services that you can access. This menu is shown only if it is...
User Guide
Page 46
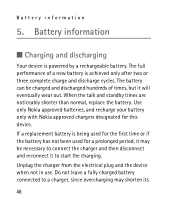
...Nokia approved batteries, and recharge your battery only with Nokia approved chargers designated for a prolonged period, it may shorten its 46 Do not leave a fully charged battery connected to a charger, since overcharging may be charged and discharged hundreds of a new battery is being used for the first time or if the battery...to connect the charger and then disconnect and reconnect it will eventually wear out. The battery can be necessary to start the charging. If a replacement battery is achieved only after two or three complete charge and discharge cycles. When the talk...
...Nokia approved batteries, and recharge your battery only with Nokia approved chargers designated for a prolonged period, it may shorten its 46 Do not leave a fully charged battery connected to a charger, since overcharging may be charged and discharged hundreds of a new battery is being used for the first time or if the battery...to connect the charger and then disconnect and reconnect it will eventually wear out. The battery can be necessary to start the charging. If a replacement battery is achieved only after two or three complete charge and discharge cycles. When the talk...

User Guide
Page 47
... places, such as a coin, clip, or pen causes direct connection of the positive (+) and negative (-) terminals of the battery. Always try to keep the battery between 15°C and 25°C (59°F and 77°F). Short-circuiting the terminals may not work temporarily, even... when the 47 Do not short-circuit the battery. Accidental short-circuiting can be made. Battery information lifetime. If the battery is completely discharged, it may take a few minutes before the charging indicator appears on the...
... places, such as a coin, clip, or pen causes direct connection of the positive (+) and negative (-) terminals of the battery. Always try to keep the battery between 15°C and 25°C (59°F and 77°F). Short-circuiting the terminals may not work temporarily, even... when the 47 Do not short-circuit the battery. Accidental short-circuiting can be made. Battery information lifetime. If the battery is completely discharged, it may take a few minutes before the charging indicator appears on the...

User Guide
Page 48
... possible. Do not dispose as they may also explode if damaged. Battery performance is particularly limited in a fire as household waste. ■ Nokia battery authentication guidelines Always use original Nokia batteries for your battery is not an authentic original Nokia battery, you are getting an original Nokia battery, purchase it from using it and take it to local regulations. To...
... possible. Do not dispose as they may also explode if damaged. Battery performance is particularly limited in a fire as household waste. ■ Nokia battery authentication guidelines Always use original Nokia batteries for your battery is not an authentic original Nokia battery, you are getting an original Nokia battery, purchase it from using it and take it to local regulations. To...

User Guide
Page 49
When looking at the hologram on the label, you should see 1, 2, 3, and 4 dots on each side respectively. 49 Authenticate hologram 1. Battery information dealer will inspect the battery for authenticity. When you angle the hologram left, right, down, and up, you should see the Nokia connecting hands symbol from one angle and the Nokia Original Enhancements logo when looking from another angle. 2. If authenticity cannot be verified, return the battery to the place of purchase.
When looking at the hologram on the label, you should see 1, 2, 3, and 4 dots on each side respectively. 49 Authenticate hologram 1. Battery information dealer will inspect the battery for authenticity. When you angle the hologram left, right, down, and up, you should see the Nokia connecting hands symbol from one angle and the Nokia Original Enhancements logo when looking from another angle. 2. If authenticity cannot be verified, return the battery to the place of purchase.

User Guide
Page 50
Confirm that the numbers are facing upwards. Turn the battery so that the 20-digit code is valid by following the instructions at the top row followed by the bottom row. 4. Battery information 3. The 20-digit code reads starting from the number at www.nokia.com/ batterycheck. 50 Scratch the side of the label to reveal a 20-digit code, for example, 12345678919876543210.
Confirm that the numbers are facing upwards. Turn the battery so that the 20-digit code is valid by following the instructions at the top row followed by the bottom row. 4. Battery information 3. The 20-digit code reads starting from the number at www.nokia.com/ batterycheck. 50 Scratch the side of the label to reveal a 20-digit code, for example, 12345678919876543210.
User Guide
Page 51
... out more about original Nokia batteries, visit www.nokia.com/battery. 51 National and international operator charges will apply. Take it to the nearest authorized Nokia service point or dealer for example, 12345678919876543210, and send to your Nokia battery with the hologram on the label is an authentic Nokia battery, please do not use the battery. If you cannot confirm...
... out more about original Nokia batteries, visit www.nokia.com/battery. 51 National and international operator charges will apply. Take it to the nearest authorized Nokia service point or dealer for example, 12345678919876543210, and send to your Nokia battery with the hologram on the label is an authentic Nokia battery, please do not use the battery. If you cannot confirm...

User Guide
Page 53
...not store the device in dusty, dirty areas. High temperatures can contain minerals that will help you protect your device does get wet, remove the battery, and allow the device to dry completely before replacing it. • Do not use or store the device in hot areas. Care and ...maintenance Care and maintenance Your device is a product of electronic devices, damage batteries, and warp or melt certain plastics. 53 If your warranty coverage. • Keep the device dry. Its moving parts and electronic components can be ...
...not store the device in dusty, dirty areas. High temperatures can contain minerals that will help you protect your device does get wet, remove the battery, and allow the device to dry completely before replacing it. • Do not use or store the device in hot areas. Care and ...maintenance Care and maintenance Your device is a product of electronic devices, damage batteries, and warp or melt certain plastics. 53 If your warranty coverage. • Keep the device dry. Its moving parts and electronic components can be ...

User Guide
Page 55
If any enhancement. Care and maintenance All of the above suggestions apply equally to your device, battery, charger, or any device is not working properly, take it to the nearest authorized service facility for service. 55
If any enhancement. Care and maintenance All of the above suggestions apply equally to your device, battery, charger, or any device is not working properly, take it to the nearest authorized service facility for service. 55


