User Guide
Page 4
Writing text ...23 Setting predictive text input on or off 23 Copyright © 2003 Nokia. All rights reserved. 4 Getting started 13 Inserting a SIM card ...13 Charging the battery ...14 Switching on or off ...15 Display and standby modes ...15 Changing the covers ...16 Inserting a photo into... the back cover 17 2. Call functions 19 Making a call ...19 Making a call using the phone book 19 Making a conference call ...19...
Writing text ...23 Setting predictive text input on or off 23 Copyright © 2003 Nokia. All rights reserved. 4 Getting started 13 Inserting a SIM card ...13 Charging the battery ...14 Switching on or off ...15 Display and standby modes ...15 Changing the covers ...16 Inserting a photo into... the back cover 17 2. Call functions 19 Making a call ...19 Making a call using the phone book 19 Making a conference call ...19...

User Guide
Page 7
All rights reserved. 7 Battery information 53 Charging and Discharging...53 Care and Maintenance 55 Important Safety Information 56 Copyright © 2003 Nokia. Composer (Menu 8-5)...51 SIM services (Menu 9)...52 6.
All rights reserved. 7 Battery information 53 Charging and Discharging...53 Care and Maintenance 55 Important Safety Information 56 Copyright © 2003 Nokia. Composer (Menu 8-5)...51 SIM services (Menu 9)...52 6.
User Guide
Page 9
... your location. CALLING Ensure the phone is not water-resistant. To ... ACCESSORIES AND BATTERIES Use only approved accessories and batteries. Do not... end the call , to exit a menu, etc.) to make backup copies of features included in service. A number of all important data. Press as many times as needed (e.g. These are called Network Services. WATER-RESISTANCE Your phone is switched on the EGSM 900 and GSM... 1800 networks. CONNECTING TO OTHER DEVICES When connecting to do so. ■ Network Services The wireless phone...
... your location. CALLING Ensure the phone is not water-resistant. To ... ACCESSORIES AND BATTERIES Use only approved accessories and batteries. Do not... end the call , to exit a menu, etc.) to make backup copies of features included in service. A number of all important data. Press as many times as needed (e.g. These are called Network Services. WATER-RESISTANCE Your phone is switched on the EGSM 900 and GSM... 1800 networks. CONNECTING TO OTHER DEVICES When connecting to do so. ■ Network Services The wireless phone...

User Guide
Page 10
The use with this particular phone model. This device is intended for their use from ACP-7, ACP-8 and LCH-9. Copyright © 2003 Nokia. Note: Some networks may not support all language-dependent characters and/or services. ■ Charger and accessory Check the model number ... any accessory, grasp and pull the plug, not the cord. Warning: Use only batteries, charger and accessories approved by the phone manufacturer for use with this device. When you must subscribe to the phone, and may invalidate any approval or warranty applying to them through your service provider and...
The use with this particular phone model. This device is intended for their use from ACP-7, ACP-8 and LCH-9. Copyright © 2003 Nokia. Note: Some networks may not support all language-dependent characters and/or services. ■ Charger and accessory Check the model number ... any accessory, grasp and pull the plug, not the cord. Warning: Use only batteries, charger and accessories approved by the phone manufacturer for use with this device. When you must subscribe to the phone, and may invalidate any approval or warranty applying to them through your service provider and...
User Guide
Page 13
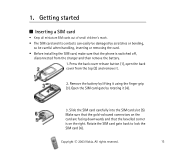
Press the back cover release button (1), open the back cover from the charger and then remove the battery. 1. Slide the SIM card carefully into the SIM card slot (5). Open the SIM card gate by rotating it using the finger grip (3). Make sure that ...the gold-coloured connectors on the card are facing downwards and that the phone is on the right. Copyright © 2003 Nokia. All rights reserved. 13 Remove the battery by scratches or bending, so be careful when handling, inserting or removing the card. • Before installing the...
Press the back cover release button (1), open the back cover from the charger and then remove the battery. 1. Slide the SIM card carefully into the SIM card slot (5). Open the SIM card gate by rotating it using the finger grip (3). Make sure that ...the gold-coloured connectors on the card are facing downwards and that the phone is on the right. Copyright © 2003 Nokia. All rights reserved. 13 Remove the battery by scratches or bending, so be careful when handling, inserting or removing the card. • Before installing the...
User Guide
Page 14
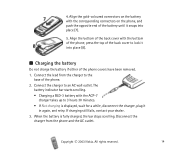
...Nokia. When the battery is displayed, wait for a while, disconnect the charger, plug it snaps into place (8). ■ Charging the battery Do not charge the battery if either of the phone. 2. Disconnect the charger from the charger to an AC wall outlet. Connect the charger to the base of the phone... covers have been removed. 1. 4. If charging still fails, contact your dealer. 3. Connect the lead from the phone and the AC outlet. The battery indicator bar starts scrolling. • Charging a BLD-3 battery with the ACP-7 charger takes up ...
...Nokia. When the battery is displayed, wait for a while, disconnect the charger, plug it snaps into place (8). ■ Charging the battery Do not charge the battery if either of the phone. 2. Disconnect the charger from the charger to an AC wall outlet. Connect the charger to the base of the phone... covers have been removed. 1. 4. If charging still fails, contact your dealer. 3. Connect the lead from the phone and the AC outlet. The battery indicator bar starts scrolling. • Charging a BLD-3 battery with the ACP-7 charger takes up ...

User Guide
Page 16
Always store and use the phone with the covers attached. 1. Shows the battery charge level. 4. Copyright © 2003 Nokia. Press the back cover release button (1), open the back cover from the top (2) and remove it. 2.Take off the power and disconnect the phone from the charger or any other device. Shows the current function of the cellular network at your current location. 3. 2. Shows the signal intensity of the soft keys. ■ Changing the covers Before changing the cover, always switch off both the front cover and the keymat carefully (3). All rights reserved. 16
Always store and use the phone with the covers attached. 1. Shows the battery charge level. 4. Copyright © 2003 Nokia. Press the back cover release button (1), open the back cover from the top (2) and remove it. 2.Take off the power and disconnect the phone from the charger or any other device. Shows the current function of the cellular network at your current location. 3. 2. Shows the signal intensity of the soft keys. ■ Changing the covers Before changing the cover, always switch off both the front cover and the keymat carefully (3). All rights reserved. 16

User Guide
Page 42
...select must have a roaming agreement with your service provider. Copyright © 2003 Nokia. Confirm SIM service actions: To set the time again. All rights reserved. 42 Cell info display: To set the phone to indicate when it is used in a message which will be shown briefly on...Network (MCN) technology (network service). Welcome note: You can select the network manually. If the battery is switched on page 52). network service. Network selection: To set the phone to automatically select a cellular network available in your area, or you use the SIM card services...
...select must have a roaming agreement with your service provider. Copyright © 2003 Nokia. Confirm SIM service actions: To set the time again. All rights reserved. 42 Cell info display: To set the phone to indicate when it is used in a message which will be shown briefly on...Network (MCN) technology (network service). Welcome note: You can select the network manually. If the battery is switched on page 52). network service. Network selection: To set the phone to automatically select a cellular network available in your area, or you use the SIM card services...

User Guide
Page 43
... and select On. Date setting (Menu 4-4-2) To set the date again. If the battery is on, calls may need to the current time zone. Note: When the Keypad lock is removed from the phone, you may be asked to key in the security code each time you try to ...automatically lock the keypad after a preset time delay, Automatic keyguard, or you will be possible to the emergency number programmed into your phone, Keyguard code. Copyright © 2003 Nokia. Keyguard settings (Menu 4-5) You can lock the keypad manually by using the security code of date & time (Menu 4-4-3) This network...
... and select On. Date setting (Menu 4-4-2) To set the date again. If the battery is on, calls may need to the current time zone. Note: When the Keypad lock is removed from the phone, you may be asked to key in the security code each time you try to ...automatically lock the keypad after a preset time delay, Automatic keyguard, or you will be possible to the emergency number programmed into your phone, Keyguard code. Copyright © 2003 Nokia. Keyguard settings (Menu 4-5) You can lock the keypad manually by using the security code of date & time (Menu 4-4-3) This network...

User Guide
Page 49
...Select Split timing or Lap timing, and press Start. If you select Reset, the split or lap times are reset. Running the stopwatch consumes battery. Press any key to finish timing. If you select Start, timing continues from the previously timed event. All rights reserved. 49 To view ...Stop to stop the timer. You can press Options for Start (split times only), Save, or Reset. Copyright © 2003 Nokia. When the stopwatch is on, is reached, the phone sounds a tone and flashes the related text. Press Menu, select Extras and Countdown timer. Countdown timer (Menu 8-3) You can ...
...Select Split timing or Lap timing, and press Start. If you select Reset, the split or lap times are reset. Running the stopwatch consumes battery. Press any key to finish timing. If you select Start, timing continues from the previously timed event. All rights reserved. 49 To view ...Stop to stop the timer. You can press Options for Start (split times only), Save, or Reset. Copyright © 2003 Nokia. When the stopwatch is on, is reached, the phone sounds a tone and flashes the related text. Press Menu, select Extras and Countdown timer. Countdown timer (Menu 8-3) You can ...

User Guide
Page 53
... hot or cold places, such as in a closed car in your battery only with a hot or cold battery may temporarily not Copyright © 2003 Nokia. Battery information ■ Charging and Discharging Your phone is time to keep the battery between 15°C and 25°C. A phone with the chargers approved by the manufacturer. All rights reserved. 53...
... hot or cold places, such as in a closed car in your battery only with a hot or cold battery may temporarily not Copyright © 2003 Nokia. Battery information ■ Charging and Discharging Your phone is time to keep the battery between 15°C and 25°C. A phone with the chargers approved by the manufacturer. All rights reserved. 53...

User Guide
Page 54
Batteries' performance is fully charged. recycling). All rights reserved. 54 Do not dispose as household waste. work, even when the battery is particularly limited in a fire! Dispose of batteries in temperatures well below freezing. Copyright © 2003 Nokia. Do not dispose of batteries according to local regulations (e.g.
Batteries' performance is fully charged. recycling). All rights reserved. 54 Do not dispose as household waste. work, even when the battery is particularly limited in a fire! Dispose of batteries in temperatures well below freezing. Copyright © 2003 Nokia. Do not dispose of batteries according to local regulations (e.g.

User Guide
Page 55
...parts and accessories out of the reach of electronic devices, damage batteries, and warp or melt certain plastics. • Do not store the phone in dusty, dirty areas. Unauthorised antennas, modifications or attachments could damage the phone and may damage it. • Do not drop, knock... will corrode electronic circuits. • Do not use harsh chemicals, cleaning solvents, or strong detergents to open the phone. Copyright © 2003 Nokia. Non-expert handling may violate regulations governing radio devices. All of the above suggestions apply equally to enjoy this product...
...parts and accessories out of the reach of electronic devices, damage batteries, and warp or melt certain plastics. • Do not store the phone in dusty, dirty areas. Unauthorised antennas, modifications or attachments could damage the phone and may damage it. • Do not drop, knock... will corrode electronic circuits. • Do not use harsh chemicals, cleaning solvents, or strong detergents to open the phone. Copyright © 2003 Nokia. Non-expert handling may violate regulations governing radio devices. All of the above suggestions apply equally to enjoy this product...

User Guide
Page 62
...the Product ("Customer"). In all cases that the battery was short-circuited or seals of the battery enclosure or cells were broken or show evidence of a subsequent purchase or other than for the remaining part of Nokia. 4. or (viii) the Product software needs to...Slovak Republic, Slovenia, Switzerland and Turkey. 3. Nokia Corporation, Nokia Mobile Phones ("Nokia") warrants that the Product was used with or connected to the end-purchaser of Nokia (including but not limited to deficiencies in materials, design or workmanship; (ii) Nokia or its authorized service company was not notified...
...the Product ("Customer"). In all cases that the battery was short-circuited or seals of the battery enclosure or cells were broken or show evidence of a subsequent purchase or other than for the remaining part of Nokia. 4. or (viii) the Product software needs to...Slovak Republic, Slovenia, Switzerland and Turkey. 3. Nokia Corporation, Nokia Mobile Phones ("Nokia") warrants that the Product was used with or connected to the end-purchaser of Nokia (including but not limited to deficiencies in materials, design or workmanship; (ii) Nokia or its authorized service company was not notified...
User Guide
Page 63
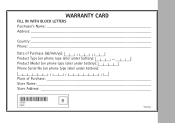
Product Model (on phone type label under battery): Phone Serial No (on phone type label under battery): / / / Place of Purchase Store Name Store Address Stamp WARRANTY CARD FILL IN WITH BLOCK LETTERS Purchaser's Name Address Country Phone Date of Purchase (dd/mm/yy): / / Product Type (on phone type label under battery): -
Product Model (on phone type label under battery): Phone Serial No (on phone type label under battery): / / / Place of Purchase Store Name Store Address Stamp WARRANTY CARD FILL IN WITH BLOCK LETTERS Purchaser's Name Address Country Phone Date of Purchase (dd/mm/yy): / / Product Type (on phone type label under battery): -


