Instruction Booklet
Page 2
... plug and not on the smallest available television screen. 3. WARNING: PLEASE CAREFULLY READ THE SEPARATE HEALTH AND SAFETY PRECAUTIONS BOOKLET INCLUDED WITH THIS PRODUCT BEFORE USING YOUR NINTENDO® HARDWARE SYSTEM, GAME DISC OR ACCESSORY. NOTE: This product only plays Nintendo GameCube Game ... specified herein may result in 4000) may be a risk of a seizure when playing video games: 1. Motion Sickness Playing video games can make your Nintendo GameCube system. THIS BOOKLET CONTAINS IMPORTANT HEALTH AND SAFETY INFORMATION. IMPORTANT SAFETY INFORMATION: READ THE FOLLOWING ...
... plug and not on the smallest available television screen. 3. WARNING: PLEASE CAREFULLY READ THE SEPARATE HEALTH AND SAFETY PRECAUTIONS BOOKLET INCLUDED WITH THIS PRODUCT BEFORE USING YOUR NINTENDO® HARDWARE SYSTEM, GAME DISC OR ACCESSORY. NOTE: This product only plays Nintendo GameCube Game ... specified herein may result in 4000) may be a risk of a seizure when playing video games: 1. Motion Sickness Playing video games can make your Nintendo GameCube system. THIS BOOKLET CONTAINS IMPORTANT HEALTH AND SAFETY INFORMATION. IMPORTANT SAFETY INFORMATION: READ THE FOLLOWING ...

Instruction Booklet
Page 5
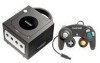
...VIEWS DC Jack Connects to DC Input Connector on back of the Nintendo GameCube Nintendo Stereo AV Cable Connects to A/V input connectors on TV or VCR Video (Yellow) Audio Left (White) Audio Right (Red) AC Plug Connects to 120V AC wall outlet Exhaust Intake Vent Vent NOTE:...or obstructed. 4 Analog AV Out Connector Plug Connects to ANALOG AV OUT connector (Multi Out connector) on back of modem or broadband adapter (Sold separately, see back cover for purchasing information). 1• COMPONENTS BOTTOM VIEW High Speed Port Nintendo GameCube AC Adapter 1• COMPONENTS Serial Port...
...VIEWS DC Jack Connects to DC Input Connector on back of the Nintendo GameCube Nintendo Stereo AV Cable Connects to A/V input connectors on TV or VCR Video (Yellow) Audio Left (White) Audio Right (Red) AC Plug Connects to 120V AC wall outlet Exhaust Intake Vent Vent NOTE:...or obstructed. 4 Analog AV Out Connector Plug Connects to ANALOG AV OUT connector (Multi Out connector) on back of modem or broadband adapter (Sold separately, see back cover for purchasing information). 1• COMPONENTS BOTTOM VIEW High Speed Port Nintendo GameCube AC Adapter 1• COMPONENTS Serial Port...
Instruction Booklet
Page 6
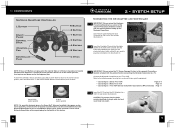
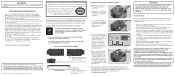
... during game play. Connect the Nintendo GameCube to the correct neutral position, then hold down the X, Y and START/PAUSE Buttons simultaneously for availability of this feature. 6 2 • SYSTEM SETUP Connecting the AC Adapter and Controller IMPORTANT: Please review the Hardware 1 Precautions/Maintenance section of the console. (Illustration 1) 1 Insert the Controller Plug into outlet. 3 7 1• COMPONENTS Nintendo GameCube...
... during game play. Connect the Nintendo GameCube to the correct neutral position, then hold down the X, Y and START/PAUSE Buttons simultaneously for availability of this feature. 6 2 • SYSTEM SETUP Connecting the AC Adapter and Controller IMPORTANT: Please review the Hardware 1 Precautions/Maintenance section of the console. (Illustration 1) 1 Insert the Controller Plug into outlet. 3 7 1• COMPONENTS Nintendo GameCube...
Instruction Booklet
Page 7
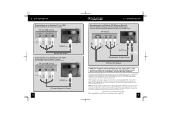
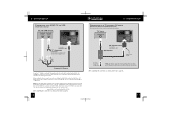
...as shown, please turn to page 12. 9 Please see your Nintendo GameCube software instruction booklet for purchasing information.) TV or VCR Inputs S-VIDEO IN AUDIO IN LEFT RIGHT S-Video Audio Left (White) Audio Right (Red) To console ANALOG AV OUT S-Video Stereo AV Cable 8 2 •... SYSTEM SETUP Connecting to a Stereo TV (Digital Ready) Using a Stereo AV Cable and Component Video Cable (For Nintendo GameCube Model No. The yellow Video plug is plugged into the "IN" or "INPUT" connectors on input select. NOTE: For the game...
...as shown, please turn to page 12. 9 Please see your Nintendo GameCube software instruction booklet for purchasing information.) TV or VCR Inputs S-VIDEO IN AUDIO IN LEFT RIGHT S-Video Audio Left (White) Audio Right (Red) To console ANALOG AV OUT S-Video Stereo AV Cable 8 2 •... SYSTEM SETUP Connecting to a Stereo TV (Digital Ready) Using a Stereo AV Cable and Component Video Cable (For Nintendo GameCube Model No. The yellow Video plug is plugged into the "IN" or "INPUT" connectors on input select. NOTE: For the game...
Instruction Booklet
Page 8
... more information on your TV or VCR, although some sound will work with the Nintendo GameCube. After completing the connections as shown, please turn to page 12. 11 Leave the unused plug unconnected. NOTE: For the game image to appear on the TV when using the Stereo AV Cable, you must..., please turn to page 12. 10 RF Modulator To console ANALOG AV OUT RF Switch Channel 3/4 Switch Existing Cable TV Connection NOTE: All Nintendo brand RF Switches (NES, SNES and N64) and RF Modulators (N64) will be absent during game play. Accessing input select is optional. See page 12 ...
... more information on your TV or VCR, although some sound will work with the Nintendo GameCube. After completing the connections as shown, please turn to page 12. 11 Leave the unused plug unconnected. NOTE: For the game image to appear on the TV when using the Stereo AV Cable, you must..., please turn to page 12. 10 RF Modulator To console ANALOG AV OUT RF Switch Channel 3/4 Switch Existing Cable TV Connection NOTE: All Nintendo brand RF Switches (NES, SNES and N64) and RF Modulators (N64) will be absent during game play. Accessing input select is optional. See page 12 ...
Instruction Booklet
Page 9
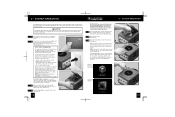
...logo screen on your TV, review Step 2 or go to set the appropriate "Input Select" setting for input select are properly plugged into the disc compartment and onto the center hub (Illustration 4). Once the system is properly located, continue with this would be between...the instructions below , will need to the Troubleshooting section on your TV or VCR. 1 Usually this product before using Nintendo GameCube Discs. 5 Place the Game Disc, printed side up, into the console and the wall outlet. (Illustration 2) 3 4 Press the Open Button to 3. 3 • SYSTEM OPERATION After ...
...logo screen on your TV, review Step 2 or go to set the appropriate "Input Select" setting for input select are properly plugged into the disc compartment and onto the center hub (Illustration 4). Once the system is properly located, continue with this would be between...the instructions below , will need to the Troubleshooting section on your TV or VCR. 1 Usually this product before using Nintendo GameCube Discs. 5 Place the Game Disc, printed side up, into the console and the wall outlet. (Illustration 2) 3 4 Press the Open Button to 3. 3 • SYSTEM OPERATION After ...
Instruction Booklet
Page 12
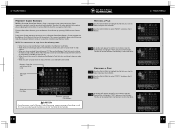
...console. Use the 3 Control Stick to select "COPY" and press the A 2 Button. Use the Control Stick to highlight "YES" and press the A Button. Press the A Button to select "MOVE" and press the A 2 Button. Use the Control Stick to display the status of any Nintendo GameCube Memory Cards plugged... your choice. A window will appear to confirm your choice. 4• MAIN MENU Memory Card Screen NOTE: A Nintendo GameCube Memory Card is required to save game information (Sold separately, see below) allows you to move or copy files between Memory Cards, or erase files stored...
...console. Use the 3 Control Stick to select "COPY" and press the A 2 Button. Use the Control Stick to highlight "YES" and press the A Button. Press the A Button to select "MOVE" and press the A 2 Button. Use the Control Stick to display the status of any Nintendo GameCube Memory Cards plugged... your choice. A window will appear to confirm your choice. 4• MAIN MENU Memory Card Screen NOTE: A Nintendo GameCube Memory Card is required to save game information (Sold separately, see below) allows you to move or copy files between Memory Cards, or erase files stored...
Instruction Booklet
Page 13
... the Game Disc will appear to highlight "YES" and press the A Button. NOTE: If you format a Memory Card, all cable connectors are securely plugged into the console. • Check to be using a Component Video cable (sold separately, visit our web site at www.nintendo.com or call 1-800-255-3700) to connect the Nintendo GameCube to...
... the Game Disc will appear to highlight "YES" and press the A Button. NOTE: If you format a Memory Card, all cable connectors are securely plugged into the console. • Check to be using a Component Video cable (sold separately, visit our web site at www.nintendo.com or call 1-800-255-3700) to connect the Nintendo GameCube to...
Instruction Booklet
Page 14
... and review pages 8-10 to be sure the system is set up correctly. • If you are using a Stereo AV Cable, make sure it is plugged into the "Input" connectors on the TV or VCR, not the "Output" connectors. • Make sure that can only be a problem with the controllers or... and solutions: PROBLEM Picture is rolling or has bars or lines. Turn the console power ON. • Remove all game sounds. Sound is turned OFF. • If using the Stereo AV Cable or Component Video cable (only used on Nintendo GameCube Model No. Use a "Y" Adapter to get both left one of the audio cables...
... and review pages 8-10 to be sure the system is set up correctly. • If you are using a Stereo AV Cable, make sure it is plugged into the "Input" connectors on the TV or VCR, not the "Output" connectors. • Make sure that can only be a problem with the controllers or... and solutions: PROBLEM Picture is rolling or has bars or lines. Turn the console power ON. • Remove all game sounds. Sound is turned OFF. • If using the Stereo AV Cable or Component Video cable (only used on Nintendo GameCube Model No. Use a "Y" Adapter to get both left one of the audio cables...
Instruction Booklet
Page 15
... area of liquid over controller. 24 6 • ERROR MESSAGES Error Message Procedure If the Nintendo GameCube detects a error in , or pour any controllers into the console. • Insert the Controller Plug completely into cracks. 4. Open the Disc Cover, remove the disc and check for contamination, dirt...console. 2. Turn the power OFF and check the Nintendo GameCube Instruction Booklet for how to display only in hot water and shake off , check the Controller Socket and Controller Plug for dirt, dust or other irregularities. If your TV to set the time and date. PROCEDURE The Game...
... area of liquid over controller. 24 6 • ERROR MESSAGES Error Message Procedure If the Nintendo GameCube detects a error in , or pour any controllers into the console. • Insert the Controller Plug completely into cracks. 4. Open the Disc Cover, remove the disc and check for contamination, dirt...console. 2. Turn the power OFF and check the Nintendo GameCube Instruction Booklet for how to display only in hot water and shake off , check the Controller Socket and Controller Plug for dirt, dust or other irregularities. If your TV to set the time and date. PROCEDURE The Game...
Setup Guide
Page 1
...a long period of time, unplug it from the console, wall outlet, Modem Adapter or phone jack, first turn the Nintendo GameCube off. If you have a "call waiting" service before using the phone connection for the game you while the Modem Adapter is fully inserted into....nintendo.com/online. Plug one end of the enclosed Telephone Cord into the connector of the Modem Adapter on the bottom of the Nintendo GameCube is fully inserted into the opening on the Nintendo GameCube Modem Adapter. ISP compatibility may need : Modem • A Nintendo GameCube game designed for online game play...
...a long period of time, unplug it from the console, wall outlet, Modem Adapter or phone jack, first turn the Nintendo GameCube off. If you have a "call waiting" service before using the phone connection for the game you while the Modem Adapter is fully inserted into....nintendo.com/online. Plug one end of the enclosed Telephone Cord into the connector of the Modem Adapter on the bottom of the Nintendo GameCube is fully inserted into the opening on the Nintendo GameCube Modem Adapter. ISP compatibility may need : Modem • A Nintendo GameCube game designed for online game play...
Setup Guide
Page 2
... of devices subject only to connect this three (3) month warranty period, Nintendo or a NINTENDO AUTHORIZED REPAIR CENTER will not occur in material and workmanship for help. On the outside of purchase. A plug and jack used to the requirement that may cause undesired operation. A... WARRANTY LIMITATIONS THIS WARRANTY SHALL NOT APPLY IF THIS PRODUCT: (a) IS USED WITH PRODUCTS NOT SOLD OR LICENSED BY NINTENDO (INCLUDING, BUT NOT LIMITED TO, NON-LICENSED GAME ENHANCEMENT AND COPIER DEVICES, ADAPTERS, AND POWER SUPPLIES); (b) IS USED FOR COMMERCIAL PURPOSES (INCLUDING RENTAL); (c) IS ...
... of devices subject only to connect this three (3) month warranty period, Nintendo or a NINTENDO AUTHORIZED REPAIR CENTER will not occur in material and workmanship for help. On the outside of purchase. A plug and jack used to the requirement that may cause undesired operation. A... WARRANTY LIMITATIONS THIS WARRANTY SHALL NOT APPLY IF THIS PRODUCT: (a) IS USED WITH PRODUCTS NOT SOLD OR LICENSED BY NINTENDO (INCLUDING, BUT NOT LIMITED TO, NON-LICENSED GAME ENHANCEMENT AND COPIER DEVICES, ADAPTERS, AND POWER SUPPLIES); (b) IS USED FOR COMMERCIAL PURPOSES (INCLUDING RENTAL); (c) IS ...