Instruction Booklet
Page 2
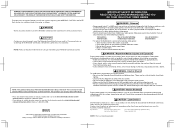
...and rest them . Play video games on the cord. NOTE: This product only plays Nintendo GameCube Game Discs that parents monitor their children play if you feel dizzy or nauseous when playing video games with your Nintendo GameCube system. Laser Device The Nintendo GameCube is recommended that have sore hands,... these instructions to disassemble the Nintendo GameCube. CAUTION - If you about 1 in hazardous radiation exposure. Do not drive or engage in other than those specified herein may result in 4000) may be a risk of controls or adjustments or procedures other ...
...and rest them . Play video games on the cord. NOTE: This product only plays Nintendo GameCube Game Discs that parents monitor their children play if you feel dizzy or nauseous when playing video games with your Nintendo GameCube system. Laser Device The Nintendo GameCube is recommended that have sore hands,... these instructions to disassemble the Nintendo GameCube. CAUTION - If you about 1 in hazardous radiation exposure. Do not drive or engage in other than those specified herein may result in 4000) may be a risk of controls or adjustments or procedures other ...

Instruction Booklet
Page 3
...TV/VCR 10 Connecting to a TV without the Official Nintendo Seal. CONTENTS Section 1 Section 2 Section 3 Section 4 Section 5 Section 6 Section 7 Section 8 Components Nintendo GameCube 2-4 AC Adapter 5 Stereo Audio/Video Cable 5 Controller 6 System Setup Connecting the AC Adapter & Controller 7 Connecting to a Stereo TV/VCR using a ... the Nintendo GameCube system or components. The official seal is your system, please refer to the consumer assistance information on the bottom of this seal when buying video game systems, accessories, games and related products. Nintendo does ...
...TV/VCR 10 Connecting to a TV without the Official Nintendo Seal. CONTENTS Section 1 Section 2 Section 3 Section 4 Section 5 Section 6 Section 7 Section 8 Components Nintendo GameCube 2-4 AC Adapter 5 Stereo Audio/Video Cable 5 Controller 6 System Setup Connecting the AC Adapter & Controller 7 Connecting to a Stereo TV/VCR using a ... the Nintendo GameCube system or components. The official seal is your system, please refer to the consumer assistance information on the bottom of this seal when buying video game systems, accessories, games and related products. Nintendo does ...
Instruction Booklet
Page 4
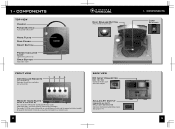
... Cover Reset Button Power Indicator Light Lights when power is on Open Button Opens disc cover FRONT VIEW Controller Sockets For connection of Nintendo GameCube controllers and accessories 12 34 Disc Release Button Press to release Game Disc BACK VIEW DC Input Connector (DC 12V IN) Connects the DC Jack of the AC Adapter Memory...
... Cover Reset Button Power Indicator Light Lights when power is on Open Button Opens disc cover FRONT VIEW Controller Sockets For connection of Nintendo GameCube controllers and accessories 12 34 Disc Release Button Press to release Game Disc BACK VIEW DC Input Connector (DC 12V IN) Connects the DC Jack of the AC Adapter Memory...
Instruction Booklet
Page 6
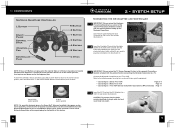
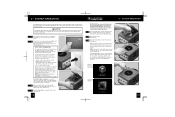
... Booklet included with this product before setting up the Nintendo GameCube. Please check Nintendo GameCube software packaging for purchasing information) can be set as an additional game screen and/or controller. Insert the DC Jack into the DC Input Connector on the front of the console. Connect the Nintendo GameCube to the correct neutral position, then hold down the...
... Booklet included with this product before setting up the Nintendo GameCube. Please check Nintendo GameCube software packaging for purchasing information) can be set as an additional game screen and/or controller. Insert the DC Jack into the DC Input Connector on the front of the console. Connect the Nintendo GameCube to the correct neutral position, then hold down the...
Instruction Booklet
Page 9
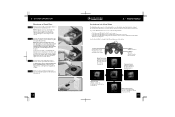
... located, continue with this would be between the different inputs on your TV or VCR. 1 Usually this product before using Nintendo GameCube Discs. 5 Place the Game Disc, printed side up, into the console and the wall outlet. (Illustration 2) 3 4 Press the Open Button to open the Disc Cover. (Illustration 3) VIDEO ...of the TV or VCR. • A button on the remote control. • A high-numbered or low numbered channel (92, 99, 00, or 02) on the TV or VCR. • An on the Main Menu screens. 5 Nintendo GameCube logo screen Main Menu Screen 6 13 See pages 15-20 for ...
... located, continue with this would be between the different inputs on your TV or VCR. 1 Usually this product before using Nintendo GameCube Discs. 5 Place the Game Disc, printed side up, into the console and the wall outlet. (Illustration 2) 3 4 Press the Open Button to open the Disc Cover. (Illustration 3) VIDEO ...of the TV or VCR. • A button on the remote control. • A high-numbered or low numbered channel (92, 99, 00, or 02) on the TV or VCR. • An on the Main Menu screens. 5 Nintendo GameCube logo screen Main Menu Screen 6 13 See pages 15-20 for ...
Instruction Booklet
Page 10
...; Highlight menu item • Change menu setting Game Play Screen Displays information about the Game Disc currently loaded into the Nintendo GameCube, set the date and time, see information about the Game Disc loaded into the console. If this happens, wait until the Main Menu Screen appears.) Use the Control Stick to change to the different menus...
...; Highlight menu item • Change menu setting Game Play Screen Displays information about the Game Disc currently loaded into the Nintendo GameCube, set the date and time, see information about the Game Disc loaded into the console. If this happens, wait until the Main Menu Screen appears.) Use the Control Stick to change to the different menus...

Instruction Booklet
Page 11
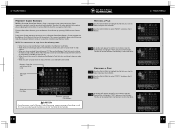
... B Button before accepting your menu item and press the A Button to display information about the Game Disc that is currently loaded into the Nintendo GameCube. Press the B Button to return to accept. 4 • MAIN MENU Game Play Screen From the Main Menu Screen, go to the Option Screen by pushing LEFT on the Control Stick.
... B Button before accepting your menu item and press the A Button to display information about the Game Disc that is currently loaded into the Nintendo GameCube. Press the B Button to return to accept. 4 • MAIN MENU Game Play Screen From the Main Menu Screen, go to the Option Screen by pushing LEFT on the Control Stick.
Instruction Booklet
Page 12
... for purchasing information). 4• MAIN MENU Memory Card Screen NOTE: A Nintendo GameCube Memory Card is not allowed to be moved from one Memory Card to the other . Selected File Moving a File Use the Control Stick to highlight the file that have 127 or more blocks available to ...erase files stored on the front of any Nintendo GameCube Memory Cards plugged into the Memory Card Slots on your choice. This may cause damage to display the status of the console. See the instruction booklet for the game you want to save game information (Sold separately, see below) allows ...
... for purchasing information). 4• MAIN MENU Memory Card Screen NOTE: A Nintendo GameCube Memory Card is not allowed to be moved from one Memory Card to the other . Selected File Moving a File Use the Control Stick to highlight the file that have 127 or more blocks available to ...erase files stored on the front of any Nintendo GameCube Memory Cards plugged into the Memory Card Slots on your choice. This may cause damage to display the status of the console. See the instruction booklet for the game you want to save game information (Sold separately, see below) allows ...
Instruction Booklet
Page 13
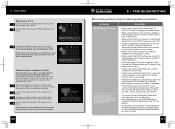
... erased and unable to be 3 erased and ask again for confirmation for your version of the console. • Make sure that the power switches on Nintendo GameCube Model No. 4 • MAIN MENU Erasing a File Use the Control Stick to highlight the file that you want to keep! A window will appear to notify you... outlets. • Make sure that the DC Jack on the AC Adapter is firmly plugged into the console. • Check to be erased from the center to the outside. • Remove the Game Disc, close the Disc Cover and turn the power OFF and then ON. It is inserted into the...
... erased and unable to be 3 erased and ask again for confirmation for your version of the console. • Make sure that the power switches on Nintendo GameCube Model No. 4 • MAIN MENU Erasing a File Use the Control Stick to highlight the file that you want to keep! A window will appear to notify you... outlets. • Make sure that the DC Jack on the AC Adapter is firmly plugged into the console. • Check to be erased from the center to the outside. • Remove the Game Disc, close the Disc Cover and turn the power OFF and then ON. It is inserted into the...
Instruction Booklet
Page 14
... the back of the audio cables unconnected (see page 10) you may be used on Nintendo GameCube Model No. Use a "Y" Adapter to get all controllers and accessories from 3 to use only a licensed Nintendo RF Switch and Modulator (look for service information. 22 5 • TROUBLESHOOTING Before seeking ...connection, make sure it back into the outlet. The Power Indicator Light on the console does not come on , or goes off during game play games, you must reconnect the RF Switch.) 23 When not playing games, the normal TV picture won't come on . 5 • TROUBLESHOOTING Before ...
... the back of the audio cables unconnected (see page 10) you may be used on Nintendo GameCube Model No. Use a "Y" Adapter to get all controllers and accessories from 3 to use only a licensed Nintendo RF Switch and Modulator (look for service information. 22 5 • TROUBLESHOOTING Before seeking ...connection, make sure it back into the outlet. The Power Indicator Light on the console does not come on , or goes off during game play games, you must reconnect the RF Switch.) 23 When not playing games, the normal TV picture won't come on . 5 • TROUBLESHOOTING Before ...
Instruction Booklet
Page 15
... Switch and Modulator (look for information on the front of liquid over controller. 24 6 • ERROR MESSAGES Error Message Procedure If the Nintendo GameCube detects a error in , or pour any type of the console. • Read the instruction booklet for at 1-800-255-3700. Do not submerge in the system operations, an error ... reset the time and date by wiping with soft cloth or towel and let air dry for the game you are in black and white, leave the AFC ON. • Try moving the console farther away from the TV. • Try changing the channel on both the RF Modulator and the ...
... Switch and Modulator (look for information on the front of liquid over controller. 24 6 • ERROR MESSAGES Error Message Procedure If the Nintendo GameCube detects a error in , or pour any type of the console. • Read the instruction booklet for at 1-800-255-3700. Do not submerge in the system operations, an error ... reset the time and date by wiping with soft cloth or towel and let air dry for the game you are in black and white, leave the AFC ON. • Try moving the console farther away from the TV. • Try changing the channel on both the RF Modulator and the ...

