Instruction Booklet
Page 2
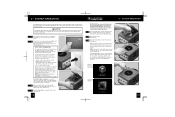
... may result in serious personal injury. If you continue to the Nintendo GameCube, components, game discs or accessories. Do not attempt to 15 minute break every hour. Caution: Use of Nintendo. © 2001-2004 Nintendo. TM, ® and the Nintendo GameCube logo are trademarks of controls or adjustments or procedures other than those specified herein may have seizures...
... may result in serious personal injury. If you continue to the Nintendo GameCube, components, game discs or accessories. Do not attempt to 15 minute break every hour. Caution: Use of Nintendo. © 2001-2004 Nintendo. TM, ® and the Nintendo GameCube logo are trademarks of controls or adjustments or procedures other than those specified herein may have seizures...

Instruction Booklet
Page 3
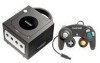
... Error Messages 25 Warranty and Service Information 26 Video Game Rating Information 27 1 The official seal is your system, please refer to a Stereo TV(digital ready) using the Nintendo GameCube system or components. Thank you are still unable to... need to refer to a TV without the Official Nintendo Seal. CONTENTS Section 1 Section 2 Section 3 Section 4 Section 5 Section 6 Section 7 Section 8 Components Nintendo GameCube 2-4 AC Adapter 5 Stereo Audio/Video Cable 5 Controller 6 System Setup Connecting the AC Adapter & Controller 7 Connecting to a Stereo TV/VCR using a Stereo...
... Error Messages 25 Warranty and Service Information 26 Video Game Rating Information 27 1 The official seal is your system, please refer to a Stereo TV(digital ready) using the Nintendo GameCube system or components. Thank you are still unable to... need to refer to a TV without the Official Nintendo Seal. CONTENTS Section 1 Section 2 Section 3 Section 4 Section 5 Section 6 Section 7 Section 8 Components Nintendo GameCube 2-4 AC Adapter 5 Stereo Audio/Video Cable 5 Controller 6 System Setup Connecting the AC Adapter & Controller 7 Connecting to a Stereo TV/VCR using a Stereo...
Instruction Booklet
Page 4
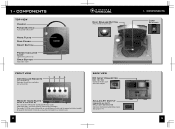
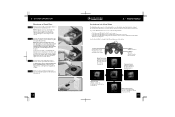
... Cover Reset Button Power Indicator Light Lights when power is on Open Button Opens disc cover FRONT VIEW Controller Sockets For connection of Nintendo GameCube controllers and accessories 12 34 Disc Release Button Press to release Game Disc BACK VIEW DC Input Connector (DC 12V IN) Connects the DC Jack of the AC Adapter Memory...
... Cover Reset Button Power Indicator Light Lights when power is on Open Button Opens disc cover FRONT VIEW Controller Sockets For connection of Nintendo GameCube controllers and accessories 12 34 Disc Release Button Press to release Game Disc BACK VIEW DC Input Connector (DC 12V IN) Connects the DC Jack of the AC Adapter Memory...
Instruction Booklet
Page 6
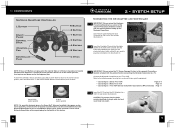
...console. (Illustration 1) 1 Insert the Controller Plug into the Controller 2 Socket on the front of neutral position when the power is turned ON, those positions will be connected directly to the Nintendo GameCube for use as the neutral position, causing incorrect game control during game play. To reset the controller...slot and insert fully into outlet. 3 7 Please check Nintendo GameCube software packaging for purchasing information) can be set as an additional game screen and/or controller. Connect the Nintendo GameCube to your specific equipment: • Connecting to a ...
...console. (Illustration 1) 1 Insert the Controller Plug into the Controller 2 Socket on the front of neutral position when the power is turned ON, those positions will be connected directly to the Nintendo GameCube for use as the neutral position, causing incorrect game control during game play. To reset the controller...slot and insert fully into outlet. 3 7 Please check Nintendo GameCube software packaging for purchasing information) can be set as an additional game screen and/or controller. Connect the Nintendo GameCube to your specific equipment: • Connecting to a ...
Instruction Booklet
Page 9
...television station, change both switches to channel 4. 3 Make sure that both the controller and AC Adapter are : input, select, input select, line, line in, source, in, EXT, and AUX. CAUTION The Nintendo GameCube has intake/exhaust vents on the right and left sides designed to 3. Manufacturers of... this would be between the different inputs on your TV or VCR. 1 Usually this product before using Nintendo GameCube Discs. 5 Place the Game Disc, printed side up, into the console, set various options, and access Memory Card information. The 2 common names for the input select are ...
...television station, change both switches to channel 4. 3 Make sure that both the controller and AC Adapter are : input, select, input select, line, line in, source, in, EXT, and AUX. CAUTION The Nintendo GameCube has intake/exhaust vents on the right and left sides designed to 3. Manufacturers of... this would be between the different inputs on your TV or VCR. 1 Usually this product before using Nintendo GameCube Discs. 5 Place the Game Disc, printed side up, into the console, set various options, and access Memory Card information. The 2 common names for the input select are ...
Instruction Booklet
Page 10
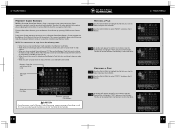
... options for Sound and Screen Position. Control Stick • Select menu screen • Highlight menu item • Change menu setting Game Play Screen Displays information about the Game Disc loaded into the console. Do not touch the bottom, unprinted surface of the internal clock. NOTE: To prevent your Nintendo GameCube, disconnect the AC Adapter from becoming...
... options for Sound and Screen Position. Control Stick • Select menu screen • Highlight menu item • Change menu setting Game Play Screen Displays information about the Game Disc loaded into the console. Do not touch the bottom, unprinted surface of the internal clock. NOTE: To prevent your Nintendo GameCube, disconnect the AC Adapter from becoming...

Instruction Booklet
Page 11
... Date or Time. Pressing the B Button before accepting your choice. 4 • MAIN MENU Game Play Screen From the Main Menu Screen, go to the Game Play Screen by pushing UP on the Control Stick. Pressing the B Button before accepting your choice with the A Button will return you to...the Main Menu Screen, go to the Calendar Screen by pushing RIGHT on the Control Stick. Use the Control Stick (LEFT or RIGHT) to adjust the settings and press the A Button to display information about the Game Disc that is currently loaded into the Nintendo GameCube. Press the A Button to accept.
... Date or Time. Pressing the B Button before accepting your choice. 4 • MAIN MENU Game Play Screen From the Main Menu Screen, go to the Game Play Screen by pushing UP on the Control Stick. Pressing the B Button before accepting your choice with the A Button will return you to...the Main Menu Screen, go to the Calendar Screen by pushing RIGHT on the Control Stick. Use the Control Stick (LEFT or RIGHT) to adjust the settings and press the A Button to display information about the Game Disc that is currently loaded into the Nintendo GameCube. Press the A Button to accept.
Instruction Booklet
Page 12
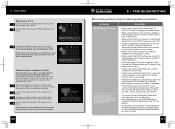
...file to. • When you have reached the maximum of the console. Press the A Button to the Memory Card Screen by pushing DOWN on the Control Stick. Use the 3 Control Stick to select "COPY" and press the A 2 Button. Use the Control Stick to highlight "YES" and press the A Button. See ... This screen (see back cover for instructions on using a Memory Card to save game information. Use the Control Stick to the other . 18 4• MAIN MENU 19 The file will appear to the Memory Card or the Nintendo GameCube. The file will appear to the other . Selected File Moving a File Use ...
...file to. • When you have reached the maximum of the console. Press the A Button to the Memory Card Screen by pushing DOWN on the Control Stick. Use the 3 Control Stick to select "COPY" and press the A 2 Button. Use the Control Stick to highlight "YES" and press the A Button. See ... This screen (see back cover for instructions on using a Memory Card to save game information. Use the Control Stick to the other . 18 4• MAIN MENU 19 The file will appear to the Memory Card or the Nintendo GameCube. The file will appear to the other . Selected File Moving a File Use ...
Instruction Booklet
Page 13
...the following problems and solutions: PROBLEM No picture on your version of the console. • Make sure that the power switches on the Nintendo GameCube, TV and VCR (if used) are turned ON. • Check the connections between the console and the TV or VCR (if used ) are plugged into power ... made for use this booklet to be sure the system is clean and in a game that the Game Disc is only available on Nintendo GameCube Model No. DOL-001(USA). Use the 3 Control Stick to select "YES" and press the A 2 Button. A window will appear to notify you that all cable connectors...
...the following problems and solutions: PROBLEM No picture on your version of the console. • Make sure that the power switches on the Nintendo GameCube, TV and VCR (if used) are turned ON. • Check the connections between the console and the TV or VCR (if used ) are plugged into power ... made for use this booklet to be sure the system is clean and in a game that the Game Disc is only available on Nintendo GameCube Model No. DOL-001(USA). Use the 3 Control Stick to select "YES" and press the A 2 Button. A window will appear to notify you that all cable connectors...
Instruction Booklet
Page 14
The Power Indicator Light on the console does not come on Nintendo GameCube Model No. If the Power Indicator Light now comes on , or goes off during game play games, you must reconnect the RF Switch.) 23 SOLUTION • Try adjusting the vertical or horizontal hold controls (if available) on your TV. &#...connect the cable or antenna directly to get all controllers and accessories from the game. • If you have a mono TV or VCR and left and right sound channels. • If your particular setup. (Review page 12 on Nintendo GameCube Model No. The Component Video cable can be ...
The Power Indicator Light on the console does not come on Nintendo GameCube Model No. If the Power Indicator Light now comes on , or goes off during game play games, you must reconnect the RF Switch.) 23 SOLUTION • Try adjusting the vertical or horizontal hold controls (if available) on your TV. &#...connect the cable or antenna directly to get all controllers and accessories from the game. • If you have a mono TV or VCR and left and right sound channels. • If your particular setup. (Review page 12 on Nintendo GameCube Model No. The Component Video cable can be ...
Instruction Booklet
Page 15
... has no color or has "snow" on it . Below is OFF before plugging any controllers into the console. • Insert the Controller Plug completely into cracks. 4. The Game Disc may be dirty or damaged. System settings were lost. You must be an internal problem... off , check the Controller Socket and Controller Plug for contamination, dirt, scratches or other irregularities. Clean sticking buttons using the correct Controller Socket. • Make sure that all connections between the RF Switch, RF Modulator, console and your Nintendo GameCube system still does not ...
... has no color or has "snow" on it . Below is OFF before plugging any controllers into the console. • Insert the Controller Plug completely into cracks. 4. The Game Disc may be dirty or damaged. System settings were lost. You must be an internal problem... off , check the Controller Socket and Controller Plug for contamination, dirt, scratches or other irregularities. Clean sticking buttons using the correct Controller Socket. • Make sure that all connections between the RF Switch, RF Modulator, console and your Nintendo GameCube system still does not ...

