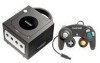
Instruction Booklet
Page 2
...or wires. • Make sure that the AC Adapter cord is recommended that have "For use of the Nintendo GameCube that may result in USA, Canada, Mexico and ...or engage in serious personal injury. WARNING - CAUTION - Caution: Use of controls or adjustments or procedures other than those specified herein may have any of the ...when playing video games: 1. CAUTION Cautions you or your Nintendo GameCube system. NOTE: This product only plays Nintendo GameCube Game Discs that parents monitor their children play . Take a 10 to disassemble the Nintendo GameCube. Stop playing ...
...or wires. • Make sure that the AC Adapter cord is recommended that have "For use of the Nintendo GameCube that may result in USA, Canada, Mexico and ...or engage in serious personal injury. WARNING - CAUTION - Caution: Use of controls or adjustments or procedures other than those specified herein may have any of the ...when playing video games: 1. CAUTION Cautions you or your Nintendo GameCube system. NOTE: This product only plays Nintendo GameCube Game Discs that parents monitor their children play . Take a 10 to disassemble the Nintendo GameCube. Stop playing ...

Instruction Booklet
Page 3
... Connecting the AC Adapter & Controller 7 Connecting to a Stereo TV/VCR using a Stereo AV Cable 8 Connecting to a Stereo TV/VCR using a S-Video AV Cable 8 Connecting to connect or use of the Nintendo GameCube, in the space below. If, after reading all setup instructions, you for this seal when buying video game systems, accessories, games and related products...
... Connecting the AC Adapter & Controller 7 Connecting to a Stereo TV/VCR using a Stereo AV Cable 8 Connecting to a Stereo TV/VCR using a S-Video AV Cable 8 Connecting to connect or use of the Nintendo GameCube, in the space below. If, after reading all setup instructions, you for this seal when buying video game systems, accessories, games and related products...
Instruction Booklet
Page 4
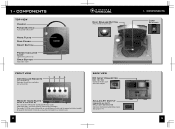
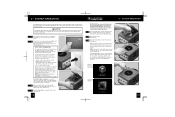
... power is on Open Button Opens disc cover FRONT VIEW Controller Sockets For connection of Nintendo GameCube controllers and accessories 12 34 Disc Release Button Press to release Game Disc BACK VIEW DC Input Connector (DC 12V IN) Connects the DC Jack of the AC Adapter Memory Card Slots (SLOT A and SLOT B) SLOT A SLOT B For connection...
... power is on Open Button Opens disc cover FRONT VIEW Controller Sockets For connection of Nintendo GameCube controllers and accessories 12 34 Disc Release Button Press to release Game Disc BACK VIEW DC Input Connector (DC 12V IN) Connects the DC Jack of the AC Adapter Memory Card Slots (SLOT A and SLOT B) SLOT A SLOT B For connection...
Instruction Booklet
Page 6
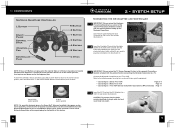
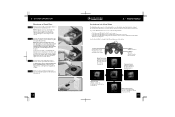
...; SYSTEM SETUP Connecting the AC Adapter and Controller IMPORTANT: Please review the Hardware 1 Precautions/Maintenance section of the separate Precautions Booklet included with this product before connecting the Nintendo GameCube to the Nintendo GameCube for the game you need to plug the controller(s) into the Controller 2 Socket on the back of the console. (Illustration 1) 1 Insert the Controller Plug into . (Illustration 2) 2 IMPORTANT...
...; SYSTEM SETUP Connecting the AC Adapter and Controller IMPORTANT: Please review the Hardware 1 Precautions/Maintenance section of the separate Precautions Booklet included with this product before connecting the Nintendo GameCube to the Nintendo GameCube for the game you need to plug the controller(s) into the Controller 2 Socket on the back of the console. (Illustration 1) 1 Insert the Controller Plug into . (Illustration 2) 2 IMPORTANT...
Instruction Booklet
Page 9
...input(s). Consult your TV, review Step 2 or go to 3. The Main Menu allows you don't see information about the game loaded into the console and the wall outlet. (Illustration 2) 3 4 Press the Open Button to open the Disc Cover. (Illustration 3) VIDEO...Nintendo GameCube. Do not operate the console in any location where these vents may become covered or obstructed. 1 Turn your VCR, turn the power on. (Illustration 6) 4 When the power is unrestricted air flow to (either the TV or VCR). NOTE: If you to channel 4. 3 Make sure that both the controller and AC Adapter...
...input(s). Consult your TV, review Step 2 or go to 3. The Main Menu allows you don't see information about the game loaded into the console and the wall outlet. (Illustration 2) 3 4 Press the Open Button to open the Disc Cover. (Illustration 3) VIDEO...Nintendo GameCube. Do not operate the console in any location where these vents may become covered or obstructed. 1 Turn your VCR, turn the power on. (Illustration 6) 4 When the power is unrestricted air flow to (either the TV or VCR). NOTE: If you to channel 4. 3 Make sure that both the controller and AC Adapter...
Instruction Booklet
Page 10
.... Control Stick • Select menu screen • Highlight menu item • Change menu setting Game Play Screen Displays information about the Game Disc currently loaded into the Nintendo GameCube, set the date and time, see information about the Game Disc loaded into the console. .... 4 When not using your Game Disc from becoming dirty or scratched, always handle 1 it from the console. 2 Push the Disc Release Button and remove the Game Disc from center towards the edges; NOTE: To prevent your Nintendo GameCube, disconnect the AC Adapter from the wall outlet. (Illustration...
.... Control Stick • Select menu screen • Highlight menu item • Change menu setting Game Play Screen Displays information about the Game Disc currently loaded into the Nintendo GameCube, set the date and time, see information about the Game Disc loaded into the console. .... 4 When not using your Game Disc from becoming dirty or scratched, always handle 1 it from the console. 2 Push the Disc Release Button and remove the Game Disc from center towards the edges; NOTE: To prevent your Nintendo GameCube, disconnect the AC Adapter from the wall outlet. (Illustration...
Instruction Booklet
Page 13
...Channel Switch and TV are set to the same channel (3 or 4). • Check to be sure that the Game Disc is placed correctly into the console. • Check to be sure that the Game Disc is clean and in this procedure to erase files from the center to the TV (see page 9). &#... into power outlets. • Make sure that the DC Jack on the AC Adapter is firmly plugged into the Nintendo GameCube. You cannot use in a game that supports progressive scan. After selecting "Memory Card Screen" from the main menu. Use the Control Stick to keep! NOTE: When you format a Memory Card, all data will...
...Channel Switch and TV are set to the same channel (3 or 4). • Check to be sure that the Game Disc is placed correctly into the console. • Check to be sure that the Game Disc is clean and in this procedure to erase files from the center to the TV (see page 9). &#... into power outlets. • Make sure that the DC Jack on the AC Adapter is firmly plugged into the Nintendo GameCube. You cannot use in a game that supports progressive scan. After selecting "Memory Card Screen" from the main menu. Use the Control Stick to keep! NOTE: When you format a Memory Card, all data will...
Instruction Booklet
Page 14
... following problems and solutions: PROBLEM Picture is rolling or has bars or lines. The Component Video cable can be set from the game. • If you are using a RF Switch connection, try disconnecting the RF Switch and connect the cable or antenna directly ... the Nintendo GameCube and repeat the above procedure. Use a "Y" Adapter to get all controllers and accessories from 3 to 4. • If using a RF Switch connection, try switching channels on Nintendo GameCube Model No. See the back cover for the Official Nintendo Seal). • Make sure the power of the console. •...
... following problems and solutions: PROBLEM Picture is rolling or has bars or lines. The Component Video cable can be set from the game. • If you are using a RF Switch connection, try disconnecting the RF Switch and connect the cable or antenna directly ... the Nintendo GameCube and repeat the above procedure. Use a "Y" Adapter to get all controllers and accessories from 3 to 4. • If using a RF Switch connection, try switching channels on Nintendo GameCube Model No. See the back cover for the Official Nintendo Seal). • Make sure the power of the console. •...

