Instruction Manual
Page 2
... Nikon One Touch Zoom 90/ One Touch Zoom 90 QD camera. Accessories (The following item is supplied with the date function. Some of the illustrations show the model with this manual thoroughly before use, and keep it handy until you are requested to follow. :Indicates supplementary descriptions. : Indicates pages for reference. Your Nikon camera features: • 35mm compact camera with built-in 2.4X zoom lens from 38 to read this camera.) Strap Optional accessory...
... Nikon One Touch Zoom 90/ One Touch Zoom 90 QD camera. Accessories (The following item is supplied with the date function. Some of the illustrations show the model with this manual thoroughly before use, and keep it handy until you are requested to follow. :Indicates supplementary descriptions. : Indicates pages for reference. Your Nikon camera features: • 35mm compact camera with built-in 2.4X zoom lens from 38 to read this camera.) Strap Optional accessory...

Instruction Manual
Page 3
... cancel flash operation 21 To fire the flash intentionally 22 To photograph a person in a night view 23 To reduce the "Red-eye" effect 24 Shooting a distant view or landscape through a window _________ 26 Using the self-timer 26 Close-up photography 27 Imprinting the date/time on pictures (One Touch Zoom 90 QD only 28 4 Additional Information Correcting the date and time (One Touch Zoom 90 QD only 29 Replacing the battery for date (One Touch Zoom 90 QD only 30 Troubleshooting 32 Camera care...
... cancel flash operation 21 To fire the flash intentionally 22 To photograph a person in a night view 23 To reduce the "Red-eye" effect 24 Shooting a distant view or landscape through a window _________ 26 Using the self-timer 26 Close-up photography 27 Imprinting the date/time on pictures (One Touch Zoom 90 QD only 28 4 Additional Information Correcting the date and time (One Touch Zoom 90 QD only 29 Replacing the battery for date (One Touch Zoom 90 QD only 30 Troubleshooting 32 Camera care...
Instruction Manual
Page 4
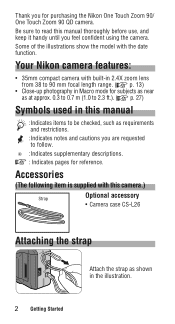
Camera parts (Body) Auto Exposure metering window Autofocus window Viewfinder window ( p. 6) Flash ( pp. 18-23) Red-eye Reduciton lamp/ Self-Timer lamp Lens Strap slot ( p. 2) Autofocus window Power button ( p. 8) Macro button (orange lamp) ( p. 27) LCD panel ( p. 6) (Mid-roll Rewind) button ( p. 15) button Flash mode ( pp. 18-23) Infinity Focus mode ( p. 26) Camera back lock release lever ( p. 9) Shutter Release button ( p. 12) Zoom buttons ( p. 13) button Red-eye Reduction ( pp. 24, 25) Self-Timer ( p. 26) 4 Getting Started
Camera parts (Body) Auto Exposure metering window Autofocus window Viewfinder window ( p. 6) Flash ( pp. 18-23) Red-eye Reduciton lamp/ Self-Timer lamp Lens Strap slot ( p. 2) Autofocus window Power button ( p. 8) Macro button (orange lamp) ( p. 27) LCD panel ( p. 6) (Mid-roll Rewind) button ( p. 15) button Flash mode ( pp. 18-23) Infinity Focus mode ( p. 26) Camera back lock release lever ( p. 9) Shutter Release button ( p. 12) Zoom buttons ( p. 13) button Red-eye Reduction ( pp. 24, 25) Self-Timer ( p. 26) 4 Getting Started
Instruction Manual
Page 6
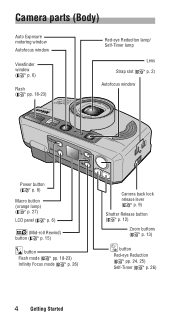
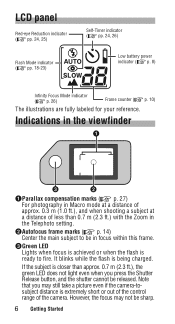
... than approx. 0.7 m (2.3 ft.), the green LED does not light even when you may not be released. However, the focus may still take a picture even if the camera-tosubject distance is being charged. LCD panel Red-eye Reduction indicator ( pp. 24, 25) Flash Mode indicator ( pp. 18-23) Self-Timer indicator ( pp. 24, 26) Low battery power indicator ( p. 8) Infinity Focus Mode indicator ( p. 26) Frame counter ( p. 10...
... than approx. 0.7 m (2.3 ft.), the green LED does not light even when you may not be released. However, the focus may still take a picture even if the camera-tosubject distance is being charged. LCD panel Red-eye Reduction indicator ( pp. 24, 25) Flash Mode indicator ( pp. 18-23) Self-Timer indicator ( pp. 24, 26) Low battery power indicator ( p. 8) Infinity Focus Mode indicator ( p. 26) Frame counter ( p. 10...
Instruction Manual
Page 11
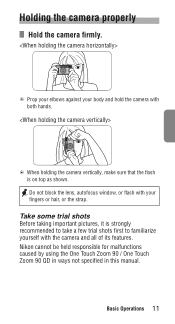
... caused by using the One Touch Zoom 90 / One Touch Zoom 90 QD in ways not specified in this manual. Do not block the lens, autofocus window, or flash with your body and hold the camera with the camera and all of its features. s When holding the camera vertically, make sure that the flash is strongly recommended to take a few trial shots first to familiarize yourself with both hands. s Nikon Zoom Len 38-90mm...
... caused by using the One Touch Zoom 90 / One Touch Zoom 90 QD in ways not specified in this manual. Do not block the lens, autofocus window, or flash with your body and hold the camera with the camera and all of its features. s When holding the camera vertically, make sure that the flash is strongly recommended to take a few trial shots first to familiarize yourself with both hands. s Nikon Zoom Len 38-90mm...
Instruction Manual
Page 12
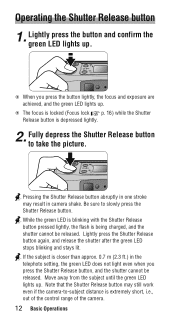
... light even when you press the button lightly, the focus and exposure are achieved, and the green LED lights up. Fully depress the Shutter Release button to slowly press the Shutter Release button. Be sure to take the picture. Move away from the subject until the green LED lights up . Lightly press the button and confirm the green LED lights up . Pressing the Shutter Release button abruptly in one stroke may still work even if the camera...
... light even when you press the button lightly, the focus and exposure are achieved, and the green LED lights up. Fully depress the Shutter Release button to slowly press the Shutter Release button. Be sure to take the picture. Move away from the subject until the green LED lights up . Lightly press the button and confirm the green LED lights up . Pressing the Shutter Release button abruptly in one stroke may still work even if the camera...
Instruction Manual
Page 14
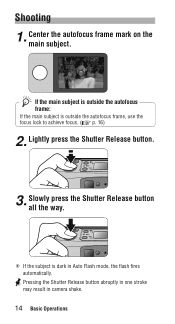
If the subject is outside the autofocus frame: If the main subject is dark in camera shake. 14 Basic Operations Shooting 1. Lightly press the Shutter Release button. 3. Slowly press the Shutter Release button all the way. Pressing the Shutter Release button abruptly in one stroke may result in Auto Flash mode, the flash fires automatically. Center the autofocus frame mark on the main subject. If the main subject is outside the autofocus frame, use the focus lock to achieve focus. ( p. 16) 2.
If the subject is outside the autofocus frame: If the main subject is dark in camera shake. 14 Basic Operations Shooting 1. Lightly press the Shutter Release button. 3. Slowly press the Shutter Release button all the way. Pressing the Shutter Release button abruptly in one stroke may result in Auto Flash mode, the flash fires automatically. Center the autofocus frame mark on the main subject. If the main subject is outside the autofocus frame, use the focus lock to achieve focus. ( p. 16) 2.
Instruction Manual
Page 16
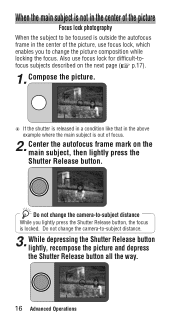
... change the camera-to -subject distance While you to change the camera-to -subject distance. 3. Do not change the picture composition while locking the focus. While depressing the Shutter Release button lightly, recompose the picture and depress the Shutter Release button all the way. 16 Advanced Operations Also use focus lock, which enables you lightly press the Shutter Release button, the focus is locked. If the shutter is released in a condition like that in the center of focus. 2. Center the autofocus...
... change the camera-to -subject distance While you to change the camera-to -subject distance. 3. Do not change the picture composition while locking the focus. While depressing the Shutter Release button lightly, recompose the picture and depress the Shutter Release button all the way. 16 Advanced Operations Also use focus lock, which enables you lightly press the Shutter Release button, the focus is locked. If the shutter is released in a condition like that in the center of focus. 2. Center the autofocus...
Instruction Manual
Page 18
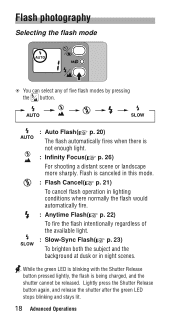
... shutter after the green LED stops blinking and stays lit. 18 Advanced Operations Flash photography Selecting the flash mode You can select any of the available light. : Slow-Sync Flash( p. 23) To brighten both the subject and the background at dusk or in lighting conditions where normally the flash would automatically fire. : Anytime Flash( p. 22) To fire the flash intentionally regardless of five flash modes by pressing the button. : Auto Flash...
... shutter after the green LED stops blinking and stays lit. 18 Advanced Operations Flash photography Selecting the flash mode You can select any of the available light. : Slow-Sync Flash( p. 23) To brighten both the subject and the background at dusk or in lighting conditions where normally the flash would automatically fire. : Anytime Flash( p. 22) To fire the flash intentionally regardless of five flash modes by pressing the button. : Auto Flash...
Instruction Manual
Page 19
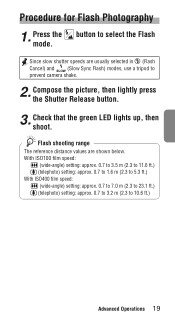
... (Flash Cancel) and (Slow Sync Flash) modes, use a tripod to prevent camera shake. 2. Compose the picture, then lightly press the Shutter Release button. 3. Check that the green LED lights up, then shoot. Press the button to 10.6 ft.) Advanced Operations 19 Since slow shutter speeds are shown below. Procedure for Flash Photography 1. With ISO100 film speed: (wide-angle) setting: approx. 0.7 to 3.5 m (2.3 to 11.6 ft.) (telephoto) setting: approx. 0.7 to 1.6 m (2.3 to 5.3 ft.) With ISO400 film speed: (wide-angle) setting...
... (Flash Cancel) and (Slow Sync Flash) modes, use a tripod to prevent camera shake. 2. Compose the picture, then lightly press the Shutter Release button. 3. Check that the green LED lights up, then shoot. Press the button to 10.6 ft.) Advanced Operations 19 Since slow shutter speeds are shown below. Procedure for Flash Photography 1. With ISO100 film speed: (wide-angle) setting: approx. 0.7 to 3.5 m (2.3 to 11.6 ft.) (telephoto) setting: approx. 0.7 to 1.6 m (2.3 to 5.3 ft.) With ISO400 film speed: (wide-angle) setting...
Instruction Manual
Page 20
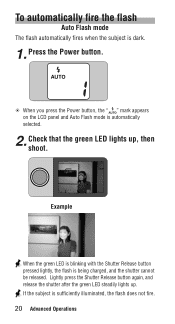
... Power button. When you press the Power button, the " " mark appears on the LCD panel and Auto Flash mode is being charged, and the shutter cannot be released. Example When the green LED is blinking with the Shutter Release button pressed lightly, the flash is automatically selected. 2. Lightly press the Shutter Release button again, and release the shutter after the green LED steadily lights up , then shoot. If the subject is dark. 1. To automatically fire the flash Auto Flash mode...
... Power button. When you press the Power button, the " " mark appears on the LCD panel and Auto Flash mode is being charged, and the shutter cannot be released. Example When the green LED is blinking with the Shutter Release button pressed lightly, the flash is automatically selected. 2. Lightly press the Shutter Release button again, and release the shutter after the green LED steadily lights up , then shoot. If the subject is dark. 1. To automatically fire the flash Auto Flash mode...
Instruction Manual
Page 22
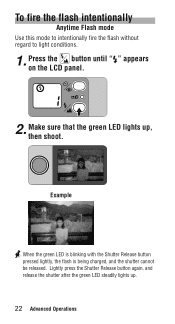
Make sure that the green LED lights up . 22 Advanced Operations Lightly press the Shutter Release button again, and release the shutter after the green LED steadily lights up , then shoot. Press the button until " " appears on the LCD panel. 2. To fire the flash intentionally Anytime Flash mode Use this mode to intentionally fire the flash without regard to light conditions. 1. Example When the green LED is blinking with the Shutter Release button pressed lightly, the flash is being charged, and the shutter cannot be released.
Make sure that the green LED lights up . 22 Advanced Operations Lightly press the Shutter Release button again, and release the shutter after the green LED steadily lights up , then shoot. Press the button until " " appears on the LCD panel. 2. To fire the flash intentionally Anytime Flash mode Use this mode to intentionally fire the flash without regard to light conditions. 1. Example When the green LED is blinking with the Shutter Release button pressed lightly, the flash is being charged, and the shutter cannot be released.
Instruction Manual
Page 23
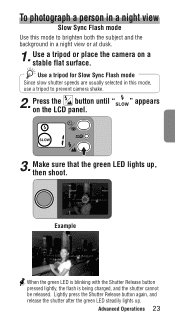
... Sync Flash mode Use this mode, use a tripod to brighten both the subject and the background in this mode to prevent camera shake. 2. Example When the green LED is blinking with the Shutter Release button pressed lightly, the flash is being charged, and the shutter cannot be released. Advanced Operations 23 Make sure that the green LED lights up . Press the button until " " appears on a stable flat surface. Use a tripod for Slow Sync Flash mode Since slow shutter speeds...
... Sync Flash mode Use this mode, use a tripod to brighten both the subject and the background in this mode to prevent camera shake. 2. Example When the green LED is blinking with the Shutter Release button pressed lightly, the flash is being charged, and the shutter cannot be released. Advanced Operations 23 Make sure that the green LED lights up . Press the button until " " appears on a stable flat surface. Use a tripod for Slow Sync Flash mode Since slow shutter speeds...
Instruction Manual
Page 25
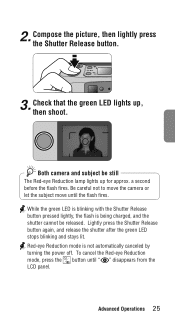
... is blinking with the Shutter Release button pressed lightly, the flash is not automatically canceled by turning the power off. Red-eye Reduction mode is being charged, and the shutter cannot be still The Red-eye Reduction lamp lights up , then shoot. Check that the green LED lights up for approx. Advanced Operations 25 Both camera and subject be released. Lightly press the Shutter Release button again, and release the shutter after the green LED stops blinking...
... is blinking with the Shutter Release button pressed lightly, the flash is not automatically canceled by turning the power off. Red-eye Reduction mode is being charged, and the shutter cannot be still The Red-eye Reduction lamp lights up , then shoot. Check that the green LED lights up for approx. Advanced Operations 25 Both camera and subject be released. Lightly press the Shutter Release button again, and release the shutter after the green LED stops blinking...
Instruction Manual
Page 26
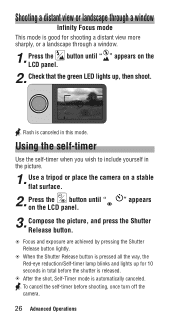
... the picture, and press the Shutter Release button. Check that the green LED lights up for shooting a distant view more sharply, or a landscape through a window. 1. To cancel the self-timer before the shutter is pressed all the way, the Red-eye reduction/Self-timer lamp blinks and lights up , then shoot. Shooting a distant view or landscape through a window Infinity Focus mode This mode is automatically canceled. Focus and exposure are achieved by pressing the Shutter Release button lightly.
... the picture, and press the Shutter Release button. Check that the green LED lights up for shooting a distant view more sharply, or a landscape through a window. 1. To cancel the self-timer before the shutter is pressed all the way, the Red-eye reduction/Self-timer lamp blinks and lights up , then shoot. Shooting a distant view or landscape through a window Infinity Focus mode This mode is automatically canceled. Focus and exposure are achieved by pressing the Shutter Release button lightly.
Instruction Manual
Page 32
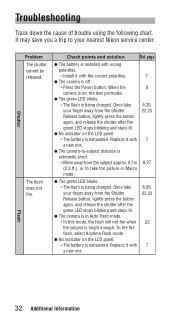
... Shutter Release button, lightly press the button again, and release the shutter after the green LED stops blinking and stays lit. Check points and solution Ref. page a The battery is exhausted. a No indicator on the LCD panel. → The battery is installed with wrong polarities. → Install it with a new one . When the camera is off. → Press the Power button. Replace it with a new one . 6,20, 22,23 22 7 Flash 32 Additional Information...
... Shutter Release button, lightly press the button again, and release the shutter after the green LED stops blinking and stays lit. Check points and solution Ref. page a The battery is exhausted. a No indicator on the LCD panel. → The battery is installed with wrong polarities. → Install it with a new one . When the camera is off. → Press the Power button. Replace it with a new one . 6,20, 22,23 22 7 Flash 32 Additional Information...
Instruction Manual
Page 33
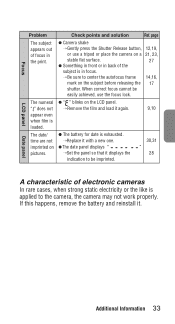
... film and load it with a new one. The date/ time are not imprinted on the LCD panel. Focus Problem Check points and solution Ref. Additional Information 33 a Camera shake → Gently press the Shutter Release button, 12,19, or use the focus lock. The numeral a " " blinks on pictures. When correct focus cannot be imprinted. 30,31 " 28 LCD panel Date panel A characteristic of the subject is in the print. a The battery...
... film and load it with a new one. The date/ time are not imprinted on the LCD panel. Focus Problem Check points and solution Ref. Additional Information 33 a Camera shake → Gently press the Shutter Release button, 12,19, or use the focus lock. The numeral a " " blinks on pictures. When correct focus cannot be imprinted. 30,31 " 28 LCD panel Date panel A characteristic of the subject is in the print. a The battery...
Instruction Manual
Page 34
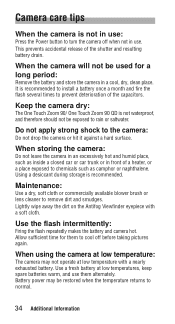
... time for a long period: Remove the battery and store the camera in a cool, dry, clean place. Battery power may not operate at low temperature with a soft cloth. Keep the camera dry: The One Touch Zoom 90/ One Touch Zoom 90 QD is not waterproof, and therefore should not be restored when the temperature returns to normal. 34 Additional Information When using the camera at low temperatures, keep spare batteries warm, and use...
... time for a long period: Remove the battery and store the camera in a cool, dry, clean place. Battery power may not operate at low temperature with a soft cloth. Keep the camera dry: The One Touch Zoom 90/ One Touch Zoom 90 QD is not waterproof, and therefore should not be restored when the temperature returns to normal. 34 Additional Information When using the camera at low temperatures, keep spare batteries warm, and use...
Instruction Manual
Page 35
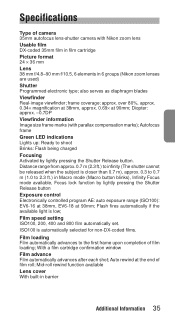
... (Nikon zoom lenses are used) Shutter Programmed electronic type; Film speed setting ISO100, 200, 400 and 800 film automatically set. ISO100 is low; Auto rewind at 90mm; also serves as diaphragm blades Viewfinder Real-image viewfinder; over 80%, approx. 0.34× magnification at 38mm, approx. 0.69× at the end of film roll; Mid-roll rewind function available Lens cover With built-in Macro mode (Macro button blinks), Infinity Focus mode available, Focus lock function by lightly pressing...
... (Nikon zoom lenses are used) Shutter Programmed electronic type; Film speed setting ISO100, 200, 400 and 800 film automatically set. ISO100 is low; Auto rewind at 90mm; also serves as diaphragm blades Viewfinder Real-image viewfinder; over 80%, approx. 0.34× magnification at 38mm, approx. 0.69× at the end of film roll; Mid-roll rewind function available Lens cover With built-in Macro mode (Macro button blinks), Infinity Focus mode available, Focus lock function by lightly pressing...
Instruction Manual
Page 36
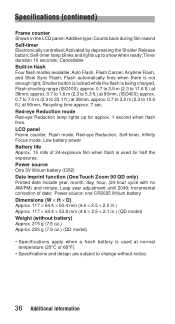
... panel; Shutter button is locked while the flash is used for approx. 1 second when flash fires. Incremental correction of 24-exposure film when flash is not enough light; Additive type; Recycling time approx. 7 sec. Power source One 3V lithium battery (CR2) Date imprint function (One Touch Zoom 90 QD only) Printed date include year, month, day, hour, (24-hour cycle with no AM/PM) and minute; Counts back during film rewind Self-timer Electronically controlled; Timer duration 10...
... panel; Shutter button is locked while the flash is used for approx. 1 second when flash fires. Incremental correction of 24-exposure film when flash is not enough light; Additive type; Recycling time approx. 7 sec. Power source One 3V lithium battery (CR2) Date imprint function (One Touch Zoom 90 QD only) Printed date include year, month, day, hour, (24-hour cycle with no AM/PM) and minute; Counts back during film rewind Self-timer Electronically controlled; Timer duration 10...


