
S640 User's Manual
Page 3
Introduction First Steps A Basic Photography and Playback: Auto Mode C Shooting Suited for the Scene F Taking Pictures of Smiling Faces (Smart Portrait Mode) s Focusing on a Moving Subject in Subject Tracking Mode c More on Playback/In-Camera Editing D Movies Connecting to Televisions, Computers and Printers d Shooting, Playback and Setup Menus Technical Notes i
Introduction First Steps A Basic Photography and Playback: Auto Mode C Shooting Suited for the Scene F Taking Pictures of Smiling Faces (Smart Portrait Mode) s Focusing on a Moving Subject in Subject Tracking Mode c More on Playback/In-Camera Editing D Movies Connecting to Televisions, Computers and Printers d Shooting, Playback and Setup Menus Technical Notes i

S640 User's Manual
Page 4
... this equipment. ii After removing or disconnecting the power source, take the product to a Nikon-authorized service representative for inspection. Repairs should be taken to prevent infants from the camera or Charging AC Adapter, unplug the Charging AC Adapter and remove the battery immediately, taking...presence of flammable gas Do not use the product will read them. Should the camera or Charging AC Adapter break open as this Nikon product, to prevent possible injury. Handle the camera strap with care Never place the strap around the neck of children Particular care ...
... this equipment. ii After removing or disconnecting the power source, take the product to a Nikon-authorized service representative for inspection. Repairs should be taken to prevent infants from the camera or Charging AC Adapter, unplug the Charging AC Adapter and remove the battery immediately, taking...presence of flammable gas Do not use the product will read them. Should the camera or Charging AC Adapter break open as this Nikon product, to prevent possible injury. Handle the camera strap with care Never place the strap around the neck of children Particular care ...

S640 User's Manual
Page 5
... Li-ion Battery EN-EL12 (supplied). Continued use with travel converters or adapters designed to heat or flames. Charge the battery inserting it into the camera and connecting the Charging AC Adapter EH-68P/EH-68P (AR) (supplied). • When inserting the battery, do not attempt to insert it to convert...
... Li-ion Battery EN-EL12 (supplied). Continued use with travel converters or adapters designed to heat or flames. Charge the battery inserting it into the camera and connecting the Charging AC Adapter EH-68P/EH-68P (AR) (supplied). • When inserting the battery, do not attempt to insert it to convert...

S640 User's Manual
Page 6
... break, care should not be taken to your fingers or other objects are not pinched by Nikon for the purpose, to maintain compliance with the flash window touching a person or object Failure to observe this camera may disrupt the electronic systems of the airplane or the instruments of the hospital when using...
... break, care should not be taken to your fingers or other objects are not pinched by Nikon for the purpose, to maintain compliance with the flash window touching a person or object Failure to observe this camera may disrupt the electronic systems of the airplane or the instruments of the hospital when using...

S640 User's Manual
Page 9
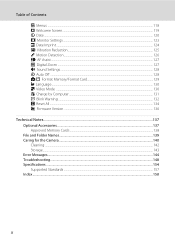
Table of Contents For Your Safety...ii WARNINGS...ii Notices ...v Introduction ...1 About This Manual ...1 Information and Precautions...2 Parts of the Camera...4 The Camera Body ...4 The Monitor...6 Basic Operations...8 The A (shooting mode) Button...8 The c (playback) Button ...9 The Rotary Multi Selector...10 The d... Language, Date and Time 20 Inserting Memory Cards ...22 Removing Memory Cards...22 A Basic Photography and Playback: Auto Mode 24 Step 1 Turn the Camera On and Select A (Auto) Mode 24 Indicators Displayed in A (Auto) Mode 25 Step 2 Frame a Picture ...26 Using the Zoom...27 ...
Table of Contents For Your Safety...ii WARNINGS...ii Notices ...v Introduction ...1 About This Manual ...1 Information and Precautions...2 Parts of the Camera...4 The Camera Body ...4 The Monitor...6 Basic Operations...8 The A (shooting mode) Button...8 The c (playback) Button ...9 The Rotary Multi Selector...10 The d... Language, Date and Time 20 Inserting Memory Cards ...22 Removing Memory Cards...22 A Basic Photography and Playback: Auto Mode 24 Step 1 Turn the Camera On and Select A (Auto) Mode 24 Indicators Displayed in A (Auto) Mode 25 Step 2 Frame a Picture ...26 Using the Zoom...27 ...

S640 User's Manual
Page 10
...Suited for the Scene 37 Shooting in Scene Mode ...37 Choosing a Scene Mode ...37 Features ...38 Shooting in the Scene Mode Selected by the Camera (Scene Auto Selector 45 Taking Pictures in Food Mode...47 Taking Pictures for a Panorama ...49 F Taking Pictures of Smiling Faces (Smart Portrait ...52 s Focusing on a Moving Subject in Subject Tracking Mode 54 Subject Tracking Mode ...54 Subject Tracking Menu ...56 c More on Playback/In-Camera Editing 57 Viewing Multiple Pictures: Thumbnail Playback 57 Calendar Display...59 Taking a Closer Look: Playback Zoom 60 Viewing Pictures by Date (List by ...
...Suited for the Scene 37 Shooting in Scene Mode ...37 Choosing a Scene Mode ...37 Features ...38 Shooting in the Scene Mode Selected by the Camera (Scene Auto Selector 45 Taking Pictures in Food Mode...47 Taking Pictures for a Panorama ...49 F Taking Pictures of Smiling Faces (Smart Portrait ...52 s Focusing on a Moving Subject in Subject Tracking Mode 54 Subject Tracking Mode ...54 Subject Tracking Menu ...56 c More on Playback/In-Camera Editing 57 Viewing Multiple Pictures: Thumbnail Playback 57 Calendar Display...59 Taking a Closer Look: Playback Zoom 60 Viewing Pictures by Date (List by ...

S640 User's Manual
Page 11
... Computers and Printers 79 Connecting to a TV...79 Connecting to a Computer...80 Before Connecting the Camera...80 Transferring Pictures from the Camera to a Computer 81 Charging While Connecting to a Computer 84 Connecting to a Printer...85 Connecting the Camera to a Printer...86 Printing Pictures One at a Time ...88 Printing Multiple Pictures ...89 Creating a... Options: The Playback Menu 110 Displaying the Playback Menu...110 b Slide Show...112 c Delete...113 d Protect ...113 f Rotate Image...114 h Copy...115 Basic Camera Setup: The Setup Menu 116 Displaying the Setup Menu...117 ix
... Computers and Printers 79 Connecting to a TV...79 Connecting to a Computer...80 Before Connecting the Camera...80 Transferring Pictures from the Camera to a Computer 81 Charging While Connecting to a Computer 84 Connecting to a Printer...85 Connecting the Camera to a Printer...86 Printing Pictures One at a Time ...88 Printing Multiple Pictures ...89 Creating a... Options: The Playback Menu 110 Displaying the Playback Menu...110 b Slide Show...112 c Delete...113 d Protect ...113 f Rotate Image...114 h Copy...115 Basic Camera Setup: The Setup Menu 116 Displaying the Setup Menu...117 ix
S640 User's Manual
Page 12
......118 c Welcome Screen...119 d Date ...120 e Monitor Settings ...123 f Date Imprint ...124 g Vibration Reduction...125 U Motion Detection...126 h AF Assist...127 u Digital Zoom ...127 i Sound Settings...128 k Auto Off ...128 l/m Format Memory/Format Card 129 n Language...130 o Video Mode ...130 V Charge by Computer ...131 d...Technical Notes...137 Optional Accessories ...137 Approved Memory Cards ...138 File and Folder Names...139 Caring for the Camera ...140 Cleaning ...142 Storage ...143 Error Messages...144 Troubleshooting...148 Specifications ...154 Supported Standards ...157 Index ...158 x
......118 c Welcome Screen...119 d Date ...120 e Monitor Settings ...123 f Date Imprint ...124 g Vibration Reduction...125 U Motion Detection...126 h AF Assist...127 u Digital Zoom ...127 i Sound Settings...128 k Auto Off ...128 l/m Format Memory/Format Card 129 n Language...130 o Video Mode ...130 V Charge by Computer ...131 d...Technical Notes...137 Optional Accessories ...137 Approved Memory Cards ...138 File and Folder Names...139 Caring for the Camera ...140 Cleaning ...142 Storage ...143 Error Messages...144 Troubleshooting...148 Specifications ...154 Supported Standards ...157 Index ...158 x
S640 User's Manual
Page 13
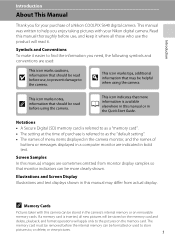
... are used to store pictures to the pictures on removable memory cards. C Memory Cards Pictures taken with your purchase of a Nikon COOLPIX S640 digital camera. D This icon marks tips, additional information that monitor indicators can be stored on the memory card and delete, playback, and...that more clearly shown. Introduction Introduction About This Manual Thank you for your Nikon digital camera. This manual was written to as the "default setting". • The names of menu items displayed in the camera monitor, and the names of purchase is referred to as a "memory card...
... are used to store pictures to the pictures on removable memory cards. C Memory Cards Pictures taken with your purchase of a Nikon COOLPIX S640 digital camera. D This icon marks tips, additional information that monitor indicators can be stored on the memory card and delete, playback, and...that more clearly shown. Introduction Introduction About This Manual Thank you for your Nikon digital camera. This manual was written to as the "default setting". • The names of menu items displayed in the camera monitor, and the names of purchase is referred to as a "memory card...
S640 User's Manual
Page 14
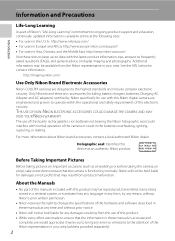
... product support and education, continually updated information is functioning normally. Nikon will not be held liable for contact information: http://imaging.nikon.com/ Use Only Nikon Brand Electronic Accessories Nikon COOLPIX cameras are engineered and proven to operate within the operational and safety requirements of this Nikon digital camera are designed to the highest standards and include complex electronic...
... product support and education, continually updated information is functioning normally. Nikon will not be held liable for contact information: http://imaging.nikon.com/ Use Only Nikon Brand Electronic Accessories Nikon COOLPIX cameras are engineered and proven to operate within the operational and safety requirements of this Nikon digital camera are designed to the highest standards and include complex electronic...
S640 User's Manual
Page 15
... government, licenses issued by a company. Ensuring the privacy of such data is prohibited. Unless the prior permission of the government was digitally copied or reproduced by the government is prohibited. Do not use of personal image data. The copying or reproduction of stamps issued by... Please note that was obtained, the copying or reproduction of unused postage stamps or post cards issued by means of a scanner, digital camera or other device may be recovered from discarded storage devices using commercial deletion software, or format the device and then completely refill it...
... government, licenses issued by a company. Ensuring the privacy of such data is prohibited. Unless the prior permission of the government was digitally copied or reproduced by the government is prohibited. Do not use of personal image data. The copying or reproduction of stamps issued by... Please note that was obtained, the copying or reproduction of unused postage stamps or post cards issued by means of a scanner, digital camera or other device may be recovered from discarded storage devices using commercial deletion software, or format the device and then completely refill it...

S640 User's Manual
Page 16
Parts of the Camera The Camera Body 12 3 4 5 67 Introduction 9 8 Lens cover closed Zoom control 27 f : Wide 27 1 g : Tele 27 h : Thumbnail playback..........57, 59 i : Playback zoom 60 j : Help 13 2 Shutter-release button 13, 28 3 Power switch/Power-on lamp 19, 128 4 Built-in microphone 67, 76 5 Built-in flash 32 6 Self-timer lamp 34 AF-assist illuminator 127 7 Speaker 67, 78 8 Lens 142, 154 9 Lens cover 4
Parts of the Camera The Camera Body 12 3 4 5 67 Introduction 9 8 Lens cover closed Zoom control 27 f : Wide 27 1 g : Tele 27 h : Thumbnail playback..........57, 59 i : Playback zoom 60 j : Help 13 2 Shutter-release button 13, 28 3 Power switch/Power-on lamp 19, 128 4 Built-in microphone 67, 76 5 Built-in flash 32 6 Self-timer lamp 34 AF-assist illuminator 127 7 Speaker 67, 78 8 Lens 142, 154 9 Lens cover 4

S640 User's Manual
Page 17
1 23 4 Parts of the Camera Introduction 12 13 5 6 7 8 9 10 11 14 15 1 Monitor 6, 25 2 Rotary multi selector 10 3 A (shooting mode) button 8 4 Charge lamp 17, 84 Flash lamp 33 5 Tripod socket 6 d ... slot cover 14, 22 16 17 18 10 Power connector cover (for optional AC adapter connection 137 11 k (apply selection) button 10 12 Eyelet for camera strap 13 13 c (playback) button 9, 30 14 Cable connector 79, 81, 86 15 Connector cover 79, 81, 86 16 Battery latch 14, 15 17 Battery...
1 23 4 Parts of the Camera Introduction 12 13 5 6 7 8 9 10 11 14 15 1 Monitor 6, 25 2 Rotary multi selector 10 3 A (shooting mode) button 8 4 Charge lamp 17, 84 Flash lamp 33 5 Tripod socket 6 d ... slot cover 14, 22 16 17 18 10 Power connector cover (for optional AC adapter connection 137 11 k (apply selection) button 10 12 Eyelet for camera strap 13 13 c (playback) button 9, 30 14 Cable connector 79, 81, 86 15 Connector cover 79, 81, 86 16 Battery latch 14, 15 17 Battery...
S640 User's Manual
Page 18
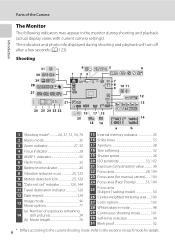
The indicators and photo info displayed during shooting and playback (actual display varies with current camera settings). Refer to the current shooting mode. Shooting 31 30 2 29 28 27 4 1 23 5 6 7 8 9 10 11 12 21 26 25 24 23 22 1600 1/250 ... "Date not set" indicator 120, 144 11 Travel destination indicator 120 12 Date imprint 124 13 Image mode 96 Movie options 77 (a) Number of the Camera Introduction The Monitor The following indicators may appear in the monitor during shooting and playback will turn off after a few seconds (A 123). Parts of exposures...
The indicators and photo info displayed during shooting and playback (actual display varies with current camera settings). Refer to the current shooting mode. Shooting 31 30 2 29 28 27 4 1 23 5 6 7 8 9 10 11 12 21 26 25 24 23 22 1600 1/250 ... "Date not set" indicator 120, 144 11 Travel destination indicator 120 12 Date imprint 124 13 Image mode 96 Movie options 77 (a) Number of the Camera Introduction The Monitor The following indicators may appear in the monitor during shooting and playback will turn off after a few seconds (A 123). Parts of exposures...

S640 User's Manual
Page 19
Parts of the Camera Introduction Playback 15 14 13 5 1 23 4 15/11/2009 12:00 6 18 9999.JPG 17 16 12 7 11 999 999 10 9 999 999 9999 9999 a 8 ...
Parts of the Camera Introduction Playback 15 14 13 5 1 23 4 15/11/2009 12:00 6 18 9999.JPG 17 16 12 7 11 999 999 10 9 999 999 9999 9999 a 8 ...

S640 User's Manual
Page 21
C List by date mode (A 61) While the playback-mode selection menu is off, holding down the c button will turn the camera on in playback mode. Playback-mode Selection Menu Use the rotary multi selector (A 10) to the current playback mode without changing the mode. 9 c Playback mode (A ... to playback mode. • Press the c button in playback mode to display the "playback-mode selection menu" and change the playback mode. • When the camera is displayed, press the c button to return to select the following playback modes. 1 Play 1.
C List by date mode (A 61) While the playback-mode selection menu is off, holding down the c button will turn the camera on in playback mode. Playback-mode Selection Menu Use the rotary multi selector (A 10) to the current playback mode without changing the mode. 9 c Playback mode (A ... to playback mode. • Press the c button in playback mode to display the "playback-mode selection menu" and change the playback mode. • When the camera is displayed, press the c button to return to select the following playback modes. 1 Play 1.

S640 User's Manual
Page 25
...currently selected menu option. White balance For accurate color reproduction, choose a setting that matches the light source. Press the shutter- Attaching the Camera Strap 13 Press the shutter- To set focus and rest of the way down exposure. release button halfway release button the to set ... Rotate the zoom control to g (j) when M/L is held in this may result in camera shake and blurred pictures. Exit Back Pressing the Shutter-Release Button Halfway/All the Way Down The camera features a two-stage shutter-release button. To release the shutter and take a picture, ...
...currently selected menu option. White balance For accurate color reproduction, choose a setting that matches the light source. Press the shutter- Attaching the Camera Strap 13 Press the shutter- To set focus and rest of the way down exposure. release button halfway release button the to set ... Rotate the zoom control to g (j) when M/L is held in this may result in camera shake and blurred pictures. Exit Back Pressing the Shutter-Release Button Halfway/All the Way Down The camera features a two-stage shutter-release button. To release the shutter and take a picture, ...
S640 User's Manual
Page 26
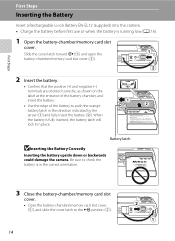
...by the arrow (1) and fully insert the battery (2). Battery latch BInserting the Battery Correctly Inserting the battery upside down or backwards could damage the camera. Be sure to push the orange battery latch in the correct orientation. 3 Close the battery-chamber/memory card slot cover. • Close ... to the Z position (2). 14 First Steps First Steps Inserting the Battery Insert a Rechargeable Li-ion Battery EN-EL12 (supplied) into the camera. • Charge the battery before first use or when the battery is running low (A 16). 1 Open the battery-chamber/memory card slot cover.
...by the arrow (1) and fully insert the battery (2). Battery latch BInserting the Battery Correctly Inserting the battery upside down or backwards could damage the camera. Be sure to push the orange battery latch in the correct orientation. 3 Close the battery-chamber/memory card slot cover. • Close ... to the Z position (2). 14 First Steps First Steps Inserting the Battery Insert a Rechargeable Li-ion Battery EN-EL12 (supplied) into the camera. • Charge the battery before first use or when the battery is running low (A 16). 1 Open the battery-chamber/memory card slot cover.

S640 User's Manual
Page 27
..." (A ii) thoroughly before using the battery. • Be sure to read and follow the warnings for "The Battery" (A 141) of the section "Caring for the Camera" thoroughly before using the battery. • If the battery will not be used for an extended period, recharge it at least once every six months... and run it to storage. 15 observe due caution when removing the battery. Removing the Battery Turn the camera off before returning it flat before opening the battery-chamber/memory card slot cover.
..." (A ii) thoroughly before using the battery. • Be sure to read and follow the warnings for "The Battery" (A 141) of the section "Caring for the Camera" thoroughly before using the battery. • If the battery will not be used for an extended period, recharge it at least once every six months... and run it to storage. 15 observe due caution when removing the battery. Removing the Battery Turn the camera off before returning it flat before opening the battery-chamber/memory card slot cover.

S640 User's Manual
Page 28
EH-68P (AR) 2 Be sure that the power-on the Charging AC Adapter. For Customers in Argentina If the camera was purchased. Proceed to the camera. When disconnecting the cable, do not pull the 16 connector at an angle. If a plug adapter* is properly oriented. Push the plug adapter firmly ...the plug adapter could damage the product. * The shape of the Charging AC Adapter EH-68P (AR) differs from that the camera connector is included, attach the plug adapter to the camera. Once the two are off. • Be sure to insert the battery into an electrical outlet. 1 Prepare the Charging AC...
EH-68P (AR) 2 Be sure that the power-on the Charging AC Adapter. For Customers in Argentina If the camera was purchased. Proceed to the camera. When disconnecting the cable, do not pull the 16 connector at an angle. If a plug adapter* is properly oriented. Push the plug adapter firmly ...the plug adapter could damage the product. * The shape of the Charging AC Adapter EH-68P (AR) differs from that the camera connector is included, attach the plug adapter to the camera. Once the two are off. • Be sure to insert the battery into an electrical outlet. 1 Prepare the Charging AC...


