S600 User's Manual
Page 4
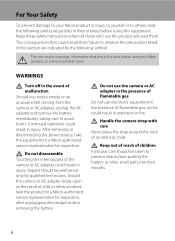
...the product and/or removing the battery. ii After removing or disconnecting the power source, take the product to a Nikon-authorized service representative for inspection. Handle the camera strap with care Never place the strap around the neck of a fall or other small parts into their entirety before... To prevent damage to your Nikon product or injury to yourself or to others, read the following symbol: This icon marks warnings, information that could result in the event of children Particular care should be taken to prevent infants from the camera or AC adapter, unplug the...
...the product and/or removing the battery. ii After removing or disconnecting the power source, take the product to a Nikon-authorized service representative for inspection. Handle the camera strap with care Never place the strap around the neck of a fall or other small parts into their entirety before... To prevent damage to your Nikon product or injury to yourself or to others, read the following symbol: This icon marks warnings, information that could result in the event of children Particular care should be taken to prevent infants from the camera or AC adapter, unplug the...
S600 User's Manual
Page 9
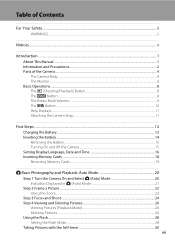
...About This Manual ...1 Information and Precautions...2 Parts of the Camera...4 The Camera Body ...4 The Monitor...6 Basic Operations...8 The c (Shooting/Playback) Button...8 The e Button...8 The Rotary Multi Selector...9 The d Button...10 Help Displays ...11 Attaching the Camera Strap ...11 First Steps ...12 Charging the Battery ...12... Date and Time 16 Inserting Memory Cards ...18 Removing Memory Cards...19 A Basic Photography and Playback: Auto Mode 20 Step 1 Turn the Camera On and Select A (Auto) Mode 20 Indicators Displayed in A (Auto) Mode 21 Step 2 Frame a Picture ...22 Using the Zoom...
...About This Manual ...1 Information and Precautions...2 Parts of the Camera...4 The Camera Body ...4 The Monitor...6 Basic Operations...8 The c (Shooting/Playback) Button...8 The e Button...8 The Rotary Multi Selector...9 The d Button...10 Help Displays ...11 Attaching the Camera Strap ...11 First Steps ...12 Charging the Battery ...12... Date and Time 16 Inserting Memory Cards ...18 Removing Memory Cards...19 A Basic Photography and Playback: Auto Mode 20 Step 1 Turn the Camera On and Select A (Auto) Mode 20 Indicators Displayed in A (Auto) Mode 21 Step 2 Frame a Picture ...22 Using the Zoom...

S600 User's Manual
Page 11
... ...80 C Continuous ...81 E ISO Sensitivity...82 F Color Options...83 G AF Area Mode ...84 Face Priority...86 I Autofocus Mode ...87 Restrictions on Camera Settings ...88 Playback Options: The Playback Menu 89 Displaying the Playback Menu...89 b Slide Show...91 c Delete ...92 d Protect ...92 f Rotate Image...93... h Copy ...94 Basic Camera Setup: The Setup Menu 95 Displaying the Setup Menu...96 a Menus ...96 c Welcome Screen...97 d Date...98 e Monitor Settings ...101 f Date ...
... ...80 C Continuous ...81 E ISO Sensitivity...82 F Color Options...83 G AF Area Mode ...84 Face Priority...86 I Autofocus Mode ...87 Restrictions on Camera Settings ...88 Playback Options: The Playback Menu 89 Displaying the Playback Menu...89 b Slide Show...91 c Delete ...92 d Protect ...92 f Rotate Image...93... h Copy ...94 Basic Camera Setup: The Setup Menu 95 Displaying the Setup Menu...96 a Menus ...96 c Welcome Screen...97 d Date...98 e Monitor Settings ...101 f Date ...
S600 User's Manual
Page 12
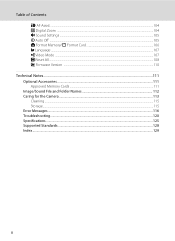
Table of Contents h AF Assist ...104 u Digital Zoom ...104 i Sound Settings ...105 k Auto Off ...105 l Format Memory/ m Format Card 106 n Language ...107 o Video Mode ...107 p Reset All ...108 r Firmware Version ...110 Technical Notes...111 Optional Accessories ...111 Approved Memory Cards ...111 Image/Sound File and Folder Names 112 Caring for the Camera ...113 Cleaning ...115 Storage ...115 Error Messages ...116 Troubleshooting...120 Specifications ...125 Supported Standards ...128 Index ...129 x
Table of Contents h AF Assist ...104 u Digital Zoom ...104 i Sound Settings ...105 k Auto Off ...105 l Format Memory/ m Format Card 106 n Language ...107 o Video Mode ...107 p Reset All ...108 r Firmware Version ...110 Technical Notes...111 Optional Accessories ...111 Approved Memory Cards ...111 Image/Sound File and Folder Names 112 Caring for the Camera ...113 Cleaning ...115 Storage ...115 Error Messages ...116 Troubleshooting...120 Specifications ...125 Supported Standards ...128 Index ...129 x
S600 User's Manual
Page 13
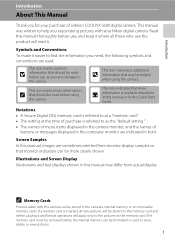
...to as the "default setting." • The names of menu items displayed in the camera monitor, and the names of a Nikon COOLPIX S600 digital camera. If a memory card is available elsewhere in the camera's internal memory or on the memory card. This icon marks tips, additional D information... before use the product will read it where all new pictures will apply only to the camera. Introduction Introduction About This Manual Thank you for your Nikon digital camera. This icon marks notes, information C that monitor indicators can be more A information is inserted...
...to as the "default setting." • The names of menu items displayed in the camera monitor, and the names of a Nikon COOLPIX S600 digital camera. If a memory card is available elsewhere in the camera's internal memory or on the memory card. This icon marks tips, additional D information... before use the product will read it where all new pictures will apply only to the camera. Introduction Introduction About This Manual Thank you for your Nikon digital camera. This icon marks notes, information C that monitor indicators can be more A information is inserted...
S600 User's Manual
Page 14
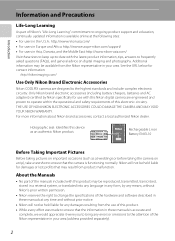
...product malfunction. THE USE OF NON-NIKON ELECTRONIC ACCESSORIES COULD DAMAGE THE CAMERA AND MAY VOID YOUR NIKON WARRANTY. Nikon will not be held liable for contact information: http://nikonimaging.com/ Use Only Nikon Brand Electronic Accessories Nikon COOLPIX cameras are engineered and proven to ensure that...and AC adapters) certified by any means, without prior notice. • Nikon will not be held liable for use with this Nikon digital camera are designed to the attention of the Nikon representative in your area. Rechargeable Li-ion Battery EN-EL10 Before Taking ...
...product malfunction. THE USE OF NON-NIKON ELECTRONIC ACCESSORIES COULD DAMAGE THE CAMERA AND MAY VOID YOUR NIKON WARRANTY. Nikon will not be held liable for contact information: http://nikonimaging.com/ Use Only Nikon Brand Electronic Accessories Nikon COOLPIX cameras are engineered and proven to ensure that...and AC adapters) certified by any means, without prior notice. • Nikon will not be held liable for use with this Nikon digital camera are designed to the attention of the Nikon representative in your area. Rechargeable Li-ion Battery EN-EL10 Before Taking ...
S600 User's Manual
Page 15
... be taken to avoid injury or damage to infringe copyright laws. Unless the prior permission of the government was digitally copied or reproduced by means of a scanner, digital camera or other device may be provided for business use by a company. Care should be recovered from being in ...possession of material that deleting images or formatting data storage devices such as memory cards or builtin camera memory does not completely erase the...
... be taken to avoid injury or damage to infringe copyright laws. Unless the prior permission of the government was digitally copied or reproduced by means of a scanner, digital camera or other device may be provided for business use by a company. Care should be recovered from being in ...possession of material that deleting images or formatting data storage devices such as memory cards or builtin camera memory does not completely erase the...
S600 User's Manual
Page 16
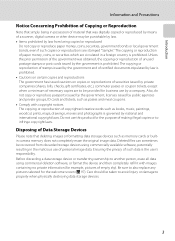
Parts of the Camera The Camera Body 1 23 4 56 Introduction Lens cover closed 7 8 9 10 1 Shutter-release button 24 2 Power-on lamp 20, 105 3 Power switch 20 4 Built-in microphone 48, 52, 56 5 Built-in flash 28 6 Speaker 48, 55, 58 7 Eyelet for camera strap 11 8 Self-timer lamp 30, 114 AF-assist illuminator 25, 104, 114 9 Lens 115, 125 10 Lens cover 113 4
Parts of the Camera The Camera Body 1 23 4 56 Introduction Lens cover closed 7 8 9 10 1 Shutter-release button 24 2 Power-on lamp 20, 105 3 Power switch 20 4 Built-in microphone 48, 52, 56 5 Built-in flash 28 6 Speaker 48, 55, 58 7 Eyelet for camera strap 11 8 Self-timer lamp 30, 114 AF-assist illuminator 25, 104, 114 9 Lens 115, 125 10 Lens cover 113 4
S600 User's Manual
Page 17
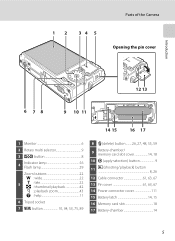
1 2 34 5 Parts of the Camera Opening the pin cover Introduction 12 13 6 78 9 10 11 14 15 16 17 1 Monitor 6 2 Rotary multi selector 9 3 e button 8 4 Indicator lamp 56 Flash lamp 29 ...
1 2 34 5 Parts of the Camera Opening the pin cover Introduction 12 13 6 78 9 10 11 14 15 16 17 1 Monitor 6 2 Rotary multi selector 9 3 e button 8 4 Indicator lamp 56 Flash lamp 29 ...
S600 User's Manual
Page 18
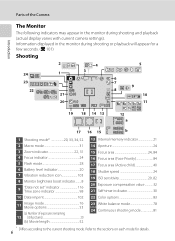
... boost indicator.........8 9 "Date not set" indicator 116 Time zone indicator 98 10 Date imprint 102 11 Image mode 76 Movie options 53 (a) Number of the Camera Introduction The Monitor The following indicators may appear in the monitor during shooting or playback will appear for details. 6 Information displayed in the monitor during...
... boost indicator.........8 9 "Date not set" indicator 116 Time zone indicator 98 10 Date imprint 102 11 Image mode 76 Movie options 53 (a) Number of the Camera Introduction The Monitor The following indicators may appear in the monitor during shooting or playback will appear for details. 6 Information displayed in the monitor during...

S600 User's Manual
Page 19
Parts of the Camera Introduction Playback 1 23 4 15/05/2008 12:00 5 18 9999.JPG 16 17 6 15 14 11 12 13 7 10 9 8 999 999 9999 9999 a 9m59s 9m59s b 1 ...
Parts of the Camera Introduction Playback 1 23 4 15/05/2008 12:00 5 18 9999.JPG 16 17 6 15 14 11 12 13 7 10 9 8 999 999 9999 9999 a 9m59s 9m59s b 1 ...

S600 User's Manual
Page 20
...and playback mode. The b icon will be displayed on the monitor when the brightness setting is on in playback mode (A 26). If the camera is turned off, hold down the c button again to change the monitor brightness to the maximum by date mode (A 49) 8 Introduction Basic... Operations The c (Shooting/Playback) Button Press c once in shooting mode to turn the camera on will change back to display the playbackmode selection menu. Hold down c to enter playback mode; The e Button Press e during shooting to display...
...and playback mode. The b icon will be displayed on the monitor when the brightness setting is on in playback mode (A 26). If the camera is turned off, hold down the c button again to change the monitor brightness to the maximum by date mode (A 49) 8 Introduction Basic... Operations The c (Shooting/Playback) Button Press c once in shooting mode to turn the camera on will change back to display the playbackmode selection menu. Hold down c to enter playback mode; The e Button Press e during shooting to display...
S600 User's Manual
Page 23
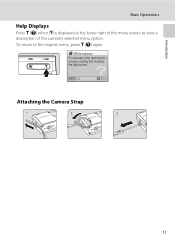
Introduction Basic Operations Help Displays Press g (j) when M is displayed at the lower right of the menu screen to the original menu, press g (j) again. To return to view a description of the currently selected menu option. Exit Back Attaching the Camera Strap 11 B White balance For accurate color reproduction, choose a setting that matches the light source.
Introduction Basic Operations Help Displays Press g (j) when M is displayed at the lower right of the menu screen to the original menu, press g (j) again. To return to view a description of the currently selected menu option. Exit Back Attaching the Camera Strap 11 B White balance For accurate color reproduction, choose a setting that matches the light source.
S600 User's Manual
Page 24
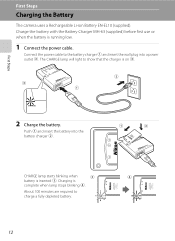
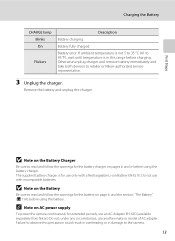
... the battery into a power outlet 2. About 100 minutes are required to show that the charger is inserted 3. First Steps First Steps Charging the Battery The camera uses a Rechargeable Li-ion Battery EN-EL10 (supplied). Connect the power cable to the battery charger 1 and insert the wall plug into the battery charger...
... the battery into a power outlet 2. About 100 minutes are required to show that the charger is inserted 3. First Steps First Steps Charging the Battery The camera uses a Rechargeable Li-ion Battery EN-EL10 (supplied). Connect the power cable to the battery charger 1 and insert the wall plug into the battery charger...
S600 User's Manual
Page 25
... charger on pages iii and iv before charging. B Note on the Battery Be sure to the camera. 13 First Steps B Note on the Battery Charger Be sure to retailer or Nikon-authorized service representative. 3 Unplug the charger. The supplied battery charger is in this precaution could result...damage to read and follow the warnings for the battery on AC power supply To power the camera continuously for extended periods, use an AC Adapter EH-62D (available separately from Nikon) Do not, under any circumstances, use only with incompatible batteries. Otherwise unplug charger and remove...
... charger on pages iii and iv before charging. B Note on the Battery Be sure to the camera. 13 First Steps B Note on the Battery Charger Be sure to retailer or Nikon-authorized service representative. 3 Unplug the charger. The supplied battery charger is in this precaution could result...damage to read and follow the warnings for the battery on AC power supply To power the camera continuously for extended periods, use an AC Adapter EH-62D (available separately from Nikon) Do not, under any circumstances, use only with incompatible batteries. Otherwise unplug charger and remove...
S600 User's Manual
Page 26
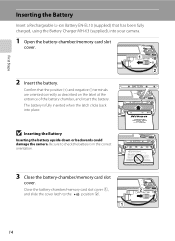
...orientation. 3 Close the battery-chamber/memory card slot cover. B Inserting the Battery Inserting the battery upside down or backwards could damage the camera. Close the battery-chamber/memory card slot cover 1, and slide the cover latch to check the battery is fully inserted when the latch ...clicks back into your camera. 1 Open the battery-chamber/memory card slot cover. 2 Insert the battery. Confirm that has been fully charged, using the Battery Charger ...
...orientation. 3 Close the battery-chamber/memory card slot cover. B Inserting the Battery Inserting the battery upside down or backwards could damage the camera. Close the battery-chamber/memory card slot cover 1, and slide the cover latch to check the battery is fully inserted when the latch ...clicks back into your camera. 1 Open the battery-chamber/memory card slot cover. 2 Insert the battery. Confirm that has been fully charged, using the Battery Charger ...
S600 User's Manual
Page 27
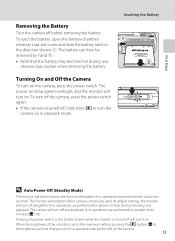
... operations are performed for another three minutes (A 105). observe due caution when removing the battery. To turn off the camera, press the power switch again. • If the camera is set to the maximum setting by hand 2. • Note that the battery may become hot during shooting and ...by using the c button (A 8), the brightness will dim to turn on in the direction shown 1. Turning On and Off the Camera To turn the camera on the camera, press the power switch. When the brightness of the monitor is turned off before removing the battery. To eject the battery, open...
... operations are performed for another three minutes (A 105). observe due caution when removing the battery. To turn off the camera, press the power switch again. • If the camera is set to the maximum setting by hand 2. • Note that the battery may become hot during shooting and ...by using the c button (A 8), the brightness will dim to turn on in the direction shown 1. Turning On and Off the Camera To turn the camera on the camera, press the power switch. When the brightness of the monitor is turned off before removing the battery. To eject the battery, open...
S600 User's Manual
Page 28
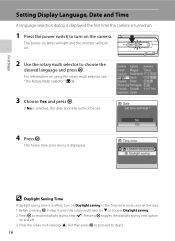
... zone menu is displayed. No Yes Time zone London,Casablanca Daylight saving D Daylight Saving Time If daylight saving time is in effect, turn on the camera. If No is selected, the date and time will turn on. 2 Use the rotary multi selector to choose the desired language and press k. Pressing k toggles... H, and then press k to proceed to step 5. 16 First Steps Setting Display Language, Date and Time A language-selection dialog is displayed the first time the camera is turned on. 1 Press the power switch to turn on Daylight saving in the Time zone menu and set . 4 Press k.
... zone menu is displayed. No Yes Time zone London,Casablanca Daylight saving D Daylight Saving Time If daylight saving time is in effect, turn on the camera. If No is selected, the date and time will turn on. 2 Use the rotary multi selector to choose the desired language and press k. Pressing k toggles... H, and then press k to proceed to step 5. 16 First Steps Setting Display Language, Date and Time A language-selection dialog is displayed the first time the camera is turned on. 1 Press the power switch to turn on Daylight saving in the Time zone menu and set . 4 Press k.
S600 User's Manual
Page 30
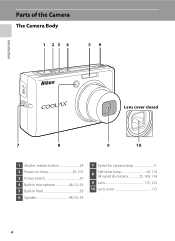
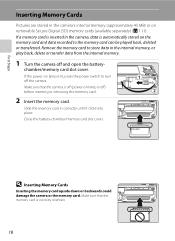
...slot cover. Make sure that the camera is correctly oriented. 18 chamber/memory card slot cover. D Inserting Memory Cards Inserting the memory card upside down or backwards could damage the camera or the memory card. If the power-on removable Secure Digital (SD) memory cards (available ...separately) (A 111). First Steps Inserting Memory Cards Pictures are stored in the camera's internal memory (approximately 45 MB) or on ...
...slot cover. Make sure that the camera is correctly oriented. 18 chamber/memory card slot cover. D Inserting Memory Cards Inserting the memory card upside down or backwards could damage the camera or the memory card. If the power-on removable Secure Digital (SD) memory cards (available ...separately) (A 111). First Steps Inserting Memory Cards Pictures are stored in the camera's internal memory (approximately 45 MB) or on ...
S600 User's Manual
Page 31
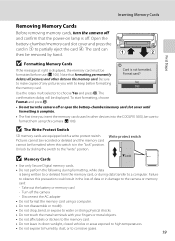
...1 to partially eject the card 2. Unlock by hand. No Yes • Do not turn the camera off and confirm that formatting permanently deletes all pictures and other devices into the COOLPIX S600, be sure to format them using a computer. • Do not disassemble or modify. •...with a write protect switch. Write protect switch B Memory Cards • Use only Secure Digital memory cards. • Do not perform the following during data transfer to a computer. Turn off the camera - Format card? To start formatting, choose Format and press k. Inserting Memory Cards First...
...1 to partially eject the card 2. Unlock by hand. No Yes • Do not turn the camera off and confirm that formatting permanently deletes all pictures and other devices into the COOLPIX S600, be sure to format them using a computer. • Do not disassemble or modify. •...with a write protect switch. Write protect switch B Memory Cards • Use only Secure Digital memory cards. • Do not perform the following during data transfer to a computer. Turn off the camera - Format card? To start formatting, choose Format and press k. Inserting Memory Cards First...


