
Instruction Manual
Page 3
... FLASH EXPOSURE BRACKETING 94-95 USABLE LENSES WITH BUILT-IN FLASH 96 USING ACCESSORY NIKON SPEEDLIGHTS 97-102 SPEEDLIGHT COMPATIBILITY 97 TYPE OF TIL AUTO FLASH 98-99 WHAT YOU CAN DO WITH NIKON SPEEDLIGHTS ......... 100 NOTES ON FLASH PHOTOGRAPHY 101 EV CHARTS FOR FLASH PHOTOGRAPHy 102... MiSCELLANEOUS 103-127 LENSES 104-106 ACCESSORY COMPATIBILITY 107 CAMERA CARE TiPS 108-110 NOTES ON BATIERIES 111 SPECIFICATIONS 112-115 ...
... FLASH EXPOSURE BRACKETING 94-95 USABLE LENSES WITH BUILT-IN FLASH 96 USING ACCESSORY NIKON SPEEDLIGHTS 97-102 SPEEDLIGHT COMPATIBILITY 97 TYPE OF TIL AUTO FLASH 98-99 WHAT YOU CAN DO WITH NIKON SPEEDLIGHTS ......... 100 NOTES ON FLASH PHOTOGRAPHY 101 EV CHARTS FOR FLASH PHOTOGRAPHy 102... MiSCELLANEOUS 103-127 LENSES 104-106 ACCESSORY COMPATIBILITY 107 CAMERA CARE TiPS 108-110 NOTES ON BATIERIES 111 SPECIFICATIONS 112-115 ...
Instruction Manual
Page 4
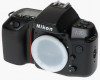
..., it , be sure to read this manual thoroughly; The N70's Command Control Input System enables you to set camera function and shooting mode by just pressing buttons that are color-coordinated with the N70 camera. 4 FOREWORD Thank you will enjoy advanced flash photography and make... better flash pictures than ever before using it is easy to operate. Although the N70 offers many advanced functions including 3D MultiSensor Balanced Fill-Flash, you for purchasing the new Nikon N70 camera. then tum your N70,...
..., it , be sure to read this manual thoroughly; The N70's Command Control Input System enables you to set camera function and shooting mode by just pressing buttons that are color-coordinated with the N70 camera. 4 FOREWORD Thank you will enjoy advanced flash photography and make... better flash pictures than ever before using it is easy to operate. Although the N70 offers many advanced functions including 3D MultiSensor Balanced Fill-Flash, you for purchasing the new Nikon N70 camera. then tum your N70,...

Instruction Manual
Page 5
NOMENCLATURE Once you know the names of the parts of your new Nikon N70, as well as their functions and the camera's other controls, you will be surprised how simple and logical the N70's operation can be. 5
NOMENCLATURE Once you know the names of the parts of your new Nikon N70, as well as their functions and the camera's other controls, you will be surprised how simple and logical the N70's operation can be. 5
Instruction Manual
Page 7
M for Manual focus (pp. 40-42) @ Lens release button @ Remote terminal: For optional Nikon Remote Cord MC-12B ® Flash lock-release button ® Camera strap eyelet CD OR call (OUT) button ® Function button (FUNCTION button)® Function set-/self-timer button (...-Program symbols @ Vari -Program (Ps)/film rewind button (pp. 62-67 for N70's Command Control Input System. Program) @ Focus area button (pp. 29-30) @ LCD panel (p. 8) ® Film cartridge confirmation window @ Camera back lock release @ Eyepiece cover (provided): Prevents stray light from lens mounting flange to...
M for Manual focus (pp. 40-42) @ Lens release button @ Remote terminal: For optional Nikon Remote Cord MC-12B ® Flash lock-release button ® Camera strap eyelet CD OR call (OUT) button ® Function button (FUNCTION button)® Function set-/self-timer button (...-Program symbols @ Vari -Program (Ps)/film rewind button (pp. 62-67 for N70's Command Control Input System. Program) @ Focus area button (pp. 29-30) @ LCD panel (p. 8) ® Film cartridge confirmation window @ Camera back lock release @ Eyepiece cover (provided): Prevents stray light from lens mounting flange to...
Instruction Manual
Page 9
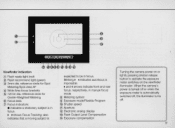
...174; Exposure mode/ Flexible Program @ Shutter speed (jJ) Aperture 1 Electronic analog display @ Flash Output Level Compensation @ Exposure compensation Turning the camera power on the viewfinder illuminator. reference circle for Center-Weighted Metering ® Focus area CD Focus indicators: • indicates a stationary subject is...button to be in focus. • • shows Focus Tracking; also indicates that a moving subject is in focus. When the camera's power is turned off or when the exposure meter is impossible. • and . reference circle for Spot Metering/Spot Area AF...
...174; Exposure mode/ Flexible Program @ Shutter speed (jJ) Aperture 1 Electronic analog display @ Flash Output Level Compensation @ Exposure compensation Turning the camera power on the viewfinder illuminator. reference circle for Center-Weighted Metering ® Focus area CD Focus indicators: • indicates a stationary subject is...button to be in focus. • • shows Focus Tracking; also indicates that a moving subject is in focus. When the camera's power is turned off or when the exposure meter is impossible. • and . reference circle for Spot Metering/Spot Area AF...
Instruction Manual
Page 10
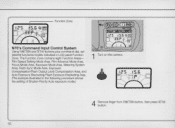
Function Zone N70's Command Input Control System Using FUNCTION and SET/~ buttons plus command dial , set desired functions/modes indicated in the following procedure shows the setting of Shutter-Priority Auto exposure mode.) 1 Turn on the camera. 4 Remove finger from FUNCTION button, then press SETI~ button. 10 The Function Zone contains eight Function...
Function Zone N70's Command Input Control System Using FUNCTION and SET/~ buttons plus command dial , set desired functions/modes indicated in the following procedure shows the setting of Shutter-Priority Auto exposure mode.) 1 Turn on the camera. 4 Remove finger from FUNCTION button, then press SETI~ button. 10 The Function Zone contains eight Function...
Instruction Manual
Page 12
BASIC OPERATION This section shows you how to prepare the camera for shootinge.g., how to mount lens, load film, etc.-as well as how to actually take pictures: Whether you're a beginner or a seasoned photographer, you should master this section before proceeding further. 12
BASIC OPERATION This section shows you how to prepare the camera for shootinge.g., how to mount lens, load film, etc.-as well as how to actually take pictures: Whether you're a beginner or a seasoned photographer, you should master this section before proceeding further. 12
Instruction Manual
Page 13
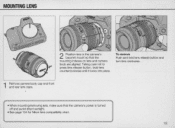
To remove Push and hold lens release button and tum lens clockwise. 1 Remove camera body cap and front and rear lens caps. • When mounting/ removing lens, make sure that the mounting indexes on lens and camera body are aligned. MOUNTING LENS 2 Position lens in the camera's bayonet mount so that the camera's power is tumed off and avoid direct sunlight. • See page 104 for Nikon lens compatibility chart. 13 Taking care not to press lens release button, twist lens counterclockwise until it locks into place.
To remove Push and hold lens release button and tum lens clockwise. 1 Remove camera body cap and front and rear lens caps. • When mounting/ removing lens, make sure that the mounting indexes on lens and camera body are aligned. MOUNTING LENS 2 Position lens in the camera's bayonet mount so that the camera's power is tumed off and avoid direct sunlight. • See page 104 for Nikon lens compatibility chart. 13 Taking care not to press lens release button, twist lens counterclockwise until it locks into place.

Instruction Manual
Page 15
... power switch to OFF and replace batteries with a fresh set. LCD panel and viewfinder LCD show aperture/shutter speed indications, and autofocus operation starts (unless camera is set for manual focusing), The exposure indications and battery mark stay on for approx, 8 sec, after you take your finger off shutter release button...
... power switch to OFF and replace batteries with a fresh set. LCD panel and viewfinder LCD show aperture/shutter speed indications, and autofocus operation starts (unless camera is set for manual focusing), The exposure indications and battery mark stay on for approx, 8 sec, after you take your finger off shutter release button...

Instruction Manual
Page 17
00 z sf 2 Slide camera back lock release down to ensure film is properly positioned with no slack (see illustration). 17 Do not touch shutter curtains with your finger or with film leader. 4 Pull film leader out to red index mark. 5 Check to open camera back. 00000000000 3 Install film. Insert the film cartridge by placing the cartridge spindle on the fork at the bottom of the film cartridge chamber.
00 z sf 2 Slide camera back lock release down to ensure film is properly positioned with no slack (see illustration). 17 Do not touch shutter curtains with your finger or with film leader. 4 Pull film leader out to red index mark. 5 Check to open camera back. 00000000000 3 Install film. Insert the film cartridge by placing the cartridge spindle on the fork at the bottom of the film cartridge chamber.

Instruction Manual
Page 18
Set ISO speed manually (see p. 27). 18 Open camera back and reload film properly. • If non-OX-coded film or film with an unacceptab,e OX code is loaded, the Err, ISO and ID3 marks in LCD panel blink and the shutter is locked. 6 Gently close camera back until lock release snaps closed. 7 Fully depress shutter release button to advance film to frame #1 . Confirm frame counter shows : and (!) _ symbol appears on LCD panel. • If film is incorrectly positioned, E remains, (!) _ symbol blinks and shutter is locked.
Set ISO speed manually (see p. 27). 18 Open camera back and reload film properly. • If non-OX-coded film or film with an unacceptab,e OX code is loaded, the Err, ISO and ID3 marks in LCD panel blink and the shutter is locked. 6 Gently close camera back until lock release snaps closed. 7 Fully depress shutter release button to advance film to frame #1 . Confirm frame counter shows : and (!) _ symbol appears on LCD panel. • If film is incorrectly positioned, E remains, (!) _ symbol blinks and shutter is locked.

Instruction Manual
Page 20
The camera's settings are automatically reset to factory initial settings (as shown below) for basIc shooting: Film advance mode: Single frame (m) Focus area: Wide (,,) Focus mode Single Servo AF (AF-S) Metering system: Matrix (fWJ) Exposure mode (including Vari-Program): Auto-Multi Program (P) Flash sync mode Normal (If accessory Nikon Speedlight attached is set...
The camera's settings are automatically reset to factory initial settings (as shown below) for basIc shooting: Film advance mode: Single frame (m) Focus area: Wide (,,) Focus mode Single Servo AF (AF-S) Metering system: Matrix (fWJ) Exposure mode (including Vari-Program): Auto-Multi Program (P) Flash sync mode Normal (If accessory Nikon Speedlight attached is set...
Instruction Manual
Page 21
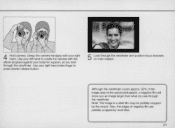
... th rough the viewfinder. Although the viewfinder covers approx. 92% of the image area of negative film are partially cropped by the mount. Grasp the camera handgrip with the elbow propped against your right hand index finger to cradle the...
... th rough the viewfinder. Although the viewfinder covers approx. 92% of the image area of negative film are partially cropped by the mount. Grasp the camera handgrip with the elbow propped against your right hand index finger to cradle the...

Instruction Manual
Page 22
... press shutter release button to refocus. With a stationary subject, confirm that Focus Tracking indicator • • appears. With a moving subject, confirm that the in the camera's extemal LCD paneL) • If • appears, subject is lightly pressed.
... press shutter release button to refocus. With a stationary subject, confirm that Focus Tracking indicator • • appears. With a moving subject, confirm that the in the camera's extemal LCD paneL) • If • appears, subject is lightly pressed.

Instruction Manual
Page 23
or slower and picture blur may occur due to smallest aperture. If FEE blinks in flash or an accessory Nikon Speedlight. To reduce possibility of blur, hold camera very steady, use a tripod or use the built-in the aperture position-Lens setting error alert: Lens is not ...is insufficient, 'I If lo appears in the shutter speed position-Underexposure alert: Use a Nikon Speedlight, higher ISO film or lens with faster aperture, whichever is 1/50 sec. Set lens to camera shake. If shutter speed indication blinks inside viewfinder-picture blur possibility: The automatically selected shutter ...
or slower and picture blur may occur due to smallest aperture. If FEE blinks in flash or an accessory Nikon Speedlight. To reduce possibility of blur, hold camera very steady, use a tripod or use the built-in the aperture position-Lens setting error alert: Lens is not ...is insufficient, 'I If lo appears in the shutter speed position-Underexposure alert: Use a Nikon Speedlight, higher ISO film or lens with faster aperture, whichever is 1/50 sec. Set lens to camera shake. If shutter speed indication blinks inside viewfinder-picture blur possibility: The automatically selected shutter ...

Instruction Manual
Page 24
Erod and Camera automatically advances film by one frame , and LCD frame counter increases by one. 10 ~P}7~: I 1 When filrn reaches its end of roll, film advance stops automatically and shutter locks. REWINDING FILM 7 To take picture, fully depress shutter release button.
Erod and Camera automatically advances film by one frame , and LCD frame counter increases by one. 10 ~P}7~: I 1 When filrn reaches its end of roll, film advance stops automatically and shutter locks. REWINDING FILM 7 To take picture, fully depress shutter release button.
Instruction Manual
Page 25
2 Press IN button and Ps button to start film rewind. During film rewind ,
2 Press IN button and Ps button to start film rewind. During film rewind ,
Instruction Manual
Page 26
GENERAL FUNCTIONS This chapter explains the various modes of the N70 camera's operation. Please review it thoroughly. 26
GENERAL FUNCTIONS This chapter explains the various modes of the N70 camera's operation. Please review it thoroughly. 26
Instruction Manual
Page 27
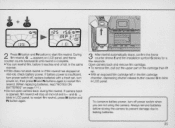
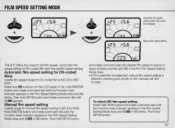
...and rotate command dial until desired film speed is shown in place of frame counter with a OX-coded film installed) Manual filmspeed setting The N70 offers two ways to set ISO number. Then hold FUNCTION button and rotate command dial until the Function Area indicator appears in the Film ...and rotate command dial until ISOIlIl appears. Automatic film speed setting for DX-coded films Usable film speed range for OX-coded film is selected, camera gives priority to the manually set film speed-automatic fil m speed setting for manual film speed setting is shown on the LCD panel. FILM...
...and rotate command dial until desired film speed is shown in place of frame counter with a OX-coded film installed) Manual filmspeed setting The N70 offers two ways to set ISO number. Then hold FUNCTION button and rotate command dial until the Function Area indicator appears in the Film ...and rotate command dial until ISOIlIl appears. Automatic film speed setting for DX-coded films Usable film speed range for OX-coded film is selected, camera gives priority to the manually set film speed-automatic fil m speed setting for manual film speed setting is shown on the LCD panel. FILM...

Instruction Manual
Page 32
After focus is achieved with . . ). However, if the camera-to-subject distance changes, you have to be in focus, the lens stops moving subjects expected to refocus. Stationary subject is in the viewfinder, and ...
After focus is achieved with . . ). However, if the camera-to-subject distance changes, you have to be in focus, the lens stops moving subjects expected to refocus. Stationary subject is in the viewfinder, and ...
