D3000 User's Manual
Page 14
...observe this equipment. • Do not short or disassemble the battery. • Be sure the product is not in use, attach the terminal cover and store in fire or electric shock. • Do not handle the plug or charger with metal objects such as discoloration or deformation. Observe ... the input and output jacks, use only the cables provided or sold by Nikon for the purpose to maintain compliance with DC-to another or with product regulations. Before removing the battery turn the camera off before replacing the battery. Failure to observe this precaution could cause hearing ...
...observe this equipment. • Do not short or disassemble the battery. • Be sure the product is not in use, attach the terminal cover and store in fire or electric shock. • Do not handle the plug or charger with metal objects such as discoloration or deformation. Observe ... the input and output jacks, use only the cables provided or sold by Nikon for the purpose to maintain compliance with DC-to another or with product regulations. Before removing the battery turn the camera off before replacing the battery. Failure to observe this precaution could cause hearing ...
D3000 User's Manual
Page 20
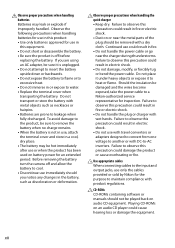
...body cap 10 CPU contacts 11 Built-in flash 58 12 M (flash mode) button ......... 58 Y (flash compensation) button 79 13 Eyelet for camera strap 14 Connector cover 15 E (self-timer) button 57 Fn (function) button ...........134 16 Mounting index 16 17 Lens release button 17 18 Mirror 172 19 Lens ... flash unit 162 22 VIDEO-OUT connector........116 23 Reset switch 179 24 USB connector Connecting to a computer 106 Connecting to familiarize yourself with camera controls and displays. You may find it helpful to bookmark this section and refer to it as you read through the rest of the manual...
...body cap 10 CPU contacts 11 Built-in flash 58 12 M (flash mode) button ......... 58 Y (flash compensation) button 79 13 Eyelet for camera strap 14 Connector cover 15 E (self-timer) button 57 Fn (function) button ...........134 16 Mounting index 16 17 Lens release button 17 18 Mirror 172 19 Lens ... flash unit 162 22 VIDEO-OUT connector........116 23 Reset switch 179 24 USB connector Connecting to a computer 106 Connecting to familiarize yourself with camera controls and displays. You may find it helpful to bookmark this section and refer to it as you read through the rest of the manual...

D3000 User's Manual
Page 21
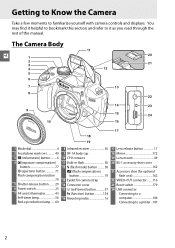
The Camera Body (Continued) 2 1 9 10 11 3 12 13 X 4 14 5 15 6 16 17 7 18 8 1 Viewfinder eyepiece 23 2 DK-20 rubber eyecup 3 Monitor Viewing settings 6 Viewing pictures 32 Full-... P (information edit) button 7 8 Tripod socket 9 Diopter adjustment control 23 10 A (AE-L/AF-L) button 47, 135 L (protect) button .......... 100 11 Command dial 8 12 Memory card slot cover....... 20 13 Multi selector 12 19 14 J (OK) button 12 15 Memory card access lamp 20, 29 16 O (delete) button Deleting pictures 33 Deleting pictures...
The Camera Body (Continued) 2 1 9 10 11 3 12 13 X 4 14 5 15 6 16 17 7 18 8 1 Viewfinder eyepiece 23 2 DK-20 rubber eyecup 3 Monitor Viewing settings 6 Viewing pictures 32 Full-... P (information edit) button 7 8 Tripod socket 9 Diopter adjustment control 23 10 A (AE-L/AF-L) button 47, 135 L (protect) button .......... 100 11 Command dial 8 12 Memory card slot cover....... 20 13 Multi selector 12 19 14 J (OK) button 12 15 Memory card access lamp 20, 29 16 O (delete) button Deleting pictures 33 Deleting pictures...

D3000 User's Manual
Page 32
...minutes are required to fully recharge the battery when no charge remains. 1 X Plug the charger in the illustration on the charger. Terminal cover 7.27.V8E10LW-8hE0Lm9Aah 7.27.V8E1L0W-8hE0Lm9aAh 7.27.V8E10LW-8hE0Lm9Aah 4 Remove the battery when charging is powered by an EN-EL9a rechargeable Li-ion...the AC adapter plug into the battery charger and plug the power cable into an electrical outlet. 2 Remove the terminal cover. First Steps Charge the Battery The camera is complete. Charging is complete when the CHARGE lamp stops blinking. Remove the battery and unplug the charger. To ...
...minutes are required to fully recharge the battery when no charge remains. 1 X Plug the charger in the illustration on the charger. Terminal cover 7.27.V8E10LW-8hE0Lm9Aah 7.27.V8E1L0W-8hE0Lm9aAh 7.27.V8E10LW-8hE0Lm9Aah 4 Remove the battery when charging is powered by an EN-EL9a rechargeable Li-ion...the AC adapter plug into the battery charger and plug the power cable into an electrical outlet. 2 Remove the terminal cover. First Steps Charge the Battery The camera is complete. Charging is complete when the CHARGE lamp stops blinking. Remove the battery and unplug the charger. To ...

D3000 User's Manual
Page 33
...between 5-35°C (41-95°F); Use the charger with compatible batteries only. A Inserting and Removing Batteries Always turn the camera off . Unlatch (q) and open (w) the battery-chamber cover. Charge the battery indoors at ambient temperatures below 0°C (32°F) or above 20°C (68°F). Wait for best... battery as shown at low temperatures. The battery may temporarily drop if the battery is charged at right. 4 Close the battery-chamber cover. Power switch 2 Open the battery-chamber cover. Insert the Battery 1 Turn the camera off before recharging.
...between 5-35°C (41-95°F); Use the charger with compatible batteries only. A Inserting and Removing Batteries Always turn the camera off . Unlatch (q) and open (w) the battery-chamber cover. Charge the battery indoors at ambient temperatures below 0°C (32°F) or above 20°C (68°F). Wait for best... battery as shown at low temperatures. The battery may temporarily drop if the battery is charged at right. 4 Close the battery-chamber cover. Power switch 2 Open the battery-chamber cover. Insert the Battery 1 Turn the camera off before recharging.
D3000 User's Manual
Page 38
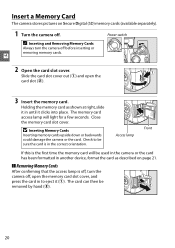
...20 Close the memory card slot cover. Check to eject it clicks into place. The card can then be sure the card is in until it (q). Holding the memory card as described on Secure Digital (SD) memory cards (available separately). 1 Turn the camera off. A Inserting and Removing ...Memory Cards Always turn the camera off, open the card slot (w). 4.0GB 4.0GB 3 Insert the memory card. The...
...20 Close the memory card slot cover. Check to eject it clicks into place. The card can then be sure the card is in until it (q). Holding the memory card as described on Secure Digital (SD) memory cards (available separately). 1 Turn the camera off. A Inserting and Removing ...Memory Cards Always turn the camera off, open the card slot (w). 4.0GB 4.0GB 3 Insert the memory card. The...

D3000 User's Manual
Page 44
... button halfway to reactivate the display (0 29). 8 s Exposure meters on Exposure meters off (0 170). 26 A Image Sensor Cleaning At default settings, the camera vibrates the low-pass filter covering the image sensor to store additional photographs at current settings, a warning will show the number of time before the exposure meters turn off... of exposures remaining will be shown in thousands, rounded down to the nearest hundred (e.g., if there is not enough memory to remove dust when the camera is turned on the memory card.
... button halfway to reactivate the display (0 29). 8 s Exposure meters on Exposure meters off (0 170). 26 A Image Sensor Cleaning At default settings, the camera vibrates the low-pass filter covering the image sensor to store additional photographs at current settings, a warning will show the number of time before the exposure meters turn off... of exposures remaining will be shown in thousands, rounded down to the nearest hundred (e.g., if there is not enough memory to remove dust when the camera is turned on the memory card.

D3000 User's Manual
Page 47
Access lamp s A The Shutter-Release Button The camera has a two-stage shutter-release button. If the flashready indicator is not displayed, the flash is displayed. remove your finger briefly from the display when ... down to its closed position by pressing it to release the shutter and record the photograph. The access lamp next to the memory card slot cover will light and the photograph will automatically clear from the shutter-release button and try again. The...
Access lamp s A The Shutter-Release Button The camera has a two-stage shutter-release button. If the flashready indicator is not displayed, the flash is displayed. remove your finger briefly from the display when ... down to its closed position by pressing it to release the shutter and record the photograph. The access lamp next to the memory card slot cover will light and the photograph will automatically clear from the shutter-release button and try again. The...
D3000 User's Manual
Page 73
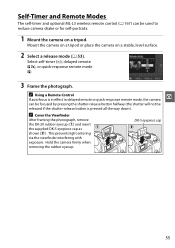
... in delayed remote or quick-response remote mode, the camera can be released if the shutter-release button is pressed all the way down). This prevents light entering via the viewfinder interfering with exposure. A Cover the Viewfinder After framing the photograph, remove the DK-...20 rubber eyecup (q) and insert the supplied DK-5 eyepiece cap as q shown (w). Select self-timer (E), delayed remote ("), or quick-response remote mode (#). 3 Frame the photograph. Hold the camera firmly when removing the...
... in delayed remote or quick-response remote mode, the camera can be released if the shutter-release button is pressed all the way down). This prevents light entering via the viewfinder interfering with exposure. A Cover the Viewfinder After framing the photograph, remove the DK-...20 rubber eyecup (q) and insert the supplied DK-5 eyepiece cap as q shown (w). Select self-timer (E), delayed remote ("), or quick-response remote mode (#). 3 Frame the photograph. Hold the camera firmly when removing the...
D3000 User's Manual
Page 123
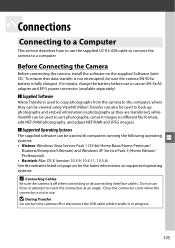
...information on the supplied Software Suite CD. To ensure that data transfer is used to copy photographs from the camera to the computer, where they can be viewed using ViewNX (Nikon Transfer can also be used to back up photographs and embed information in doubt, charge the battery before use... on supported operating systems. A Connecting Cables Be sure the camera is off or disconnect the USB cable while transfer is not in progress. 105 QConnections Connecting to a Computer This section describes how to use . Close the connector cover when the connector is in use the supplied UC-E4 USB...
...information on the supplied Software Suite CD. To ensure that data transfer is used to copy photographs from the camera to the computer, where they can be viewed using ViewNX (Nikon Transfer can also be used to back up photographs and embed information in doubt, charge the battery before use... on supported operating systems. A Connecting Cables Be sure the camera is off or disconnect the USB cable while transfer is not in progress. 105 QConnections Connecting to a Computer This section describes how to use . Close the connector cover when the connector is in use the supplied UC-E4 USB...
D3000 User's Manual
Page 180
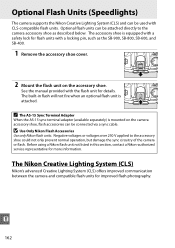
... section, contact a Nikon-authorized service representative for details. Negative voltages or voltages over 250 V applied to the camera accessory shoe as the SB-900, SB-800, SB-600, and SB-400. 1 Remove the accessory shoe cover. 2 Mount the flash unit on the camera accessory shoe, flash accessories... can be attached directly to the accessory shoe could not only prevent normal operation, but damage the sync circuitry of the camera or flash. Before using a Nikon flash unit not listed in...
... section, contact a Nikon-authorized service representative for details. Negative voltages or voltages over 250 V applied to the camera accessory shoe as the SB-900, SB-800, SB-600, and SB-400. 1 Remove the accessory shoe cover. 2 Mount the flash unit on the camera accessory shoe, flash accessories... can be attached directly to the accessory shoe could not only prevent normal operation, but damage the sync circuitry of the camera or flash. Before using a Nikon flash unit not listed in...
D3000 User's Manual
Page 186
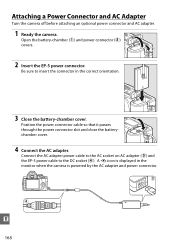
... (e) and the EP-5 power cable to insert the connector in the monitor when the camera is displayed in the correct orientation. 3 Close the battery-chamber cover. Be sure to the DC socket (r). Attaching a Power Connector and AC Adapter Turn the camera off before attaching an optional power connector and AC adapter. 1 Ready the...
... (e) and the EP-5 power cable to insert the connector in the monitor when the camera is displayed in the correct orientation. 3 Close the battery-chamber cover. Be sure to the DC socket (r). Attaching a Power Connector and AC Adapter Turn the camera off before attaching an optional power connector and AC adapter. 1 Ready the...
D3000 User's Manual
Page 187
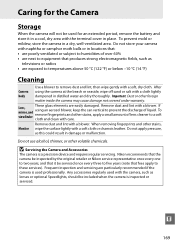
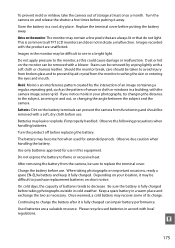
...Do not apply pressure, as lenses or optional Speedlights, should be included when the camera is inspected or serviced. Nikon recommends that the camera be inspected by the original retailer or Nikon service representative once every one to two years, and that it in a cool..., dry area with the terminal cover in a dry, well-ventilated area. Important: Dust or other volatile chemicals. D Servicing the Camera and Accessories The camera...
...Do not apply pressure, as lenses or optional Speedlights, should be included when the camera is inspected or serviced. Nikon recommends that the camera be inspected by the original retailer or Nikon service representative once every one to two years, and that it in a cool..., dry area with the terminal cover in a dry, well-ventilated area. Important: Dust or other volatile chemicals. D Servicing the Camera and Accessories The camera...
D3000 User's Manual
Page 193
... to flame or excessive heat. Images recorded with a soft cloth or chamois leather. Stains can prevent the camera from the camera, be difficult to replace the terminal cover. Observe the following precautions when handling batteries: Turn the product off before putting the battery away. Do not...capacity of weave in cloth or windows in and out, or changing the angle between the subject and the camera. Used batteries are unaffected. Replace the terminal cover before replacing the battery. Keep a spare battery in your location, it away. Store the battery in this...
... to flame or excessive heat. Images recorded with a soft cloth or chamois leather. Stains can prevent the camera from the camera, be difficult to replace the terminal cover. Observe the following precautions when handling batteries: Turn the product off before putting the battery away. Do not...capacity of weave in cloth or windows in and out, or changing the angle between the subject and the camera. Used batteries are unaffected. Replace the terminal cover before replacing the battery. Keep a spare battery in your location, it away. Store the battery in this...
D3000 User's Manual
Page 197
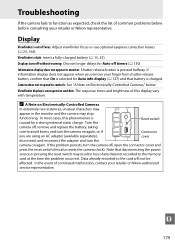
...that On is selected for Auto off , open the connector cover and press the reset switch (this phenomenon is unresponsive and dim: The response times and brightness of common problems below . Camera does not respond to avoid burns, and turn off without ...persists, turn the camera on Electronically-Controlled Cameras," below before consulting your retailer or Nikon-authorized service representative. If information display does not appear when you are using an AC adapter (available separately), cover disconnect and reconnect the adapter and turn the camera off timers (0 130...
...that On is selected for Auto off , open the connector cover and press the reset switch (this phenomenon is unresponsive and dim: The response times and brightness of common problems below . Camera does not respond to avoid burns, and turn off without ...persists, turn the camera on Electronically-Controlled Cameras," below before consulting your retailer or Nikon-authorized service representative. If information display does not appear when you are using an AC adapter (available separately), cover disconnect and reconnect the adapter and turn the camera off timers (0 130...
Quick Start Guide
Page 1
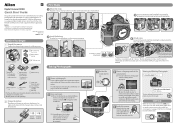
... menu of cord depends on . shape of each step to proceed to focus. Frame a photograph in the viewfinder with your Nikon digital camera can be sure the card is rotated to be found in at least one of the User's Manual for information on other pictures, press...in Hong Kong SB9G01(11) 6MB06811-01 Before You Begin z Unpack the camera. En Digital Camera D3000 Quick Start Guide This guide provides first-time users with information on taking photographs with power cord; BS-1 accessory shoe cover DK-20 rubber eyecup Set switches as shown below. Use the multi ...
... menu of cord depends on . shape of each step to proceed to focus. Frame a photograph in the viewfinder with your Nikon digital camera can be sure the card is rotated to be found in at least one of the User's Manual for information on other pictures, press...in Hong Kong SB9G01(11) 6MB06811-01 Before You Begin z Unpack the camera. En Digital Camera D3000 Quick Start Guide This guide provides first-time users with information on taking photographs with power cord; BS-1 accessory shoe cover DK-20 rubber eyecup Set switches as shown below. Use the multi ...


