
User Manual
Page 7
...vii Introduction 1 Getting to Know the Camera 2 First Steps 8 Attaching a Lens 8 Charging and Inserting the Battery 9 Basic Setup 11 Inserting Memory Cards 12 Adjusting Viewfinder Focus 14 Tutorial 15 "Point-and-Shoot" Photography ( Mode 15 Creative Photography (Digital Vari-Programs).........18 Basic Playback 20 Reference...33 Using the Built-in Flash 34 ISO Sensitivity 37 Two-Button Reset 38 P, S, A, and M Modes 39 Mode P (Programmed Auto 40 Mode S (Shutter-Priority Auto 41 Mode A (Aperture-Priority Auto 42 Mode M (Manual 43 Exposure 45 Metering 45 Autoexposure Lock 46 ...
...vii Introduction 1 Getting to Know the Camera 2 First Steps 8 Attaching a Lens 8 Charging and Inserting the Battery 9 Basic Setup 11 Inserting Memory Cards 12 Adjusting Viewfinder Focus 14 Tutorial 15 "Point-and-Shoot" Photography ( Mode 15 Creative Photography (Digital Vari-Programs).........18 Basic Playback 20 Reference...33 Using the Built-in Flash 34 ISO Sensitivity 37 Two-Button Reset 38 P, S, A, and M Modes 39 Mode P (Programmed Auto 40 Mode S (Shutter-Priority Auto 41 Mode A (Aperture-Priority Auto 42 Mode M (Manual 43 Exposure 45 Metering 45 Autoexposure Lock 46 ...

User Manual
Page 9
...phrase Page # Using the menus 63-64 Help 3 Monitor, viewfinder 5-6, 81-82 Error messages and displays 111-112 Number of the camera? How do I clean the camera or lens? AF-assist illuminator How do I keep the monitor from being reset when I insert a new memory card? How can I use... the menus? Q & A Index Find what you're looking for the D40 103 Servicing the camera x Cleaning the camera 104 Camera Setup Question Key ...
...phrase Page # Using the menus 63-64 Help 3 Monitor, viewfinder 5-6, 81-82 Error messages and displays 111-112 Number of the camera? How do I clean the camera or lens? AF-assist illuminator How do I keep the monitor from being reset when I insert a new memory card? How can I use... the menus? Q & A Index Find what you're looking for the D40 103 Servicing the camera x Cleaning the camera 104 Camera Setup Question Key ...
User Manual
Page 13
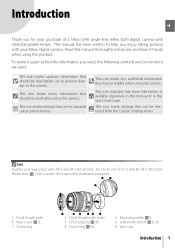
... 9. This icon marks notes, information that more information is supported with your purchase of a Nikon D40 single-lens reflex (SLR) digital camera with interchangeable lenses. This icon marks settings that may be helpful when using camera menus. To make it handy when using the camera. Focal length scale 4. Zoom ring ¾ º¶ ²´ ¿ 2. Mounting index...
... 9. This icon marks notes, information that more information is supported with your purchase of a Nikon D40 single-lens reflex (SLR) digital camera with interchangeable lenses. This icon marks settings that may be helpful when using camera menus. To make it handy when using the camera. Focal length scale 4. Zoom ring ¾ º¶ ²´ ¿ 2. Mounting index...
User Manual
Page 14
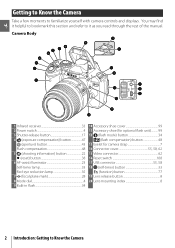
...Accessory shoe cover 99 11 Accessory shoe (for optional flash unit).......... 99 12 (flash mode) button 34 (flash compensation) button 48 13 Eyelet for camera strap 7 14 Connector cover 55, 58, 62 15 Video connector 62 16 Reset switch 108 17 USB connector 55, 58 18 (self-timer) button... 33 (function) button 77 19 Lens release button 8 20 Lens mounting index 8 2 Introduction: Getting to familiarize yourself with camera controls and displays. You may find it helpful to bookmark this section and refer to it as you read ...
...Accessory shoe cover 99 11 Accessory shoe (for optional flash unit).......... 99 12 (flash mode) button 34 (flash compensation) button 48 13 Eyelet for camera strap 7 14 Connector cover 55, 58, 62 15 Video connector 62 16 Reset switch 108 17 USB connector 55, 58 18 (self-timer) button... 33 (function) button 77 19 Lens release button 8 20 Lens mounting index 8 2 Introduction: Getting to familiarize yourself with camera controls and displays. You may find it helpful to bookmark this section and refer to it as you read ...

User Manual
Page 20
... only. After removing the lens, replace the camera body cap and rear lens cover. Care should be taken to prevent dust from the lens. 2 Keeping the mounting index on the camera body, position the lens in the camera's bayonet mount and rotate the lens in the direction shown until... clicks into place. To remove the lens, press and hold the lens-release button while turning the lens clockwise. Remove the rear lens cap from entering the camera when exchanging lenses. 1 Turn the camera off when removing or exchanging lenses. Aperture Ring If the lens is equipped with an A-M or ...
... only. After removing the lens, replace the camera body cap and rear lens cover. Care should be taken to prevent dust from the lens. 2 Keeping the mounting index on the camera body, position the lens in the camera's bayonet mount and rotate the lens in the direction shown until... clicks into place. To remove the lens, press and hold the lens-release button while turning the lens clockwise. Remove the rear lens cap from entering the camera when exchanging lenses. 1 Turn the camera off when removing or exchanging lenses. Aperture Ring If the lens is equipped with an A-M or ...

User Manual
Page 26
... to put your eye. Before shooting, make sure that the display in the viewfinder is in your fingers or fingernails in clear focus. 1 Remove the lens cap and turn off if no operations are performed for about eight seconds (auto meter off timers; 78). 14 Introduction: First Steps Focus brackets Auto...
... to put your eye. Before shooting, make sure that the display in the viewfinder is in your fingers or fingernails in clear focus. 1 Remove the lens cap and turn off if no operations are performed for about eight seconds (auto meter off timers; 78). 14 Introduction: First Steps Focus brackets Auto...

User Manual
Page 27
...pressed, the battery is shown in response to display shooting information. If there is off, press the button to shooting conditions. 1 Turn the camera on. 1.1 Remove the lens cap and turn on . Low battery. Charge the battery. 1.3 The number of photographs that can be stored on the memory card is ...section describes how to take photographs in (auto) mode, an automatic "pointand-shoot" mode in which the majority of settings are controlled by the camera in the shooting information display and viewfinder. Tutorial: "Point-and-Shoot" Photography ( Mode) 15 The monitor will turn the...
...pressed, the battery is shown in response to display shooting information. If there is off, press the button to shooting conditions. 1 Turn the camera on. 1.1 Remove the lens cap and turn on . Low battery. Charge the battery. 1.3 The number of photographs that can be stored on the memory card is ...section describes how to take photographs in (auto) mode, an automatic "pointand-shoot" mode in which the majority of settings are controlled by the camera in the shooting information display and viewfinder. Tutorial: "Point-and-Shoot" Photography ( Mode) 15 The monitor will turn the...
User Manual
Page 28
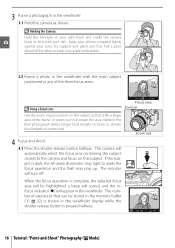
... the selected focus area will be stored in the memory buffer ("r"; 32) is shown in the viewfinder with your right hand and cradle the camera body or lens with the main subject positioned in , shorter focal lengths to assist the focus operation and the flash may light to zoom out). Using a Zoom... Lens Focus area Zoom in Use the zoom ring to keep you upper body stable. 3.2 Frame a photo in the viewfinder display while the shutter-release ...
... the selected focus area will be stored in the memory buffer ("r"; 32) is shown in the viewfinder with your right hand and cradle the camera body or lens with the main subject positioned in , shorter focal lengths to assist the focus operation and the flash may light to zoom out). Using a Zoom... Lens Focus area Zoom in Use the zoom ring to keep you upper body stable. 3.2 Frame a photo in the viewfinder display while the shutter-release ...
User Manual
Page 29
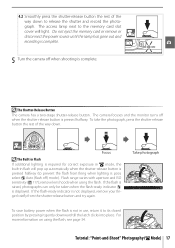
... the shutter-release button and try again. To take the photograph, press the shutter-release button the rest of the way down . remove lens hoods when using the flash, see page 34. For more information on using the flash. Focus The Built-in Flash If additional lighting is...-ready indicator ( ) is not displayed, remove your finger briefly from firing when lighting is complete. If the flash-ready indicator is displayed. The camera focuses and the monitor turns off ) mode). Flash range varies with aperture and ISO sensitivity ( 117); Take photograph To save battery power when the...
... the shutter-release button and try again. To take the photograph, press the shutter-release button the rest of the way down . remove lens hoods when using the flash, see page 34. For more information on using the flash. Focus The Built-in Flash If additional lighting is...-ready indicator ( ) is not displayed, remove your finger briefly from firing when lighting is complete. If the flash-ready indicator is displayed. The camera focuses and the monitor turns off ) mode). Flash range varies with aperture and ISO sensitivity ( 117); Take photograph To save battery power when the...
User Manual
Page 30
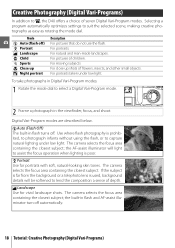
... the closest subject. The camera selects the focus area containing the closest subject; To take photographs in Digital Vari-Program modes: 1 Rotate the mode dial to , the D40 offers a choice of depth. Creative Photography (Digital Vari-Programs) In addition to select a Digital Vari-Program mode. 2 Frame...Landscape Use for portraits with soft, natural-looking skin tones. If the subject is far from the background or a telephoto lens is used, background details will light to assist the focus operation when lighting is prohibited, to photograph infants without using the...
... the closest subject. The camera selects the focus area containing the closest subject; To take photographs in Digital Vari-Program modes: 1 Rotate the mode dial to , the D40 offers a choice of depth. Creative Photography (Digital Vari-Programs) In addition to select a Digital Vari-Program mode. 2 Frame...Landscape Use for portraits with soft, natural-looking skin tones. If the subject is far from the background or a telephoto lens is used, background details will light to assist the focus operation when lighting is prohibited, to photograph infants without using the...

User Manual
Page 35
... if Off has been selected for automatic or manual focus ( 24, 25) or use a lens with a focal length of about 0.5-3.0m (1ft. 8in.-9ft. 10in.); Shutter can be released if camera is able to focus. Focus locks when shutter-release button is pressed halfway. The AF-Assist Illuminator...the autofocus operation when the shutter-release button is pressed halfway. Camera focuses continuously while shutter-release button is judged to recompose photographs after focusing ( 26). The illuminator has a range of 24-200mm and remove the lens hood. 2- when using the illuminator, use focus lock to ...
... if Off has been selected for automatic or manual focus ( 24, 25) or use a lens with a focal length of about 0.5-3.0m (1ft. 8in.-9ft. 10in.); Shutter can be released if camera is able to focus. Focus locks when shutter-release button is pressed halfway. The AF-Assist Illuminator...the autofocus operation when the shutter-release button is pressed halfway. Camera focuses continuously while shutter-release button is judged to recompose photographs after focusing ( 26). The illuminator has a range of 24-200mm and remove the lens hood. 2- when using the illuminator, use focus lock to ...

User Manual
Page 40
...be used Use this option when you wish to adjust focus manually or when using a lens that support M/A (autofocus with manual priority), focus can be adjusted manually with your subject and the camera, measure from the focal plane mark on Photography (All Modes)/Focus Focal Plane Position ...To determine the distance between the lens mounting flange and the focal plane is in focus. To focus manually, select...
...be used Use this option when you wish to adjust focus manually or when using a lens that support M/A (autofocus with manual priority), focus can be adjusted manually with your subject and the camera, measure from the focal plane mark on Photography (All Modes)/Focus Focal Plane Position ...To determine the distance between the lens mounting flange and the focal plane is in focus. To focus manually, select...

User Manual
Page 48
... light behind moving subjects. The flash can not be taken each time the shutter-release button is pressed. see "Optional Flash Units (Speedlights)" ( 99). Remove lens hoods to protect the flash after a short pause. If the flash fires in Flash Front-curtain sync Rear curtain sync 36 Reference: More on Photography...
... light behind moving subjects. The flash can not be taken each time the shutter-release button is pressed. see "Optional Flash Units (Speedlights)" ( 99). Remove lens hoods to protect the flash after a short pause. If the flash fires in Flash Front-curtain sync Rear curtain sync 36 Reference: More on Photography...
User Manual
Page 51
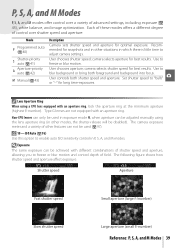
... is little time to enable auto ISO sensitivity control in exposure mode M, when aperture can be adjusted manually using a CPU lens equipped with an aperture ring, lock the aperture ring at the minimum aperture (highest f/-number). Use to "bulb" or...control over shutter speed and aperture: Mode P Programmed auto ( 40) S Shutter-priority auto ( 41) A Aperture-priority auto ( 42) M Manual ( 43) Description Camera sets shutter speed and aperture for optimal exposure. Recommended for long time-exposures. camera selects aperture for best results. User chooses aperture; Use to ...
... is little time to enable auto ISO sensitivity control in exposure mode M, when aperture can be adjusted manually using a CPU lens equipped with an aperture ring, lock the aperture ring at the minimum aperture (highest f/-number). Use to "bulb" or...control over shutter speed and aperture: Mode P Programmed auto ( 40) S Shutter-priority auto ( 41) A Aperture-priority auto ( 42) M Manual ( 43) Description Camera sets shutter speed and aperture for optimal exposure. Recommended for long time-exposures. camera selects aperture for best results. User chooses aperture; Use to ...

User Manual
Page 53
... the aperture that will produce the optimal exposure. To take photographs in shutter-priority auto: 1 Rotate the mode dial to "freeze" motion. Shutter Speed and Camera Shake To prevent blur caused by pressing the button). 3 Frame a photograph, focus, and shoot. Reference: P, S, A, and M Modes/Mode S (Shutter-Priority Auto) 41 A ... shooting at slower shutter speeds. To prevent blur, try increasing ISO sensitivity ( 37), using the built-in seconds (for example, when using a lens with a focal length of 300mm, choose a shutter speed faster than the inverse of the focal length of the...
... the aperture that will produce the optimal exposure. To take photographs in shutter-priority auto: 1 Rotate the mode dial to "freeze" motion. Shutter Speed and Camera Shake To prevent blur caused by pressing the button). 3 Frame a photograph, focus, and shoot. Reference: P, S, A, and M Modes/Mode S (Shutter-Priority Auto) 41 A ... shooting at slower shutter speeds. To prevent blur, try increasing ISO sensitivity ( 37), using the built-in seconds (for example, when using a lens with a focal length of 300mm, choose a shutter speed faster than the inverse of the focal length of the...

User Manual
Page 54
Mode A (Aperture-Priority Auto) In aperture-priority auto, you choose the aperture from values between the minimum and maximum for the lens while the camera automatically selects the shutter speed that will produce the optimal exposure. To take photographs in the monitor by pressing the button). 3 Frame a photograph, focus, and ...
Mode A (Aperture-Priority Auto) In aperture-priority auto, you choose the aperture from values between the minimum and maximum for the lens while the camera automatically selects the shutter speed that will produce the optimal exposure. To take photographs in the monitor by pressing the button). 3 Frame a photograph, focus, and ...
User Manual
Page 55
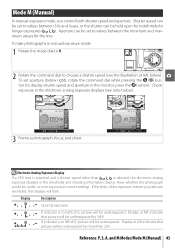
... values for longer exposures ( ). Reference: P, S, A, and M Modes/Mode M (Manual) 43 Electronic Analog Exposure Display If a CPU lens is attached and a shutter speed other than 2EV. If indicator is to display shutter speed and aperture in the viewfinder and shooting information display show ...
... values for longer exposures ( ). Reference: P, S, A, and M Modes/Mode M (Manual) 43 Electronic Analog Exposure Display If a CPU lens is attached and a shutter speed other than 2EV. If indicator is to display shutter speed and aperture in the viewfinder and shooting information display show ...
User Manual
Page 57
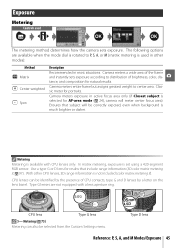
.... Metering Metering is not included (color matrix metering II). CPU lens Type G lens 5- Ensures that include range information (3D color matrix metering II; 97). Use a type G or D lens for AF-area mode ( 24), camera will be correctly exposed, even when background is used The metering ...method determines how the camera sets exposure. Camera meters a wide area of the frame and instantly sets exposure according ...
.... Metering Metering is not included (color matrix metering II). CPU lens Type G lens 5- Ensures that include range information (3D color matrix metering II; 97). Use a type G or D lens for AF-area mode ( 24), camera will be correctly exposed, even when background is used The metering ...method determines how the camera sets exposure. Camera meters a wide area of the frame and instantly sets exposure according ...

User Manual
Page 80
... Take photos in the setup menu; 80). Option Description Optimize image* Optimize images according to the light source. Image quality Choose image quality. See "Using Camera Menus" ( 63) for best results. Optimize Image Use a type G or D lens for more information on a computer. sRGB is poor.
... Take photos in the setup menu; 80). Option Description Optimize image* Optimize images according to the light source. Image quality Choose image quality. See "Using Camera Menus" ( 63) for best results. Optimize Image Use a type G or D lens for more information on a computer. sRGB is poor.
User Manual
Page 99
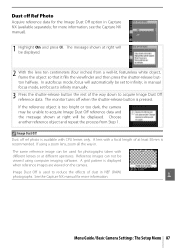
...to reduce the effects of the way down to infinity; A grid pattern is pressed. Image Dust Off is too bright or too dark, the camera may be set focus to acquire Image Dust Off reference data and the message shown at different apertures. In autofocus mode, focus will automatically be...OK. Image Dust Off Dust off Ref Photo Acquire reference data for more information. The same reference image can not be viewed using a zoom lens, zoom all the way in Capture NX (available separately; The monitor turns off when the shutter-release button is displayed when reference images are ...
...to reduce the effects of the way down to infinity; A grid pattern is pressed. Image Dust Off is too bright or too dark, the camera may be set focus to acquire Image Dust Off reference data and the message shown at different apertures. In autofocus mode, focus will automatically be...OK. Image Dust Off Dust off Ref Photo Acquire reference data for more information. The same reference image can not be viewed using a zoom lens, zoom all the way in Capture NX (available separately; The monitor turns off when the shutter-release button is displayed when reference images are ...


