L20/19 User's Manual
Page 5
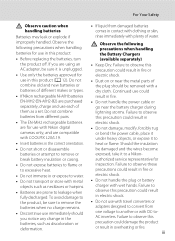
...turn the product off. Should the insulation be removed with plenty of them as necklaces or hairpins. • Batteries are compatible with COOLPIX L20/L19. • Insert batteries in the correct orientation. • Do not short or disassemble batteries or attempt to remove or break...B2) are purchased separately, charge and use with Nikon digital cameras only, and are prone to a Nikonauthorized service representative for inspection. Failure to water. • Do not transport or store with metal objects such as a set. For Your Safety Observe caution when handling batteries ...
...turn the product off. Should the insulation be removed with plenty of them as necklaces or hairpins. • Batteries are compatible with COOLPIX L20/L19. • Insert batteries in the correct orientation. • Do not short or disassemble batteries or attempt to remove or break...B2) are purchased separately, charge and use with Nikon digital cameras only, and are prone to a Nikonauthorized service representative for inspection. Failure to water. • Do not transport or store with metal objects such as a set. For Your Safety Observe caution when handling batteries ...
L20/19 User's Manual
Page 9
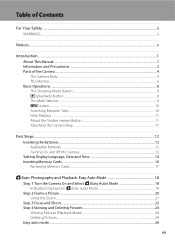
...-release Button...11 Attaching the Camera Strap ...11 First Steps ...12 Inserting the Batteries ...12 Applicable Batteries ...12 Turning On and Off the Camera...12 Setting Display Language, Date and Time 14 Inserting Memory Cards ...16 Removing Memory Cards...17 G Basic Photography and Playback: Easy Auto Mode 18 Step 1 Turn the...
...-release Button...11 Attaching the Camera Strap ...11 First Steps ...12 Inserting the Batteries ...12 Applicable Batteries ...12 Turning On and Off the Camera...12 Setting Display Language, Date and Time 14 Inserting Memory Cards ...16 Removing Memory Cards...17 G Basic Photography and Playback: Easy Auto Mode 18 Step 1 Turn the...
L20/19 User's Manual
Page 10
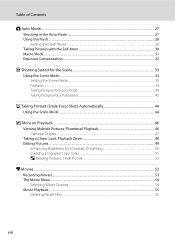
......28 Taking Pictures with the Self-timer 30 Macro Mode...31 Exposure Compensation ...32 C Shooting Suited for the Scene 33 Using the Scene Mode ...33 Setting the Scene Mode...33 Features ...34 Taking Pictures for Food Mode...40 Taking Pictures for a Panorama ...42 a Taking Portrait (Smile Face) Shots Automatically 44 Using...
......28 Taking Pictures with the Self-timer 30 Macro Mode...31 Exposure Compensation ...32 C Shooting Suited for the Scene 33 Using the Scene Mode ...33 Setting the Scene Mode...33 Features ...34 Taking Pictures for Food Mode...40 Taking Pictures for a Panorama ...42 a Taking Portrait (Smile Face) Shots Automatically 44 Using...
L20/19 User's Manual
Page 11
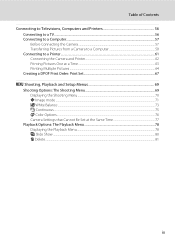
... Printer...61 Connecting the Camera and Printer...62 Printing Pictures One at a Time ...63 Printing Multiple Pictures ...64 Creating a DPOF Print Order: Print Set 67 d Shooting, Playback and Setup Menus 69 Shooting Options: The Shooting Menu 69 Displaying the Shooting Menu...70 A Image mode ...71 B White ...Balance...73 C Continuous ...75 F Color Options...76 Camera Settings that Cannot Be Set at the Same Time 77 Playback Options: The Playback Menu 78 Displaying the Playback Menu...78 b Slide Show...80 c Delete ...81 ix
... Printer...61 Connecting the Camera and Printer...62 Printing Pictures One at a Time ...63 Printing Multiple Pictures ...64 Creating a DPOF Print Order: Print Set 67 d Shooting, Playback and Setup Menus 69 Shooting Options: The Shooting Menu 69 Displaying the Shooting Menu...70 A Image mode ...71 B White ...Balance...73 C Continuous ...75 F Color Options...76 Camera Settings that Cannot Be Set at the Same Time 77 Playback Options: The Playback Menu 78 Displaying the Playback Menu...78 b Slide Show...80 c Delete ...81 ix

L20/19 User's Manual
Page 12
... Basic Camera Setup: The Setup Menu 82 Displaying the Setup Menu...83 a Menus ...84 c Welcome Screen...85 d Date...86 e Monitor Settings ...89 f Date Imprint...91 U Motion detection...92 h AF Assist ...92 i Sound Settings ...93 k Auto Off ...94 l Format Memory/m Format Card...95 n Language ...96 o Video Mode ...96 d Blink Warning...97 p Reset All...
... Basic Camera Setup: The Setup Menu 82 Displaying the Setup Menu...83 a Menus ...84 c Welcome Screen...85 d Date...86 e Monitor Settings ...89 f Date Imprint...91 U Motion detection...92 h AF Assist ...92 i Sound Settings ...93 k Auto Off ...94 l Format Memory/m Format Card...95 n Language ...96 o Video Mode ...96 d Blink Warning...97 p Reset All...
L20/19 User's Manual
Page 13
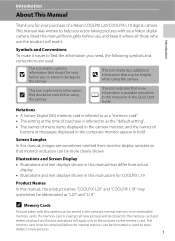
... icon marks notes, information C that more clearly shown. Notations • A Secure Digital (SD) memory card is referred to as a "memory card". • The setting at the time of a Nikon COOLPIX L20/COOLPIX L19 digital camera. Illustrations and Screen Display • Illustrations and text displays shown in this manual may differ from monitor display samples so...
... icon marks notes, information C that more clearly shown. Notations • A Secure Digital (SD) memory card is referred to as a "memory card". • The setting at the time of a Nikon COOLPIX L20/COOLPIX L19 digital camera. Illustrations and Screen Display • Illustrations and text displays shown in this manual may differ from monitor display samples so...

L20/19 User's Manual
Page 18
... 4 AE/AF-L indicator 43 5 Focus indicator 22 6 Flash mode 28 7 Battery level indicator 18 8 Motion detection indicator ...........19, 92 9 "Date not set" indicator 110 Time zone indicator 86 10 Date imprint 91 11 Image mode*2 71 Movie options 54 12 (still pictures 18 b Movie length 53 13... 73 22 Continuous shooting mode 75 23 Self-timer indicator 30 *1 Differs according to the sections on each mode for details. 6 *2 K and K are displayed on L20, and z and y are displayed on L19. Shooting 4 5 23 1 2 3 22 10 7 21 8 20 19 +1.0 18 1/125 F3.1 999 6 9 10 11 17 ...
... 4 AE/AF-L indicator 43 5 Focus indicator 22 6 Flash mode 28 7 Battery level indicator 18 8 Motion detection indicator ...........19, 92 9 "Date not set" indicator 110 Time zone indicator 86 10 Date imprint 91 11 Image mode*2 71 Movie options 54 12 (still pictures 18 b Movie length 53 13... 73 22 Continuous shooting mode 75 23 Self-timer indicator 30 *1 Differs according to the sections on each mode for details. 6 *2 K and K are displayed on L20, and z and y are displayed on L19. Shooting 4 5 23 1 2 3 22 10 7 21 8 20 19 +1.0 18 1/125 F3.1 999 6 9 10 11 17 ...

L20/19 User's Manual
Page 19
... 67 10 Small picture 52 11 D-Lighting icon 50 12 Protect icon 100 13 File number and type 105 * The displayed icons vary with the settings in shooting mode. 7
... 67 10 Small picture 52 11 D-Lighting icon 50 12 Protect icon 100 13 File number and type 105 * The displayed icons vary with the settings in shooting mode. 7

L20/19 User's Manual
Page 22
...Between Tabs Shooting menu Image mode White balance Continuous Color options Shooting menu Image mode White balance Continuous Color options Exit Exit Set up Motion detection AF assist Sound settings Auto off Format memory Exit Press k or the multi selector K to proceed to follow. The selected menu will be ... the setup menu. • To exit the menu display, press d again. Displayed when the menu contains two or more menu items to the next set of options. AF assist Auto Off Exit Press k or the multi selector K to select a tab and press k or K. When using the following modes...
...Between Tabs Shooting menu Image mode White balance Continuous Color options Shooting menu Image mode White balance Continuous Color options Exit Exit Set up Motion detection AF assist Sound settings Auto off Format memory Exit Press k or the multi selector K to proceed to follow. The selected menu will be ... the setup menu. • To exit the menu display, press d again. Displayed when the menu contains two or more menu items to the next set of options. AF assist Auto Off Exit Press k or the multi selector K to select a tab and press k or K. When using the following modes...
L20/19 User's Manual
Page 23
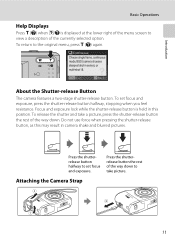
... to take a picture, press the shutter-release button the rest of the currently selected option. To return to view a description of the way down to set focus and exposure, press the shutter-release button halfway, stopping when you feel resistance. Introduction Basic Operations Help Displays Press g (j) when M/j is held in series... pressing the shutter-release button, as this position. Press the shutterrelease button the rest of the menu screen to the original menu, press g (j) again. To set focus and exposure.
... to take a picture, press the shutter-release button the rest of the currently selected option. To return to view a description of the way down to set focus and exposure, press the shutter-release button halfway, stopping when you feel resistance. Introduction Basic Operations Help Displays Press g (j) when M/j is held in series... pressing the shutter-release button, as this position. Press the shutterrelease button the rest of the menu screen to the original menu, press g (j) again. To set focus and exposure.
L20/19 User's Manual
Page 25
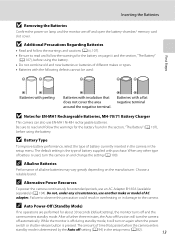
... result in overheating or in the setup menu. C Alternative Power Resources To power the camera continuously for about 30 seconds (default setting), the monitor turns off setting (A 94) in the section, "The Battery" (A 107), before using the battery. • Do not combine old and ...Auto off and the camera enters standby mode. Batteries with purchase. Inserting the Batteries B Removing the Batteries Confirm the power-on and change the setting (A 100). B Additional Precautions Regarding Batteries • Read and follow the warnings and cautions (A iii, 107). • Be sure to...
... result in overheating or in the setup menu. C Alternative Power Resources To power the camera continuously for about 30 seconds (default setting), the monitor turns off setting (A 94) in the section, "The Battery" (A 107), before using the battery. • Do not combine old and ...Auto off and the camera enters standby mode. Batteries with purchase. Inserting the Batteries B Removing the Batteries Confirm the power-on and change the setting (A 100). B Additional Precautions Regarding Batteries • Read and follow the warnings and cautions (A iii, 107). • Be sure to...
L20/19 User's Manual
Page 26
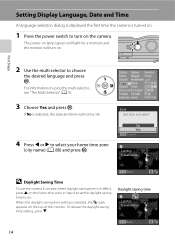
... time London Casablanca Back 14 When the daylight saving time setting is in effect, press H on the home time zone in Step 4 to set . 4 Press J or K to select your home time zone (city name) (A 88) and press k. Setting Display Language, Date and Time A language-selection dialog is... displayed the first time the camera is turned on. 1 Press the power switch to turn on. Date Set time and date? To release the daylight saving time setting, press I. For information on using the multi selector, see "The Multi Selector" (A 9). 3 Choose Yes and press k....
... time London Casablanca Back 14 When the daylight saving time setting is in effect, press H on the home time zone in Step 4 to set . 4 Press J or K to select your home time zone (city name) (A 88) and press k. Setting Display Language, Date and Time A language-selection dialog is... displayed the first time the camera is turned on. 1 Press the power switch to turn on. Date Set time and date? To release the daylight saving time setting, press I. For information on using the multi selector, see "The Multi Selector" (A 9). 3 Choose Yes and press k....

L20/19 User's Manual
Page 27
... (A 86) in the setup menu (A 82) and follow the instructions starting from the above step 5. • To change the time zone and the daylight saving settings, select Time zone from Date in the Auto Mode" (A 27), "Using the Scene Mode" (A 33), "Using the Smile Mode" (A 44), or "Recording Movies" ... Y • Press J to return to the previous item. 6 Choose the order in which the day, month and year are displayed and press k or K. • The settings are applied. 7 Press the shooting mode button to move the cursor in Easy auto mode (A 18). • Press the multi selector H or I to edit the...
... (A 86) in the setup menu (A 82) and follow the instructions starting from the above step 5. • To change the time zone and the daylight saving settings, select Time zone from Date in the Auto Mode" (A 27), "Using the Scene Mode" (A 33), "Using the Smile Mode" (A 44), or "Recording Movies" ... Y • Press J to return to the previous item. 6 Choose the order in which the day, month and year are displayed and press k or K. • The settings are applied. 7 Press the shooting mode button to move the cursor in Easy auto mode (A 18). • Press the multi selector H or I to edit the...
L20/19 User's Manual
Page 30
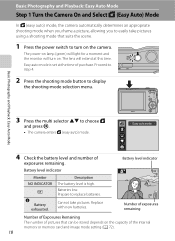
... 2 Press the shooting mode button to choose G and press k. • The camera enters G (easy auto) mode. Description The battery level is set at this time. Cannot take pictures using a shooting mode that can be stored depends on the capacity of exposures remaining. Replace with new batteries. 7 ...allowing you to easily take pictures. Easy auto mode 4 Check the battery level and number of the internal memory or memory card and image mode setting (A 72). 18 Easy auto mode is high. The power-on lamp (green) will light for a moment and the monitor will extend at...
... 2 Press the shooting mode button to choose G and press k. • The camera enters G (easy auto) mode. Description The battery level is set at this time. Cannot take pictures using a shooting mode that can be stored depends on the capacity of exposures remaining. Replace with new batteries. 7 ...allowing you to easily take pictures. Easy auto mode 4 Check the battery level and number of the internal memory or memory card and image mode setting (A 72). 18 Easy auto mode is high. The power-on lamp (green) will light for a moment and the monitor will extend at...

L20/19 User's Manual
Page 31
...camera detects shaking and increases shutter speed, the motion detection indicator turns green. 19 Image mode Display image size and quality set to AUTO (default setting), if the camera detects a moving subject or camera shaking while shooting still pictures, shutter speed increases to reduce blurring...., the camera automatically recognizes the face and focuses on it. • The flash setting can be set to indicate the shooting mode selected by subject or camera shake. The default settings are as follows: L20: K Normal (3648×2736) L19: y Normal (3264×2448) The indicators...
...camera detects shaking and increases shutter speed, the motion detection indicator turns green. 19 Image mode Display image size and quality set to AUTO (default setting), if the camera detects a moving subject or camera shaking while shooting still pictures, shutter speed increases to reduce blurring...., the camera automatically recognizes the face and focuses on it. • The flash setting can be set to indicate the shooting mode selected by subject or camera shake. The default settings are as follows: L20: K Normal (3648×2736) L19: y Normal (3264×2448) The indicators...

L20/19 User's Manual
Page 33
... Mode Optical Digital zoom zoom Digital Zoom When the optical zoom is increased beyond V. optical zoom magnification of optical zoom. When zoom is set at the current image mode setting. The position of V moves to the right as interpolation to zoom in the center of picture quality. When the image size is...
... Mode Optical Digital zoom zoom Digital Zoom When the optical zoom is increased beyond V. optical zoom magnification of optical zoom. When zoom is set at the current image mode setting. The position of V moves to the right as interpolation to zoom in the center of picture quality. When the image size is...

L20/19 User's Manual
Page 38
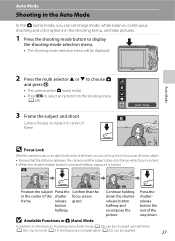
...; In some cases, included those noted in the easy auto mode The macro mode button (A 9, 31) on the multi selector is selected, the camera automatically sets the flash mode according to focus, use ) (A 27) • e Portrait (A 34) • f Landscape (A 34) • g Night landscape (A 37) • h Night...auto) mode, focus on a variety of the shooting conditions. When faces are partially hidden by sunglasses or other obstructions - Flash settings in easy auto mode Auto (default setting) or Off can be in the flash mode (A 28). • When U (Auto) is not available. 26 When faces...
...; In some cases, included those noted in the easy auto mode The macro mode button (A 9, 31) on the multi selector is selected, the camera automatically sets the flash mode according to focus, use ) (A 27) • e Portrait (A 34) • f Landscape (A 34) • g Night landscape (A 37) • h Night...auto) mode, focus on a variety of the shooting conditions. When faces are partially hidden by sunglasses or other obstructions - Flash settings in easy auto mode Auto (default setting) or Off can be in the flash mode (A 28). • When U (Auto) is not available. 26 When faces...
L20/19 User's Manual
Page 39
... object in the center of the way down the shutterrelease button halfway and Press the shutterrelease button the halfway. rest of the frame, you can set image mode, white balance, continuous shooting and color options in the center of the shutter focus area is locked. 7 1/125 F3.1 1/125 F3.1 Position the...
... object in the center of the way down the shutterrelease button halfway and Press the shutterrelease button the halfway. rest of the frame, you can set image mode, white balance, continuous shooting and color options in the center of the shutter focus area is locked. 7 1/125 F3.1 1/125 F3.1 Position the...
L20/19 User's Manual
Page 40
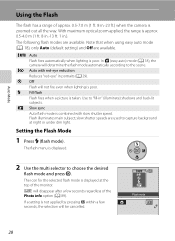
... capture background at the top of the monitor. The flash menu is poor. If a setting is taken. Note that when using easy auto mode (A 18), only Auto (default setting) and Off are available. Auto with slow shutter speed. Setting the Flash Mode 1 Press m (flash mode). Flash mode 7 28 Fill flash Flash fires when...
... capture background at the top of the monitor. The flash menu is poor. If a setting is taken. Note that when using easy auto mode (A 18), only Auto (default setting) and Off are available. Auto with slow shutter speed. Setting the Flash Mode 1 Press m (flash mode). Flash mode 7 28 Fill flash Flash fires when...
L20/19 User's Manual
Page 41
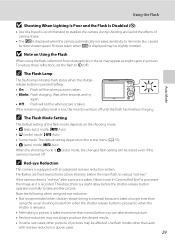
...pictures may be affected. If the camera detects "red-eye" after a picture is taken, Nikon's own In-Camera Red Eye Fix processes the image as bright spots in above cases. 29 C The Flash Mode Setting The default setting of the flash mode depends on the shooting mode. • G (easy auto) mode:...cases, other than using the flash, reflections from when the shutter-release button is pressed to when the shutter is recorded. To reduce these reflections, set the flash to minimize blur caused by slow shutter speed. Wait a few seconds and try again. • Off: Flash will turn off . C...
...pictures may be affected. If the camera detects "red-eye" after a picture is taken, Nikon's own In-Camera Red Eye Fix processes the image as bright spots in above cases. 29 C The Flash Mode Setting The default setting of the flash mode depends on the shooting mode. • G (easy auto) mode:...cases, other than using the flash, reflections from when the shutter-release button is pressed to when the shutter is recorded. To reduce these reflections, set the flash to minimize blur caused by slow shutter speed. Wait a few seconds and try again. • Off: Flash will turn off . C...


