
L20/19 User's Manual
Page 2
... of the SD Card Association. • PictBridge is a trademark. • All other trade names mentioned in this manual or the other documentation provided with your Nikon product are trademarks or registered trademarks of their respective holders.
... of the SD Card Association. • PictBridge is a trademark. • All other trade names mentioned in this manual or the other documentation provided with your Nikon product are trademarks or registered trademarks of their respective holders.

L20/19 User's Manual
Page 3
Introduction First Steps G Basic Photography and Playback: Easy Auto Mode A Shooting in the Auto Mode C Shooting Suited for the Scene a Taking Portrait (Smile Face) Shots Automatically c More on Playback D Movies Connecting to Televisions, Computers and Printers d Shooting, Playback and Setup Menus Technical Notes i
Introduction First Steps G Basic Photography and Playback: Easy Auto Mode A Shooting in the Auto Mode C Shooting Suited for the Scene a Taking Portrait (Smile Face) Shots Automatically c More on Playback D Movies Connecting to Televisions, Computers and Printers d Shooting, Playback and Setup Menus Technical Notes i
L20/19 User's Manual
Page 4
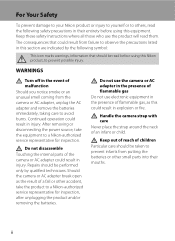
...precautions listed in their mouths. ii The consequences that should be performed only by the following safety precautions in this Nikon product, to a Nikon-authorized service representative for inspection. After removing or disconnecting the power source, take the product to prevent possible injury... result from the camera or AC adapter, unplug the AC adapter and remove the batteries immediately, taking care to a Nikon-authorized service representative for inspection, after unplugging the product and/or removing the batteries. WARNINGS Turn off in the presence of...
...precautions listed in their mouths. ii The consequences that should be performed only by the following safety precautions in this Nikon product, to a Nikon-authorized service representative for inspection. After removing or disconnecting the power source, take the product to prevent possible injury... result from the camera or AC adapter, unplug the AC adapter and remove the batteries immediately, taking care to a Nikon-authorized service representative for inspection, after unplugging the product and/or removing the batteries. WARNINGS Turn off in the presence of...
L20/19 User's Manual
Page 5
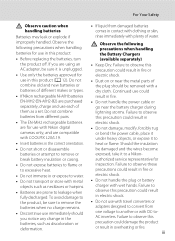
...in fire or electric shock. • Dust on or near the metal parts of them as necklaces or hairpins. • Batteries are compatible with COOLPIX L20/L19. • Insert batteries in the correct orientation. • Do not short or disassemble batteries or attempt to remove or break battery insulation ...or bend the power cable, place it under heavy objects, or expose it is unplugged. • Use only the batteries approved for use with Nikon digital cameras only, and are prone to water. • Do not transport or store with wet hands. Observe the following precautions when handling ...
...in fire or electric shock. • Dust on or near the metal parts of them as necklaces or hairpins. • Batteries are compatible with COOLPIX L20/L19. • Insert batteries in the correct orientation. • Do not short or disassemble batteries or attempt to remove or break battery insulation ...or bend the power cable, place it under heavy objects, or expose it is unplugged. • Use only the batteries approved for use with Nikon digital cameras only, and are prone to water. • Do not transport or store with wet hands. Observe the following precautions when handling ...

L20/19 User's Manual
Page 6
... the equipment. For Your Safety Use appropriate cables When connecting cables to the input and output jacks, use only the cables provided or sold by Nikon for the purpose, to prevent liquid crystal from the subject.
... the equipment. For Your Safety Use appropriate cables When connecting cables to the input and output jacks, use only the cables provided or sold by Nikon for the purpose, to prevent liquid crystal from the subject.
L20/19 User's Manual
Page 7
... found to comply with the instructions, may cause harmful interference to radio communications. Using other reproductive harm. Notice for Customers in the U.S.A. Nikon Inc., 1300 Walt Whitman Road Melville, New York 11747-3064 USA Tel: 631-547-4200 v Notices Notice for customers in the State... to this product will not occur in accordance with the limits for help. Interface Cables Use the interface cables sold or provided by Nikon Corporation may exceed the limits of Class B Part 15 of the following measures: • Reorient or relocate the receiving antenna. •...
... found to comply with the instructions, may cause harmful interference to radio communications. Using other reproductive harm. Notice for Customers in the U.S.A. Nikon Inc., 1300 Walt Whitman Road Melville, New York 11747-3064 USA Tel: 631-547-4200 v Notices Notice for customers in the State... to this product will not occur in accordance with the limits for help. Interface Cables Use the interface cables sold or provided by Nikon Corporation may exceed the limits of Class B Part 15 of the following measures: • Reorient or relocate the receiving antenna. •...

L20/19 User's Manual
Page 8
The following apply only to users in European countries: • All batteries, whether marked with Canadian ICES-003. Do not dispose of as household waste. • For more information, contact the retailer or the local authorities in charge of waste management. ATTENTION Cet appareil numérique de la classe B est conforme à la norme NMB-003 du Canada. vi The following apply only to users in European Countries This symbol indicates that the battery is to be collected separately. Notices Notice for customers in Canada CAUTION This Class B digital apparatus complies...
The following apply only to users in European countries: • All batteries, whether marked with Canadian ICES-003. Do not dispose of as household waste. • For more information, contact the retailer or the local authorities in charge of waste management. ATTENTION Cet appareil numérique de la classe B est conforme à la norme NMB-003 du Canada. vi The following apply only to users in European Countries This symbol indicates that the battery is to be collected separately. Notices Notice for customers in Canada CAUTION This Class B digital apparatus complies...
L20/19 User's Manual
Page 9
Table of Contents For Your Safety ...ii WARNINGS...ii Notices...v Introduction ...1 About This Manual ...1 Information and Precautions...2 Parts of the Camera...4 The Camera Body ...4 The Monitor...6 Basic Operations...8 The Shooting Mode Button ...8 c (playback) button...8 The Multi Selector...9 d button ...10 Switching Between Tabs...10 Help Displays...11 About the Shutter-release Button...11 Attaching the Camera Strap ...11 First Steps ...12 Inserting the Batteries ...12 Applicable Batteries ...12 Turning On and Off the Camera...12 Setting Display Language, Date and Time 14 Inserting ...
Table of Contents For Your Safety ...ii WARNINGS...ii Notices...v Introduction ...1 About This Manual ...1 Information and Precautions...2 Parts of the Camera...4 The Camera Body ...4 The Monitor...6 Basic Operations...8 The Shooting Mode Button ...8 c (playback) button...8 The Multi Selector...9 d button ...10 Switching Between Tabs...10 Help Displays...11 About the Shutter-release Button...11 Attaching the Camera Strap ...11 First Steps ...12 Inserting the Batteries ...12 Applicable Batteries ...12 Turning On and Off the Camera...12 Setting Display Language, Date and Time 14 Inserting ...
L20/19 User's Manual
Page 10
Table of Contents A Auto Mode...27 Shooting in the Auto Mode...27 Using the Flash...28 Setting the Flash Mode...28 Taking Pictures with the Self-timer 30 Macro Mode...31 Exposure Compensation ...32 C Shooting Suited for the Scene 33 Using the Scene Mode ...33 Setting the Scene Mode...33 Features ...34 Taking Pictures for Food Mode...40 Taking Pictures for a Panorama ...42 a Taking Portrait (Smile Face) Shots Automatically 44 Using the Smile Mode ...44 c More on Playback...46 Viewing Multiple Pictures: Thumbnail Playback 46 Calendar Display...47 Taking a Closer Look: Playback Zoom 48 ...
Table of Contents A Auto Mode...27 Shooting in the Auto Mode...27 Using the Flash...28 Setting the Flash Mode...28 Taking Pictures with the Self-timer 30 Macro Mode...31 Exposure Compensation ...32 C Shooting Suited for the Scene 33 Using the Scene Mode ...33 Setting the Scene Mode...33 Features ...34 Taking Pictures for Food Mode...40 Taking Pictures for a Panorama ...42 a Taking Portrait (Smile Face) Shots Automatically 44 Using the Smile Mode ...44 c More on Playback...46 Viewing Multiple Pictures: Thumbnail Playback 46 Calendar Display...47 Taking a Closer Look: Playback Zoom 48 ...
L20/19 User's Manual
Page 11
Table of Contents Connecting to Televisions, Computers and Printers 56 Connecting to a TV ...56 Connecting to a Computer...57 Before Connecting the Camera...57 Transferring Pictures from a Camera to a Computer 58 Connecting to a Printer...61 Connecting the Camera and Printer...62 Printing Pictures One at a Time ...63 Printing Multiple Pictures ...64 Creating a DPOF Print Order: Print Set 67 d Shooting, Playback and Setup Menus 69 Shooting Options: The Shooting Menu 69 Displaying the Shooting Menu...70 A Image mode ...71 B White Balance...73 C Continuous ...75 F Color Options...76 Camera ...
Table of Contents Connecting to Televisions, Computers and Printers 56 Connecting to a TV ...56 Connecting to a Computer...57 Before Connecting the Camera...57 Transferring Pictures from a Camera to a Computer 58 Connecting to a Printer...61 Connecting the Camera and Printer...62 Printing Pictures One at a Time ...63 Printing Multiple Pictures ...64 Creating a DPOF Print Order: Print Set 67 d Shooting, Playback and Setup Menus 69 Shooting Options: The Shooting Menu 69 Displaying the Shooting Menu...70 A Image mode ...71 B White Balance...73 C Continuous ...75 F Color Options...76 Camera ...

L20/19 User's Manual
Page 12
Table of Contents Basic Camera Setup: The Setup Menu 82 Displaying the Setup Menu...83 a Menus ...84 c Welcome Screen...85 d Date...86 e Monitor Settings ...89 f Date Imprint...91 U Motion detection...92 h AF Assist ...92 i Sound Settings ...93 k Auto Off ...94 l Format Memory/m Format Card...95 n Language ...96 o Video Mode ...96 d Blink Warning...97 p Reset All ...98 s Battery Type ...100 d Protect ...100 f Rotate Image...101 h Copy ...102 r Firmware Version ...103 Technical Notes...104 Optional Accessories ...104 Approved Memory Cards ...104 Image File and Folder Names ...105 Caring for ...
Table of Contents Basic Camera Setup: The Setup Menu 82 Displaying the Setup Menu...83 a Menus ...84 c Welcome Screen...85 d Date...86 e Monitor Settings ...89 f Date Imprint...91 U Motion detection...92 h AF Assist ...92 i Sound Settings ...93 k Auto Off ...94 l Format Memory/m Format Card...95 n Language ...96 o Video Mode ...96 d Blink Warning...97 p Reset All ...98 s Battery Type ...100 d Protect ...100 f Rotate Image...101 h Copy ...102 r Firmware Version ...103 Technical Notes...104 Optional Accessories ...104 Approved Memory Cards ...104 Image File and Folder Names ...105 Caring for ...
L20/19 User's Manual
Page 13
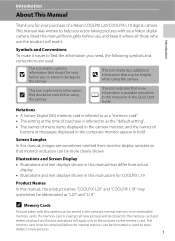
... and format operations will apply only to the pictures on removable memory cards. C Memory Cards Pictures taken with your purchase of a Nikon COOLPIX L20/COOLPIX L19 digital camera. This icon marks notes, information C that more clearly shown. Product Names In this manual or in this manual thoroughly...". This manual was written to the camera. If a memory card is available elsewhere in this manual, the product names "COOLPIX L20" and "COOLPIX L19" may be abbreviated as the "default setting". • The names of menu items displayed in the camera monitor, ...
... and format operations will apply only to the pictures on removable memory cards. C Memory Cards Pictures taken with your purchase of a Nikon COOLPIX L20/COOLPIX L19 digital camera. This icon marks notes, information C that more clearly shown. Product Names In this manual or in this manual thoroughly...". This manual was written to the camera. If a memory card is available elsewhere in this manual, the product names "COOLPIX L20" and "COOLPIX L19" may be abbreviated as the "default setting". • The names of menu items displayed in the camera monitor, ...

L20/19 User's Manual
Page 14
... your area. For more information about Nikon brand accessories, contact a local authorized Nikon dealer. THE USE OF NON-NIKON ELECTRONIC ACCESSORIES COULD DAMAGE THE CAMERA AND MAY VOID YOUR NIKON WARRANTY. Nikon will not be held liable for contact information: http://imaging.nikon.com/ Use Only Nikon Brand Electronic Accessories Nikon COOLPIX cameras are engineered and proven to operate...
... your area. For more information about Nikon brand accessories, contact a local authorized Nikon dealer. THE USE OF NON-NIKON ELECTRONIC ACCESSORIES COULD DAMAGE THE CAMERA AND MAY VOID YOUR NIKON WARRANTY. Nikon will not be held liable for contact information: http://imaging.nikon.com/ Use Only Nikon Brand Electronic Accessories Nikon COOLPIX cameras are engineered and proven to operate...

L20/19 User's Manual
Page 15
Be sure to also replace any pictures selected for business use by a company. Also, do not copy or reproduce passports issued by the government, licenses issued by law is the user's responsibility. Before discarding a data storage device or transferring ownership to infringe copyright laws. The copying or reproduction of stamps issued by the government and of certified documents stipulated by public agencies and private groups, ID cards and tickets, such as passes and meal coupons. • Comply with images containing no private information (for the purpose of ...
Be sure to also replace any pictures selected for business use by a company. Also, do not copy or reproduce passports issued by the government, licenses issued by law is the user's responsibility. Before discarding a data storage device or transferring ownership to infringe copyright laws. The copying or reproduction of stamps issued by the government and of certified documents stipulated by public agencies and private groups, ID cards and tickets, such as passes and meal coupons. • Comply with images containing no private information (for the purpose of ...

L20/19 User's Manual
Page 16
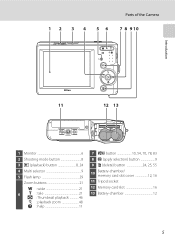
Introduction Parts of the Camera The Camera Body 1 23 4 10 11 98 7 Lens cover closed 5 6 12 13 1 Shutter-release button 22 2 Power switch 18 3 Power-on lamp 18, 94 4 Self-timer lamp 30 AF-assist illuminator 23, 92 5 Built-in flash 28 6 Lens 108, 118 7 Speaker 55 8 Power connector cover 104 9 Eyelet for camera strap 11 10 Pin cover 56, 58, 62 11 Cable connector 56, 58, 62 12 Lens cover 106 13 Built-in microphone 53 4
Introduction Parts of the Camera The Camera Body 1 23 4 10 11 98 7 Lens cover closed 5 6 12 13 1 Shutter-release button 22 2 Power switch 18 3 Power-on lamp 18, 94 4 Self-timer lamp 30 AF-assist illuminator 23, 92 5 Built-in flash 28 6 Lens 108, 118 7 Speaker 55 8 Power connector cover 104 9 Eyelet for camera strap 11 10 Pin cover 56, 58, 62 11 Cable connector 56, 58, 62 12 Lens cover 106 13 Built-in microphone 53 4
L20/19 User's Manual
Page 17
Parts of the Camera 1 2 3 4 5 6 7 8 9 10 Introduction 11 12 13 1 Monitor 6 2 Shooting mode button 8 3 c (playback) button 8, 24 4 Multi selector 9 5 Flash lamp 29 Zoom buttons 21 f : wide 21 6 g : tele 21 h : Thumbnail playback 46 i : playback zoom 48 j : help 11 7 d button 10, 54, 70, 78, 83 8 k (apply selection) button 9 9 l (delete) button 24, 25, 55 10 Battery-chamber/ memory card slot cover 12, 16 11 Tripod socket 12 Memory card slot 16 13 Battery-chamber 12 5
Parts of the Camera 1 2 3 4 5 6 7 8 9 10 Introduction 11 12 13 1 Monitor 6 2 Shooting mode button 8 3 c (playback) button 8, 24 4 Multi selector 9 5 Flash lamp 29 Zoom buttons 21 f : wide 21 6 g : tele 21 h : Thumbnail playback 46 i : playback zoom 48 j : help 11 7 d button 10, 54, 70, 78, 83 8 k (apply selection) button 9 9 l (delete) button 24, 25, 55 10 Battery-chamber/ memory card slot cover 12, 16 11 Tripod socket 12 Memory card slot 16 13 Battery-chamber 12 5

L20/19 User's Manual
Page 18
... 73 22 Continuous shooting mode 75 23 Self-timer indicator 30 *1 Differs according to the sections on each mode for details. 6 *2 K and K are displayed on L20, and z and y are displayed on L19.
... 73 22 Continuous shooting mode 75 23 Self-timer indicator 30 *1 Differs according to the sections on each mode for details. 6 *2 K and K are displayed on L20, and z and y are displayed on L19.

L20/19 User's Manual
Page 19
Parts of the Camera Introduction Playback 1 2 34 15/05/2009 12:00 13 9999.JPG 12 10 11 9 5 999 999 6 87 999 999 a 9999 9999 1m00s b 1m00s 1 Date of recording 14 2 Time of recording 14 3 Volume 55 4 Battery level indicator 18 5 Image mode 71 Movie options 54 a Current frame number/ 6 total number of frames 24 b Movie length 55 7 Internal memory indicator 24 8 Movie playback indicator 55 9 Print-order icon 67 10 Small picture 52 11 D-Lighting icon 50 12 Protect icon 100 13 File number and type 105 * The displayed icons vary with the settings in shooting ...
Parts of the Camera Introduction Playback 1 2 34 15/05/2009 12:00 13 9999.JPG 12 10 11 9 5 999 999 6 87 999 999 a 9999 9999 1m00s b 1m00s 1 Date of recording 14 2 Time of recording 14 3 Volume 55 4 Battery level indicator 18 5 Image mode 71 Movie options 54 a Current frame number/ 6 total number of frames 24 b Movie length 55 7 Internal memory indicator 24 8 Movie playback indicator 55 9 Print-order icon 67 10 Small picture 52 11 D-Lighting icon 50 12 Protect icon 100 13 File number and type 105 * The displayed icons vary with the settings in shooting ...
L20/19 User's Manual
Page 20
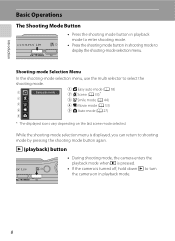
c (playback) button • During shooting mode, the camera enters the playback mode when c is pressed. • If the camera is displayed, you can return to turn the camera on in shooting mode to select the shooting mode. 1 Easy auto mode 2 3 4 1 G Easy auto mode (A 18) 2 b Scene (A 33)* 3 a Smile mode (A 44) 4 D Movie mode (A 53) 5 A Auto mode (A 27) 5 * The displayed icons vary depending on the last scene mode selected. Shooting-mode Selection Menu In the shooting-mode selection menu, use the multi selector to display the shooting-mode selection menu. Introduction ...
c (playback) button • During shooting mode, the camera enters the playback mode when c is pressed. • If the camera is displayed, you can return to turn the camera on in shooting mode to select the shooting mode. 1 Easy auto mode 2 3 4 1 G Easy auto mode (A 18) 2 b Scene (A 33)* 3 a Smile mode (A 44) 4 D Movie mode (A 53) 5 A Auto mode (A 27) 5 * The displayed icons vary depending on the last scene mode selected. Shooting-mode Selection Menu In the shooting-mode selection menu, use the multi selector to display the shooting-mode selection menu. Introduction ...

L20/19 User's Manual
Page 21
Flash mode For Playback Display the previous picture. 15/05/2009 15:30 0004.JPG Display the next picture. 44 For the Menu Screen Select the item above . Select the item below. Apply selection (Go to the previous screen. Display n (self-timer) menu (A 30). Display p (macro mode) menu (A 31). Select the item to the left and right operating parts of the multi selector to select modes, select menu options and to the next screen (apply selection). Select the item to the right/go to apply selection. Shooting menu Image mode White balance Continuous Color options Exit...
Flash mode For Playback Display the previous picture. 15/05/2009 15:30 0004.JPG Display the next picture. 44 For the Menu Screen Select the item above . Select the item below. Apply selection (Go to the previous screen. Display n (self-timer) menu (A 30). Display p (macro mode) menu (A 31). Select the item to the left and right operating parts of the multi selector to select modes, select menu options and to the next screen (apply selection). Select the item to the right/go to apply selection. Shooting menu Image mode White balance Continuous Color options Exit...
