

L18 / L16 User's Manual
Page 3
Introduction First Steps G Basic Photography and Playback: Easy Auto Mode A Auto Mode C Shooting Suited for the Scene c More on Playback D Movies Connecting to Televisions, Computers and Printers d Shooting, Playback and Setup Menus Technical Notes i
Introduction First Steps G Basic Photography and Playback: Easy Auto Mode A Auto Mode C Shooting Suited for the Scene c More on Playback D Movies Connecting to Televisions, Computers and Printers d Shooting, Playback and Setup Menus Technical Notes i

L18 / L16 User's Manual
Page 6
... the monitor touching the skin or entering the eyes or mouth. For Your Safety Use appropriate cables When connecting cables to the input and output jacks, use only the cables provided or sold by Nikon for the purpose, to prevent liquid crystal from the subject. Playing CDROMs on audio CD equipment. Handle...
... the monitor touching the skin or entering the eyes or mouth. For Your Safety Use appropriate cables When connecting cables to the input and output jacks, use only the cables provided or sold by Nikon for the purpose, to prevent liquid crystal from the subject. Playing CDROMs on audio CD equipment. Handle...
L18 / L16 User's Manual
Page 7
Using other reproductive harm. Nikon Inc., 1300 Walt Whitman Road Melville, New York 11747-3064 USA Tel: 631-547-4200 COOLPIX L18/L16 v However, there is connected. • Consult the dealer or an experienced radio/television technician for help. Notice for a Class B digital device, pursuant to Part 15 of the following measures: &#...
Using other reproductive harm. Nikon Inc., 1300 Walt Whitman Road Melville, New York 11747-3064 USA Tel: 631-547-4200 COOLPIX L18/L16 v However, there is connected. • Consult the dealer or an experienced radio/television technician for help. Notice for a Class B digital device, pursuant to Part 15 of the following measures: &#...

L18 / L16 User's Manual
Page 11
... Televisions, Computers and Printers 49 Connecting to a TV...49 Connecting to a Computer...50 Before Connecting the Camera...50 Transferring Pictures from the Camera to a Computer 51 Connecting to a Printer...54 Connecting the Camera and Printer...55 Printing Pictures One at a Time ...56 Printing Multiple Pictures ...57 Creating a DPOF Print Order: Print Set 60 d Shooting, Playback...
... Televisions, Computers and Printers 49 Connecting to a TV...49 Connecting to a Computer...50 Before Connecting the Camera...50 Transferring Pictures from the Camera to a Computer 51 Connecting to a Printer...54 Connecting the Camera and Printer...55 Printing Pictures One at a Time ...56 Printing Multiple Pictures ...57 Creating a DPOF Print Order: Print Set 60 d Shooting, Playback...

L18 / L16 User's Manual
Page 61
See the documentation provided with the COOLPIX L18) to play back pictures on the TV, and the white plug to the camera. Do not use force when connecting the A/V cable to the audioin jack. Connect the yellow plug to the video-in jack on the television. 1 Turn the camera off . B ... not pull the connector at an angle. • Do not pinch the connector cover between the camera's A/V connector and the A/V cable connector when connecting the cable to the standard used by your television for details. 4 Turn the camera on the television. The video mode setting is oriented correctly...
See the documentation provided with the COOLPIX L18) to play back pictures on the TV, and the white plug to the camera. Do not use force when connecting the A/V cable to the audioin jack. Connect the yellow plug to the video-in jack on the television. 1 Turn the camera off . B ... not pull the connector at an angle. • Do not pinch the connector cover between the camera's A/V connector and the A/V cable connector when connecting the cable to the standard used by your television for details. 4 Turn the camera on the television. The video mode setting is oriented correctly...
L18 / L16 User's Manual
Page 62
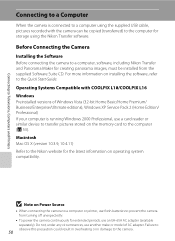
... supplied Software Suite CD. Before Connecting the Camera Installing the Software Before connecting the camera to a computer, software, including Nikon Transfer and Panorama Maker for creating panorama images, must be copied (transferred) to the Nikon website for extended periods, use an...COOLPIX L18/COOLPIX L16 Windows Preinstalled versions of AC adapter. Do not, under any circumstances, use another make or model of Windows Vista (32-bit Home Basic/Home Premium/ Business/Enterprise/Ultimate editions), Windows XP Service Pack 2 (Home Edition/ Professional) If your computer is connected...
... supplied Software Suite CD. Before Connecting the Camera Installing the Software Before connecting the camera to a computer, software, including Nikon Transfer and Panorama Maker for creating panorama images, must be copied (transferred) to the Nikon website for extended periods, use an...COOLPIX L18/COOLPIX L16 Windows Preinstalled versions of AC adapter. Do not, under any circumstances, use another make or model of Windows Vista (32-bit Home Basic/Home Premium/ Business/Enterprise/Ultimate editions), Windows XP Service Pack 2 (Home Edition/ Professional) If your computer is connected...
L18 / L16 User's Manual
Page 63
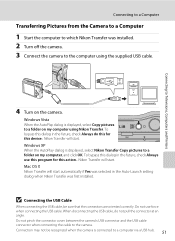
... camera. Do not pinch the connector cover between the camera's USB connector and the USB cable connector when connecting the cable to a computer via a USB hub. 51 Mac OS X Nikon Transfer will start . Connecting to Televisions, Computers and Printers Connecting to a Computer Transferring Pictures from the Camera to a Computer 1 Start the computer to which...
... camera. Do not pinch the connector cover between the camera's USB connector and the USB cable connector when connecting the cable to a computer via a USB hub. 51 Mac OS X Nikon Transfer will start . Connecting to Televisions, Computers and Printers Connecting to a Computer Transferring Pictures from the Camera to a Computer 1 Start the computer to which...
L18 / L16 User's Manual
Page 64
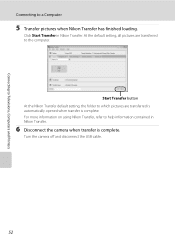
... Connecting to help information contained in Nikon Transfer. For more information on using Nikon Transfer, refer to a Computer 5 Transfer pictures when Nikon Transfer has finished loading. At the default setting, all pictures are transferred is automatically opened when transfer is complete. Click Start Transfer in Nikon... Transfer. 6 Disconnect the camera when transfer is complete. Turn the camera off and disconnect the USB cable. 52 Start Transfer button At the Nikon Transfer default setting, the folder to which pictures ...
... Connecting to help information contained in Nikon Transfer. For more information on using Nikon Transfer, refer to a Computer 5 Transfer pictures when Nikon Transfer has finished loading. At the default setting, all pictures are transferred is automatically opened when transfer is complete. Click Start Transfer in Nikon... Transfer. 6 Disconnect the camera when transfer is complete. Turn the camera off and disconnect the USB cable. 52 Start Transfer button At the Nikon Transfer default setting, the folder to which pictures ...
L18 / L16 User's Manual
Page 65
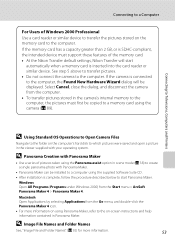
...internal memory to the computer, the pictures must support these features of the memory card. • At the Nikon Transfer default settings, Nikon Transfer will be installed to create a single panorama photo with your operating system. Macintosh Open Applications by selecting ...Applications from the Start menu > ArcSoft Panorama Maker 4 > Panorama Maker 4. Connecting to a Computer For Users of Windows 2000 Professional Use...
...internal memory to the computer, the pictures must support these features of the memory card. • At the Nikon Transfer default settings, Nikon Transfer will be installed to create a single panorama photo with your operating system. Macintosh Open Applications by selecting ...Applications from the Start menu > ArcSoft Panorama Maker 4 > Panorama Maker 4. Connecting to a Computer For Users of Windows 2000 Professional Use...

L18 / L16 User's Manual
Page 66
... under any circumstances, use fresh batteries to prevent the camera from turning off and disconnect USB cable Connecting to Televisions, Computers and Printers B Note on Power Source • When connecting the camera to a computer or printer, use another make or model of prints each using a ...computer. D Printing Pictures In addition to printing pictures transferred to a computer from your 54 camera's print set option (A 60) Connect to printer (A 55) Print pictures one at a time (A 56) Print multiple pictures (A 57) Turn camera off unexpectedly. • To power...
... under any circumstances, use fresh batteries to prevent the camera from turning off and disconnect USB cable Connecting to Televisions, Computers and Printers B Note on Power Source • When connecting the camera to a computer or printer, use another make or model of prints each using a ...computer. D Printing Pictures In addition to printing pictures transferred to a computer from your 54 camera's print set option (A 60) Connect to printer (A 55) Print pictures one at a time (A 56) Print multiple pictures (A 57) Turn camera off unexpectedly. • To power...

L18 / L16 User's Manual
Page 67
...PictBridge startup screen 1 will be displayed 2. 1 2 Print selection 15/05 2008 NO. 12 [ 12 ] B Connecting the USB Cable • When connecting the USB cable, be displayed in the camera monitor. Then the print selection screen will be sure that the connectors ... camera's USB connector and the USB cable connector when connecting the cable to the printer using the supplied USB cable. Connecting to a Printer 2 Turn on the camera. Check printer settings. 3 Connect the camera to the camera. 55 Connecting to Televisions, Computers and Printers 4 Turn on the printer...
...PictBridge startup screen 1 will be displayed 2. 1 2 Print selection 15/05 2008 NO. 12 [ 12 ] B Connecting the USB Cable • When connecting the USB cable, be displayed in the camera monitor. Then the print selection screen will be sure that the connectors ... camera's USB connector and the USB cable connector when connecting the cable to the printer using the supplied USB cable. Connecting to a Printer 2 Turn on the camera. Check printer settings. 3 Connect the camera to the camera. 55 Connecting to Televisions, Computers and Printers 4 Turn on the printer...

L18 / L16 User's Manual
Page 68
... PictBridge Start print Copies Paper size Exit 56 Press g (i) to switch back to choose the desired picture and press k. Connecting to Televisions, Computers and Printers Connecting to a Printer Printing Pictures One at a Time After connecting the camera to the printer correctly (A 55), print pictures by following the procedure below. 1 Use the multi selector...
... PictBridge Start print Copies Paper size Exit 56 Press g (i) to switch back to choose the desired picture and press k. Connecting to Televisions, Computers and Printers Connecting to a Printer Printing Pictures One at a Time After connecting the camera to the printer correctly (A 55), print pictures by following the procedure below. 1 Use the multi selector...

L18 / L16 User's Manual
Page 69
..., Computers and Printers Connecting to exit the print menu. To cancel before all images DPOF printing Paper size Exit 57 The print menu is displayed. 2 Use the multi selector ... . Letter A3 A4 Exit PictBridge Start print Copies Paper size Exit Printing 002/004 Cancel Current print/total number of prints Printing Multiple Pictures After connecting the camera to that shown in step 1 when printing is displayed, press d. Print menu Print selection Print all copies have been printed, press k. Monitor display...
..., Computers and Printers Connecting to exit the print menu. To cancel before all images DPOF printing Paper size Exit 57 The print menu is displayed. 2 Use the multi selector ... . Letter A3 A4 Exit PictBridge Start print Copies Paper size Exit Printing 002/004 Cancel Current print/total number of prints Printing Multiple Pictures After connecting the camera to that shown in step 1 when printing is displayed, press d. Print menu Print selection Print all copies have been printed, press k. Monitor display...

L18 / L16 User's Manual
Page 70
... (y) and the numeral Back indicating the number of each . Choose Cancel and press k to return to full-frame playback. A check mark is complete. Connecting to Televisions, Computers and Printers Connecting to thumbnail display. Start print Cancel Exit 58 The menu shown at right will not be displayed. Paper size 4 × 6 in. 8 ×...
... (y) and the numeral Back indicating the number of each . Choose Cancel and press k to return to full-frame playback. A check mark is complete. Connecting to Televisions, Computers and Printers Connecting to thumbnail display. Start print Cancel Exit 58 The menu shown at right will not be displayed. Paper size 4 × 6 in. 8 ×...

L18 / L16 User's Manual
Page 71
... sizes: Default (the default paper size for which a print order was created in Print set (A 60). • The menu shown at a time. Connecting to Televisions, Computers and Printers Connecting to a Printer Print all images All pictures stored in the internal memory, or on the memory card, are printed one at right will...
... sizes: Default (the default paper size for which a print order was created in Print set (A 60). • The menu shown at a time. Connecting to Televisions, Computers and Printers Connecting to a Printer Print all images All pictures stored in the internal memory, or on the memory card, are printed one at right will...

L18 / L16 User's Manual
Page 72
...option in the playback menu is used to create digital "print orders" for which no copies have created for pictures in playback mode. Connecting to Televisions, Computers and Printers 2 Use the multi selector to nine) of copies to be printed from the camera, you have ... displayed. 3 Choose Select images and press k. Print selection Press the multi selector J or K to full-frame playback. If the memory card is connected to a PictBridge-compatible printer, pictures can create the DPOF print order for pictures on DPOF-compatible devices (A 107). Press f (h) to switch back ...
...option in the playback menu is used to create digital "print orders" for which no copies have created for pictures in playback mode. Connecting to Televisions, Computers and Printers 2 Use the multi selector to nine) of copies to be printed from the camera, you have ... displayed. 3 Choose Select images and press k. Print selection Press the multi selector J or K to full-frame playback. If the memory card is connected to a PictBridge-compatible printer, pictures can create the DPOF print order for pictures on DPOF-compatible devices (A 107). Press f (h) to switch back ...

L18 / L16 User's Manual
Page 73
.... Choose Date and press k to also print shooting date and photo information. Print set Done Date Info Exit 15/05/2008 15:30 0004.JPG Connecting to a printer through the supplied USB cable and choose DPOF printing (A 58). • Date and Info are reset each time the print set in the.... Choose Done and press k to print shutter speed and aperture on pictures. Choose Info and press k to complete the print order and exit. If you connect the camera to Televisions, Computers and Printers 44 B Note on Printing with DPOF printing when Date in the print set menu can be printed on...
.... Choose Date and press k to also print shooting date and photo information. Print set Done Date Info Exit 15/05/2008 15:30 0004.JPG Connecting to a printer through the supplied USB cable and choose DPOF printing (A 58). • Date and Info are reset each time the print set in the.... Choose Done and press k to print shutter speed and aperture on pictures. Choose Info and press k to complete the print order and exit. If you connect the camera to Televisions, Computers and Printers 44 B Note on Printing with DPOF printing when Date in the print set menu can be printed on...

L18 / L16 User's Manual
Page 86
... version. 74 A 76 A 76 A 77 A 80 A 81 A 82 A 83 A 83 A 84 A 85 A 86 A 86 A 87 A 89 A 89 A 89 A 90 o Video mode Adjust settings necessary for connection to default values.
... version. 74 A 76 A 76 A 77 A 80 A 81 A 82 A 83 A 83 A 84 A 85 A 86 A 86 A 87 A 89 A 89 A 89 A 90 o Video mode Adjust settings necessary for connection to default values.

L18 / L16 User's Manual
Page 90
... home time zone, choose w in step 2. • To change the home time zone, choose w in effect: Turn Daylight saving on (w) when daylight saving time is connected, and can provide several days of backup power after about ten hours of charging. The setting is in effect: Turn Daylight saving off when daylight...
... home time zone, choose w in step 2. • To change the home time zone, choose w in effect: Turn Daylight saving on (w) when daylight saving time is connected, and can provide several days of backup power after about ten hours of charging. The setting is in effect: Turn Daylight saving off when daylight...

L18 / L16 User's Manual
Page 98
Choose from NTSC and PAL. Shooting, Playback and Setup Menus 86 Czech Danish German (default setting) Spanish Greek French Indonesian Italian Hungarian Dutch Norwegian Polish Portuguese Russian Finnish Swedish Turkish Arabic Simplified Chinese Traditional Chinese Japanese Korean Thai o Video mode Adjust settings for display of 24 languages for connection to a television. Basic Camera Setup: The Setup Menu n Language Choose one of camera menus and messages.
Choose from NTSC and PAL. Shooting, Playback and Setup Menus 86 Czech Danish German (default setting) Spanish Greek French Indonesian Italian Hungarian Dutch Norwegian Polish Portuguese Russian Finnish Swedish Turkish Arabic Simplified Chinese Traditional Chinese Japanese Korean Thai o Video mode Adjust settings for display of 24 languages for connection to a television. Basic Camera Setup: The Setup Menu n Language Choose one of camera menus and messages.


