

L18 / L16 User's Manual
Page 3
Introduction First Steps G Basic Photography and Playback: Easy Auto Mode A Auto Mode C Shooting Suited for the Scene c More on Playback D Movies Connecting to Televisions, Computers and Printers d Shooting, Playback and Setup Menus Technical Notes i
Introduction First Steps G Basic Photography and Playback: Easy Auto Mode A Auto Mode C Shooting Suited for the Scene c More on Playback D Movies Connecting to Televisions, Computers and Printers d Shooting, Playback and Setup Menus Technical Notes i
L18 / L16 User's Manual
Page 9
... Camera...12 Setting Display Language, Date and Time 14 Inserting Memory Cards ...16 Removing Memory Cards...17 G Basic Photography and Playback: Easy Auto Mode 18 Step 1 Turn the Camera On and Select G (Easy Auto) Mode 18 Step 2 Frame a Picture ...20 Step 3 Focus and Shoot ...22 Step 4 Viewing and Deleting Pictures 24 Using the Flash...
... Camera...12 Setting Display Language, Date and Time 14 Inserting Memory Cards ...16 Removing Memory Cards...17 G Basic Photography and Playback: Easy Auto Mode 18 Step 1 Turn the Camera On and Select G (Easy Auto) Mode 18 Step 2 Frame a Picture ...20 Step 3 Focus and Shoot ...22 Step 4 Viewing and Deleting Pictures 24 Using the Flash...

L18 / L16 User's Manual
Page 20
... mode button in playback mode to enter shooting mode. • Press the shooting mode button in shooting mode to enter playback mode. 8 Easy auto mode G Easy auto mode (A 18) D Movie (A 46) C Scene (A 32) A Auto mode (A 31) • The shooting-mode selection menu is continuously displayed until you select the shooting mode and press k to determine...
... mode button in playback mode to enter shooting mode. • Press the shooting mode button in shooting mode to enter playback mode. 8 Easy auto mode G Easy auto mode (A 18) D Movie (A 46) C Scene (A 32) A Auto mode (A 31) • The shooting-mode selection menu is continuously displayed until you select the shooting mode and press k to determine...
L18 / L16 User's Manual
Page 27
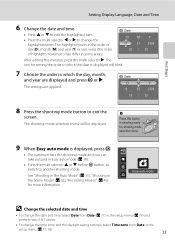
...Display Language, Date and Time 6 Change the date and time. • Press H or I before k button, to switch to another shooting mode. Press this button in Easy auto mode (A 18). • Press the multi selector H or I to edit the highlighted item. • Press the multi selector J or K to exit the screen.... you can take pictures in shooting mode for more information. The row for setting the order in which the day, month, and year are applied. Easy auto mode D Change the selected date and time • To change the date and time, select Date from Date (A 77) in the setup menu ...
...Display Language, Date and Time 6 Change the date and time. • Press H or I before k button, to switch to another shooting mode. Press this button in Easy auto mode (A 18). • Press the multi selector H or I to edit the highlighted item. • Press the multi selector J or K to exit the screen.... you can take pictures in shooting mode for more information. The row for setting the order in which the day, month, and year are applied. Easy auto mode D Change the selected date and time • To change the date and time, select Date from Date (A 77) in the setup menu ...
L18 / L16 User's Manual
Page 30
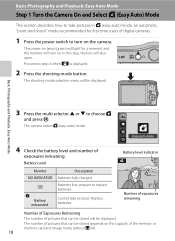
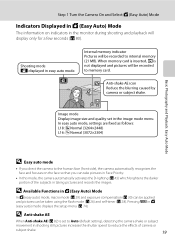
... menu will turn on the capacity of digital cameras. 1 Press the power switch to replace batteries. The camera enters G (easy auto) mode. Basic Photography and Playback: Easy Auto Mode 3 Press the multi selector H or I to step 4 when U is displayed. 2 Press the shooting mode button.... monitor will be stored depends on the camera. Easy auto mode 4 Check the battery level and number of pictures that can be displayed. Basic Photography and Playback: Easy Auto Mode Step 1 Turn the Camera On and Select G (Easy Auto) Mode This section describes how to take pictures....
... menu will turn on the capacity of digital cameras. 1 Press the power switch to replace batteries. The camera enters G (easy auto) mode. Basic Photography and Playback: Easy Auto Mode 3 Press the multi selector H or I to step 4 when U is displayed. 2 Press the shooting mode button.... monitor will be stored depends on the camera. Easy auto mode 4 Check the battery level and number of pictures that can be displayed. Basic Photography and Playback: Easy Auto Mode Step 1 Turn the Camera On and Select G (Easy Auto) Mode This section describes how to take pictures....
L18 / L16 User's Manual
Page 31
... pictures and records the images. Pressing d in easy auto mode. In easy auto mode, settings are fixed as follows: L18: y Normal (3264×2448) L16: d Normal (3072×2304) Basic Photography and Playback: Easy Auto Mode D Easy auto mode • If you can be recorded to memory card. D Available Functions in G (Easy Auto) Mode In G (easy auto) mode, macro mode (A 29) and exposure...
... pictures and records the images. Pressing d in easy auto mode. In easy auto mode, settings are fixed as follows: L18: y Normal (3264×2448) L16: d Normal (3072×2304) Basic Photography and Playback: Easy Auto Mode D Easy auto mode • If you can be recorded to memory card. D Available Functions in G (Easy Auto) Mode In G (easy auto) mode, macro mode (A 29) and exposure...

L18 / L16 User's Manual
Page 32
... when shooting nonhuman subjects or when no faces are pressed. Zoom out Zoom in microphone. Step 2 Frame a Picture 1 Ready the camera. Basic Photography and Playback: Easy Auto Mode 2 Frame the picture. Using the Zoom Use the zoom buttons to zoom in the frame. Zoom indicator displayed when the zoom buttons are recognized...
... when shooting nonhuman subjects or when no faces are pressed. Zoom out Zoom in microphone. Step 2 Frame a Picture 1 Ready the camera. Basic Photography and Playback: Easy Auto Mode 2 Frame the picture. Using the Zoom Use the zoom buttons to zoom in the frame. Zoom indicator displayed when the zoom buttons are recognized...
L18 / L16 User's Manual
Page 33
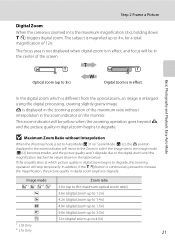
... zoomed in digital zoom begins to degrade. V is set to degrade. Basic Photography and Playback: Easy Auto Mode Optical zoom (up to 4.0×) 1 L18 Only 2 L16 Only 21 B Maximum Zoom Ratio without interpolation in digital zoom begins to Auto Mode (A 31) or Scene Mode (A 32), the V position displayed in the zooming position of the...
... zoomed in digital zoom begins to degrade. V is set to degrade. Basic Photography and Playback: Easy Auto Mode Optical zoom (up to 4.0×) 1 L18 Only 2 L16 Only 21 B Maximum Zoom Ratio without interpolation in digital zoom begins to Auto Mode (A 31) or Scene Mode (A 32), the V position displayed in the zooming position of the...
L18 / L16 User's Manual
Page 34
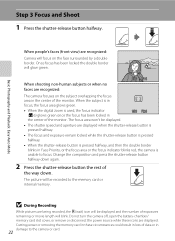
... shutter-release button is pressed halfway. • When the shutter-release button is unable to the memory card or internal memory. Basic Photography and Playback: Easy Auto Mode When people's faces (front view) are being recorded, the O (wait) icon will be recorded to focus. Do not turn the camera off, open the...
... shutter-release button is pressed halfway. • When the shutter-release button is unable to the memory card or internal memory. Basic Photography and Playback: Easy Auto Mode When people's faces (front view) are being recorded, the O (wait) icon will be recorded to focus. Do not turn the camera off, open the...

L18 / L16 User's Manual
Page 35
... focus, refocus on the center of the frame. • The camera may be unable to detect faces in the following situations. Basic Photography and Playback: Easy Auto Mode Step 3 Focus and Shoot B Face Priority • If no face is recognized when the shutter-release button is very rare cases, but if you...
... focus, refocus on the center of the frame. • The camera may be unable to detect faces in the following situations. Basic Photography and Playback: Easy Auto Mode Step 3 Focus and Shoot B Face Priority • If no face is recognized when the shutter-release button is very rare cases, but if you...
L18 / L16 User's Manual
Page 36
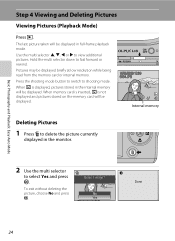
... from the memory card or internal memory. Done To exit without deleting the picture, choose No and press No k. Yes 24 Basic Photography and Playback: Easy Auto Mode Step 4 Viewing and Deleting Pictures Viewing Pictures (Playback Mode) Press c. The last picture taken will be displayed. 15/05/2008 15:30 0004.JPG...
... from the memory card or internal memory. Done To exit without deleting the picture, choose No and press No k. Yes 24 Basic Photography and Playback: Easy Auto Mode Step 4 Viewing and Deleting Pictures Viewing Pictures (Playback Mode) Press c. The last picture taken will be displayed. 15/05/2008 15:30 0004.JPG...
L18 / L16 User's Manual
Page 37
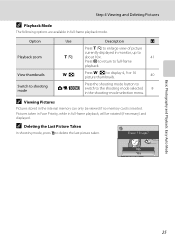
... display 4, 9 or 16 picture thumbnails. 40 Switch to shooting mode Press the shooting mode button to A/D/y switch to full-frame playback. Basic Photography and Playback: Easy Auto Mode Step 4 Viewing and Deleting Pictures C Playback Mode The following options are available in the internal memory can only be rotated (if necessary) and displayed...
... display 4, 9 or 16 picture thumbnails. 40 Switch to shooting mode Press the shooting mode button to A/D/y switch to full-frame playback. Basic Photography and Playback: Easy Auto Mode Step 4 Viewing and Deleting Pictures C Playback Mode The following options are available in the internal memory can only be rotated (if necessary) and displayed...

L18 / L16 User's Manual
Page 38
Off Flash will be cancelled. 26 Flash mode 7 Setting the Flash Mode 1 Press m (flash mode). Basic Photography and Playback: Easy Auto Mode 2 Use the multi selector to "fill-in .) when the camera is zoomed out all the way. Fill flash Flash fires when a picture is combined ...with red-eye reduction Reduces "red-eye" in .). Slow sync U (auto) is taken. slow shutter speeds are used to capture background at the top of the monitor. The icon for a few seconds, the selection will not...
Off Flash will be cancelled. 26 Flash mode 7 Setting the Flash Mode 1 Press m (flash mode). Basic Photography and Playback: Easy Auto Mode 2 Use the multi selector to "fill-in .) when the camera is zoomed out all the way. Fill flash Flash fires when a picture is combined ...with red-eye reduction Reduces "red-eye" in .). Slow sync U (auto) is taken. slow shutter speeds are used to capture background at the top of the monitor. The icon for a few seconds, the selection will not...
L18 / L16 User's Manual
Page 39
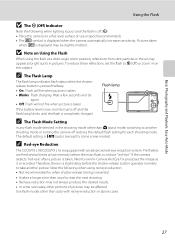
...COOLPIX L16 is a slight delay before the main flash, to take another shooting mode or turning the camera off restores the default flash setting for when shutter-release timing is completely charged. C The Flash Mode Setting In any flash mode selected in on the subject. The default setting is U (auto...is equipped with red-eye reduction in pictures. Basic Photography and Playback: Easy Auto Mode Using the Flash B The W (Off) Indicator Note the ... If the camera detects "red-eye" after a picture is taken, Nikon's own In-Camera Red Eye Fix processes the image as bright spots ...
...COOLPIX L16 is a slight delay before the main flash, to take another shooting mode or turning the camera off restores the default flash setting for when shutter-release timing is completely charged. C The Flash Mode Setting In any flash mode selected in on the subject. The default setting is U (auto...is equipped with red-eye reduction in pictures. Basic Photography and Playback: Easy Auto Mode Using the Flash B The W (Off) Indicator Note the ... If the camera detects "red-eye" after a picture is taken, Nikon's own In-Camera Red Eye Fix processes the image as bright spots ...

L18 / L16 User's Manual
Page 40
Basic Photography and Playback: Easy Auto Mode Taking Pictures with the Self-timer The camera is displayed. 2 Use the multi selector to choose ON and press k. If a setting is recommended. 1 Press n (...
Basic Photography and Playback: Easy Auto Mode Taking Pictures with the Self-timer The camera is displayed. 2 Use the multi selector to choose ON and press k. If a setting is recommended. 1 Press n (...
L18 / L16 User's Manual
Page 41
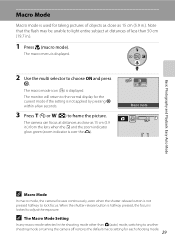
...mode icon (F) is over the G). The monitor will return to the normal display for each shooting mode. 29 Macro mode Basic Photography and Playback: Easy Auto Mode C Macro Mode In macro mode, the camera focuses continuously, even when the shutter-release button is locked to adjust the exposure. When the shutter...halfway to lock focus. The macro menu is used for taking pictures of less than 50 cm (19.7 in the shooting mode other than A (auto) mode, switching to another shooting mode or turning the camera off restores the default macro setting for the current mode if the setting is not...
...mode icon (F) is over the G). The monitor will return to the normal display for each shooting mode. 29 Macro mode Basic Photography and Playback: Easy Auto Mode C Macro Mode In macro mode, the camera focuses continuously, even when the shutter-release button is locked to adjust the exposure. When the shutter...halfway to lock focus. The macro menu is used for taking pictures of less than 50 cm (19.7 in the shooting mode other than A (auto) mode, switching to another shooting mode or turning the camera off restores the default macro setting for the current mode if the setting is not...

L18 / L16 User's Manual
Page 42
... brighter or darker. 1 Press o (exposure compensation). Positive compensation may be cancelled. 3 The setting is much darker than the main 30 subject. Basic Photography and Playback: Easy Auto Mode Exposure Compensation Exposure compensation is much brighter than...
... brighter or darker. 1 Press o (exposure compensation). Positive compensation may be cancelled. 3 The setting is much darker than the main 30 subject. Basic Photography and Playback: Easy Auto Mode Exposure Compensation Exposure compensation is much brighter than...

L18 / L16 User's Manual
Page 75
.... y Normal (3,264) with L18 and d Normal (3,072) with L16 are recorded as image files. y Normal (3264)1 (L18 Only) d Normal (3072)2 (L16 Only) 3,264 × 2,448 3,072 × 2,304 Best choice in the easy auto mode. j PC Screen (1024) 1,024 × 768 Suited to...× 1,536 Smaller size allows more pictures to use the picture. Option Size (Pixels) Description z High (3264P) (L18 Only) M High (3072P) (L16 Only) 3,264 × 2,448 3,072 × 2,304 Highest quality, suitable for the current setting is approximately 1:4. The compression ratio is approximately 1:8. The...
.... y Normal (3,264) with L18 and d Normal (3,072) with L16 are recorded as image files. y Normal (3264)1 (L18 Only) d Normal (3072)2 (L16 Only) 3,264 × 2,448 3,072 × 2,304 Best choice in the easy auto mode. j PC Screen (1024) 1,024 × 768 Suited to...× 1,536 Smaller size allows more pictures to use the picture. Option Size (Pixels) Description z High (3264P) (L18 Only) M High (3072P) (L16 Only) 3,264 × 2,448 3,072 × 2,304 Highest quality, suitable for the current setting is approximately 1:4. The compression ratio is approximately 1:8. The...

L18 / L16 User's Manual
Page 87
... or I to display the setup menu. Set up Easy auto mode Menus Welcome screen Date Monitor settings Exit Auto Mode, Scene Mode, and Movie Mode Press d to display the setup menu. Monitor settings -- Date -- Auto mode Image mode White balance Continuous Color options Set up ...and press k. Set up Auto mode Menus Welcome screen -- Basic Camera Setup: The Setup Menu Displaying the Setup Menu G (easy auto) mode Press d to display the shooting menu...
... or I to display the setup menu. Set up Easy auto mode Menus Welcome screen Date Monitor settings Exit Auto Mode, Scene Mode, and Movie Mode Press d to display the setup menu. Monitor settings -- Date -- Auto mode Image mode White balance Continuous Color options Set up ...and press k. Set up Auto mode Menus Welcome screen -- Basic Camera Setup: The Setup Menu Displaying the Setup Menu G (easy auto) mode Press d to display the shooting menu...

L18 / L16 User's Manual
Page 92
...during shooting and playback mode. Hide info Shooting, Playback and Setup Menus 15/05/2008 15:30 0004.JPG Framing grid 80 7 In G (easy auto) mode, A (auto) mode, a framing grid is displayed to display information in Show info above . In other current settings or operation guide is 3. See "The... Monitor" (A 6) for monitor brightness. Brightness Choose from five settings for information on indicators in Auto info above is displayed, as in the monitor, and set the monitor brightness. Shooting mode Playback mode 15/05/2008 15:30 0004....
...during shooting and playback mode. Hide info Shooting, Playback and Setup Menus 15/05/2008 15:30 0004.JPG Framing grid 80 7 In G (easy auto) mode, A (auto) mode, a framing grid is displayed to display information in Show info above . In other current settings or operation guide is 3. See "The... Monitor" (A 6) for monitor brightness. Brightness Choose from five settings for information on indicators in Auto info above is displayed, as in the monitor, and set the monitor brightness. Shooting mode Playback mode 15/05/2008 15:30 0004....


