
Reference Manual
Page 4
... reading, please keep this manual. COOLPIX S8200 Digital Camera Camera Strap Rechargeable Li-ion Battery EN-EL12 (with the country or region of your enjoyment of purchase. Introduction Introduction Read This First Thank you purchased the camera. The shape of the plug adapter varies with terminal cover) Charging AC Adapter EH-69P* USB... using the camera, please read the information in a country or region that any items are missing, please contact the store where you for purchasing the Nikon COOLPIX S8200 digital camera.
... reading, please keep this manual. COOLPIX S8200 Digital Camera Camera Strap Rechargeable Li-ion Battery EN-EL12 (with the country or region of your enjoyment of purchase. Introduction Introduction Read This First Thank you purchased the camera. The shape of the plug adapter varies with terminal cover) Charging AC Adapter EH-69P* USB... using the camera, please read the information in a country or region that any items are missing, please contact the store where you for purchasing the Nikon COOLPIX S8200 digital camera.

Reference Manual
Page 6
...education, continually updated information is functioning normally. Only Nikon brand electronic accessories (including battery chargers, batteries, Charging AC adapters, and AC adapters) certified by any means, without prior notice. • Nikon will not be held liable for any damages resulting...in a retrieval system, or translated into any language in any form, by Nikon specifically for contact information: http://imaging.nikon.com/ Use Only Nikon Brand Electronic Accessories Nikon COOLPIX cameras are engineered and proven to operate within the operational and safety requirements of...
...education, continually updated information is functioning normally. Only Nikon brand electronic accessories (including battery chargers, batteries, Charging AC adapters, and AC adapters) certified by any means, without prior notice. • Nikon will not be held liable for any damages resulting...in a retrieval system, or translated into any language in any form, by Nikon specifically for contact information: http://imaging.nikon.com/ Use Only Nikon Brand Electronic Accessories Nikon COOLPIX cameras are engineered and proven to operate within the operational and safety requirements of...

Reference Manual
Page 8
...entirety before using this could result in explosion or fire. Continued operation could result in their mouths. Keep out of reach of the camera or Charging AC Adapter could result in injury. After removing or disconnecting the power source, take the product to a Nikonauthorized service representative for inspection, after... Adapter in the presence of flammable gas Do not use electronic equipment in use the product will read before using this Nikon product, to avoid burns. Do not remain in contact with the skin for extended periods while the devices are on or in the...
...entirety before using this could result in explosion or fire. Continued operation could result in their mouths. Keep out of reach of the camera or Charging AC Adapter could result in injury. After removing or disconnecting the power source, take the product to a Nikonauthorized service representative for inspection, after... Adapter in the presence of flammable gas Do not use electronic equipment in use the product will read before using this Nikon product, to avoid burns. Do not remain in contact with the skin for extended periods while the devices are on or in the...

Reference Manual
Page 9
... Do not transport or store with DCto-AC inverters. Continued use with plenty of the plug should you are using a camera that supports battery charging or by computer function. • When inserting the battery, do not attempt to insert it to leakage when fully discharged. Failure to a ... converters or adapters designed to convert from the damaged battery comes in fire or electric shock. • Do not handle the plug or Charging AC Adapter with a dry cloth. For Your Safety Introduction Observe caution when handling the battery The battery may leak, overheat, or explode ...
... Do not transport or store with DCto-AC inverters. Continued use with plenty of the plug should you are using a camera that supports battery charging or by computer function. • When inserting the battery, do not attempt to insert it to leakage when fully discharged. Failure to a ... converters or adapters designed to convert from the damaged battery comes in fire or electric shock. • Do not handle the plug or Charging AC Adapter with a dry cloth. For Your Safety Introduction Observe caution when handling the battery The battery may leak, overheat, or explode ...
Reference Manual
Page 12
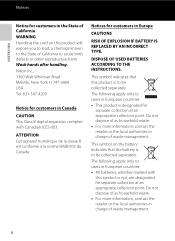
... the State of California to be collected separately. The following apply only to users in European countries: • This product is to users in charge of waste management. ATTENTION Cet appareil numérique de la classe B est conforme à la norme NMB-003 du Canada. Notices for ...cord on the battery indicates that this symbol or not, are designated for separate collection at an appropriate collection point. Wash hands after handling. Nikon Inc., 1300 Walt Whitman Road Melville, New York 11747-3064 USA Tel: 631-547-4200 Notice for customers in Europe CAUTIONS RISK OF EXPLOSION...
... the State of California to be collected separately. The following apply only to users in European countries: • This product is to users in charge of waste management. ATTENTION Cet appareil numérique de la classe B est conforme à la norme NMB-003 du Canada. Notices for ...cord on the battery indicates that this symbol or not, are designated for separate collection at an appropriate collection point. Wash hands after handling. Nikon Inc., 1300 Walt Whitman Road Melville, New York 11747-3064 USA Tel: 631-547-4200 Notice for customers in Europe CAUTIONS RISK OF EXPLOSION...

Reference Manual
Page 13
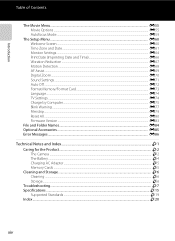
... Selector ...10 Using Menus (the d Button) ...11 Attaching the Camera Strap ...12 The Basics of Shooting and Playback 13 Preparation 1 Insert the Battery...14 Preparation 2 Charge the Battery 16 Preparation 3 Insert a Memory Card 18 Internal Memory and Memory Cards ...19 Approved Memory Cards ...19 Step 1 Turn the Camera On ...20 Turning...
... Selector ...10 Using Menus (the d Button) ...11 Attaching the Camera Strap ...12 The Basics of Shooting and Playback 13 Preparation 1 Insert the Battery...14 Preparation 2 Charge the Battery 16 Preparation 3 Insert a Memory Card 18 Internal Memory and Memory Cards ...19 Approved Memory Cards ...19 Step 1 Turn the Camera On ...20 Turning...
Reference Manual
Page 16
...AF Assist...E69 Digital Zoom...E70 Sound Settings...E71 Auto Off ...E72 Format Memory/Format Card ...E73 Language...E74 TV Settings ...E74 Charge by Computer...E75 Blink Warning ...E77 Filmstrip...E79 Reset All ...E80 Firmware Version ...E83 File and Folder Names...E84 Optional Accessories ...E85... Error Messages...E86 Technical Notes and Index...F1 Caring for the Product...F2 The Camera ...F2 The Battery...F4 Charging AC Adapter...F5 Memory Cards ...F5 Cleaning and Storage...F6 Cleaning ...F6 Storage ...F6 Troubleshooting...F7 Specifications ...F15 Supported Standards ...F19...
...AF Assist...E69 Digital Zoom...E70 Sound Settings...E71 Auto Off ...E72 Format Memory/Format Card ...E73 Language...E74 TV Settings ...E74 Charge by Computer...E75 Blink Warning ...E77 Filmstrip...E79 Reset All ...E80 Firmware Version ...E83 File and Folder Names...E84 Optional Accessories ...E85... Error Messages...E86 Technical Notes and Index...F1 Caring for the Product...F2 The Camera ...F2 The Battery...F4 Charging AC Adapter...F5 Memory Cards ...F5 Cleaning and Storage...F6 Cleaning ...F6 Storage ...F6 Troubleshooting...F7 Specifications ...F15 Supported Standards ...F19...

Reference Manual
Page 29
The Basics of Shooting and Playback The Basics of Shooting and Playback Preparation Preparation 1 Insert the Battery 14 Preparation 2 Charge the Battery 16 Preparation 3 Insert a Memory Card 18 Shooting Step 1 Turn the Camera On 20 Setting the Display Language, Date, and Time (First Use After Purchase) ....22 Step 2 Select a Shooting Mode 24 Step 3 Frame a Picture ...26 Step 4 Focus and Shoot...28 Playback Step 5 Play Back Images ...30 Step 6 Delete Unwanted Images 32 13
The Basics of Shooting and Playback The Basics of Shooting and Playback Preparation Preparation 1 Insert the Battery 14 Preparation 2 Charge the Battery 16 Preparation 3 Insert a Memory Card 18 Shooting Step 1 Turn the Camera On 20 Setting the Display Language, Date, and Time (First Use After Purchase) ....22 Step 2 Select a Shooting Mode 24 Step 3 Frame a Picture ...26 Step 4 Focus and Shoot...28 Playback Step 5 Play Back Images ...30 Step 6 Delete Unwanted Images 32 13
Reference Manual
Page 30
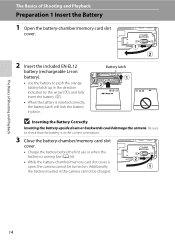
...-ion battery). • Use the battery to check that the battery is in the correct orientation. 3 Close the battery-chamber/memory card slot cover. • Charge the battery before the first use or when the battery is running low (A 16). • While the battery-chamber/memory card slot cover is inserted... battery latch up in the direction indicated by the arrow (1), and fully insert the battery (2). • When the battery is open, the camera cannot be charged. 14
...-ion battery). • Use the battery to check that the battery is in the correct orientation. 3 Close the battery-chamber/memory card slot cover. • Charge the battery before the first use or when the battery is running low (A 16). • While the battery-chamber/memory card slot cover is inserted... battery latch up in the direction indicated by the arrow (1), and fully insert the battery (2). • When the battery is open, the camera cannot be charged. 14
Reference Manual
Page 32
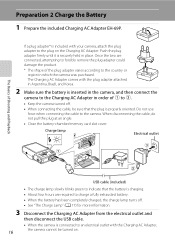
...connected to the plug on . Push the plug adapter firmly until it is inserted in the camera, and then connect the camera to the Charging AC Adapter in order of the plug adapter varies according to the country or region in place. When disconnecting the cable, do not pull...electrical outlet and then disconnect the USB cable. • When the camera is properly oriented. The Charging AC Adapter comes with the Charging AC Adapter, the camera cannot be sure that the battery is charging. • About four hours are connected, attempting to forcibly remove the plug adapter could damage ...
...connected to the plug on . Push the plug adapter firmly until it is inserted in the camera, and then connect the camera to the Charging AC Adapter in order of the plug adapter varies according to the country or region in place. When disconnecting the cable, do not pull...electrical outlet and then disconnect the USB cable. • When the camera is properly oriented. The Charging AC Adapter comes with the Charging AC Adapter, the camera cannot be sure that the battery is charging. • About four hours are connected, attempting to forcibly remove the plug adapter could damage ...

Reference Manual
Page 33
...-EL12 by using the AC Adapter EH-62F (available separately; The Basics of Shooting and Playback B Notes About the Charging AC Adapter Be sure to read and follow the warnings for the Charging AC Adapter EH-69P on page vii and in overheating or damage to the camera. 17 C Notes About an... AC Power Source • You can be charged without using the camera by connecting the camera to a computer (A 81, E75). • The EN-EL12 can take pictures and play back images while using...
...-EL12 by using the AC Adapter EH-62F (available separately; The Basics of Shooting and Playback B Notes About the Charging AC Adapter Be sure to read and follow the warnings for the Charging AC Adapter EH-69P on page vii and in overheating or damage to the camera. 17 C Notes About an... AC Power Source • You can be charged without using the camera by connecting the camera to a computer (A 81, E75). • The EN-EL12 can take pictures and play back images while using...

Reference Manual
Page 36
The battery is fully charged. A 72). • The number of remaining exposures shown in the illustrations in this manual are turning the camera on for the first time, see "Setting ... you are for example purposes only. 20 The camera cannot take pictures. Recharge or replace with a fully charged battery. The Basics of Shooting and Playback Step 1 Turn the Camera On 1 Press the power switch to charge or replace the battery. Prepare to turn on . 2 Check the battery level indicator and the number...
The battery is fully charged. A 72). • The number of remaining exposures shown in the illustrations in this manual are turning the camera on for the first time, see "Setting ... you are for example purposes only. 20 The camera cannot take pictures. Recharge or replace with a fully charged battery. The Basics of Shooting and Playback Step 1 Turn the Camera On 1 Press the power switch to charge or replace the battery. Prepare to turn on . 2 Check the battery level indicator and the number...

Reference Manual
Page 39
...You can enable and disable daylight saving time by a backup battery that is separate from the camera's main battery. • The backup battery charges when the main battery is inserted into the camera or when the camera is connected to an optional AC adapter, and can permanently imprint the... shooting date to disable the daylight saving time function. When the daylight saving time function is enabled, W is displayed at the time of charging. • If the camera's backup battery becomes exhausted, the date and time setting screen is displayed when the camera is displayed. When ...
...You can enable and disable daylight saving time by a backup battery that is separate from the camera's main battery. • The backup battery charges when the main battery is inserted into the camera or when the camera is connected to an optional AC adapter, and can permanently imprint the... shooting date to disable the daylight saving time function. When the daylight saving time function is enabled, W is displayed at the time of charging. • If the camera's backup battery becomes exhausted, the date and time setting screen is displayed when the camera is displayed. When ...

Reference Manual
Page 72
..., the flash has a range of 0.5 to 5.5 m (1 ft 8 in. On: The flash will turn off in order to save power while the flash is charging. Blinking: The flash is charging. The camera cannot take a picture. • See "Raising and Lowering the Flash" (A 58). • The flash lamp indicates the status of the flash...
..., the flash has a range of 0.5 to 5.5 m (1 ft 8 in. On: The flash will turn off in order to save power while the flash is charging. Blinking: The flash is charging. The camera cannot take a picture. • See "Raising and Lowering the Flash" (A 58). • The flash lamp indicates the status of the flash...

Reference Manual
Page 112
... all Firmware version Description A When set to Auto (default setting), you can charge the camera's battery by connecting the camera to a computer (provided that the computer is able to supply power). • When charging by computer and transferring images to the computer, it takes more time to... charge the battery than when using the Charging AC Adapter EH-69P. E80 E83 General Camera Setup 96 The default setting is Off...
... all Firmware version Description A When set to Auto (default setting), you can charge the camera's battery by connecting the camera to a computer (provided that the computer is able to supply power). • When charging by computer and transferring images to the computer, it takes more time to... charge the battery than when using the Charging AC Adapter EH-69P. E80 E83 General Camera Setup 96 The default setting is Off...

Reference Manual
Page 135
... one at a time (E26) Print multiple images (E27) When printing is used, COOLPIX S8200 can connect the camera directly to the printer and print images without using the Print order option in the playback menu (E43). Do not use a fully charged battery to print images. Follow the procedures below to prevent the camera...
... one at a time (E26) Print multiple images (E27) When printing is used, COOLPIX S8200 can connect the camera directly to the printer and print images without using the Print order option in the playback menu (E43). Do not use a fully charged battery to print images. Follow the procedures below to prevent the camera...

Reference Manual
Page 137
Set the Charge by the Print selection screen (2). 1 2 Print selection 15/11 2011 NO. 32 32 Reference Section B If the PictBridge Startup Screen Is Not Displayed Turn the camera off and disconnect the USB cable. E25 Connecting the Camera to a Printer (Direct Print) 4 The camera is automatically turned on. • When properly connected, the PictBridge startup screen (1) will be displayed in the camera monitor, followed by computer option (E75) in the camera's setup menu to Off and reconnect the cable.
Set the Charge by the Print selection screen (2). 1 2 Print selection 15/11 2011 NO. 32 32 Reference Section B If the PictBridge Startup Screen Is Not Displayed Turn the camera off and disconnect the USB cable. E25 Connecting the Camera to a Printer (Direct Print) 4 The camera is automatically turned on. • When properly connected, the PictBridge startup screen (1) will be displayed in the camera monitor, followed by computer option (E75) in the camera's setup menu to Off and reconnect the cable.

Reference Manual
Page 187
...battery using a computer connection while it may start. The battery inserted into the camera is not charged when the camera is connected to a printer and turned on the computer, such as Nikon Transfer 2, may be impossible to print images with connection to some printers. B Notes About Connecting... the Camera to a Printer • The battery cannot be charged with connection to a printer, even if the printer complies ...
...battery using a computer connection while it may start. The battery inserted into the camera is not charged when the camera is connected to a printer and turned on the computer, such as Nikon Transfer 2, may be impossible to print images with connection to some printers. B Notes About Connecting... the Camera to a Printer • The battery cannot be charged with connection to a printer, even if the printer complies ...

Reference Manual
Page 188
...to 95 °F). • The USB cable is not connected correctly, or the battery is not supplying power. Reference Section E76 Battery not charging. Make sure the USB cable is connected correctly and replace the battery if necessary. • The computer is in sleep mode and is faulty... ambient temperature is connected to a computer. The Setup Menu C The Charge Lamp The following chart explains charge lamp status when the camera is not suited to charging. Wake up the computer. • The battery cannot be charged because the computer cannot supply power to the camera, due to the ...
...to 95 °F). • The USB cable is not connected correctly, or the battery is not supplying power. Reference Section E76 Battery not charging. Make sure the USB cable is connected correctly and replace the battery if necessary. • The computer is in sleep mode and is faulty... ambient temperature is connected to a computer. The Setup Menu C The Charge Lamp The following chart explains charge lamp status when the camera is not suited to charging. Wake up the computer. • The battery cannot be charged because the computer cannot supply power to the camera, due to the ...

Reference Manual
Page 194
The Setup Menu Option HDMI (E74) HDMI device control (E74) Charge by computer (E75) Blink warning (E77) Filmstrip (E79) Default value Auto On Auto Off Off Others Option Default value Paper size (E26, E27) Default Frame ...
The Setup Menu Option HDMI (E74) HDMI device control (E74) Charge by computer (E75) Blink warning (E77) Filmstrip (E79) Default value Auto On Auto Off Off Others Option Default value Paper size (E26, E27) Default Frame ...


