
Reference Manual
Page 4
... Package Contents In the event that requires a plug adapter. COOLPIX S8200 Digital Camera Camera Strap Rechargeable Li-ion Battery EN-EL12 (with the camera. NOTE: A memory card is not included with terminal cover) Charging AC Adapter EH-69P* USB Cable UC-E6 Audio Video Cable... EG-CP16 ViewNX 2 Installer CD Reference Manual CD • Warranty * A plug adapter is included if the camera was purchased in a country or region that any items are missing, please contact the store where you for purchasing the Nikon COOLPIX S8200...
... Package Contents In the event that requires a plug adapter. COOLPIX S8200 Digital Camera Camera Strap Rechargeable Li-ion Battery EN-EL12 (with the camera. NOTE: A memory card is not included with terminal cover) Charging AC Adapter EH-69P* USB Cable UC-E6 Audio Video Cable... EG-CP16 ViewNX 2 Installer CD Reference Manual CD • Warranty * A plug adapter is included if the camera was purchased in a country or region that any items are missing, please contact the store where you for purchasing the Nikon COOLPIX S8200...

Reference Manual
Page 6
... (including battery chargers, batteries, Charging AC adapters, and AC adapters) certified by any means, without prior notice. • Nikon will not be held liable for contact information: http://imaging.nikon.com/ Use Only Nikon Brand Electronic Accessories Nikon COOLPIX cameras are engineered and proven to operate within the operational and safety requirements of Nikon's "Life-Long Learning...
... (including battery chargers, batteries, Charging AC adapters, and AC adapters) certified by any means, without prior notice. • Nikon will not be held liable for contact information: http://imaging.nikon.com/ Use Only Nikon Brand Electronic Accessories Nikon COOLPIX cameras are engineered and proven to operate within the operational and safety requirements of Nikon's "Life-Long Learning...

Reference Manual
Page 8
.... Do not use the camera or Charging AC Adapter in the presence of flammable gas Do not use electronic equipment in the presence of flammable gas, as the result of a fall or other small parts into their entirety before using this Nikon product, to prevent possible injury. Handle...those who use Parts of children Particular care should be read before using this equipment. Introduction For Your Safety To prevent damage to your Nikon product or injury to yourself or to others, read the following safety precautions in their mouths. This icon marks warnings, information that ...
.... Do not use the camera or Charging AC Adapter in the presence of flammable gas Do not use electronic equipment in the presence of flammable gas, as the result of a fall or other small parts into their entirety before using this Nikon product, to prevent possible injury. Handle...those who use Parts of children Particular care should be read before using this equipment. Introduction For Your Safety To prevent damage to your Nikon product or injury to yourself or to others, read the following safety precautions in their mouths. This icon marks warnings, information that ...

Reference Manual
Page 9
...deformation. • If liquid from one voltage to another or with DCto-AC inverters. Observe the following precautions when handling the Charging AC Adapter • Keep dry. Failure to observe this precaution could result in this precaution could result in the battery, ... a Nikonauthorized service representative for use immediately should you are using a Battery Charger MH-65 (available separately). Charge the battery by using a camera that supports battery charging or by computer function. • When inserting the battery, do not attempt to insert it to remove...
...deformation. • If liquid from one voltage to another or with DCto-AC inverters. Observe the following precautions when handling the Charging AC Adapter • Keep dry. Failure to observe this precaution could result in this precaution could result in the battery, ... a Nikonauthorized service representative for use immediately should you are using a Battery Charger MH-65 (available separately). Charge the battery by using a camera that supports battery charging or by computer function. • When inserting the battery, do not attempt to insert it to remove...
Reference Manual
Page 12
Nikon Inc., 1300 Walt Whitman Road Melville, New York 11747-3064 USA Tel: 631-547-4200 Notice for customers in Canada CAUTION This Class B digital apparatus ..., whether marked with Canadian ICES-003. Do not dispose of as household waste. • For more information, contact the retailer or the local authorities in charge of waste management. Wash hands after handling. Notices for separate collection at an appropriate collection point. Do not dispose of as household waste. • For...
Nikon Inc., 1300 Walt Whitman Road Melville, New York 11747-3064 USA Tel: 631-547-4200 Notice for customers in Canada CAUTION This Class B digital apparatus ..., whether marked with Canadian ICES-003. Do not dispose of as household waste. • For more information, contact the retailer or the local authorities in charge of waste management. Wash hands after handling. Notices for separate collection at an appropriate collection point. Do not dispose of as household waste. • For...

Reference Manual
Page 13
... Selector ...10 Using Menus (the d Button) ...11 Attaching the Camera Strap ...12 The Basics of Shooting and Playback 13 Preparation 1 Insert the Battery...14 Preparation 2 Charge the Battery 16 Preparation 3 Insert a Memory Card 18 Internal Memory and Memory Cards ...19 Approved Memory Cards ...19 Step 1 Turn the Camera On ...20 Turning...
... Selector ...10 Using Menus (the d Button) ...11 Attaching the Camera Strap ...12 The Basics of Shooting and Playback 13 Preparation 1 Insert the Battery...14 Preparation 2 Charge the Battery 16 Preparation 3 Insert a Memory Card 18 Internal Memory and Memory Cards ...19 Approved Memory Cards ...19 Step 1 Turn the Camera On ...20 Turning...
Reference Manual
Page 16
...AF Assist...E69 Digital Zoom...E70 Sound Settings...E71 Auto Off ...E72 Format Memory/Format Card ...E73 Language...E74 TV Settings ...E74 Charge by Computer...E75 Blink Warning ...E77 Filmstrip...E79 Reset All ...E80 Firmware Version ...E83 File and Folder Names...E84 Optional Accessories ...E85... Error Messages...E86 Technical Notes and Index...F1 Caring for the Product...F2 The Camera ...F2 The Battery...F4 Charging AC Adapter...F5 Memory Cards ...F5 Cleaning and Storage...F6 Cleaning ...F6 Storage ...F6 Troubleshooting...F7 Specifications ...F15 Supported Standards ...F19...
...AF Assist...E69 Digital Zoom...E70 Sound Settings...E71 Auto Off ...E72 Format Memory/Format Card ...E73 Language...E74 TV Settings ...E74 Charge by Computer...E75 Blink Warning ...E77 Filmstrip...E79 Reset All ...E80 Firmware Version ...E83 File and Folder Names...E84 Optional Accessories ...E85... Error Messages...E86 Technical Notes and Index...F1 Caring for the Product...F2 The Camera ...F2 The Battery...F4 Charging AC Adapter...F5 Memory Cards ...F5 Cleaning and Storage...F6 Cleaning ...F6 Storage ...F6 Troubleshooting...F7 Specifications ...F15 Supported Standards ...F19...

Reference Manual
Page 29
The Basics of Shooting and Playback The Basics of Shooting and Playback Preparation Preparation 1 Insert the Battery 14 Preparation 2 Charge the Battery 16 Preparation 3 Insert a Memory Card 18 Shooting Step 1 Turn the Camera On 20 Setting the Display Language, Date, and Time (First Use After Purchase) ....22 Step 2 Select a Shooting Mode 24 Step 3 Frame a Picture ...26 Step 4 Focus and Shoot...28 Playback Step 5 Play Back Images ...30 Step 6 Delete Unwanted Images 32 13
The Basics of Shooting and Playback The Basics of Shooting and Playback Preparation Preparation 1 Insert the Battery 14 Preparation 2 Charge the Battery 16 Preparation 3 Insert a Memory Card 18 Shooting Step 1 Turn the Camera On 20 Setting the Display Language, Date, and Time (First Use After Purchase) ....22 Step 2 Select a Shooting Mode 24 Step 3 Frame a Picture ...26 Step 4 Focus and Shoot...28 Playback Step 5 Play Back Images ...30 Step 6 Delete Unwanted Images 32 13
Reference Manual
Page 30
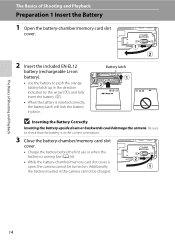
...-ion battery). • Use the battery to check that the battery is in the correct orientation. 3 Close the battery-chamber/memory card slot cover. • Charge the battery before the first use or when the battery is running low (A 16). • While the battery-chamber/memory card slot cover is inserted... battery latch up in the direction indicated by the arrow (1), and fully insert the battery (2). • When the battery is open, the camera cannot be charged. 14
...-ion battery). • Use the battery to check that the battery is in the correct orientation. 3 Close the battery-chamber/memory card slot cover. • Charge the battery before the first use or when the battery is running low (A 16). • While the battery-chamber/memory card slot cover is inserted... battery latch up in the direction indicated by the arrow (1), and fully insert the battery (2). • When the battery is open, the camera cannot be charged. 14
Reference Manual
Page 32
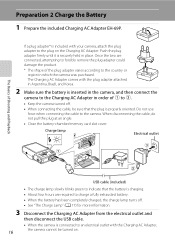
... could damage the product. * The shape of 1 to 3. • Keep the camera turned off . • See "The Charge Lamp" (A 17) for more information. 3 16 Disconnect the Charging AC Adapter from the electrical outlet and then disconnect the USB cable. • When the camera is connected to an electrical...When disconnecting the cable, do not pull the plug at an angle. • Close the battery-chamber/memory card slot cover. Preparation 2 Charge the Battery 1 Prepare the included Charging AC Adapter EH-69P. Do not use force when connecting the cable to the country or region in place.
... could damage the product. * The shape of 1 to 3. • Keep the camera turned off . • See "The Charge Lamp" (A 17) for more information. 3 16 Disconnect the Charging AC Adapter from the electrical outlet and then disconnect the USB cable. • When the camera is connected to an electrical...When disconnecting the cable, do not pull the plug at an angle. • Close the battery-chamber/memory card slot cover. Preparation 2 Charge the Battery 1 Prepare the included Charging AC Adapter EH-69P. Do not use force when connecting the cable to the country or region in place.

Reference Manual
Page 33
...vii and in overheating or damage to 95 °F). • The USB cable or Charging AC Adapter is not properly connected, or there is complete, the charge lamp stops blinking green and turns off. When charging is a problem with an ambient temperature of 5 °C to 35 °C (...41 °F to the camera. 17 Preparation 2 Charge the Battery The Charge Lamp Status Description Blinks slowly (green) The battery is charging. The Basics of AC adapter other than EH-62F. E85). E85) to power the camera from an electrical outlet...
...vii and in overheating or damage to 95 °F). • The USB cable or Charging AC Adapter is not properly connected, or there is complete, the charge lamp stops blinking green and turns off. When charging is a problem with an ambient temperature of 5 °C to 35 °C (...41 °F to the camera. 17 Preparation 2 Charge the Battery The Charge Lamp Status Description Blinks slowly (green) The battery is charging. The Basics of AC adapter other than EH-62F. E85). E85) to power the camera from an electrical outlet...

Reference Manual
Page 36
... the image quality and image size (determined by the image mode setting; Recharge or replace with a fully charged battery. The Basics of Shooting and Playback Step 1 Turn the Camera On 1 Press the power switch to charge or replace the battery. A 72). • The number of exposures remaining Battery Level Indicator Display b B N Battery...
... the image quality and image size (determined by the image mode setting; Recharge or replace with a fully charged battery. The Basics of Shooting and Playback Step 1 Turn the Camera On 1 Press the power switch to charge or replace the battery. A 72). • The number of exposures remaining Battery Level Indicator Display b B N Battery...

Reference Manual
Page 39
...). 23 C The Clock Battery • The camera's clock is powered by a backup battery that is separate from the camera's main battery. • The backup battery charges when the main battery is inserted into the camera or when the camera is connected to an optional AC adapter, and can provide several days.... Press I to set the date and time (A 94). Use the Time zone and date setting in images as they are saved at the top of charging. • If the camera's backup battery becomes exhausted, the date and time setting screen is displayed when the camera is in effect, press the multi...
...). 23 C The Clock Battery • The camera's clock is powered by a backup battery that is separate from the camera's main battery. • The backup battery charges when the main battery is inserted into the camera or when the camera is connected to an optional AC adapter, and can provide several days.... Press I to set the date and time (A 94). Use the Time zone and date setting in images as they are saved at the top of charging. • If the camera's backup battery becomes exhausted, the date and time setting screen is displayed when the camera is in effect, press the multi...

Reference Manual
Page 72
...is only displayed for Auto a few seconds, regardless of Monitor settings (A 94). 29m 0s 840 3 Frame the subject and take pictures. - Blinking: The flash is charging. On: The flash will turn off in . to Auto, the flash has a range of the flash when you press the shutter-release button all the... a few seconds, the selection will be canceled. • When U (auto) is applied, D is set the flash mode to save power while the flash is charging. Features That Can Be Set Using the Multi Selector Using the Flash (Flash Mode) You can set to 18 ft) at the 56 maximum telephoto...
...is only displayed for Auto a few seconds, regardless of Monitor settings (A 94). 29m 0s 840 3 Frame the subject and take pictures. - Blinking: The flash is charging. On: The flash will turn off in . to Auto, the flash has a range of the flash when you press the shutter-release button all the... a few seconds, the selection will be canceled. • When U (auto) is applied, D is set the flash mode to save power while the flash is charging. Features That Can Be Set Using the Multi Selector Using the Flash (Flash Mode) You can set to 18 ft) at the 56 maximum telephoto...

Reference Manual
Page 112
... camera's battery by connecting the camera to a computer (provided that the computer is able to supply power). • When charging by computer and transferring images to the computer, it takes more time to their default values. • Certain settings such as Time zone and... date and Language are displayed in full-frame playback mode (A 30). Additionally, when charging by computer, it takes more time to check the image. E75 Except when using the Charging AC Adapter EH-69P. The default setting is Off. E80 E83 General Camera Setup 96 E77 When ...
... camera's battery by connecting the camera to a computer (provided that the computer is able to supply power). • When charging by computer and transferring images to the computer, it takes more time to their default values. • Certain settings such as Time zone and... date and Language are displayed in full-frame playback mode (A 30). Additionally, when charging by computer, it takes more time to check the image. E75 Except when using the Charging AC Adapter EH-69P. The default setting is Off. E80 E83 General Camera Setup 96 E77 When ...

Reference Manual
Page 135
Do not use a fully charged battery to prevent the camera from turning off unexpectedly. • If the AC Adapter EH-62F (available separately) is used, COOLPIX S8200 can connect the camera directly to print images. E23 Connecting the Camera to a Printer (Direct Print) Users of prints each to the memory card using ...
Do not use a fully charged battery to prevent the camera from turning off unexpectedly. • If the AC Adapter EH-62F (available separately) is used, COOLPIX S8200 can connect the camera directly to print images. E23 Connecting the Camera to a Printer (Direct Print) Users of prints each to the memory card using ...

Reference Manual
Page 137
Connecting the Camera to a Printer (Direct Print) 4 The camera is automatically turned on. • When properly connected, the PictBridge startup screen (1) will be displayed in the camera monitor, followed by computer option (E75) in the camera's setup menu to Off and reconnect the cable. E25 Set the Charge by the Print selection screen (2). 1 2 Print selection 15/11 2011 NO. 32 32 Reference Section B If the PictBridge Startup Screen Is Not Displayed Turn the camera off and disconnect the USB cable.
Connecting the Camera to a Printer (Direct Print) 4 The camera is automatically turned on. • When properly connected, the PictBridge startup screen (1) will be displayed in the camera monitor, followed by computer option (E75) in the camera's setup menu to Off and reconnect the cable. E25 Set the Charge by the Print selection screen (2). 1 2 Print selection 15/11 2011 NO. 32 32 Reference Section B If the PictBridge Startup Screen Is Not Displayed Turn the camera off and disconnect the USB cable.

Reference Manual
Page 187
... and disconnect the USB cable. The battery inserted into the camera is not charged when the camera is connected to a printer and turned on the computer, such as Nikon Transfer 2, may be impossible to print images with direct connection of charging the battery, exit the application. • The camera turns off automatically if...
... and disconnect the USB cable. The battery inserted into the camera is not charged when the camera is connected to a printer and turned on the computer, such as Nikon Transfer 2, may be impossible to print images with direct connection of charging the battery, exit the application. • The camera turns off automatically if...

Reference Manual
Page 188
... the USB cable is connected correctly and replace the battery if necessary. • The computer is in sleep mode and is not supplying power. Charge the battery indoors with an ambient temperature of 5 °C to 35 °C (41 °F to the computer's settings or its specifications.... Reference Section E76 Battery not charging. Wake up the computer. • The battery cannot be charged because the computer cannot supply power to the camera, due to 95 °F). • The USB cable is not connected...
... the USB cable is connected correctly and replace the battery if necessary. • The computer is in sleep mode and is not supplying power. Charge the battery indoors with an ambient temperature of 5 °C to 35 °C (41 °F to the computer's settings or its specifications.... Reference Section E76 Battery not charging. Wake up the computer. • The battery cannot be charged because the computer cannot supply power to the camera, due to 95 °F). • The USB cable is not connected...

Reference Manual
Page 194
... menus are reset with Reset all . • The following menu settings will continue from memory. The Setup Menu Option HDMI (E74) HDMI device control (E74) Charge by computer (E75) Blink warning (E77) Filmstrip (E79) Default value Auto On Auto Off Off Others Option Default value Paper size (E26, E27) Default Frame...
... menus are reset with Reset all . • The following menu settings will continue from memory. The Setup Menu Option HDMI (E74) HDMI device control (E74) Charge by computer (E75) Blink warning (E77) Filmstrip (E79) Default value Auto On Auto Off Off Others Option Default value Paper size (E26, E27) Default Frame...


