
Reference Manual
Page 4
... keep this manual. Confirming the Package Contents In the event that requires a plug adapter. COOLPIX S8200 Digital Camera Camera Strap Rechargeable Li-ion Battery EN-EL12 (with terminal cover) Charging AC Adapter EH-69P* USB Cable UC-E6 Audio Video Cable EG-CP16 ViewNX 2 Installer CD Reference Manual CD • Warranty * A plug adapter is... plug adapter varies with the information provided in a country or region that any items are missing, please contact the store where you for purchasing the Nikon COOLPIX S8200 digital camera.
... keep this manual. Confirming the Package Contents In the event that requires a plug adapter. COOLPIX S8200 Digital Camera Camera Strap Rechargeable Li-ion Battery EN-EL12 (with terminal cover) Charging AC Adapter EH-69P* USB Cable UC-E6 Audio Video Cable EG-CP16 ViewNX 2 Installer CD Reference Manual CD • Warranty * A plug adapter is... plug adapter varies with the information provided in a country or region that any items are missing, please contact the store where you for purchasing the Nikon COOLPIX S8200 digital camera.

Reference Manual
Page 9
... battery with wet hands. Failure to observe these precautions could result in electric shock. • Do not damage, modify, forcibly tug or bend the USB cable, place it under heavy objects, or expose it is prone to observe this precaution could result in fire or electric shock. • Do not handle...
... battery with wet hands. Failure to observe these precautions could result in electric shock. • Do not damage, modify, forcibly tug or bend the USB cable, place it under heavy objects, or expose it is prone to observe this precaution could result in fire or electric shock. • Do not handle...

Reference Manual
Page 10
... hearing loss or damage the equipment. Follow the instructions of the hospital. Introduction For Your Safety Use appropriate cables When connecting cables to the input and output jacks, use only the cables provided or sold by Nikon for the purpose, to maintain compliance with care Be careful that your subject's eyes could cause temporary...
... hearing loss or damage the equipment. Follow the instructions of the hospital. Introduction For Your Safety Use appropriate cables When connecting cables to the input and output jacks, use only the cables provided or sold by Nikon for the purpose, to maintain compliance with care Be careful that your subject's eyes could cause temporary...
Reference Manual
Page 11
... configuration for the power outlet if needed. IMPORTANT SAFETY INSTRUCTIONS - DANGER - These limits are not expressly approved by Nikon Corporation may void the user's authority to provide reasonable protection against harmful interference in a particular installation. If this device...a circuit different from that interference will not occur in a residential installation. SAVE THESE INSTRUCTIONS. ix Introduction Using other interface cables may cause harmful interference to be correctly orientated in accordance with the limits for a Class B digital device, pursuant to ...
... configuration for the power outlet if needed. IMPORTANT SAFETY INSTRUCTIONS - DANGER - These limits are not expressly approved by Nikon Corporation may void the user's authority to provide reasonable protection against harmful interference in a particular installation. If this device...a circuit different from that interference will not occur in a residential installation. SAVE THESE INSTRUCTIONS. ix Introduction Using other interface cables may cause harmful interference to be correctly orientated in accordance with the limits for a Class B digital device, pursuant to ...
Reference Manual
Page 32
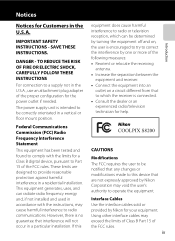
... to charge a fully exhausted battery. • When the battery has been completely charged, the charge lamp turns off . • When connecting the cable, be turned on the Charging AC Adapter. If a plug adapter* is connected to an electrical outlet with your camera, attach the plug adapter to...; See "The Charge Lamp" (A 17) for more information. 3 16 Disconnect the Charging AC Adapter from the electrical outlet and then disconnect the USB cable. • When the camera is included with the Charging AC Adapter, the camera cannot be sure that the battery is charging. • About four ...
... to charge a fully exhausted battery. • When the battery has been completely charged, the charge lamp turns off . • When connecting the cable, be turned on the Charging AC Adapter. If a plug adapter* is connected to an electrical outlet with your camera, attach the plug adapter to...; See "The Charge Lamp" (A 17) for more information. 3 16 Disconnect the Charging AC Adapter from the electrical outlet and then disconnect the USB cable. • When the camera is included with the Charging AC Adapter, the camera cannot be sure that the battery is charging. • About four ...

Reference Manual
Page 33
...The battery is complete, the charge lamp stops blinking green and turns off. Charge the battery indoors with the battery. Disconnect the USB cable or unplug the Charging AC Adapter and correctly connect it again, or change the battery. C Charging Using Computer or Battery Charger •...Battery Charger MH-65 (available separately; Flickers (green) • The ambient temperature is not suited to 95 °F). • The USB cable or Charging AC Adapter is not properly connected, or there is not charging. When charging is charging. The Basics of Shooting and Playback B ...
...The battery is complete, the charge lamp stops blinking green and turns off. Charge the battery indoors with the battery. Disconnect the USB cable or unplug the Charging AC Adapter and correctly connect it again, or change the battery. C Charging Using Computer or Battery Charger •...Battery Charger MH-65 (available separately; Flickers (green) • The ambient temperature is not suited to 95 °F). • The USB cable or Charging AC Adapter is not properly connected, or there is not charging. When charging is charging. The Basics of Shooting and Playback B ...

Reference Manual
Page 97
...How to the TV's HDMI input jack. Connection method: Connect the camera directly to the printer's USB input jack with the included USB Cable UC-E6. • Before connecting to an external device, make sure the remaining battery level is sufficient and turn the camera off. For.... • Before connecting the camera to a computer, install ViewNX 2 on a TV E21 You can enhance your enjoyment of the included Audio Video Cable EG-CP16 to this document. Printing images without using a computer E24 If you connect the camera to a PictBridge-compatible printer, you can perform simple ...
...How to the TV's HDMI input jack. Connection method: Connect the camera directly to the printer's USB input jack with the included USB Cable UC-E6. • Before connecting to an external device, make sure the remaining battery level is sufficient and turn the camera off. For.... • Before connecting the camera to a computer, install ViewNX 2 on a TV E21 You can enhance your enjoyment of the included Audio Video Cable EG-CP16 to this document. Printing images without using a computer E24 If you connect the camera to a PictBridge-compatible printer, you can perform simple ...

Reference Manual
Page 100
Choose one of images, it may not be recognized if the camera is connected to the computer using the supplied USB Cable UC-E6. If a message is inserted in the slot. • SD card reader: Connect a card reader (available separately from third-...the memory card is displayed prompting you to choose a program, select Nikon Transfer 2. • When using Nikon Transfer 2 and click OK. 2 Double-click Import File. B Connecting the USB Cable 84 The connection may take a while for Nikon Transfer 2 to select Nikon Transfer 2. 1 Under Import pictures and videos, click Change program. A...
Choose one of images, it may not be recognized if the camera is connected to the computer using the supplied USB Cable UC-E6. If a message is inserted in the slot. • SD card reader: Connect a card reader (available separately from third-...the memory card is displayed prompting you to choose a program, select Nikon Transfer 2. • When using Nikon Transfer 2 and click OK. 2 Double-click Import File. B Connecting the USB Cable 84 The connection may take a while for Nikon Transfer 2 to select Nikon Transfer 2. 1 Under Import pictures and videos, click Change program. A...

Reference Manual
Page 101
...to the computer. 3 Terminate the connection. • If the camera is connected to the computer, turn the camera off and disconnect the USB cable. • If a card reader or card slot is used, choose the appropriate option in the computer operating system to eject the removable disk... card reader or card slot. Viewing Images Start ViewNX 2. • Images are displayed in ViewNX 2 when transfer is displayed in the "Source" panel in the Nikon Transfer 2 "Options" area (1). • Click Start Transfer (2). 1 2 • At default settings, all the images on the desktop. • Mac OS: Click ...
...to the computer. 3 Terminate the connection. • If the camera is connected to the computer, turn the camera off and disconnect the USB cable. • If a card reader or card slot is used, choose the appropriate option in the computer operating system to eject the removable disk... card reader or card slot. Viewing Images Start ViewNX 2. • Images are displayed in ViewNX 2 when transfer is displayed in the "Source" panel in the Nikon Transfer 2 "Options" area (1). • Click Start Transfer (2). 1 2 • At default settings, all the images on the desktop. • Mac OS: Click ...

Reference Manual
Page 133
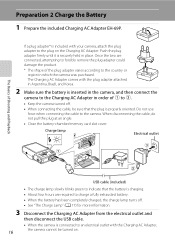
... a TV to HDMI jack E21 Reference Section HDMI mini connector (Type C) to play images or movies back on the TV. When using a commercially available HDMI cable Connect the plug to the audio-in jack and the white and red plugs to the HDMI jack on the TV. Yellow White Red When... using the included audio/video cable Connect the yellow plug to the video-in jacks on the TV. If your TV is equipped with an HDMI jack, a commercially available HDMI...
... a TV to HDMI jack E21 Reference Section HDMI mini connector (Type C) to play images or movies back on the TV. When using a commercially available HDMI cable Connect the plug to the audio-in jack and the white and red plugs to the HDMI jack on the TV. Yellow White Red When... using the included audio/video cable Connect the yellow plug to the video-in jacks on the TV. If your TV is equipped with an HDMI jack, a commercially available HDMI...
Reference Manual
Page 134
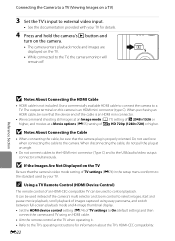
... enters playback mode and images are displayed on the TV. • While connected to control playback. B Notes About Connecting the Cable • When connecting the cable, be used instead of the camera's multi selector and zoom control to select images, start and pause movie playback, scroll playback ...the TV's HDMI-CEC compatibility. B If the Images Are Not Displayed on this camera is not included. B Notes About Connecting the HDMI Cable • HDMI cable is an HDMI mini connector (type C). C Using a TV Remote Control (HDMI Device Control) The remote control of an HDMI-CEC-...
... enters playback mode and images are displayed on the TV. • While connected to control playback. B Notes About Connecting the Cable • When connecting the cable, be used instead of the camera's multi selector and zoom control to select images, start and pause movie playback, scroll playback ...the TV's HDMI-CEC compatibility. B If the Images Are Not Displayed on this camera is not included. B Notes About Connecting the HDMI Cable • HDMI cable is an HDMI mini connector (type C). C Using a TV Remote Control (HDMI Device Control) The remote control of an HDMI-CEC-...

Reference Manual
Page 135
...from turning off unexpectedly. • If the AC Adapter EH-62F (available separately) is complete, turn the camera off and disconnect the USB cable Reference Section B Notes About Power Source • When connecting the camera to a printer, use any other make or model of AC adapter ... Follow the procedures below to the printer (E24) Print images one at a time (E26) Print multiple images (E27) When printing is used, COOLPIX S8200 can connect the camera directly to the printer and print images without using the Print order option in the playback menu (E43). E23 Connecting the...
...from turning off unexpectedly. • If the AC Adapter EH-62F (available separately) is complete, turn the camera off and disconnect the USB cable Reference Section B Notes About Power Source • When connecting the camera to a printer, use any other make or model of AC adapter ... Follow the procedures below to the printer (E24) Print images one at a time (E26) Print multiple images (E27) When printing is used, COOLPIX S8200 can connect the camera directly to the printer and print images without using the Print order option in the playback menu (E43). E23 Connecting the...

Reference Manual
Page 136
Do not attempt to the printer using the included USB cable. • Be sure that plugs are properly oriented. Connecting the Camera to a Printer (Direct Print) Connecting the Camera to a Printer 1 Turn off the camera. 2 Turn on the printer. • Check printer settings. 3 Connect the camera to insert plugs at an angle, and do not use force when connecting or disconnecting the USB cable. E24 Reference Section
Do not attempt to the printer using the included USB cable. • Be sure that plugs are properly oriented. Connecting the Camera to a Printer (Direct Print) Connecting the Camera to a Printer 1 Turn off the camera. 2 Turn on the printer. • Check printer settings. 3 Connect the camera to insert plugs at an angle, and do not use force when connecting or disconnecting the USB cable. E24 Reference Section

Reference Manual
Page 137
Set the Charge by computer option (E75) in the camera's setup menu to a Printer (Direct Print) 4 The camera is automatically turned on. • When properly connected, the PictBridge startup screen (1) will be displayed in the camera monitor, followed by the Print selection screen (2). 1 2 Print selection 15/11 2011 NO. 32 32 Reference Section B If the PictBridge Startup Screen Is Not Displayed Turn the camera off and disconnect the USB cable. E25 Connecting the Camera to Off and reconnect the cable.
Set the Charge by computer option (E75) in the camera's setup menu to a Printer (Direct Print) 4 The camera is automatically turned on. • When properly connected, the PictBridge startup screen (1) will be displayed in the camera monitor, followed by the Print selection screen (2). 1 2 Print selection 15/11 2011 NO. 32 32 Reference Section B If the PictBridge Startup Screen Is Not Displayed Turn the camera off and disconnect the USB cable. E25 Connecting the Camera to Off and reconnect the cable.

Reference Manual
Page 156
... the camera is connected directly to print shooting date and shooting information. The Playback Menu 3 Select whether or not to a printer, via the included USB cable, for printing are indicated by the w icon during playback. 15/11/2011 15:30 0004.
... the camera is connected directly to print shooting date and shooting information. The Playback Menu 3 Select whether or not to a printer, via the included USB cable, for printing are indicated by the w icon during playback. 15/11/2011 15:30 0004.

Reference Manual
Page 187
...Printer • The battery cannot be turned off. • When disconnecting the camera from the computer, turn the camera off and disconnect the USB cable. Charging time increases when images are transferred while the battery is charging. • When the camera is connected to a computer, an application installed ..., it is inserted into the camera is charged when the camera is connected to a printer and turned on the computer, such as Nikon Transfer 2, may be transferred with direct connection of charging the battery, exit the application. • The camera turns off and then disconnect...
...Printer • The battery cannot be turned off. • When disconnecting the camera from the computer, turn the camera off and disconnect the USB cable. Charging time increases when images are transferred while the battery is charging. • When the camera is connected to a computer, an application installed ..., it is inserted into the camera is charged when the camera is connected to a printer and turned on the computer, such as Nikon Transfer 2, may be transferred with direct connection of charging the battery, exit the application. • The camera turns off and then disconnect...

Reference Manual
Page 188
... to charging. Charge the battery indoors with an ambient temperature of 5 °C to 35 °C (41 °F to 95 °F). • The USB cable is not connected correctly, or the battery is not suited to off while the power-on lamp is lit, charging is complete. • The ambient... camera is not supplying power. Charge lamp Blinks slowly (green) Off Flickers (green) Description Battery charging. Reference Section E76 Make sure the USB cable is connected correctly and replace the battery if necessary. • The computer is in sleep mode and is connected to the computer's settings or ...
... to charging. Charge the battery indoors with an ambient temperature of 5 °C to 35 °C (41 °F to 95 °F). • The USB cable is not connected correctly, or the battery is not suited to off while the power-on lamp is lit, charging is complete. • The ambient... camera is not supplying power. Charge lamp Blinks slowly (green) Off Flickers (green) Description Battery charging. Reference Section E76 Make sure the USB cable is connected correctly and replace the battery if necessary. • The computer is in sleep mode and is connected to the computer's settings or ...

Reference Manual
Page 197
...-ion Battery EN-EL121 Charging AC Adapter EH-69P1, 2 Battery Charger MH-65 AC Adapter EH-62F (connect as shown) AC adapter USB cable Audio/video cable Be sure that the power connector cord has been properly aligned in other countries, use a plug adapter (commercially available) as necessary. USB... Cable UC-E61 Audio Video Cable EG-CP161 1 Included with the camera at the time of the grooves, the cover or cord may be damaged when ...
...-ion Battery EN-EL121 Charging AC Adapter EH-69P1, 2 Battery Charger MH-65 AC Adapter EH-62F (connect as shown) AC adapter USB cable Audio/video cable Be sure that the power connector cord has been properly aligned in other countries, use a plug adapter (commercially available) as necessary. USB... Cable UC-E61 Audio Video Cable EG-CP161 1 Included with the camera at the time of the grooves, the cover or cord may be damaged when ...

Reference Manual
Page 201
...printer. Error Messages Display Problem Solution A u Unable to create panorama. Pan the camera more slowly. If error persists, contact retailer or Nikon-authorized 20 service representative. Turn camera off, remove and reinsert battery, and turn camera on again. Check printer. Turn camera off and reconnect ...USB cable. Turn camera off and then on . Printer error. Load the specified size of paper No paper is not moved in a straight line...
...printer. Error Messages Display Problem Solution A u Unable to create panorama. Pan the camera more slowly. If error persists, contact retailer or Nikon-authorized 20 service representative. Turn camera off, remove and reinsert battery, and turn camera on again. Check printer. Turn camera off and reconnect ...USB cable. Turn camera off and then on . Printer error. Load the specified size of paper No paper is not moved in a straight line...

Reference Manual
Page 209
... camera cannot be turned on while 16 on again. 20 95 F4 16 81, 84, E24 - Reconnect the USB cable. • Inside of common problems below before consulting your retailer or Nikon-authorized service representative. Troubleshooting If the camera fails to function as expected, check the list of the camera has become... in the setup menu. • When charging by connecting the camera to a computer, battery charging stops when the camera is turned off if the USB cable connecting it on . Technical Notes and Index F7
... camera cannot be turned on while 16 on again. 20 95 F4 16 81, 84, E24 - Reconnect the USB cable. • Inside of common problems below before consulting your retailer or Nikon-authorized service representative. Troubleshooting If the camera fails to function as expected, check the list of the camera has become... in the setup menu. • When charging by connecting the camera to a computer, battery charging stops when the camera is turned off if the USB cable connecting it on . Technical Notes and Index F7


