Reference Manual
Page 4
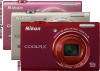
Before using the camera, please read the information in "For Your Safety" (A vi) and familiarize yourself with terminal cover) Charging AC Adapter EH-69P* USB Cable UC-E6 Audio Video Cable EG-CP16 ViewNX 2 Installer CD Reference Manual CD • Warranty *... (with the information provided in a country or region that any items are missing, please contact the store where you for purchasing the Nikon COOLPIX S6200 digital camera. After reading, please keep this manual. Introduction Introduction Read This First Thank you purchased the camera. Confirming the Package Contents ...
Before using the camera, please read the information in "For Your Safety" (A vi) and familiarize yourself with terminal cover) Charging AC Adapter EH-69P* USB Cable UC-E6 Audio Video Cable EG-CP16 ViewNX 2 Installer CD Reference Manual CD • Warranty *... (with the information provided in a country or region that any items are missing, please contact the store where you for purchasing the Nikon COOLPIX S6200 digital camera. After reading, please keep this manual. Introduction Introduction Read This First Thank you purchased the camera. Confirming the Package Contents ...

Reference Manual
Page 6
...damages or lost profits that may be held liable for any form, by Nikon specifically for contact information: http://imaging.nikon.com/ Use Only Nikon Brand Electronic Accessories Nikon COOLPIX cameras are engineered and proven to operate within the operational and safety requirements... the camera on digital imaging and photography. Only Nikon brand electronic accessories (including battery chargers, batteries, Charging AC adapters, and AC adapters) certified by any means, without Nikon's prior written permission. • Nikon reserves the right to the highest standards and include...
...damages or lost profits that may be held liable for any form, by Nikon specifically for contact information: http://imaging.nikon.com/ Use Only Nikon Brand Electronic Accessories Nikon COOLPIX cameras are engineered and proven to operate within the operational and safety requirements... the camera on digital imaging and photography. Only Nikon brand electronic accessories (including battery chargers, batteries, Charging AC adapters, and AC adapters) certified by any means, without Nikon's prior written permission. • Nikon reserves the right to the highest standards and include...

Reference Manual
Page 8
... damage to your Nikon product or injury to yourself or to others, read the following safety precautions in low-temperature burns. Keep these safety instructions where all those who use Parts of an infant or child. Should the camera or Charging AC Adapter break ...the devices become hot. Repairs should be taken to prevent infants from the camera or Charging AC Adapter, unplug the Charging AC Adapter and remove the battery immediately, taking care to a Nikon-authorized service representative for extended periods may result in their mouths. Continued operation could result...
... damage to your Nikon product or injury to yourself or to others, read the following safety precautions in low-temperature burns. Keep these safety instructions where all those who use Parts of an infant or child. Should the camera or Charging AC Adapter break ...the devices become hot. Repairs should be taken to prevent infants from the camera or Charging AC Adapter, unplug the Charging AC Adapter and remove the battery immediately, taking care to a Nikon-authorized service representative for extended periods may result in their mouths. Continued operation could result...

Reference Manual
Page 9
...lightning storms. Failure to observe this precaution could result in electric shock. • Do not use either Charging AC Adapter EH-69P (included) or the Charge by using the Charging AC Adapter/AC adapter, be damaged and the wires become exposed, take it to observe this product:...is prone to convert from the damaged battery comes in or expose to a Nikon-authorized service representative for use immediately should you are using a Battery Charger MH-65 (available separately). To charge the battery with metal objects such as discoloration or deformation. • If liquid...
...lightning storms. Failure to observe this precaution could result in electric shock. • Do not use either Charging AC Adapter EH-69P (included) or the Charge by using the Charging AC Adapter/AC adapter, be damaged and the wires become exposed, take it to observe this product:...is prone to convert from the damaged battery comes in or expose to a Nikon-authorized service representative for use immediately should you are using a Battery Charger MH-65 (available separately). To charge the battery with metal objects such as discoloration or deformation. • If liquid...

Reference Manual
Page 12
Nikon Inc., 1300 Walt Whitman Road Melville, New York 11747-3064 USA Tel: 631-547...003. Do not dispose of as household waste. • For more information, contact the retailer or the local authorities in charge of waste management. ATTENTION Cet appareil numérique de la classe B est conforme à la norme NMB-003 du.... Do not dispose of as household waste. • For more information, contact the retailer or the local authorities in charge of waste management. The following apply only to users in European countries: • This product is to cause birth defects...
Nikon Inc., 1300 Walt Whitman Road Melville, New York 11747-3064 USA Tel: 631-547...003. Do not dispose of as household waste. • For more information, contact the retailer or the local authorities in charge of waste management. ATTENTION Cet appareil numérique de la classe B est conforme à la norme NMB-003 du.... Do not dispose of as household waste. • For more information, contact the retailer or the local authorities in charge of waste management. The following apply only to users in European countries: • This product is to cause birth defects...

Reference Manual
Page 13
... Multi Selector ...9 Using Menus (the d Button) ...10 Attaching the Camera Strap ...12 The Basics of Shooting and Playback 13 Preparation 1 Insert the Battery...14 Preparation 2 Charge the Battery 16 Preparation 3 Insert a Memory Card 18 Internal Memory and Memory Cards ...19 Approved Memory Cards ...19 Step 1 Turn the Camera On ...20 Turning...
... Multi Selector ...9 Using Menus (the d Button) ...10 Attaching the Camera Strap ...12 The Basics of Shooting and Playback 13 Preparation 1 Insert the Battery...14 Preparation 2 Charge the Battery 16 Preparation 3 Insert a Memory Card 18 Internal Memory and Memory Cards ...19 Approved Memory Cards ...19 Step 1 Turn the Camera On ...20 Turning...

Reference Manual
Page 16
...AF Assist...E63 Digital Zoom...E63 Sound Settings...E64 Auto Off ...E65 Format Memory/Format Card ...E66 Language...E67 TV Settings ...E68 Charge by Computer...E69 Blink Warning ...E71 Filmstrip...E73 Reset All ...E74 Firmware Version ...E76 File and Folder Names...E77 Optional Accessories ...E78... Error Messages...E79 Technical Notes and Index...F1 Caring for the Product...F2 The Camera ...F2 The Battery...F4 Charging AC Adapter...F5 Memory Cards ...F5 Cleaning and Storage...F6 Cleaning ...F6 Storage ...F6 Troubleshooting...F7 Specifications ...F14 Supported Standards ...F18...
...AF Assist...E63 Digital Zoom...E63 Sound Settings...E64 Auto Off ...E65 Format Memory/Format Card ...E66 Language...E67 TV Settings ...E68 Charge by Computer...E69 Blink Warning ...E71 Filmstrip...E73 Reset All ...E74 Firmware Version ...E76 File and Folder Names...E77 Optional Accessories ...E78... Error Messages...E79 Technical Notes and Index...F1 Caring for the Product...F2 The Camera ...F2 The Battery...F4 Charging AC Adapter...F5 Memory Cards ...F5 Cleaning and Storage...F6 Cleaning ...F6 Storage ...F6 Troubleshooting...F7 Specifications ...F14 Supported Standards ...F18...

Reference Manual
Page 19
Parts of the Camera 1 17 2 3 4 16 5 6 7 8 9 15 10 Parts of the Camera and Basic Operations 14 13 12 11 1 Charge lamp 17, E69 Flash lamp 56 2 b (e movie-record) button.....4, 5, 82 3 A (shooting mode) button 4, 5, 8, 24 4 c (playback) button .........4, 5, 8, 30, 72 5 Rotary multi selector (multi selector 9 6 k (apply selection) ...
Parts of the Camera 1 17 2 3 4 16 5 6 7 8 9 15 10 Parts of the Camera and Basic Operations 14 13 12 11 1 Charge lamp 17, E69 Flash lamp 56 2 b (e movie-record) button.....4, 5, 82 3 A (shooting mode) button 4, 5, 8, 24 4 c (playback) button .........4, 5, 8, 30, 72 5 Rotary multi selector (multi selector 9 6 k (apply selection) ...

Reference Manual
Page 29
The Basics of Shooting and Playback The Basics of Shooting and Playback Preparation Preparation 1 Insert the Battery 14 Preparation 2 Charge the Battery 16 Preparation 3 Insert a Memory Card 18 Shooting Step 1 Turn the Camera On 20 Setting the Display Language, Date, and Time (First Use After Purchase).....22 Step 2 Select a Shooting Mode 24 Step 3 Frame a Picture ...26 Step 4 Focus and Shoot...28 Playback Step 5 Play Back Images ...30 Step 6 Delete Unwanted Images 32 13
The Basics of Shooting and Playback The Basics of Shooting and Playback Preparation Preparation 1 Insert the Battery 14 Preparation 2 Charge the Battery 16 Preparation 3 Insert a Memory Card 18 Shooting Step 1 Turn the Camera On 20 Setting the Display Language, Date, and Time (First Use After Purchase).....22 Step 2 Select a Shooting Mode 24 Step 3 Frame a Picture ...26 Step 4 Focus and Shoot...28 Playback Step 5 Play Back Images ...30 Step 6 Delete Unwanted Images 32 13

Reference Manual
Page 30
... the battery is inserted correctly, the battery latch will lock the battery in the correct orientation. 3 Close the battery-chamber/memory card slot cover. • Charge the battery before the first use or when the battery is in place. The Basics of Shooting and Playback The Basics of Shooting and Playback... that the battery is running low. Battery latch B Inserting the Battery Correctly Inserting the battery upside down or backwards could damage the camera. See "Preparation 2 Charge the Battery" (A 16) for more information. 14
... the battery is inserted correctly, the battery latch will lock the battery in the correct orientation. 3 Close the battery-chamber/memory card slot cover. • Charge the battery before the first use or when the battery is in place. The Basics of Shooting and Playback The Basics of Shooting and Playback... that the battery is running low. Battery latch B Inserting the Battery Correctly Inserting the battery upside down or backwards could damage the camera. See "Preparation 2 Charge the Battery" (A 16) for more information. 14

Reference Manual
Page 32
...the product. * The shape of 1 to 3. • Keep the camera turned off . • See "The Charge Lamp" (A 17) for more information. 3 Disconnect the Charging AC Adapter from the electrical outlet and then disconnect the USB cable. • When the camera is included with the...Once the two are required to charge a fully exhausted battery. • When the battery has been completely charged, the charge lamp turns off . • When connecting the cable, be turned on the Charging AC Adapter. Preparation 2 Charge the Battery 1 Prepare the included Charging AC Adapter EH-69P. When ...
...the product. * The shape of 1 to 3. • Keep the camera turned off . • See "The Charge Lamp" (A 17) for more information. 3 Disconnect the Charging AC Adapter from the electrical outlet and then disconnect the USB cable. • When the camera is included with the...Once the two are required to charge a fully exhausted battery. • When the battery has been completely charged, the charge lamp turns off . • When connecting the cable, be turned on the Charging AC Adapter. Preparation 2 Charge the Battery 1 Prepare the included Charging AC Adapter EH-69P. When ...

Reference Manual
Page 33
... separately; Off The battery is complete, the charge lamp stops blinking green and turns off. When charging is not charging. Disconnect the USB cable or unplug the Charging AC Adapter and correctly connect it again, or change the battery. C Charging Using a Computer or Battery Charger • ...before use another make or model of Shooting and Playback B Notes About the Charging AC Adapter Be sure to 95 °F). • The USB cable or Charging AC Adapter is not properly connected, or there is charging. Charge the battery indoors with an ambient temperature of 5 °C to 35 ...
... separately; Off The battery is complete, the charge lamp stops blinking green and turns off. When charging is not charging. Disconnect the USB cable or unplug the Charging AC Adapter and correctly connect it again, or change the battery. C Charging Using a Computer or Battery Charger • ...before use another make or model of Shooting and Playback B Notes About the Charging AC Adapter Be sure to 95 °F). • The USB cable or Charging AC Adapter is not properly connected, or there is charging. Charge the battery indoors with an ambient temperature of 5 °C to 35 ...
Reference Manual
Page 36
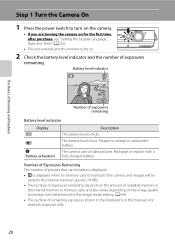
Recharge or replace with a fully charged battery. Prepare to turn on the camera. • If you are turning the camera on for example purposes only. 20 Number of Exposures Remaining The ... high. A 64). • The number of exposures remaining. B N Battery exhausted. The camera cannot take pictures. Step 1 Turn the Camera On 1 Press the power switch to charge or replace the battery.
Recharge or replace with a fully charged battery. Prepare to turn on the camera. • If you are turning the camera on for example purposes only. 20 Number of Exposures Remaining The ... high. A 64). • The number of exposures remaining. B N Battery exhausted. The camera cannot take pictures. Step 1 Turn the Camera On 1 Press the power switch to charge or replace the battery.

Reference Manual
Page 39
...Set the date and time before shooting. • You can permanently imprint the shooting date in images as they are saved at the top of charging. • If the camera's backup battery becomes exhausted, the date and time setting screen is displayed when the camera is turned on. When ... and can enable and disable daylight saving time by a backup battery that is separate from the camera's main battery. • The backup battery charges when the main battery is inserted into the camera or when the camera is automatically calculated and the date and time in step 3. London Casablanca...
...Set the date and time before shooting. • You can permanently imprint the shooting date in images as they are saved at the top of charging. • If the camera's backup battery becomes exhausted, the date and time setting screen is displayed when the camera is turned on. When ... and can enable and disable daylight saving time by a backup battery that is separate from the camera's main battery. • The backup battery charges when the main battery is inserted into the camera or when the camera is automatically calculated and the date and time in step 3. London Casablanca...

Reference Manual
Page 72
... flash has a range of 0.5 to 4.6 m (1 ft 8 in order to 15 ft) at the 56 maximum telephoto zoom position. to save power while the flash is charging. Shooting Features C Effective Range of Monitor settings settings (A 88). 29m 0s 760 3 Frame the subject and take pictures. - Off: The flash will not fire when... fire when you press the shutter-release button halfway. - Auto • When U (auto) is applied, D is only displayed for more information. • If a setting is charging.
... flash has a range of 0.5 to 4.6 m (1 ft 8 in order to 15 ft) at the 56 maximum telephoto zoom position. to save power while the flash is charging. Shooting Features C Effective Range of Monitor settings settings (A 88). 29m 0s 760 3 Frame the subject and take pictures. - Off: The flash will not fire when... fire when you press the shutter-release button halfway. - Auto • When U (auto) is applied, D is only displayed for more information. • If a setting is charging.

Reference Manual
Page 106
.... E74 E76 General Camera Setup 90 E69 Blink warning Immediately after taking a picture using face detection (A 67) (except when using the Charging AC Adapter EH-69P. The default setting is selected, thumbnails of the monitor when you rotate the multi selector quickly while viewing an image... in the bottom of previous and subsequent images are not reset. The Setup Menu Option Description A Charge by computer When set to Auto (default setting), you can charge the camera's battery by connecting the camera to a computer (provided that the computer is able to supply power...
.... E74 E76 General Camera Setup 90 E69 Blink warning Immediately after taking a picture using face detection (A 67) (except when using the Charging AC Adapter EH-69P. The default setting is selected, thumbnails of the monitor when you rotate the multi selector quickly while viewing an image... in the bottom of previous and subsequent images are not reset. The Setup Menu Option Description A Charge by computer When set to Auto (default setting), you can charge the camera's battery by connecting the camera to a computer (provided that the computer is able to supply power...

Reference Manual
Page 129
... Follow the procedures below to the memory card using the Print order option in the playback menu (E41). Do not use a fully charged battery to prevent the camera from turning off and disconnect the USB cable Reference Section B Notes About Power Source • When connecting ...images (E27) When printing is complete, turn the camera off unexpectedly. • If the AC Adapter EH-62F (available separately) is used, COOLPIX S6200 can connect the camera directly to heat up or malfunction. Take pictures Select images for printing images saved on the memory card: • Inserting a...
... Follow the procedures below to the memory card using the Print order option in the playback menu (E41). Do not use a fully charged battery to prevent the camera from turning off and disconnect the USB cable Reference Section B Notes About Power Source • When connecting ...images (E27) When printing is complete, turn the camera off unexpectedly. • If the AC Adapter EH-62F (available separately) is used, COOLPIX S6200 can connect the camera directly to heat up or malfunction. Take pictures Select images for printing images saved on the memory card: • Inserting a...

Reference Manual
Page 131
E25 Reference Section Set the Charge by computer option (E69) in the camera's setup menu to a Printer (Direct Print) B If the PictBridge Startup Screen Is not Displayed Turn the camera off and disconnect the USB cable. Connecting the Camera to Off and reconnect the cable.
E25 Reference Section Set the Charge by computer option (E69) in the camera's setup menu to a Printer (Direct Print) B If the PictBridge Startup Screen Is not Displayed Turn the camera off and disconnect the USB cable. Connecting the Camera to Off and reconnect the cable.

Reference Manual
Page 175
...computer before the battery can be charged or images can data be impossible to print images with the computer for 30 minutes after the camera is connected to a printer and turned on the computer, such as Nikon Transfer 2, may start. B Notes About Charging with Connection to a Computer ...• The battery cannot be charged, nor can be charged with connection to a printer, even if the printer complies with connection to a ...
...computer before the battery can be charged or images can data be impossible to print images with the computer for 30 minutes after the camera is connected to a printer and turned on the computer, such as Nikon Transfer 2, may start. B Notes About Charging with Connection to a Computer ...• The battery cannot be charged, nor can be charged with connection to a printer, even if the printer complies with connection to a ...

Reference Manual
Page 176
...sleep mode and is connected to off while the power-on lamp is lit, charging is complete. • The ambient temperature is faulty. If the charge lamp changes from slow blinking (green) to a computer. Charge the battery indoors with an ambient temperature of 5 °C to 35 &#...suited to the computer's settings or its specifications. Battery not charging. Reference Section E70 Charge lamp Blinks slowly (green) Off Flickers (green) Description Battery charging. Wake up the computer. • The battery cannot be charged because the computer cannot supply power to the camera, due ...
...sleep mode and is connected to off while the power-on lamp is lit, charging is complete. • The ambient temperature is faulty. If the charge lamp changes from slow blinking (green) to a computer. Charge the battery indoors with an ambient temperature of 5 °C to 35 &#...suited to the computer's settings or its specifications. Battery not charging. Reference Section E70 Charge lamp Blinks slowly (green) Off Flickers (green) Description Battery charging. Wake up the computer. • The battery cannot be charged because the computer cannot supply power to the camera, due ...


