
User Manual
Page 4
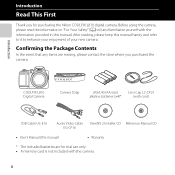
Introduction Read This First Thank you purchased the camera. Introduction COOLPIX L810 Digital Camera Camera Strap LR6/L40 (AA-size) Lens Cap LC-CP25 alkaline batteries (×4)* (with the information provided in "For Your Safety" (A viii) and familiarize yourself with cord) USB Cable UC-E16 Audio ... enjoyment of your new camera. After reading, please keep this manual. Confirming the Package Contents In the event that any items are for purchasing the Nikon COOLPIX L810 digital camera.
Introduction Read This First Thank you purchased the camera. Introduction COOLPIX L810 Digital Camera Camera Strap LR6/L40 (AA-size) Lens Cap LC-CP25 alkaline batteries (×4)* (with the information provided in "For Your Safety" (A viii) and familiarize yourself with cord) USB Cable UC-E16 Audio ... enjoyment of your new camera. After reading, please keep this manual. Confirming the Package Contents In the event that any items are for purchasing the Nikon COOLPIX L810 digital camera.

User Manual
Page 13
Observe caution when using the flash Using the flash close to your fingers or other objects are not pinched by the lens cover or other moving parts. CD-ROMs The CD-ROMs included with this device should be taken to avoid injury caused by broken glass and ... entering the eyes or mouth. Use appropriate cables When connecting cables to the input and output jacks, use only the cables provided or sold by Nikon for the purpose, to maintain compliance with care Be careful that your subject's eyes could result in burns or fire. Handle moving parts with product...
Observe caution when using the flash Using the flash close to your fingers or other objects are not pinched by the lens cover or other moving parts. CD-ROMs The CD-ROMs included with this device should be taken to avoid injury caused by broken glass and ... entering the eyes or mouth. Use appropriate cables When connecting cables to the input and output jacks, use only the cables provided or sold by Nikon for the purpose, to maintain compliance with care Be careful that your subject's eyes could result in burns or fire. Handle moving parts with product...
User Manual
Page 18
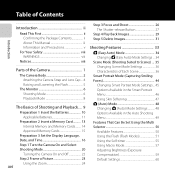
... Manual iii Information and Precautions v For Your Safety viii WARNINGS viii Notices xiii Parts of the Camera 1 The Camera Body 2 Attaching the Camera Strap and Lens Cap ... 4 Raising and Lowering the Flash 5 The Monitor 6 Shooting Mode 6 Playback Mode 8 The Basics of Shooting and Playback.... 9 Preparation 1 Insert the Batteries 10 Applicable Batteries...
... Manual iii Information and Precautions v For Your Safety viii WARNINGS viii Notices xiii Parts of the Camera 1 The Camera Body 2 Attaching the Camera Strap and Lens Cap ... 4 Raising and Lowering the Flash 5 The Monitor 6 Shooting Mode 6 Playback Mode 8 The Basics of Shooting and Playback.... 9 Preparation 1 Insert the Batteries 10 Applicable Batteries...

User Manual
Page 21
Parts of the Camera Parts of the Camera This chapter describes the parts of Shooting and Playback" (A 9). 1 The Camera Body 2 Attaching the Camera Strap and Lens Cap 4 Raising and Lowering the Flash 5 The Monitor 6 Shooting Mode 6 Playback Mode 8 If you want to start using the camera right away, see "The Basics of the camera and explains information that is displayed in the monitor.
Parts of the Camera Parts of the Camera This chapter describes the parts of Shooting and Playback" (A 9). 1 The Camera Body 2 Attaching the Camera Strap and Lens Cap 4 Raising and Lowering the Flash 5 The Monitor 6 Shooting Mode 6 Playback Mode 8 If you want to start using the camera right away, see "The Basics of the camera and explains information that is displayed in the monitor.

User Manual
Page 22
...-on lamp 20 5 Speaker 84 6 Built-in microphone (stereo 80 2 7 Eyelet for camera strap 4 8 Flash 5, 51 9 DC input connector (for AC adapter available separately from Nikon 12, E70 10 USB connector and audio/video output ...71 11 HDMI mini connector (Type C 71 12 Connector cover 71 13 m (flash pop-up) button...
...-on lamp 20 5 Speaker 84 6 Built-in microphone (stereo 80 2 7 Eyelet for camera strap 4 8 Flash 5, 51 9 DC input connector (for AC adapter available separately from Nikon 12, E70 10 USB connector and audio/video output ...71 11 HDMI mini connector (Type C 71 12 Connector cover 71 13 m (flash pop-up) button...

User Manual
Page 24
Attach them at two places. Parts of the Camera Attaching the Camera Strap and Lens Cap Attach the lens cap to the camera strap, and then attach the strap to protect the lens. B Lens Cap • Remove the lens cap before you take a picture. • At times when you will not be taking pictures such as when the power is off or while you are 4 carrying the camera, attach the lens cap to the camera to the camera.
Attach them at two places. Parts of the Camera Attaching the Camera Strap and Lens Cap Attach the lens cap to the camera strap, and then attach the strap to protect the lens. B Lens Cap • Remove the lens cap before you take a picture. • At times when you will not be taking pictures such as when the power is off or while you are 4 carrying the camera, attach the lens cap to the camera to the camera.
User Manual
Page 38
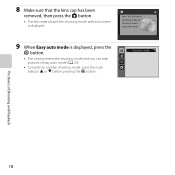
8 Make sure that the lens cap has been removed, then press the A button. • The lens extends and the shooting-mode selection screen is displayed, press the k button. • The camera enters the shooting mode and you can take pictures in shooting mode for shooting-mode selection menu. 9 When Easy auto mode is displayed. Press this button in Easy auto mode (A 20). • To switch to another shooting mode, press the multi selector H or I before pressing the k button. Easy auto mode The Basics of Shooting and Playback 18
8 Make sure that the lens cap has been removed, then press the A button. • The lens extends and the shooting-mode selection screen is displayed, press the k button. • The camera enters the shooting mode and you can take pictures in shooting mode for shooting-mode selection menu. 9 When Easy auto mode is displayed. Press this button in Easy auto mode (A 20). • To switch to another shooting mode, press the multi selector H or I before pressing the k button. Easy auto mode The Basics of Shooting and Playback 18

User Manual
Page 40
Easy auto mode The Basics of Shooting and Playback 20 Step 1 Turn the Camera On and Select Shooting Mode 1 Remove the lens cap and press the power switch to turn on the camera. • The lens extends and the monitor turns on. • Press the m (flash pop-up) button to raise the flash (A 5). 2 Press the A button. • The shooting-mode selection menu, which allows you to select the desired shooting mode, is displayed. 3 Press the multi selector H or I to select the desired shooting mode and press the k button. • G (easy auto) mode is used in this example.
Easy auto mode The Basics of Shooting and Playback 20 Step 1 Turn the Camera On and Select Shooting Mode 1 Remove the lens cap and press the power switch to turn on the camera. • The lens extends and the monitor turns on. • Press the m (flash pop-up) button to raise the flash (A 5). 2 Press the A button. • The shooting-mode selection menu, which allows you to select the desired shooting mode, is displayed. 3 Press the multi selector H or I to select the desired shooting mode and press the k button. • G (easy auto) mode is used in this example.

User Manual
Page 42
...turns back on if you are performed for approximately another three minutes, the camera will flash. Camera turns off. • The time that the lens cap has been removed, and turn the camera off automatically. C Power Saving Function (Auto Off) If no operations are using shooting mode or playback...Playback No operations performed No operations performed 29m 0s 3 min 970 Camera enters standby mode. Turning the Camera On and Off • Remove the lens cap and turn the camera on. • When the camera is in about 30 seconds when you are performed for a while, the monitor ...
...turns back on if you are performed for approximately another three minutes, the camera will flash. Camera turns off. • The time that the lens cap has been removed, and turn the camera off automatically. C Power Saving Function (Auto Off) If no operations are using shooting mode or playback...Playback No operations performed No operations performed 29m 0s 3 min 970 Camera enters standby mode. Turning the Camera On and Off • Remove the lens cap and turn the camera on. • When the camera is in about 30 seconds when you are performed for a while, the monitor ...

User Manual
Page 43
Step 2 Frame a Picture 1 Hold the camera steady. • Keep fingers, hair, the camera strap, and other objects away from the lens, flash, AF assist-illuminator, and microphone. Position the main subject near the center of the frame. Shooting mode icon 29m 0s 970 23 The Basics ...
Step 2 Frame a Picture 1 Hold the camera steady. • Keep fingers, hair, the camera strap, and other objects away from the lens, flash, AF assist-illuminator, and microphone. Position the main subject near the center of the frame. Shooting mode icon 29m 0s 970 23 The Basics ...
User Manual
Page 63
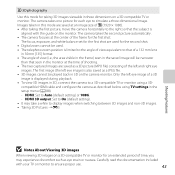
... picture, move the camera horizontally to the right so that the subject is limited to the angle of view equivalent to that of a 132 mm lens in 35mm [135] format. • The angle of view (i.e., the area visible in the frame) seen in the saved image will be played back in...
... picture, move the camera horizontally to the right so that the subject is limited to the angle of view equivalent to that of a 132 mm lens in 35mm [135] format. • The angle of view (i.e., the area visible in the frame) seen in the saved image will be played back in...

User Manual
Page 77
... to set to a position where F and the zoom indicator glow green, the camera can focus on subjects as close as about 1 cm (0.4 in .) from the lens. When the zoom is set the zoom to a position where F and the zoom indicator glow green. • How close you can be canceled. This feature... is useful when taking close as about 1 cm (0.4 in .) from the lens. 1 Shooting Features 57 Using Macro Mode When using macro mode, the camera can focus on objects as close -up pictures of flowers and other small...
... to set to a position where F and the zoom indicator glow green, the camera can focus on subjects as close as about 1 cm (0.4 in .) from the lens. When the zoom is set the zoom to a position where F and the zoom indicator glow green. • How close you can be canceled. This feature... is useful when taking close as about 1 cm (0.4 in .) from the lens. 1 Shooting Features 57 Using Macro Mode When using macro mode, the camera can focus on objects as close -up pictures of flowers and other small...
User Manual
Page 101
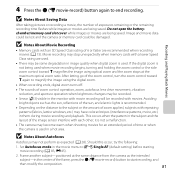
... composition. 81 it is not a malfunction. • The camera may not perform as the intended subject-in the center of zoom control operation, zoom, autofocus lens drive movement, vibration reduction, and aperture operation when brightness changes may have colored stripes (interference patterns, moire, etc.) in a hot area. B Notes About Movie Recording...
... composition. 81 it is not a malfunction. • The camera may not perform as the intended subject-in the center of zoom control operation, zoom, autofocus lens drive movement, vibration reduction, and aperture operation when brightness changes may have colored stripes (interference patterns, moire, etc.) in a hot area. B Notes About Movie Recording...

User Manual
Page 112
... prevent condensation, place the device in a carrying case or a plastic bag before exposing it to sudden changes in the vicinity of your Nikon camera, observe the following precautions and the precautions noted in temperature, such as radio transmitters could interfere with the monitor, damage data saved ...struck. Technical Notes and Index Caring for extended periods when using or storing your camera. Additionally, do not touch or apply force to the lens. F2 Technical Notes and Index B Avoid Sudden Changes in Temperature Sudden changes in "For Your Safety" (A viii-xv) when using or ...
... prevent condensation, place the device in a carrying case or a plastic bag before exposing it to sudden changes in the vicinity of your Nikon camera, observe the following precautions and the precautions noted in temperature, such as radio transmitters could interfere with the monitor, damage data saved ...struck. Technical Notes and Index Caring for extended periods when using or storing your camera. Additionally, do not touch or apply force to the lens. F2 Technical Notes and Index B Avoid Sudden Changes in Temperature Sudden changes in "For Your Safety" (A viii-xv) when using or ...

User Manual
Page 117
...if the camera will not be damaged or malfunction. • Remove dust or lint with your fingers. Remove dust or lint with a commercial liquid lens cleaner and gently wipe off any of the following locations: • Next to equipment that produces strong electromagnetic fields, such as televisions or radios ...the center and moves toward the edges. Do not store the camera with a rough cloth, otherwise the camera may be removed with a blower, wipe the lens with a soft, dry cloth or an eyeglass cleaning cloth, using a gentle spiral motion that starts in any sand, dust, or salt with a dry...
...if the camera will not be damaged or malfunction. • Remove dust or lint with your fingers. Remove dust or lint with a commercial liquid lens cleaner and gently wipe off any of the following locations: • Next to equipment that produces strong electromagnetic fields, such as televisions or radios ...the center and moves toward the edges. Do not store the camera with a rough cloth, otherwise the camera may be removed with a blower, wipe the lens with a soft, dry cloth or an eyeglass cleaning cloth, using a gentle spiral motion that starts in any sand, dust, or salt with a dry...

User Manual
Page 122
... Index F12 No sound is heard with some shooting modes and settings, even when On is too high. Noise can be used in image. Clean lens. The subject is dark, so shutter speed is too slow or ISO sensitivity is selected. • Do not block the speaker. 88, E57 2 AF-assist... illuminator does not light. When smart portrait mode is dirty. Lens is selected - White balance or hue is selected for Sound settings > Shutter sound in the setup menu. When Portrait, Night portrait, Pet portrait, or 3D...
... Index F12 No sound is heard with some shooting modes and settings, even when On is too high. Noise can be used in image. Clean lens. The subject is dark, so shutter speed is too slow or ISO sensitivity is selected. • Do not block the speaker. 88, E57 2 AF-assist... illuminator does not light. When smart portrait mode is dirty. Lens is selected - White balance or hue is selected for Sound settings > Shutter sound in the setup menu. When Portrait, Night portrait, Pet portrait, or 3D...
User Manual
Page 126
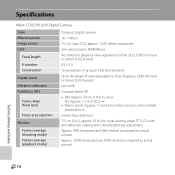
Specifications Nikon COOLPIX L810 Digital Camera Type Effective pixels Image sensor Lens Focal length f/-number Construction Digital zoom Vibration reduction Autofocus (AF) Focus range (from lens) Focus-area selection Monitor Frame coverage (shooting mode) Frame coverage (playback mode) Compact digital camera 16.1 million 1/2.3-in .), ...approx. 16.44 million total pixels 26× optical zoom, NIKKOR lens 4.0-104.0mm (angle of view equivalent to that of 22.5-585 mm lens in 35mm [135] format) f/3.1-5.9 12 elements in 9 groups (1 ED lens element) Up to 4× (angle of view equivalent to that ...
Specifications Nikon COOLPIX L810 Digital Camera Type Effective pixels Image sensor Lens Focal length f/-number Construction Digital zoom Vibration reduction Autofocus (AF) Focus range (from lens) Focus-area selection Monitor Frame coverage (shooting mode) Frame coverage (playback mode) Compact digital camera 16.1 million 1/2.3-in .), ...approx. 16.44 million total pixels 26× optical zoom, NIKKOR lens 4.0-104.0mm (angle of view equivalent to that of 22.5-585 mm lens in 35mm [135] format) f/3.1-5.9 12 elements in 9 groups (1 ED lens element) Up to 4× (angle of view equivalent to that ...

User Manual
Page 133
...Image mode 62 Imprinting date and time 19, E53 Internal memory 14 ISO sensitivity 49, E33 J JPG E69 L Landscape c 36 Language 89, E60 Lens 2, F16 Lithium batteries 11 M Macro mode 57 Memory capacity 21 Memory card 13 Memory card slot 3, 13 Monitor 3, 6, F7 Monitor settings 88...84 Movie recording 80 Movie-record button 3 MPO E69 Multi selector 3 Multi-shot 16 E32 Museum l 40 N Night landscape j 39 Night portrait e 37 Nikon Transfer 2 73, 75, 77 Number of exposures remaining... 21, 63 O Optical zoom 24 Optional accessories E70 P Panorama assist U 41, E2 Panorama Maker 6...
...Image mode 62 Imprinting date and time 19, E53 Internal memory 14 ISO sensitivity 49, E33 J JPG E69 L Landscape c 36 Language 89, E60 Lens 2, F16 Lithium batteries 11 M Macro mode 57 Memory capacity 21 Memory card 13 Memory card slot 3, 13 Monitor 3, 6, F7 Monitor settings 88...84 Movie recording 80 Movie-record button 3 MPO E69 Multi selector 3 Multi-shot 16 E32 Museum l 40 N Night landscape j 39 Night portrait e 37 Nikon Transfer 2 73, 75, 77 Number of exposures remaining... 21, 63 O Optical zoom 24 Optional accessories E70 P Panorama assist U 41, E2 Panorama Maker 6...


