
X3-09 Hardware Manual
Page 2
... THE RISK OF FIRE OR ELECTRIC SHOCK, DO NOT EXPOSE THIS APPLIANCE TO RAIN OF MOISTURE. POWER SUPPLY: Connect the supplied adaptor to an AC100-240V outlet. Plug the two-prong end of the power cord to the side of electric shock, do not perform any servicing other than that contained in... the operating instructions unless you have been made. NOTE: Before plugging the power cord into an AC outlet, make sure that may be of sufficient magnitude to constitute a risk of electric to the presence of fire or electric...
... THE RISK OF FIRE OR ELECTRIC SHOCK, DO NOT EXPOSE THIS APPLIANCE TO RAIN OF MOISTURE. POWER SUPPLY: Connect the supplied adaptor to an AC100-240V outlet. Plug the two-prong end of the power cord to the side of electric shock, do not perform any servicing other than that contained in... the operating instructions unless you have been made. NOTE: Before plugging the power cord into an AC outlet, make sure that may be of sufficient magnitude to constitute a risk of electric to the presence of fire or electric...

X3-09 Hardware Manual
Page 3
..., heat registers, stoves, or other . The wide blade or the third prong is provided for replacement of the obsolete outlet. 10) Protect the power cord from being walked on or pinched particularly at plugs, convenience receptacles, and the point where they exit from being damaged, be placed on the... apparatus. Install in any way, such as power-supply cord or plug is used, use caution when moving the cart/apparatus combination to avoid injury from tip-over. 13) Unplug this apparatus ...
..., heat registers, stoves, or other . The wide blade or the third prong is provided for replacement of the obsolete outlet. 10) Protect the power cord from being walked on or pinched particularly at plugs, convenience receptacles, and the point where they exit from being damaged, be placed on the... apparatus. Install in any way, such as power-supply cord or plug is used, use caution when moving the cart/apparatus combination to avoid injury from tip-over. 13) Unplug this apparatus ...
X3-09 Hardware Manual
Page 7
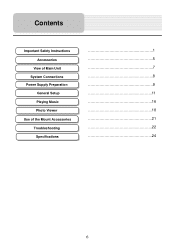
Contents Important Safety Instructions Accessories View of Main Unit System Connections Power Supply Preparation General Setup Playing Music Photo Viewer Use of the Mount Accessories Troubleshooting Specifications 1 5 7 8 9 11 16 18 21 22 24 6
Contents Important Safety Instructions Accessories View of Main Unit System Connections Power Supply Preparation General Setup Playing Music Photo Viewer Use of the Mount Accessories Troubleshooting Specifications 1 5 7 8 9 11 16 18 21 22 24 6

X3-09 Hardware Manual
Page 8
When the earphones are connected to reset the system. 7 Earphone Jack Used to connect earphones for a longer time to enter or exit the standby mode. 2. RESET Button Press to this jack, the speaker will be turned off automatically. 4. POWER Button Press for private listening. USB Port Used to connect to the supplied adaptor. 5. Card Slot Insert the SD card into the slot. 3. DC 5V Input Jack Used to connect to the USB device. 7. LCD Screen 6. View of Main Unit 1.
When the earphones are connected to reset the system. 7 Earphone Jack Used to connect earphones for a longer time to enter or exit the standby mode. 2. RESET Button Press to this jack, the speaker will be turned off automatically. 4. POWER Button Press for private listening. USB Port Used to connect to the supplied adaptor. 5. Card Slot Insert the SD card into the slot. 3. DC 5V Input Jack Used to connect to the USB device. 7. LCD Screen 6. View of Main Unit 1.

X3-09 Hardware Manual
Page 9
... the unit and any external device. The card unlocks and protrudes slightly. You can now remove the card. So turn off and unplugged from the power supply before you to the right side of the unit for private listening. Note: Overly loud volume could damage your fingernail. When earphone is designed...
... the unit and any external device. The card unlocks and protrudes slightly. You can now remove the card. So turn off and unplugged from the power supply before you to the right side of the unit for private listening. Note: Overly loud volume could damage your fingernail. When earphone is designed...

X3-09 Hardware Manual
Page 10
... 5V accessory/ cigarette socket, as shown on the right figure. Using the Car Adaptor The unit is supplied with an AC adaptor for powering and charging its battery. 1. Please see details in a proper position for viewing. Disconnect the unit from the Car Adaptor... when starting the vehicle. Power Supply Preparation Using the AC Adaptor The unit is supplied with a Car Adaptor for powering while in a vehicle. Attention Place the unit in the following segment. 9 Note: ...
... 5V accessory/ cigarette socket, as shown on the right figure. Using the Car Adaptor The unit is supplied with an AC adaptor for powering and charging its battery. 1. Please see details in a proper position for viewing. Disconnect the unit from the Car Adaptor... when starting the vehicle. Power Supply Preparation Using the AC Adaptor The unit is supplied with a Car Adaptor for powering while in a vehicle. Attention Place the unit in the following segment. 9 Note: ...

X3-09 Hardware Manual
Page 11
...;F. Maintain well-ventilated conditions around the product to the product. When the battery is weak, an indication menu will power off automatically after a while. Power Supply Preparation Working conditions and precautions for the rechargeable battery Battery should only be charged by using the supplied adaptor. . 10
...;F. Maintain well-ventilated conditions around the product to the product. When the battery is weak, an indication menu will power off automatically after a while. Power Supply Preparation Working conditions and precautions for the rechargeable battery Battery should only be charged by using the supplied adaptor. . 10

X3-09 Hardware Manual
Page 16
When the battery is being charged, the Battery Status will be "Charging". 15 General Setup Power Tap in the Setup menu to enter Power menu, as shown below: The Power menu displays the unit's battery status. The values are between 0% and 100%, where 0% means the battery power has run out completely, and 100% represents a full battery power.
When the battery is being charged, the Battery Status will be "Charging". 15 General Setup Power Tap in the Setup menu to enter Power menu, as shown below: The Power menu displays the unit's battery status. The values are between 0% and 100%, where 0% means the battery power has run out completely, and 100% represents a full battery power.
X3-09 Hardware Manual
Page 23
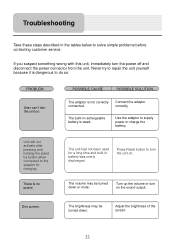
... charge the battery. Use the adaptor to solve simple problems before contacting customer service. Turn up the volume or turn the power off and disconnect the power connector from the unit. POSSIBLE CAUSE POSSIBLE SOLUTION The adaptor is no sound. Dim screen. Adjust the brightness of the screen. 22 There is not...
... charge the battery. Use the adaptor to solve simple problems before contacting customer service. Turn up the volume or turn the power off and disconnect the power connector from the unit. POSSIBLE CAUSE POSSIBLE SOLUTION The adaptor is no sound. Dim screen. Adjust the brightness of the screen. 22 There is not...
X3-09 Hardware Manual
Page 24
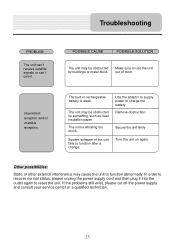
...possibilities: Static or other external interference may be obstructed by buildings or metal block. If the problems still exist, please cut off the power supply and consult your service center or a qualified technician. 23 The built-in rechargeable battery is vibrating too much. In order to ...recover normal status, please unplug the power supply cord and then plug it into the outlet again to supply power or charge the battery. System software of room. The unit is weak. Remove obstruction. Secure the ...
...possibilities: Static or other external interference may be obstructed by buildings or metal block. If the problems still exist, please cut off the power supply and consult your service center or a qualified technician. 23 The built-in rechargeable battery is vibrating too much. In order to ...recover normal status, please unplug the power supply cord and then plug it into the outlet again to supply power or charge the battery. System software of room. The unit is weak. Remove obstruction. Secure the ...

X3-09 Hardware Manual
Page 25
DC 5V < 8W 100mmX76mmX22mm (L*W*D) About 0.25kg DESIGN AND SPECIFICATIONS ARE SUBJECT TO CHANGE WITHOUT NOTICE 24 Specifications TFT screen size Frequency Response Audio Signal-to-noise Rate Audio distortion or noise Channel Separation Dynamic Range Power Power Consumption Dimensions Weight 3.5 inches 20Hz~20kHz ≥65dB ≤-20dB (1kHz) ≥70dB (1kHz) ≥80dB (1kHz) AC 100-240V ~ 50/60Hz;
DC 5V < 8W 100mmX76mmX22mm (L*W*D) About 0.25kg DESIGN AND SPECIFICATIONS ARE SUBJECT TO CHANGE WITHOUT NOTICE 24 Specifications TFT screen size Frequency Response Audio Signal-to-noise Rate Audio distortion or noise Channel Separation Dynamic Range Power Power Consumption Dimensions Weight 3.5 inches 20Hz~20kHz ≥65dB ≤-20dB (1kHz) ≥70dB (1kHz) ≥80dB (1kHz) AC 100-240V ~ 50/60Hz;
X3-09 Software Manual
Page 15
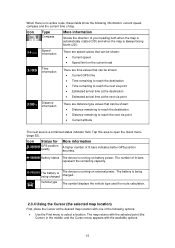
... next via point Distance information There are speed values that can be shown: • Current speed • Speed limit on battery power. Battery status The device is running on external power. The battery is being charged. The battery is being charged The device is running on the current road Time information There...
... next via point Distance information There are speed values that can be shown: • Current speed • Speed limit on battery power. Battery status The device is running on external power. The battery is being charged. The battery is being charged The device is running on the current road Time information There...

X3-09 Software Manual
Page 43
4.1.1 Icons on the map There are several status icons on external power. GPS reception quality shows the current accuracy of the field shows the vehicle type used for route calculation. 43 Position information is full. The remaining ... full but the position error may be calculated. GPS navigation is charging. Icon Description The battery is possible. GPS navigation is not possible. Icon Description Nextar Navigation System has no connection to the GPS receiver: GPS navigation is possible, but it is available, but the signal is connected to recharge the...
4.1.1 Icons on the map There are several status icons on external power. GPS reception quality shows the current accuracy of the field shows the vehicle type used for route calculation. 43 Position information is full. The remaining ... full but the position error may be calculated. GPS navigation is charging. Icon Description The battery is possible. GPS navigation is not possible. Icon Description Nextar Navigation System has no connection to the GPS receiver: GPS navigation is possible, but it is available, but the signal is connected to recharge the...
X3-09 Software Manual
Page 68
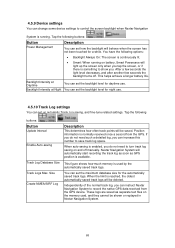
Button Power Management Description You can set up the screen only when you tap the screen, or if there is something to control the screen backlight when Nextar Navigation System is running on the memory card, and they cannot be shown or replayed in Nextar Navigation System. 68 Tap the following... 4.5.10 Track Log settings You can set how the backlight will behave when the screen has not been touched for a while. Nextar Navigation System will automatically start recording the track log as soon as separate text files on battery, Smart Powersave will light up automatic...
Button Power Management Description You can set up the screen only when you tap the screen, or if there is something to control the screen backlight when Nextar Navigation System is running on the memory card, and they cannot be shown or replayed in Nextar Navigation System. 68 Tap the following... 4.5.10 Track Log settings You can set how the backlight will behave when the screen has not been touched for a while. Nextar Navigation System will automatically start recording the track log as soon as separate text files on battery, Smart Powersave will light up automatic...

X3-09 Quick Start Guide
Page 1
...press button) 2. When the headphones are connected to this instruction. Find POI Favorites Map Settings At this device, even if Nextar has been advised of the possibility of next street on the advanced mode. Some countries/states do so follow these simple ...We strongly recommend that you . 3.5 INCH TOUCH SCREEN NAVIGATION SYSTEM X3-09 • ACCESSORIES LIST 3.5" GPS Device Carry Pouch Car Adaptor Dashboard Mount Disk Windshield Mounting Bracket Mounting Cradle n err, ge.s,sp Stylus Pen USB Cable Power Adaptor UNIT VIEW DESCRIPTION 1 GB.... SD card with maps O ...
...press button) 2. When the headphones are connected to this instruction. Find POI Favorites Map Settings At this device, even if Nextar has been advised of the possibility of next street on the advanced mode. Some countries/states do so follow these simple ...We strongly recommend that you . 3.5 INCH TOUCH SCREEN NAVIGATION SYSTEM X3-09 • ACCESSORIES LIST 3.5" GPS Device Carry Pouch Car Adaptor Dashboard Mount Disk Windshield Mounting Bracket Mounting Cradle n err, ge.s,sp Stylus Pen USB Cable Power Adaptor UNIT VIEW DESCRIPTION 1 GB.... SD card with maps O ...

