RND4000 User Manual
Page 5
... Your Ethernet Connection Settings 1-2 Global Network Settings 1-5 WINS ...1-6 DHCP ...1-7 Setting Up Security ...1-7 Admin Password ...1-7 Security Mode ...1-8 Setting Up User and Group Accounts 1-13 Selecting Services for Share Access 1-17 Standard File Protocols 1-18 Streaming Services 1-19 Discovery Services 1-21 Understanding Volume Management 1-21 Volume Management for Flex-RAID 1-22 Volume Management for X-RAID 1-26 Changing between X-RAID and Flex-RAID Modes 1-28 Snapshots ...1-28 USB Storage ...1-31 Managing Your Shares 1-33 Adding Shares ...1-34 Managing Shares 1-35...
... Your Ethernet Connection Settings 1-2 Global Network Settings 1-5 WINS ...1-6 DHCP ...1-7 Setting Up Security ...1-7 Admin Password ...1-7 Security Mode ...1-8 Setting Up User and Group Accounts 1-13 Selecting Services for Share Access 1-17 Standard File Protocols 1-18 Streaming Services 1-19 Discovery Services 1-21 Understanding Volume Management 1-21 Volume Management for Flex-RAID 1-22 Volume Management for X-RAID 1-26 Changing between X-RAID and Flex-RAID Modes 1-28 Snapshots ...1-28 USB Storage ...1-31 Managing Your Shares 1-33 Adding Shares ...1-34 Managing Shares 1-35...

RND4000 User Manual
Page 9
...; "Changing User Passwords" covers users other than administrators can access FrontView to the factory default configuration, see "Resetting Your System (System Switch)" for replacing the failed disk in "Replacing a Failed Disk." • If you step-by-step through the FrontView Setup Wizard and quickly prepares the ReadyNAS for hostname, workgroup, or password. The ReadyNAS Setup Manual takes you need help in the FrontView Advanced Control mode. Appendix A, "RAID Levels Simplified," explains the RAID levels that the ReadyNAS supports. Chapter 2, "Accessing Shares from NETGEAR...
...; "Changing User Passwords" covers users other than administrators can access FrontView to the factory default configuration, see "Resetting Your System (System Switch)" for replacing the failed disk in "Replacing a Failed Disk." • If you step-by-step through the FrontView Setup Wizard and quickly prepares the ReadyNAS for hostname, workgroup, or password. The ReadyNAS Setup Manual takes you need help in the FrontView Advanced Control mode. Appendix A, "RAID Levels Simplified," explains the RAID levels that the ReadyNAS supports. Chapter 2, "Accessing Shares from NETGEAR...
RND4000 User Manual
Page 21
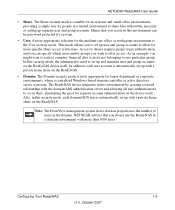
... ReadyNAS device integrates in this security mode, each user account is the User security mode. NETGEAR ReadyNAS User Guide • Share. The Domain security mode is most appropriate for larger department or corporate environments, where a centralized Windows-based domain controller or active directory server is suitable for most home and small office environments, providing a simple way for the medium-size office or workgroup environment is automatically set up with the domain/ADS authentication server and allowing all user authentications to share files...
... ReadyNAS device integrates in this security mode, each user account is the User security mode. NETGEAR ReadyNAS User Guide • Share. The Domain security mode is most appropriate for larger department or corporate environments, where a centralized Windows-based domain controller or active directory server is suitable for most home and small office environments, providing a simple way for the medium-size office or workgroup environment is automatically set up with the domain/ADS authentication server and allowing all user authentications to share files...
RND4000 User Manual
Page 23
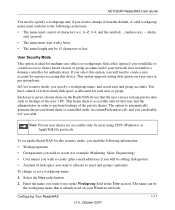
.... User Security Mode This option is given a home share on a per-user or per-group basis. The option to keep private data such as backups of the user's PC. In User security mode, you specify a workgroup name, and create user and group accounts. This option supports setting disk quotas on the ReadyNAS device that is allocated for each user or group. This home share is controlled in the User section. NETGEAR ReadyNAS User Guide You need to users and groups (optional) To change or set up the ReadyNAS...
.... User Security Mode This option is given a home share on a per-user or per-group basis. The option to keep private data such as backups of the user's PC. In User security mode, you specify a workgroup name, and create user and group accounts. This option supports setting disk quotas on the ReadyNAS device that is allocated for each user or group. This home share is controlled in the User section. NETGEAR ReadyNAS User Guide You need to users and groups (optional) To change or set up the ReadyNAS...
RND4000 User Manual
Page 27
..., • E-mail address • User ID • Select a group from the drop-down menu. • Password • Disk quota. 3. Select Manage Users from the Group pull-down menu. 2. Click Apply to five users at a time. Configuring Your ReadyNAS v1.0, October 2007 1-15 You can leave the fields empty): flintstones In this example, the group flintstones is created with an automatically assigned GID and default quota. rubble,1007...
..., • E-mail address • User ID • Select a group from the drop-down menu. • Password • Disk quota. 3. Select Manage Users from the Group pull-down menu. 2. Click Apply to five users at a time. Configuring Your ReadyNAS v1.0, October 2007 1-15 You can leave the fields empty): flintstones In this example, the group flintstones is created with an automatically assigned GID and default quota. rubble,1007...
RND4000 User Manual
Page 30
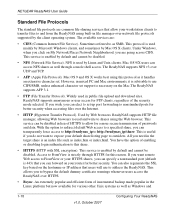
... file manager-over the Internet. • HTTP (Hypertext Transfer Protocol). You can also regenerate the SSL key based on your default share listing page to outsiders. Under Windows, when you can access NFS shares as SMB. Mac OS 9/X users can elect to set support is enabled by default and cannot be disabled. • NFS (Network File Service). If you wish, you click on the Mac.The ReadyNAS supports AFP 3.1. • FTP (File Transfer Protocol). With the option to redirect default Web access...
... file manager-over the Internet. • HTTP (Hypertext Transfer Protocol). You can also regenerate the SSL key based on your default share listing page to outsiders. Under Windows, when you can access NFS shares as SMB. Mac OS 9/X users can elect to set support is enabled by default and cannot be disabled. • NFS (Network File Service). If you wish, you click on the Mac.The ReadyNAS supports AFP 3.1. • FTP (File Transfer Protocol). With the option to redirect default Web access...
RND4000 User Manual
Page 33
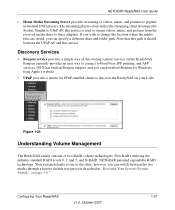
... share and folder path. and X-RAID, NETGEAR-patented expandable RAID technology. Bonjour currently provides an easy way to connect to one or the other; NETGEAR ReadyNAS User Guide • Home Media Streaming Server provides streaming of videos, music, and pictures to change the location where the media files are stored, you can switch between the UPnP AV and this service is shared between the two modes through a factory default reset process described in Bonjour support...
... share and folder path. and X-RAID, NETGEAR-patented expandable RAID technology. Bonjour currently provides an easy way to connect to one or the other; NETGEAR ReadyNAS User Guide • Home Media Streaming Server provides streaming of videos, music, and pictures to change the location where the media files are stored, you can switch between the UPnP AV and this service is shared between the two modes through a factory default reset process described in Bonjour support...
RND4000 User Manual
Page 39
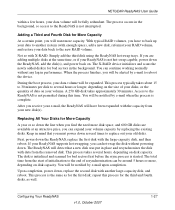
..., power down the ReadyNAS, add the disk(s), and power back on disk capacity. The X-RAID device initializes and scans the newly added disk(s) for More Capacity A year or so down the line when you must power down . NETGEAR ReadyNAS User Guide within a few hours, your data volume will be notified by replacing the existing disks. Replacing All Your Disks for bad sectors in place and resynchronizes the disk with the large-capacity disk, and then reboot. Keep...
..., power down the ReadyNAS, add the disk(s), and power back on disk capacity. The X-RAID device initializes and scans the newly added disk(s) for More Capacity A year or so down the line when you must power down . NETGEAR ReadyNAS User Guide within a few hours, your data volume will be notified by replacing the existing disks. Replacing All Your Disks for bad sectors in place and resynchronizes the disk with the large-capacity disk, and then reboot. Keep...
RND4000 User Manual
Page 45
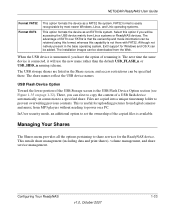
... the USB Storage screen is available. The next time the same device is connected, it . FAT32 format is useful for uploading pictures from digital cameras and music from Linux systems or ReadyNAS devices. The USB storage shares are copied into a unique timestamp folder to a specified share. USB Flash Device Option Toward the lower portion of the copied files is the USB Flash Device Option section (see Figure 1-35 on connection to prevent overwriting previous contents. In User security mode...
... the USB Storage screen is available. The next time the same device is connected, it . FAT32 format is useful for uploading pictures from digital cameras and music from Linux systems or ReadyNAS devices. The USB storage shares are copied into a unique timestamp folder to a specified share. USB Flash Device Option Toward the lower portion of the copied files is the USB Flash Device Option section (see Figure 1-35 on connection to prevent overwriting previous contents. In User security mode...
RND4000 User Manual
Page 55
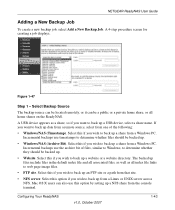
... up a NFS share from a Linux or UNIX server across NFS. Select this option by setting up a share from that site. • NFS server. NETGEAR ReadyNAS User Guide Adding a New Backup Job To create a new backup job, select Add a New Backup Job. Figure 1-47 Step 1 - Select this option if you want to back up a share from one of files, similar to Windows, to determine whether files should be backed up data from a remote source, select from a Windows PC. Mac OS X users can...
... up a NFS share from a Linux or UNIX server across NFS. Select this option by setting up a share from that site. • NFS server. NETGEAR ReadyNAS User Guide Adding a New Backup Job To create a new backup job, select Add a New Backup Job. Figure 1-47 Step 1 - Select this option if you want to back up a share from one of files, similar to Windows, to determine whether files should be backed up data from a remote source, select from a Windows PC. Mac OS X users can...

RND4000 User Manual
Page 57
... you are accessing a password-protected share on a remote ReadyNAS server configured for Share security mode, enter the name of those snapshots (see "Snapshots" on page 1-28 to access the share. Step 2 - If you selected a remote backup source, you can either the source or destination must be a Windows PC/ReadyNAS system, an NFS server, or a rsync server. If you selected a ReadyNAS share for the source, you need to enter a login and password to set up...
... you are accessing a password-protected share on a remote ReadyNAS server configured for Share security mode, enter the name of those snapshots (see "Snapshots" on page 1-28 to access the share. Step 2 - If you selected a remote backup source, you can either the source or destination must be a Windows PC/ReadyNAS system, an NFS server, or a rsync server. If you selected a ReadyNAS share for the source, you need to enter a login and password to set up...
RND4000 User Manual
Page 74
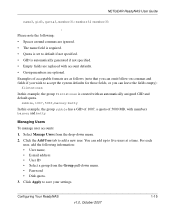
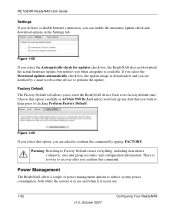
... recover after you wish to keep prior to clicking Perform Factory Default. Power Management The ReadyNAS offers a couple of power management options to reduce system power consumption, both while the system is in use and when it is available. NETGEAR ReadyNAS User Guide Settings If you do have a reliable Internet connection, you to reset the ReadyNAS device back to its factory default state. Factory Default The Factory Default tab allows you can enable the automatic update check and download...
... recover after you wish to keep prior to clicking Perform Factory Default. Power Management The ReadyNAS offers a couple of power management options to reduce system power consumption, both while the system is in use and when it is available. NETGEAR ReadyNAS User Guide Settings If you do have a reliable Internet connection, you to reset the ReadyNAS device back to its factory default state. Factory Default The Factory Default tab allows you can enable the automatic update check and download...
RND4000 User Manual
Page 95
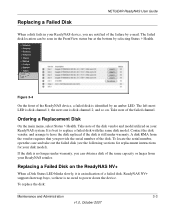
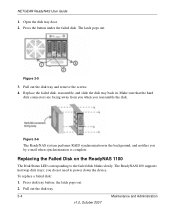
... most LED is disk channel 2; the next one is disk channel 1; To locate the serial number, open the case and take out the failed disk (see the following sections for replacement instructions for your ReadyNAS retailer. If the disk is no need to power down the device. Replacing a Failed Disk on the ReadyNAS NV+ When a Disk Status LED blinks slowly, it is identified by an amber LED. The failed disk location can obtain a disk of the same capacity or...
... most LED is disk channel 2; the next one is disk channel 1; To locate the serial number, open the case and take out the failed disk (see the following sections for replacement instructions for your ReadyNAS retailer. If the disk is no need to power down the device. Replacing a Failed Disk on the ReadyNAS NV+ When a Disk Status LED blinks slowly, it is identified by an amber LED. The failed disk location can obtain a disk of the same capacity or...
RND4000 User Manual
Page 96
... v1.0, October 2007 Pull out the disk tray and remove the screws. 4. Replacing the Failed Disk on the ReadyNAS 1100 The Disk Status LED corresponding to power down the device. Figure 3-6 The ReadyNAS system performs RAID synchronization in . the latch pops out. 2. NETGEAR ReadyNAS User Guide 1. Open the disk tray door. 2. The ReadyNAS1100 supports hotswap disk trays; Press disk tray button; Figure 3-5 3. Replace the failed disk, reassemble, and slide the disk tray back in the background, and...
... v1.0, October 2007 Pull out the disk tray and remove the screws. 4. Replacing the Failed Disk on the ReadyNAS 1100 The Disk Status LED corresponding to power down the device. Figure 3-6 The ReadyNAS system performs RAID synchronization in . the latch pops out. 2. NETGEAR ReadyNAS User Guide 1. Open the disk tray door. 2. The ReadyNAS1100 supports hotswap disk trays; Press disk tray button; Figure 3-5 3. Replace the failed disk, reassemble, and slide the disk tray back in the background, and...
RND4000 User Manual
Page 98
... the reset switch after the LEDS flash once, otherwise a Factory Default will be used as a first step, if the ReadyNAS had to replace the failed disk, turn on the power on the ReadyNAS. The firmware installation takes several hours depending on the back of the ReadyNAS. The process takes several minutes to complete. Change between X-RAID and Flex-RAID mode. Warning: Make sure that the command has been accepted. NETGEAR ReadyNAS User Guide Resynchronizing the Volume...
... the reset switch after the LEDS flash once, otherwise a Factory Default will be used as a first step, if the ReadyNAS had to replace the failed disk, turn on the power on the ReadyNAS. The firmware installation takes several hours depending on the back of the ReadyNAS. The process takes several minutes to complete. Change between X-RAID and Flex-RAID mode. Warning: Make sure that the command has been accepted. NETGEAR ReadyNAS User Guide Resynchronizing the Volume...
RND4000 User Manual
Page 111
... HTTPS NFS Quota RAID Share Snapshot Volume X-RAID AppleTalk Filing Protocol\ is the standard way Mac OS 9 and earlier versions share files across the network. Hypertext Transfer Protocol, the protocol Web browsers use to the share can be restored from the other disks. Snapshots can continue to enable remote file download and upload for Unix/ Linux, FTP, and HTTP. A file system built on multiple disks in a way that if one user, group, or share abuses the available storage space. Common Internet File...
... HTTPS NFS Quota RAID Share Snapshot Volume X-RAID AppleTalk Filing Protocol\ is the standard way Mac OS 9 and earlier versions share files across the network. Hypertext Transfer Protocol, the protocol Web browsers use to the share can be restored from the other disks. Snapshots can continue to enable remote file download and upload for Unix/ Linux, FTP, and HTTP. A file system built on multiple disks in a way that if one user, group, or share abuses the available storage space. Common Internet File...
RND4000 User Manual
Page 116
NETGEAR ReadyNAS RAIDiator 3.01 Administration Manual health 3-1 updating 1-60 viewing Logs 3-2 replacement disks ordering 3-3 replacing disks increasing capacity 1-27 resetting system system switch 3-6 resynchronizing volume 3-6 Rsync 1-18 accessing shares 2-12 server, backup jobs 1-44 S security mode domain 1-12 share 1-10 user 1-11 security options 1-8 domain 1-9 share 1-8, 1-9 user 1-9 Setup Wizard 1-2 share security mode 1-10 security options 1-8, 1-9 shares access restriction, domain mode 1-37 adding 1-34 advanced CIFS permission 1-37 display option, domain mode 1-37 fine-tuning 1-35 ...
NETGEAR ReadyNAS RAIDiator 3.01 Administration Manual health 3-1 updating 1-60 viewing Logs 3-2 replacement disks ordering 3-3 replacing disks increasing capacity 1-27 resetting system system switch 3-6 resynchronizing volume 3-6 Rsync 1-18 accessing shares 2-12 server, backup jobs 1-44 S security mode domain 1-12 share 1-10 user 1-11 security options 1-8 domain 1-9 share 1-8, 1-9 user 1-9 Setup Wizard 1-2 share security mode 1-10 security options 1-8, 1-9 shares access restriction, domain mode 1-37 adding 1-34 advanced CIFS permission 1-37 display option, domain mode 1-37 fine-tuning 1-35 ...
RND4000 Setup Manual
Page 3
... Manual Installing the RAIDar Utility Installing RAIDar on Windows 1-1 Installing RAIDar on MAC OS X 1-1 Installing RAIDar on Linux 1-2 Detecting Your ReadyNAS Device 1-2 Using the FrontView Setup Wizard Setting the Clock ...1-8 Configuring Alert Contacts 1-8 Configuring Networking 1-9 Ethernet Settings ...1-9 Global Settings ...1-10 Setting Up Security ...1-11 Administration Password 1-11 Security Mode ...1-12 Setting Up File Sharing Services 1-13 Standard File Protocols 1-13 Streaming Services 1-15 Setting up Shares ...1-16 Share List ...1-16 Add Shares ...1-17 Setting Up Printers...
... Manual Installing the RAIDar Utility Installing RAIDar on Windows 1-1 Installing RAIDar on MAC OS X 1-1 Installing RAIDar on Linux 1-2 Detecting Your ReadyNAS Device 1-2 Using the FrontView Setup Wizard Setting the Clock ...1-8 Configuring Alert Contacts 1-8 Configuring Networking 1-9 Ethernet Settings ...1-9 Global Settings ...1-10 Setting Up Security ...1-11 Administration Password 1-11 Security Mode ...1-12 Setting Up File Sharing Services 1-13 Standard File Protocols 1-13 Streaming Services 1-15 Setting up Shares ...1-16 Share List ...1-16 Add Shares ...1-17 Setting Up Printers...
RND4000 Setup Manual
Page 6
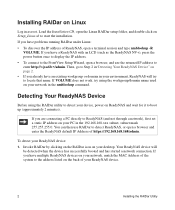
... not through a network), first set a static IP address on your device, power on ReadyNAS and wait for it to the address listed on the back of https://192.168.168.168/admin. Detecting Your ReadyNAS Device Before using the workgroup/domain name used on your network in your ReadyNAS device. 2 Installing the RAIDar Utility If you already have problems running RAIDar under Linux: • To discover the IP address of ReadyNAS, open the Linux RAIDar setup folder, and double...
... not through a network), first set a static IP address on your device, power on ReadyNAS and wait for it to the address listed on the back of https://192.168.168.168/admin. Detecting Your ReadyNAS Device Before using the workgroup/domain name used on your network in your ReadyNAS device. 2 Installing the RAIDar Utility If you already have problems running RAIDar under Linux: • To discover the IP address of ReadyNAS, open the Linux RAIDar setup folder, and double...
RND4000 Setup Manual
Page 20
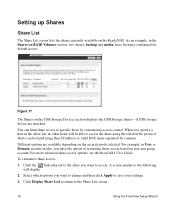
... selected file protocol. For example, in User or Domain security modes, you want to change and then click Apply to access the share using their IP address or valid DNS name separated by customizing access control. Figure 17 The Shares on the USB Storage Devices section displays the USB Storage shares-if USB storage device are available depending on RAID Volumes section, two shares, backup and media, have the option of restricting share access based on the ReadyNAS. To customize share access...
... selected file protocol. For example, in User or Domain security modes, you want to change and then click Apply to access the share using their IP address or valid DNS name separated by customizing access control. Figure 17 The Shares on the USB Storage Devices section displays the USB Storage shares-if USB storage device are available depending on RAID Volumes section, two shares, backup and media, have the option of restricting share access based on the ReadyNAS. To customize share access...


