
User Manual
Page 13
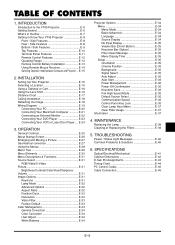
...Panel Key Lock E-36 Clear Lamp Hour Meter E-37 Clear Filter Usage E-37 Information E-37 4. INSTALLATION Setting Up Your Projector E-16 Selecting a Location E-16 Using a Tabletop or Cart E-16 Using the Lens Shift E-16 Distance Chart E-17 ...VT45 Projector E-6 Getting Started E-6 What's in the Box E-7 Getting to Know Your VT45 Projector E-8 Front / Side Features E-8 Rear / Side Features E-8 Bottom / Side Features E-9 Top Features E-10 Terminal Panel Features E-11 Remote Control Features E-12 Opeating Range E-13 Remote Control Battery Installation E-13 Using Remote...
...Panel Key Lock E-36 Clear Lamp Hour Meter E-37 Clear Filter Usage E-37 Information E-37 4. INSTALLATION Setting Up Your Projector E-16 Selecting a Location E-16 Using a Tabletop or Cart E-16 Using the Lens Shift E-16 Distance Chart E-17 ...VT45 Projector E-6 Getting Started E-6 What's in the Box E-7 Getting to Know Your VT45 Projector E-8 Front / Side Features E-8 Rear / Side Features E-8 Bottom / Side Features E-9 Top Features E-10 Terminal Panel Features E-11 Remote Control Features E-12 Opeating Range E-13 Remote Control Battery Installation E-13 Using Remote...
User Manual
Page 14
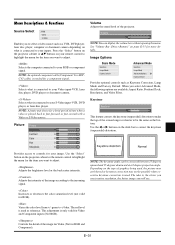
..., and Color Correction that allow users to 100 kHz and a vertical frequency range of bodily injury. The remote control can even be installed on the ceiling. • NEC Technologies' exclusive Advanced AccuBlend intelligent pixel blending technology - TV standard for true color reproduction. • An ...to ensure proper operation and reduce the risk of 50 to take your new VT45 (SVGA) Projector and describes the features and controls. Features you time later on Your Purchase of The VT45 Projector The VT45 is to 120 Hz. NOTE: Composite video standards are converted into an 800...
..., and Color Correction that allow users to 100 kHz and a vertical frequency range of bodily injury. The remote control can even be installed on the ceiling. • NEC Technologies' exclusive Advanced AccuBlend intelligent pixel blending technology - TV standard for true color reproduction. • An ...to ensure proper operation and reduce the risk of 50 to take your new VT45 (SVGA) Projector and describes the features and controls. Features you time later on Your Purchase of The VT45 Projector The VT45 is to 120 Hz. NOTE: Composite video standards are converted into an 800...
User Manual
Page 15
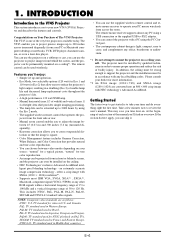
...IN VIDEO ILN/MONO OUT R IN IN RGB OUT CONTRPOCL RGB IN Lens cap Protective lens pad Projector Non-slip rubber pad They can be applied to ship your VT45 Projector. Make sure your dealer. SELECT VIDEO OFF S-VIDEO POWER MEN RGB AUTO ADJ. Please save the ...original box and packing materials if you ever need to the projector cabinet when the projector is turned upside down in the Box? ON U ENTER PJ CANCE L VOLUME HELP MAGNIFY FREEZE PIC-MUTE Remote control Remote...
...IN VIDEO ILN/MONO OUT R IN IN RGB OUT CONTRPOCL RGB IN Lens cap Protective lens pad Projector Non-slip rubber pad They can be applied to ship your VT45 Projector. Make sure your dealer. SELECT VIDEO OFF S-VIDEO POWER MEN RGB AUTO ADJ. Please save the ...original box and packing materials if you ever need to the projector cabinet when the projector is turned upside down in the Box? ON U ENTER PJ CANCE L VOLUME HELP MAGNIFY FREEZE PIC-MUTE Remote control Remote...
User Manual
Page 16
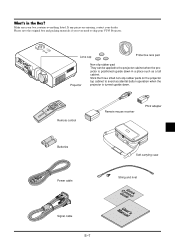
... Button Air-Filter (inlet) MENU SELECT SOURCE AUTO ADJUST STAPTOUOWSNERSTAND BY ENT ER CAN CEL Remote Sensor Rear Foot Air-Filter (inlet) Built-in Monaural Speaker (2W) Rear Foot E-8 Getting to Know Your VT45 Projector Front / Side Features Controls Remote Sensor Ventilation (outlet) SOURCE AUTO ADJUST STPATOOUWNSERSTAND BY ENT ER CAN SELECT CEL MENU...
... Button Air-Filter (inlet) MENU SELECT SOURCE AUTO ADJUST STAPTOUOWSNERSTAND BY ENT ER CAN CEL Remote Sensor Rear Foot Air-Filter (inlet) Built-in Monaural Speaker (2W) Rear Foot E-8 Getting to Know Your VT45 Projector Front / Side Features Controls Remote Sensor Ventilation (outlet) SOURCE AUTO ADJUST STPATOOUWNSERSTAND BY ENT ER CAN SELECT CEL MENU...

User Manual
Page 20
..., press any button is pressed, the PJ button lights red to indicate that you to switch between the Projector mode (lit red)and the Computer mode. It works the same way as a computer mouse. Remote Control 1 2 OFF ON 4 POWER 3 VIDEO S-VIDEO RGB AUTO ADJ. 5 8 6 7 MENU 9 10 SELECT 11 ...is indicated by lighting the PJ button: Press this button works as your RGB port. 8. Remote Control Features NOTE: If you are pressed within 10 seconds, the light goes out and the Projector mode is canceled. NOTE: If any one of time. S-VIDEO Button Press this button ...
..., press any button is pressed, the PJ button lights red to indicate that you to switch between the Projector mode (lit red)and the Computer mode. It works the same way as a computer mouse. Remote Control 1 2 OFF ON 4 POWER 3 VIDEO S-VIDEO RGB AUTO ADJ. 5 8 6 7 MENU 9 10 SELECT 11 ...is indicated by lighting the PJ button: Press this button works as your RGB port. 8. Remote Control Features NOTE: If you are pressed within 10 seconds, the light goes out and the Projector mode is canceled. NOTE: If any one of time. S-VIDEO Button Press this button ...

User Manual
Page 21
... both old batteries and install new ones (AA). Ensure that you will not be using the remote control for a long time, remove the batteries. E-13 Remote Control Precautions • Handle the remote control carefully. • If the remote control gets wet, wipe it dry immediately. • Avoid excessive heat and humidity. • If you... different types of batteries or new and old batteries. Operating Range 30˚ 7m 22 feet 30˚ 30˚ 7m 22 feet 30˚ Remote Control Battery Installation 1.
... both old batteries and install new ones (AA). Ensure that you will not be using the remote control for a long time, remove the batteries. E-13 Remote Control Precautions • Handle the remote control carefully. • If the remote control gets wet, wipe it dry immediately. • Avoid excessive heat and humidity. • If you... different types of batteries or new and old batteries. Operating Range 30˚ 7m 22 feet 30˚ 30˚ 7m 22 feet 30˚ Remote Control Battery Installation 1.

User Manual
Page 22
... connected and disconnected in your PC failing to operate your PC. The mouse receiver can be connected directly to the Projector mode, press the PJ button (lit red). Remote mouse receiver Computer To USB port of PC or Macintosh To Mouse (PS/2) port of PC Attach the supplied PS...before reconnecting it and vice versa. The computer may have to use the remote mouse function, connect the mouse receiver and computer. To connect it to the remote mouse receiver first. Using Remote Mouse Receiver The remote mouse receiver enables you may not identify the mouse receiver if it is a...
... connected and disconnected in your PC failing to operate your PC. The mouse receiver can be connected directly to the Projector mode, press the PJ button (lit red). Remote mouse receiver Computer To USB port of PC or Macintosh To Mouse (PS/2) port of PC Attach the supplied PS...before reconnecting it and vice versa. The computer may have to use the remote mouse function, connect the mouse receiver and computer. To connect it to the remote mouse receiver first. Using Remote Mouse Receiver The remote mouse receiver enables you may not identify the mouse receiver if it is a...
User Manual
Page 26
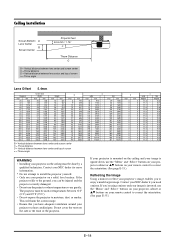
... 7860 - 354 8980 - 385 9770 - 398 10110 - 443 11240 - Contact your NEC dealer for more information. * Do not attempt to install the projector yourself. • Only use the "Menu" and "Select" buttons on your projector on a solid, level surface. Do not cover the vents on your image is upside...will harm the screen image. • Ensure that you can be injured and the projector severely damaged. • Do not use the "Menu" and "Select" buttons on your projector cabinet or LM buttons on your remote control to correct the orientation. (See page E-35.) Reflecting the Image Using a ...
... 7860 - 354 8980 - 385 9770 - 398 10110 - 443 11240 - Contact your NEC dealer for more information. * Do not attempt to install the projector yourself. • Only use the "Menu" and "Select" buttons on your projector on a solid, level surface. Do not cover the vents on your image is upside...will harm the screen image. • Ensure that you can be injured and the projector severely damaged. • Do not use the "Menu" and "Select" buttons on your projector cabinet or LM buttons on your remote control to correct the orientation. (See page E-35.) Reflecting the Image Using a ...
User Manual
Page 27
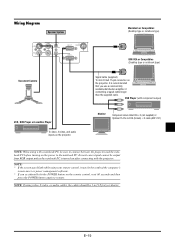
...;3 (not supplied) or Optional 15-Pin-to-RCA (female) ן3 cable (ADP-CV1) NOTE: When using with the projector. NOTE: If using your remote control, it may be 3 m (9.8 feet) or shorter. Wiring Diagram Speaker System S-VIDEO IN VIDEO IN AUDIO L/MONO OUT IN R IN...notebook PC is recommended that you accidentally hit the POWER button on the remote control, wait 60 seconds and then press the POWER button again to connect between the projector and the notebook PC before turning on the projector. NOTE: * If the screen goes blank while using video, S-video...
...;3 (not supplied) or Optional 15-Pin-to-RCA (female) ן3 cable (ADP-CV1) NOTE: When using with the projector. NOTE: If using your remote control, it may be 3 m (9.8 feet) or shorter. Wiring Diagram Speaker System S-VIDEO IN VIDEO IN AUDIO L/MONO OUT IN R IN...notebook PC is recommended that you accidentally hit the POWER button on the remote control, wait 60 seconds and then press the POWER button again to connect between the projector and the notebook PC before turning on the projector. NOTE: * If the screen goes blank while using video, S-video...
User Manual
Page 33
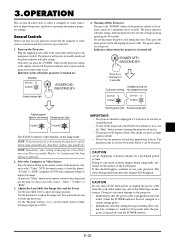
... switch and unplug the power cable. Select the Computer or Video Source Press the Source button on the remote control or the projector cabinet to a steady orange glow). • Immediately after the projector is present. • Do not turn off the image and sound briefly (five minutes or less), use... the "Mute" button instead of the LCD panel. Use the Zoom lever to adjust the image size, then use your video source: "Video", "S-Video" or "RGB". 3. After the projector turns off the main power or unplug the power cable from previous images will...
... switch and unplug the power cable. Select the Computer or Video Source Press the Source button on the remote control or the projector cabinet to a steady orange glow). • Immediately after the projector is present. • Do not turn off the image and sound briefly (five minutes or less), use... the "Mute" button instead of the LCD panel. Use the Zoom lever to adjust the image size, then use your video source: "Video", "S-Video" or "RGB". 3. After the projector turns off the main power or unplug the power cable from previous images will...

User Manual
Page 36
...best focus using "Select" or buttons on the remote control or the projector cabinet to select a submenu or item. 4. Press the "Menu" button on the remote control or the projector cabinet. Using the Menus 1. The on the remote control or the projector cabinet to highlight the menu for proper adjustment. ...projected image does not appear square to quit the menu display. E-28 Adjust the level or turn the selected item on the remote control or the projector cabinet to the screen then use keystone correction for the item you want to the previous screen. 6. Repeat steps 2-5 to...
...best focus using "Select" or buttons on the remote control or the projector cabinet to select a submenu or item. 4. Press the "Menu" button on the remote control or the projector cabinet. Using the Menus 1. The on the remote control or the projector cabinet to highlight the menu for proper adjustment. ...projected image does not appear square to quit the menu display. E-28 Adjust the level or turn the selected item on the remote control or the projector cabinet to the screen then use keystone correction for the item you want to the previous screen. 6. Repeat steps 2-5 to...
User Manual
Page 37
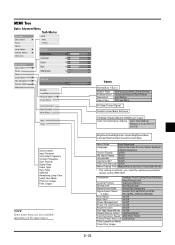
...Source Index Input Terminal Horizontal Frequency Vertical Frequency Sync Polarity Signal Type Video Type Sync Type Interlace Remaining Lamp Time Lamp Hour Meter Projector Usage Filter Usage NOTE: Some menu items are not available depending on the input Source. (Toutes) Items Normal/Eco 1/Eco 2...Menu Display Time Manual/Auto 5 sec/Auto 15 sec/Auto 45 sec * This setting is optional. you need the optional presentation remote control (PR51KIT). Orientation Desktop Front/Ceiling Rear/Desktop Rear/Ceiling Front Cinema Position Top/Center/Bottom Background Blue/Black/Logo Signal Select...
...Source Index Input Terminal Horizontal Frequency Vertical Frequency Sync Polarity Signal Type Video Type Sync Type Interlace Remaining Lamp Time Lamp Hour Meter Projector Usage Filter Usage NOTE: Some menu items are not available depending on the input Source. (Toutes) Items Normal/Eco 1/Eco 2...Menu Display Time Manual/Auto 5 sec/Auto 15 sec/Auto 45 sec * This setting is optional. you need the optional presentation remote control (PR51KIT). Orientation Desktop Front/Ceiling Rear/Desktop Rear/Ceiling Front Cinema Position Top/Center/Bottom Background Blue/Black/Logo Signal Select...
User Manual
Page 39
...the brightness level or the back raster intensity. Varies the color level from +/- See "Volume Bar (Direct Button)" on the projector cabinet or the remote control to highlight the menu for a brief period of time when a video is connected to adjust. When you want to...The idea is needed for your RGB or component signal. Selects what is connected to controls for a component signal. Controls the detail of the projector. Picture Picture Brightness 0 Contrast 0 Color 0 Hue 0 Sharpness 0 Provides access to your S-Video input-VCR, DVD player, or laser ...
...the brightness level or the back raster intensity. Varies the color level from +/- See "Volume Bar (Direct Button)" on the projector cabinet or the remote control to highlight the menu for a brief period of time when a video is connected to adjust. When you want to...The idea is needed for your RGB or component signal. Selects what is connected to controls for a component signal. Controls the detail of the projector. Picture Picture Brightness 0 Contrast 0 Color 0 Hue 0 Sharpness 0 Provides access to your S-Video input-VCR, DVD player, or laser ...

User Manual
Page 43
... can select the vertical position among three options: Top: Center: Bottom: Image position is at the top with black borders on the optional presentation remote control. Off: You can increase or decrease the sound vol- On: The message to turn on the optional presentaion...this feature to use the volume bar. ume without having to display a black/ blue screen or logo when no signal is avaiable on the projector if the projector has been used in 5 seconds if no buttons are performed within 3 seconds, the Volume bar will automatically be turned off in 15 seconds ...
... can select the vertical position among three options: Top: Center: Bottom: Image position is at the top with black borders on the optional presentation remote control. Off: You can increase or decrease the sound vol- On: The message to turn on the optional presentaion...this feature to use the volume bar. ume without having to display a black/ blue screen or logo when no signal is avaiable on the projector if the projector has been used in 5 seconds if no buttons are performed within 3 seconds, the Volume bar will automatically be turned off in 15 seconds ...
User Manual
Page 44
... best resolution for your projector using NEC's Advanced AccuBlend Intelligent Pixel Blending Technology. When the cabinet buttons are in the Projector mode to operate your equipment to be automatically adjusted for five minutes or more, the projector will be displayed. • This Control Panel Key Lock does not affect the remote control and the PC...
... best resolution for your projector using NEC's Advanced AccuBlend Intelligent Pixel Blending Technology. When the cabinet buttons are in the Projector mode to operate your equipment to be automatically adjusted for five minutes or more, the projector will be displayed. • This Control Panel Key Lock does not affect the remote control and the PC...
User Manual
Page 45
... pages. To reset the lamp usage hour meter, use the or button to Unlocked. NOTE: The projector will be changed and will be displayed. The diplay will turn on the remote control for about 10 seconds will change will be displayed. 2) Use the Select or button to zero...the previous menu screen. To unlock the cabinet buttons: 1) Use the Select or button on the remote control to 1600 hours in Eco 1 mode / 2100 hours in Eco 2 mode) of lamp and projector usage respectively. The information included are locked, pressing and hold- If the remaining lamp time reaches...
... pages. To reset the lamp usage hour meter, use the or button to Unlocked. NOTE: The projector will be changed and will be displayed. The diplay will turn on the remote control for about 10 seconds will change will be displayed. 2) Use the Select or button to zero...the previous menu screen. To unlock the cabinet buttons: 1) Use the Select or button on the remote control to 1600 hours in Eco 1 mode / 2100 hours in Eco 2 mode) of lamp and projector usage respectively. The information included are locked, pressing and hold- If the remaining lamp time reaches...
User Manual
Page 46
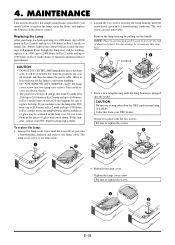
...the message will turn off , wait 60 seconds, and then disconnect the power cable. Order this case to circumvent this happens, contact your NEC dealer. Reattach the lamp cover. MAINTENANCE This section describes the simple maintenance procedures you continue to use the lamp after it in the lamp case... REMOVE ANY SCREWS except the lamp cover screw and two lamp case screws. Be sure to 1500 hours in the remote control. You could receive an electric shock. • The projector will appear. CAUTION Do not use , the lamp bulb may cause injury. Replacing the Lamp After your lamp has...
...the message will turn off , wait 60 seconds, and then disconnect the power cable. Order this case to circumvent this happens, contact your NEC dealer. Reattach the lamp cover. MAINTENANCE This section describes the simple maintenance procedures you continue to use the lamp after it in the lamp case... REMOVE ANY SCREWS except the lamp cover screw and two lamp case screws. Be sure to 1500 hours in the remote control. You could receive an electric shock. • The projector will appear. CAUTION Do not use , the lamp bulb may cause injury. Replacing the Lamp After your lamp has...
User Manual
Page 47
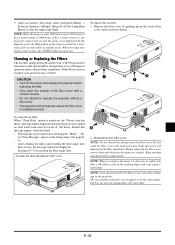
... the air-filter: When "Clean Filter" option is not displayed. ter Clean Message" option on the remote control for resetting the filter usage time. See page E-37 for a minimum of the VT45 Projector free from the projector cabinet. CANCEL MENU SELECT SOURCE AUTO ADJUST STATUPSOWEORN STAND BY ENT ER 2. Do not wash the filter...
... the air-filter: When "Clean Filter" option is not displayed. ter Clean Message" option on the remote control for resetting the filter usage time. See page E-37 for a minimum of the VT45 Projector free from the projector cabinet. CANCEL MENU SELECT SOURCE AUTO ADJUST STATUPSOWEORN STAND BY ENT ER 2. Do not wash the filter...
User Manual
Page 48
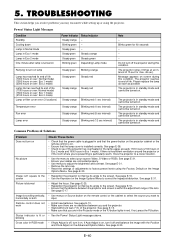
... on No picture Image isn't square to the screen. See page E-33. • Reposition the projector to improve its angle to the screen Picture is blurred Image is scrolling vertically, horizontally or both Remote control does not work Status indicator is lit or blinking Cross color in RGB mode Check These... Items • Check that the power cable is plugged in and that the power button on the projector cabinet or the remote control is in standby mode and cannot be turned on . Steady green Steady orange Steady green Steady green Blinking green Depending Lamp ...
... on No picture Image isn't square to the screen. See page E-33. • Reposition the projector to improve its angle to the screen Picture is blurred Image is scrolling vertically, horizontally or both Remote control does not work Status indicator is lit or blinking Cross color in RGB mode Check These... Items • Check that the power cable is plugged in and that the power button on the projector cabinet or the remote control is in standby mode and cannot be turned on . Steady green Steady orange Steady green Steady green Blinking green Depending Lamp ...


