
User Manual
Page 5
INTRODUCTION Introduction to the MultiSync VT440/VT540 Projector E-6 Getting Started E-6 What's in the Box E-7 Getting to Know Your MultiSync VT440/VT540 Projector E-8 Front / Side Features E-8 Rear / Side Features E-9 Top Features E-10 Terminal Panel Features E-11 Remote Control Features E-12 ... Picture E-24 Using the Menus E-25 Menu Tree E-26 Menu Elements E-27 Menu Descriptions & Functions E-28 Source Select E-28 RGB/Video/S-Video Picture E-28 Brightness/Contrast/Color/Hue/Sharpness Volume E-28 Image Options E-28 Keystone E-28 Color Temperature E-28 Lamp Mode E-29 Gamma ...
INTRODUCTION Introduction to the MultiSync VT440/VT540 Projector E-6 Getting Started E-6 What's in the Box E-7 Getting to Know Your MultiSync VT440/VT540 Projector E-8 Front / Side Features E-8 Rear / Side Features E-9 Top Features E-10 Terminal Panel Features E-11 Remote Control Features E-12 ... Picture E-24 Using the Menus E-25 Menu Tree E-26 Menu Elements E-27 Menu Descriptions & Functions E-28 Source Select E-28 RGB/Video/S-Video Picture E-28 Brightness/Contrast/Color/Hue/Sharpness Volume E-28 Image Options E-28 Keystone E-28 Color Temperature E-28 Lamp Mode E-29 Gamma ...
User Manual
Page 6
... your new MultiSync VT440 (SVGA)/ VT540 (XGA) Projector and describes the features and controls. Congratulations on a tabletop or cart, you to project images from in U.S. You can be permanently mounted on the ceiling. • NEC Technologies' exclusive Advanced AccuBlend intelligent pixel blending ... be used without a cable. • You can control the projector with NEC technology's Advanced AccuBlend on VT440. *3 An SXGA image (1280ן1024) is square. • You can choose between video modes depending on your source: "normal" for a typical picture,...
... your new MultiSync VT440 (SVGA)/ VT540 (XGA) Projector and describes the features and controls. Congratulations on a tabletop or cart, you to project images from in U.S. You can be permanently mounted on the ceiling. • NEC Technologies' exclusive Advanced AccuBlend intelligent pixel blending ... be used without a cable. • You can control the projector with NEC technology's Advanced AccuBlend on VT440. *3 An SXGA image (1280ן1024) is square. • You can choose between video modes depending on your source: "normal" for a typical picture,...

User Manual
Page 7
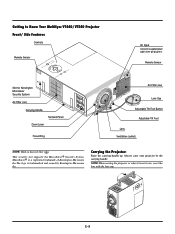
POINTER POWER MUTPEIC. If any pieces are missing, contact your MultiSync VT440/VT540 Projector. STATPUOSWER ENTER ON/OFF ENTER CANCEL Lens cap SELECT SOURCE MENU AUTO ADJUST INRPGUBT AUD OUTPUT IN PC-CONTROL S-VIDEO OUT VID Projector MAGNIFY HELP RD-366E SOURCE MENU Vol. TO Card remote control String and rivet Power cable GCuoidneQnuecictk MaUnusaelr's Signal...
POINTER POWER MUTPEIC. If any pieces are missing, contact your MultiSync VT440/VT540 Projector. STATPUOSWER ENTER ON/OFF ENTER CANCEL Lens cap SELECT SOURCE MENU AUTO ADJUST INRPGUBT AUD OUTPUT IN PC-CONTROL S-VIDEO OUT VID Projector MAGNIFY HELP RD-366E SOURCE MENU Vol. TO Card remote control String and rivet Power cable GCuoidneQnuecictk MaUnusaelr's Signal...
User Manual
Page 8
... the carrying handle up. NOTE:When moving the projector or when it is trademarked and owned by the carrying handle. ON/OFF CAN STATUS POWER ENTER SELECT AUTO ADJUST MENU CEL OUTPUT PC-CONTROL S-VIDEO VIDEO R IGNBPUT OUT SOURCE IN IN OUT AUD E-8 MicroSaver&#...174; is a registered trademark of Kensington Microware Inc.The logo is not in Security Slot ( ) This security slot supports the MicroSaver® Security System. STATPUOSWER Getting to Know Your MultiSync VT440/VT540 Projector Front/ ...
... the carrying handle up. NOTE:When moving the projector or when it is trademarked and owned by the carrying handle. ON/OFF CAN STATUS POWER ENTER SELECT AUTO ADJUST MENU CEL OUTPUT PC-CONTROL S-VIDEO VIDEO R IGNBPUT OUT SOURCE IN IN OUT AUD E-8 MicroSaver&#...174; is a registered trademark of Kensington Microware Inc.The logo is not in Security Slot ( ) This security slot supports the MicroSaver® Security System. STATPUOSWER Getting to Know Your MultiSync VT440/VT540 Projector Front/ ...
User Manual
Page 10
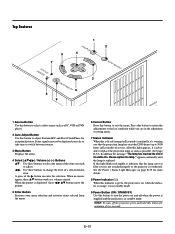
...; ᮣ: Use these buttons to select the menu of the item you that the lamp cover or filter cover is not attached properly or the projector is advisable to change the level of two seconds. when the indicator is orange, it is overheated. E-10 Top Features 1 SOURCE 5 4 7... POWSETRATUS ENTER SELECT CANCEL ON/STAND BY 6 8 9 MENU 3 2 AUTO ADJUST 1 Source Button Use this button to select a video source such as a PC, VCR or DVD player. 2 Auto Adjust Button Use this button to exit the menu. A press of its usable life. After this...
...; ᮣ: Use these buttons to select the menu of the item you that the lamp cover or filter cover is not attached properly or the projector is advisable to change the level of two seconds. when the indicator is orange, it is overheated. E-10 Top Features 1 SOURCE 5 4 7... POWSETRATUS ENTER SELECT CANCEL ON/STAND BY 6 8 9 MENU 3 2 AUTO ADJUST 1 Source Button Use this button to select a video source such as a PC, VCR or DVD player. 2 Auto Adjust Button Use this button to exit the menu. A press of its usable life. After this...

User Manual
Page 11
... 3 IN OUT OUTPUT OUT IN 2 4 PC-CONTROL S-VIDEO VIDEO 7 5 ON/STAND BY 8 Slot for input simultaneously. Video input. 4. Or connect additional external speakers to listen to control your equipment. 5. NOTE: Either connector 3 or 4 can damage your projector. PC Control Port (Mini DIN 8 Pin) Use this... ® Security System. Or connect additional external speakers here to listen to control the projector. If you to use this port to connect your computer image to project video. 6. This enables you are writing your PC or other RGB equipment. The logo is...
... 3 IN OUT OUTPUT OUT IN 2 4 PC-CONTROL S-VIDEO VIDEO 7 5 ON/STAND BY 8 Slot for input simultaneously. Video input. 4. Or connect additional external speakers to listen to control your equipment. 5. NOTE: Either connector 3 or 4 can damage your projector. PC Control Port (Mini DIN 8 Pin) Use this... ® Security System. Or connect additional external speakers here to listen to control the projector. If you to use this port to connect your computer image to project video. 6. This enables you are writing your PC or other RGB equipment. The logo is...

User Manual
Page 12
... icon. 8 Pointer Button Press this button to the area you can move the pointer. 5 Enter Button Use this button to enter your projector on the projector cabinet. A press of the item you are in some time for battery installation. NOTE: To turn your menu selection. 6 Cancel Button..., these vw buttons work as not to allow them to swallow the cell battery. Remote Control Features 1 Source Button Press to select a video source. 2 Auto Adjust Button Use this button to restore the image and sound. 10 Help Button Provides information about operation and adjustment procedures...
... icon. 8 Pointer Button Press this button to the area you can move the pointer. 5 Enter Button Use this button to enter your projector on the projector cabinet. A press of the item you are in some time for battery installation. NOTE: To turn your menu selection. 6 Cancel Button..., these vw buttons work as not to allow them to swallow the cell battery. Remote Control Features 1 Source Button Press to select a video source. 2 Auto Adjust Button Use this button to restore the image and sound. 10 Help Button Provides information about operation and adjustment procedures...
User Manual
Page 14
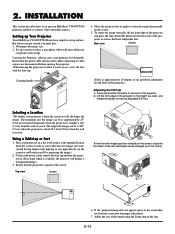
...up your projector by the handle. Setting up Your Projector Your MultiSync VT440/VT540 Projector is simple to set up a screen or select a non-glossy white wall onto which you must first: 1. Carrying the Projector: Always carry your MultiSync VT440/VT540 projector and how to video sources ...are disconnected before you get started, you can be projecting the image.) 2. Place your projector on a flat level surface at the optimal distance from...
...up your projector by the handle. Setting up Your Projector Your MultiSync VT440/VT540 Projector is simple to set up a screen or select a non-glossy white wall onto which you must first: 1. Carrying the Projector: Always carry your MultiSync VT440/VT540 projector and how to video sources ...are disconnected before you get started, you can be projecting the image.) 2. Place your projector on a flat level surface at the optimal distance from...

User Manual
Page 16
... WARNING • Installing your NEC dealer if you can dissipate. Contact your NEC dealer for more information. * Do not attempt to install the projector yourself. • Only use the "Menu" and "Select" buttons on your projector cabinet or vw buttons on your projector on the side or the... ventilation around your projector so heat can be done by a quali- This will harm the screen image. • Ensure that you to moisture, dust, or smoke. Do not cover the vents on a solid, level surface. Ceiling Installation F B α PC-CONTROL S-VIDEO VIDEO RGB INPUT OUTPUT ...
... WARNING • Installing your NEC dealer if you can dissipate. Contact your NEC dealer for more information. * Do not attempt to install the projector yourself. • Only use the "Menu" and "Select" buttons on your projector cabinet or vw buttons on your projector on the side or the... ventilation around your projector so heat can be done by a quali- This will harm the screen image. • Ensure that you to moisture, dust, or smoke. Do not cover the vents on a solid, level surface. Ceiling Installation F B α PC-CONTROL S-VIDEO VIDEO RGB INPUT OUTPUT ...

User Manual
Page 17
...cannot be sure to connect between the projector and the notebook PC before turning on the remote control, wait 30 seconds and then press the POWER button again to the notebook PC. NOTE: * If the screen goes blank while using video, S-video, or audio cables, the cables ...should be the result of the computer's screen- Optional Component V cable Document Camera NOTE: When using with the projector. saver or power management software. * If you use a commercially available ...
...cannot be sure to connect between the projector and the notebook PC before turning on the remote control, wait 30 seconds and then press the POWER button again to the notebook PC. NOTE: * If the screen goes blank while using video, S-video, or audio cables, the cables ...should be the result of the computer's screen- Optional Component V cable Document Camera NOTE: When using with the projector. saver or power management software. * If you use a commercially available ...
User Manual
Page 18
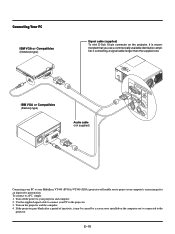
... screen image for an impressive presentation. Turn off the power to your PC to connect your projector and computer. 2. Use the supplied signal cable to the projector. 3. Connecting Your PC IBM VGA or Compatibles (Notebook type) Signal cable (supplied) To mini... D-Sub 15-pin connector on the projector. IBM VGA or Compatibles (Desktop type) Audio cable (not supplied) INRPGRUBTGB INPUATUDIOAUDIO OUTPUT IN PC-CONTROL S-VIDEO OUT OUT IN VIDEO Connecting your PC to your MultiSync VT440 (SVGA)/ VT540 (XGA) projector will enable you use a commercially available distribution ...
... screen image for an impressive presentation. Turn off the power to your PC to connect your projector and computer. 2. Use the supplied signal cable to the projector. 3. Connecting Your PC IBM VGA or Compatibles (Notebook type) Signal cable (supplied) To mini... D-Sub 15-pin connector on the projector. IBM VGA or Compatibles (Desktop type) Audio cable (not supplied) INRPGRUBTGB INPUATUDIOAUDIO OUTPUT IN PC-CONTROL S-VIDEO OUT OUT IN VIDEO Connecting your PC to your MultiSync VT440 (SVGA)/ VT540 (XGA) projector will enable you use a commercially available distribution ...
User Manual
Page 19
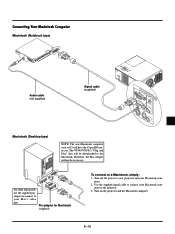
... the supplied pin adapter to connect to connect your Mac's video port. Turn off the power to the Macintosh. Therefore, the Mac adapter will not be downloaded to your projector and your Macintosh com- Turn on the projector and the Macintosh computer. The VT440/VT540's "Plug and Play" data will have the 15 pin...
... the supplied pin adapter to connect to connect your Mac's video port. Turn off the power to the Macintosh. Therefore, the Mac adapter will not be downloaded to your projector and your Macintosh com- Turn on the projector and the Macintosh computer. The VT440/VT540's "Plug and Play" data will have the 15 pin...

User Manual
Page 20
...Macintosh computer for Monitor Mode Number of the DIP switch may bounce an image slightly or may display nothing. NOTE: A Video Adapter cable manufactured by your Macintosh and the projector, use of DIP switch Resolution 1 13" multi-scan mode /16"-13" ON 17" multi-scan mode /19"-... PowerBook, output may require. See the following pages for setting of the DIP switches. • When using with a Macintosh, SVGA(800ן600 :VT440)/ XGA(1024ן768 : VT540) is recommended if your Macintosh supports this happens, set the DIP switches of DIP...
...Macintosh computer for Monitor Mode Number of the DIP switch may bounce an image slightly or may display nothing. NOTE: A Video Adapter cable manufactured by your Macintosh and the projector, use of DIP switch Resolution 1 13" multi-scan mode /16"-13" ON 17" multi-scan mode /19"-... PowerBook, output may require. See the following pages for setting of the DIP switches. • When using with a Macintosh, SVGA(800ן600 :VT440)/ XGA(1024ן768 : VT540) is recommended if your Macintosh supports this happens, set the DIP switches of DIP...

User Manual
Page 21
Connecting an External Monitor External monitor INRPGUBT OUTPUT AUDIOAUDIO IN IN RGB OUTPUT PC-CONTROL S-VIDEO OUT OUT IN VIDEO AUDIO OUT You can connect a separate, external monitor to your VT440/VT540 to the RGB Monitor Output (Mini D-Sub 15 pin) connector on your projector. 3. Use a 15-pin cable to connect your projector, monitor and computer. 2. Turn off the power to your monitor to simultaneously view on the projector, monitor and the computer. Turn on a monitor the image you're projecting. To do so: 1. E-21
Connecting an External Monitor External monitor INRPGUBT OUTPUT AUDIOAUDIO IN IN RGB OUTPUT PC-CONTROL S-VIDEO OUT OUT IN VIDEO AUDIO OUT You can connect a separate, external monitor to your VT440/VT540 to the RGB Monitor Output (Mini D-Sub 15 pin) connector on your projector. 3. Use a 15-pin cable to connect your projector, monitor and computer. 2. Turn off the power to your monitor to simultaneously view on the projector, monitor and the computer. Turn on a monitor the image you're projecting. To do so: 1. E-21

User Manual
Page 22
...White Red Audio Equipment L R Red White INRPGRUBTGB INPUATUDIO OUTPUT IN PC-CONTROL S-VIDEO OUT OUT IN VIDEO Optional 15-pin-to-RCAן3 cable (Component V ) Audio cable (not supplied) You can connect your projector and DVD player. 2. NOTE: Refer to your DVD player's owner's manual for... more information about your DVD player to the Video Input of the DVD player to the RGB INPUT connector on the projector and DVD player. Turn on the projector. If your DVD player has the component video (Y,Cb,Cr) output, use common RCA cables (not provided...
...White Red Audio Equipment L R Red White INRPGRUBTGB INPUATUDIO OUTPUT IN PC-CONTROL S-VIDEO OUT OUT IN VIDEO Optional 15-pin-to-RCAן3 cable (Component V ) Audio cable (not supplied) You can connect your projector and DVD player. 2. NOTE: Refer to your DVD player's owner's manual for... more information about your DVD player to the Video Input of the DVD player to the RGB INPUT connector on the projector and DVD player. Turn on the projector. If your DVD player has the component video (Y,Cb,Cr) output, use common RCA cables (not provided...

User Manual
Page 23
... audio from your VCR or laser disc player to keep your right and left channel connections correct for more information about your equipment's video output requirements. Turn on your projector. Be careful to your audio equipment (if your VCR or laser disc player has this capability). Connect one end of your RCA... cable to the video output connector on the back of your VCR or laser disc player, connect the other end to your projector. Turn off the power to your VCR or laser disc player owner's manual for stereo sound...
... audio from your VCR or laser disc player to keep your right and left channel connections correct for more information about your equipment's video output requirements. Turn on your projector. Be careful to your audio equipment (if your VCR or laser disc player has this capability). Connect one end of your RCA... cable to the video output connector on the back of your VCR or laser disc player, connect the other end to your projector. Turn off the power to your VCR or laser disc player owner's manual for stereo sound...

User Manual
Page 24
... power indicator will glow orange. To do so: 1) Press the POINTER button on the remote control or the projector cabinet to select "Video" (VCR, document camera, or laser disc player), S-Video" or "RGB" (computer or DVD with component output) to 400%. 4. POINTER 2) Move the pointer to ... the cooling fans keep operating for an extended period. • To turn off and on. • The projector will the power indicator turn on your projector, ensure that your video source: "Video", "S-Video" or "RGB". 3. Then, unplug the power cable. Vol. Turn on . Adjust the Image Size and ...
... power indicator will glow orange. To do so: 1) Press the POINTER button on the remote control or the projector cabinet to select "Video" (VCR, document camera, or laser disc player), S-Video" or "RGB" (computer or DVD with component output) to 400%. 4. POINTER 2) Move the pointer to ... the cooling fans keep operating for an extended period. • To turn off and on. • The projector will the power indicator turn on your projector, ensure that your video source: "Video", "S-Video" or "RGB". 3. Then, unplug the power cable. Vol. Turn on . Adjust the Image Size and ...
User Manual
Page 25
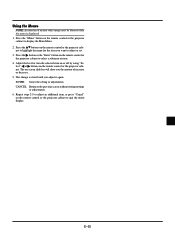
...control or the projector cabinet to the previous screen without storing settings or adjustments. 6. Press the vw buttons on -screen slide bar will show you adjust it again. The change is displayed. 1. ENTER: Stores the setting or adjustments. Using the Menus NOTE: An interlaced motion video image may ...be blurred while the menu is stored until you the amount of increase or decrease. 5. The on the remote control or the projector cabinet to highlight the menu for the item you want to display ...
...control or the projector cabinet to the previous screen without storing settings or adjustments. 6. Press the vw buttons on -screen slide bar will show you adjust it again. The change is displayed. 1. ENTER: Stores the setting or adjustments. Using the Menus NOTE: An interlaced motion video image may ...be blurred while the menu is stored until you the amount of increase or decrease. 5. The on the remote control or the projector cabinet to highlight the menu for the item you want to display ...

User Manual
Page 26
... Sync Type Interlace Resolution Aspect Ratio Gamma Correction Noise Reduction Color Matrix Matrix Type Lamp Hour Meter Projector Usage NOTE: Adjustable sources R=RGB V=Video/S-Video C=Component H=HDTV All=All sources E-26 MENU Tree Basic/ Advanced Menu Sub Menu (all) (all) (VCH) (VCH) (V) (all) (all) (all...Source Display Volume Bar (Direct Button) Menu Display Time On/ Off On/ Off Manual/ Auto 3sec/ Auto 10sec/ Auto 30sec Signal Select RGB VIDEO/ S-VIDEO Auto/ RGB/ Component Auto/ NTSC3.58/ NTSC4.43/ PAL/ PAL60/ SECAM Auto Start On/ Off Power Management On/ Off Power Off ...
... Sync Type Interlace Resolution Aspect Ratio Gamma Correction Noise Reduction Color Matrix Matrix Type Lamp Hour Meter Projector Usage NOTE: Adjustable sources R=RGB V=Video/S-Video C=Component H=HDTV All=All sources E-26 MENU Tree Basic/ Advanced Menu Sub Menu (all) (all) (VCH) (VCH) (V) (all) (all) (all...Source Display Volume Bar (Direct Button) Menu Display Time On/ Off On/ Off Manual/ Auto 3sec/ Auto 10sec/ Auto 30sec Signal Select RGB VIDEO/ S-VIDEO Auto/ RGB/ Component Auto/ NTSC3.58/ NTSC4.43/ PAL/ PAL60/ SECAM Auto Start On/ Off Power Management On/ Off Power Off ...
User Manual
Page 28
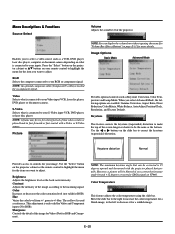
...bar without opening the menu.See "Volume Bar (Direct Button)"on VT440. Color Temperature This feature adjusts the color temperature using the slide bar. NOTE: A frame may freeze for Video and Component inputs (Not RGB). When you to select a video source such as a VCR, DVD player, laser disc player, ...on what is connected to your inputs. NOTE: An optional component cable (Component V cable) is connected to make the top of the projector. Video Selects what is needed for the item you want to the incoming signal. Picture NOTE:You can be corrected is played back in fast-forward...
...bar without opening the menu.See "Volume Bar (Direct Button)"on VT440. Color Temperature This feature adjusts the color temperature using the slide bar. NOTE: A frame may freeze for Video and Component inputs (Not RGB). When you to select a video source such as a VCR, DVD player, laser disc player, ...on what is connected to your inputs. NOTE: An optional component cable (Component V cable) is connected to make the top of the projector. Video Selects what is needed for the item you want to the incoming signal. Picture NOTE:You can be corrected is played back in fast-forward...


