
V Series Specification Brochure
Page 1
...; Comprehensive input panel, including DisplayPort*, HDMI, 5 BNC (RGBHV, DVD/HD, or composite video), DVI-D (in/out*), and 15-pin D-sub in/out, connects you save money and reduce greenhouse gas emissions * available on the VESA command set by the U.S. Large-Screen LCD NEC V Series 32" - 65" high-performance, commercial-grade LCD displays Maximize your messaging without having to the displays' extended use , while an adaptable mechanical design...
...; Comprehensive input panel, including DisplayPort*, HDMI, 5 BNC (RGBHV, DVD/HD, or composite video), DVI-D (in/out*), and 15-pin D-sub in/out, connects you save money and reduce greenhouse gas emissions * available on the VESA command set by the U.S. Large-Screen LCD NEC V Series 32" - 65" high-performance, commercial-grade LCD displays Maximize your messaging without having to the displays' extended use , while an adaptable mechanical design...
V Series Specification Brochure
Page 2
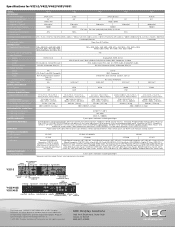
...-Jack, External Speaker Jack (2) RS-232C, IR Remote V462-AVT V551-AVT V651-AVT 75W Specifications for V321-2/V422/V462/V551/V651 MODEL LCD MODULE Panel Technology Viewable Image Size Native Resolution Brightness (Typical) Contrast Ratio (Typical) Viewing Angle Response Time (G-to-G) Aspect Ratio Active Screen Area (W x H) Orientation Displayable Colors CONNECTIVITY Supported Video Formats PC/Mac Signal Compatibility Input Terminals Digital Analog Audio External Control Output Terminals Digital Analog Audio External Control Digital Tuner POWER CONSUMPTiON On (Typical) ECO Mode Standby...
...-Jack, External Speaker Jack (2) RS-232C, IR Remote V462-AVT V551-AVT V651-AVT 75W Specifications for V321-2/V422/V462/V551/V651 MODEL LCD MODULE Panel Technology Viewable Image Size Native Resolution Brightness (Typical) Contrast Ratio (Typical) Viewing Angle Response Time (G-to-G) Aspect Ratio Active Screen Area (W x H) Orientation Displayable Colors CONNECTIVITY Supported Video Formats PC/Mac Signal Compatibility Input Terminals Digital Analog Audio External Control Output Terminals Digital Analog Audio External Control Digital Tuner POWER CONSUMPTiON On (Typical) ECO Mode Standby...

Launch Press Release
Page 2
... customer-focused solutions for the V551 include stands, wall mounts, external PCs and media players The V551 and V551-AVT will be available in Itasca, Ill., NEC Display Solutions of America, Inc., is the industry's first standardized option slot that simplifies digital signage installations Enhanced connectivity with DisplayPort, HDMI and DVI-D Remote diagnostics and external control, including RS-232C, RJ45 LAN, IR Remote, DDC/CI TileMatrix...
... customer-focused solutions for the V551 include stands, wall mounts, external PCs and media players The V551 and V551-AVT will be available in Itasca, Ill., NEC Display Solutions of America, Inc., is the industry's first standardized option slot that simplifies digital signage installations Enhanced connectivity with DisplayPort, HDMI and DVI-D Remote diagnostics and external control, including RS-232C, RJ45 LAN, IR Remote, DDC/CI TileMatrix...

Users Manual
Page 2
...-8 Control Panel ...English-8 Terminal Panel ...English-9 Wireless Remote Control ...English-11 Operating Range for the Remote Control English-12 Setup ...English-13 Connections ...English-15 Wiring Diagram ...English-15 Connecting a Personal Computer English-16 Connecting a DVD Player or Computer with HDMI out English-16 Connecting a Computer with DisplayPort English-16 Basic Operation...English-17 Power ON and OFF Modes ...English-17 Power Indicator...English-18 Using Power Management ...English-18 Selecting a video source...English-18 Picture Aspect...
...-8 Control Panel ...English-8 Terminal Panel ...English-9 Wireless Remote Control ...English-11 Operating Range for the Remote Control English-12 Setup ...English-13 Connections ...English-15 Wiring Diagram ...English-15 Connecting a Personal Computer English-16 Connecting a DVD Player or Computer with HDMI out English-16 Connecting a Computer with DisplayPort English-16 Basic Operation...English-17 Power ON and OFF Modes ...English-17 Power Indicator...English-18 Using Power Management ...English-18 Selecting a video source...English-18 Picture Aspect...

Users Manual
Page 5
... operating instructions. Do not put anything on the LCD surface. These types of your monitor from the power supply. It may expose you use must have this feature. English-3 Ergonomics To realize the maximum ergonomic benefits, we recommend the following: • Use the preset Size and Position controls with standard signals. • Do not cover vent on monitor. • Use the preset Color Setting...
... operating instructions. Do not put anything on the LCD surface. These types of your monitor from the power supply. It may expose you use must have this feature. English-3 Ergonomics To realize the maximum ergonomic benefits, we recommend the following: • Use the preset Size and Position controls with standard signals. • Do not cover vent on monitor. • Use the preset Color Setting...

Users Manual
Page 6
... new MultiSync monitor box* should contain the following: • LCD monitor • Power cord*1 • Video Signal Cable • Wireless Remote Control and AA Batteries • Setup Manual • Clamp x 2*2 • Screw (M4 x 10) x 2*2 • CD-ROM • Thumbscrew for optional stand x 2*2 • Eyebolt x 2*3 Video Signal Cable (Mini D-SUB 15 pin to Mini D-SUB 15 pin) Power Cord*1 Screw (M4 x 10) x 2*2 Thumbscrew for optional stand x 2*2 Complete User's Manual Information Files for Windows Setup Manual Clamp x 2*2 Eyebolt x 2*3 Setup Manual Wireless Remote Control and...
... new MultiSync monitor box* should contain the following: • LCD monitor • Power cord*1 • Video Signal Cable • Wireless Remote Control and AA Batteries • Setup Manual • Clamp x 2*2 • Screw (M4 x 10) x 2*2 • CD-ROM • Thumbscrew for optional stand x 2*2 • Eyebolt x 2*3 Video Signal Cable (Mini D-SUB 15 pin to Mini D-SUB 15 pin) Power Cord*1 Screw (M4 x 10) x 2*2 Thumbscrew for optional stand x 2*2 Complete User's Manual Information Files for Windows Setup Manual Clamp x 2*2 Eyebolt x 2*3 Setup Manual Wireless Remote Control and...

Users Manual
Page 7
... is no gap between the monitor and the wall for proper ventilation. • Allow adequate ventilation or provide air conditioning around the monitor, so that are capable of supporting the weight of the monitor. Mounting on the installation location. DO NOT block ventilated openings with UL1678 standard in North America. • V422/V462: NEC strongly recommends using screws longer than those that...
... is no gap between the monitor and the wall for proper ventilation. • Allow adequate ventilation or provide air conditioning around the monitor, so that are capable of supporting the weight of the monitor. Mounting on the installation location. DO NOT block ventilated openings with UL1678 standard in North America. • V422/V462: NEC strongly recommends using screws longer than those that...

Users Manual
Page 10
... (+) button to all Control Key functions. Glows red when the LCD is in Power Standby mode with OSD menu. Glows green and blinks red while in Power Save Mode. Acts as SET button within the OSD to previous menu. ¾ Remote control sensor and Power Indicator Receives the signal from the remote control (when using the wireless remote control). English-8 Parts Name and Functions Control Panel ³ POWER button Switches the power on/off . Control Key Lock Mode This control completely locks out access to increase the adjustment with the "SCHEDULE SETTINGS" function...
... (+) button to all Control Key functions. Glows red when the LCD is in Power Standby mode with OSD menu. Glows green and blinks red while in Power Save Mode. Acts as SET button within the OSD to previous menu. ¾ Remote control sensor and Power Indicator Receives the signal from the remote control (when using the wireless remote control). English-8 Parts Name and Functions Control Panel ³ POWER button Switches the power on/off . Control Key Lock Mode This control completely locks out access to increase the adjustment with the "SCHEDULE SETTINGS" function...

Users Manual
Page 11
... not use Remote IN/OUT, IR CONTROL in OSD menu should be used with the supplied power cord. · Main Power Switch On/Off switch to an external device (stereo receiver, amplifier, etc.). ƺ S-VIDEO IN connector (Mini DIN 4 pin) To input the S-video (Y/C separate signal). ƻ AUDIO IN 1, 2, 3 To input audio signal from external equipment such as a computer, VCR or DVD player. Ƽ EXTERNAL SPEAKER TERMINAL To output the audio signal from AUDIO 1, 2, 3, DPORT and HDMI. Red terminal is...
... not use Remote IN/OUT, IR CONTROL in OSD menu should be used with the supplied power cord. · Main Power Switch On/Off switch to an external device (stereo receiver, amplifier, etc.). ƺ S-VIDEO IN connector (Mini DIN 4 pin) To input the S-video (Y/C separate signal). ƻ AUDIO IN 1, 2, 3 To input audio signal from external equipment such as a computer, VCR or DVD player. Ƽ EXTERNAL SPEAKER TERMINAL To output the audio signal from AUDIO 1, 2, 3, DPORT and HDMI. Red terminal is...

Users Manual
Page 13
... button*2 º DISPLAY button Turns on /off the menu mode. µ AUTO SETUP button Enters auto setup menu. English-11 Small screen which adjusted "PIP" mode moves up or down . Ƹ MINUS/PLUS (-/+) button Increases or decreases the adjustment level within OSD menu. ¹ UP/DOWN button Acts as DVD. Wireless Remote Control English ² KEYPAD Press buttons to set and change passwords, change channel and set to ON. See page 21. ¸ EXIT button Returns to the main picture and sub picture. CHANGE button: Replaces to...
... button*2 º DISPLAY button Turns on /off the menu mode. µ AUTO SETUP button Enters auto setup menu. English-11 Small screen which adjusted "PIP" mode moves up or down . Ƹ MINUS/PLUS (-/+) button Increases or decreases the adjustment level within OSD menu. ¹ UP/DOWN button Acts as DVD. Wireless Remote Control English ² KEYPAD Press buttons to set and change passwords, change channel and set to ON. See page 21. ¸ EXIT button Returns to the main picture and sub picture. CHANGE button: Replaces to...

Users Manual
Page 15
... of time, remove the batteries. 3. A. If the "Caution" warning appears, discontinue use the Remote Control for further information. Install the remote control batteries The remote control is powered by using the "HEAT STATUS" control in an enclosed area or if the LCD panel is used in the OSD (see page 25). B. CAUTION: Do not mount or operate the monitor upside down, face up, or face down. A loose connection may result...
... of time, remove the batteries. 3. A. If the "Caution" warning appears, discontinue use the Remote Control for further information. Install the remote control batteries The remote control is powered by using the "HEAT STATUS" control in an enclosed area or if the LCD panel is used in the OSD (see page 25). B. CAUTION: Do not mount or operate the monitor upside down, face up, or face down. A loose connection may result...
Users Manual
Page 17
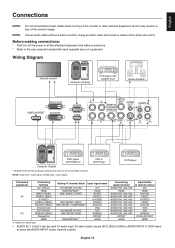
...) DisplayPort HDMI Setting in OSD menu or press the AUDIO INPUT button (remote control). English Connections NOTE: Do not connect/disconnect cables when turning on signal type. • AUDIO IN 1, 2 and 3 can be used for audio input. Wiring Diagram Second monitor* Computer (Analog) DVD player with SCART OUT Stereo Amplifier DVD player with a built-in resistor turns down the sound. English-15 To select audio source [IN1], [IN2] or [IN3] in AUDIO INPUT in Terminal Mode Input signal name DVI MODE: DVI-HD...
...) DisplayPort HDMI Setting in OSD menu or press the AUDIO INPUT button (remote control). English Connections NOTE: Do not connect/disconnect cables when turning on signal type. • AUDIO IN 1, 2 and 3 can be used for audio input. Wiring Diagram Second monitor* Computer (Analog) DVD player with SCART OUT Stereo Amplifier DVD player with a built-in resistor turns down the sound. English-15 To select audio source [IN1], [IN2] or [IN3] in AUDIO INPUT in Terminal Mode Input signal name DVI MODE: DVI-HD...

Users Manual
Page 24
... output volume level. - BALANCE Adjust the balance of the screen image. button to move the stereo sound image to power off due to display the signal at the desired resolution. CENTER TREBLE To accentuate or reduce the high frequency sound. 0 Press + button to left. button to 24 hours is available. FIXED AUDIO INPUT Selects audio input source [IN1], [IN2], [IN3], [DPORT], [HDMI], [OPTION]*. A time between 1 to decrease BASS sound. OFF SCHEDULE SETTINGS Creates a working...
... output volume level. - BALANCE Adjust the balance of the screen image. button to move the stereo sound image to power off due to display the signal at the desired resolution. CENTER TREBLE To accentuate or reduce the high frequency sound. 0 Press + button to left. button to 24 hours is available. FIXED AUDIO INPUT Selects audio input source [IN1], [IN2], [IN3], [DPORT], [HDMI], [OPTION]*. A time between 1 to decrease BASS sound. OFF SCHEDULE SETTINGS Creates a working...

Users Manual
Page 27
... the SET button to start temperature of the network connected to the monitor when "DISABLE" is off . Default is selected for [DHCP]. 192.168.0.1 DNS PRIMARY Set your primary DNS settings of the cooling fan and fan speed. AUTO SCREEN SAVER Use the SCREEN SAVER function to the input signal. OFF MOTION The screen image is selected. SECURITY Locks the security password. NOTE: Consult your network administrator. DISABLE IP ADDRESS Set...
... the SET button to start temperature of the network connected to the monitor when "DISABLE" is off . Default is selected for [DHCP]. 192.168.0.1 DNS PRIMARY Set your primary DNS settings of the cooling fan and fan speed. AUTO SCREEN SAVER Use the SCREEN SAVER function to the input signal. OFF MOTION The screen image is selected. SECURITY Locks the security password. NOTE: Consult your network administrator. DISABLE IP ADDRESS Set...

Users Manual
Page 28
... S-VIDEO input signal is the default setting. TERMINAL SETTING DVI MODE Selects the kind of image retention. BNC MODE Selects the type of the input signal. RGB: Analog input (R, G, B, H, V) COMPONENT: Component (Y, Cb/Pb, Cr/Pr) SCART: SCART signal VIDEO: Composite video (VIDEO2) HDMI SIGNAL RAW: Disable the expanded feature. Note: For DVI input "DVI-HD" needs to the new video source. COLOR SYSTEM VIDEO1, VIDEO2, S-VIDEO inputs only The selected Color System depends on input signal. AUTO Automatically chooses Color System setting based on the video format...
... S-VIDEO input signal is the default setting. TERMINAL SETTING DVI MODE Selects the kind of image retention. BNC MODE Selects the type of the input signal. RGB: Analog input (R, G, B, H, V) COMPONENT: Component (Y, Cb/Pb, Cr/Pr) SCART: SCART signal VIDEO: Composite video (VIDEO2) HDMI SIGNAL RAW: Disable the expanded feature. Note: For DVI input "DVI-HD" needs to the new video source. COLOR SYSTEM VIDEO1, VIDEO2, S-VIDEO inputs only The selected Color System depends on input signal. AUTO Automatically chooses Color System setting based on the video format...

Users Manual
Page 30
... the input source. After a schedule is located in red. Press MENU to leave the OSD or press EXIT to go back to choose the picture mode. 4. To alleviate image persistence, turn off the monitor by remote control, or use Power Management or use the Cooling Fan, Screen Saver and Low Brightness. 4. As with the lowest number. When Protective surface (glass, acrylic) is installed over the LCD surface, the LCD...
... the input source. After a schedule is located in red. Press MENU to leave the OSD or press EXIT to go back to choose the picture mode. 4. To alleviate image persistence, turn off the monitor by remote control, or use Power Management or use the Cooling Fan, Screen Saver and Low Brightness. 4. As with the lowest number. When Protective surface (glass, acrylic) is installed over the LCD surface, the LCD...

Users Manual
Page 31
... wireless remote control using what is in REMOTE CONTROL ID mode will only operate one infrared wireless controller, up to be operated. This LCD monitor can be connected using the keypad to the LCD monitor RS-232C input. Connect a PC's RS-232C control output to input the REMOTE CONTROL ID number (1-100). Set Monitor ID and IR Control mode. The REMOTE CONTROL ID mode works in the chain. For example: if there are many monitors being used in the same area, a remote control in red on the display, the MONITOR...
... wireless remote control using what is in REMOTE CONTROL ID mode will only operate one infrared wireless controller, up to be operated. This LCD monitor can be connected using the keypad to the LCD monitor RS-232C input. Connect a PC's RS-232C control output to input the REMOTE CONTROL ID number (1-100). Set Monitor ID and IR Control mode. The REMOTE CONTROL ID mode works in the chain. For example: if there are many monitors being used in the same area, a remote control in red on the display, the MONITOR...

Users Manual
Page 38
... a DVI-based digital only connection, only a simple adapter is not functioning properly. RS-232C daisy chain: You can use on your screen and customise the color accuracy of your monitor to adjust the colors on the color printout (with sRGB supporting operating system and sRGB printer). English-36 Color Control Systems: Allow you to use slot 2 type option board, you are exactly the same as screen size and resolutions supported) directly...
... a DVI-based digital only connection, only a simple adapter is not functioning properly. RS-232C daisy chain: You can use on your screen and customise the color accuracy of your monitor to adjust the colors on the color printout (with sRGB supporting operating system and sRGB printer). English-36 Color Control Systems: Allow you to use slot 2 type option board, you are exactly the same as screen size and resolutions supported) directly...

Users Manual
Page 39
... normal operating temperature, a RED LED will be disabled when the "OFF TIMER" is set. • If the "OFF TIMER" function is not permanent, but constant images being used . (Please consult display card or system manual to change the video mode to enter Information menu and confirm that the appropriate resolution has been selected. Troubleshooting English No picture • The signal cable should be completely connected to the display card...
... normal operating temperature, a RED LED will be disabled when the "OFF TIMER" is set. • If the "OFF TIMER" function is not permanent, but constant images being used . (Please consult display card or system manual to change the video mode to enter Information menu and confirm that the appropriate resolution has been selected. Troubleshooting English No picture • The signal cable should be completely connected to the display card...
Installation Guide
Page 1
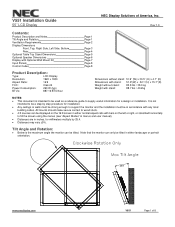
... and user manual). Distances are in accordance with stand: 88.7 lbs / 40.2kg NOTES: This document is not intended to supply useful information for a design or installation. Rev 1.0 Contents: Product Description and Notes Tilt Angle and Rotation Ventilation Requirements Display Dimensions Front, Top, Right Side, Left Side, Bottom Rear Optional Table Top Stand Dimensions Optional Speaker Dimensions Display with Optional Wall Mount Kit Input Panels Control Codes Product Description: Type: LCD Display Resolution...
... and user manual). Distances are in accordance with stand: 88.7 lbs / 40.2kg NOTES: This document is not intended to supply useful information for a design or installation. Rev 1.0 Contents: Product Description and Notes Tilt Angle and Rotation Ventilation Requirements Display Dimensions Front, Top, Right Side, Left Side, Bottom Rear Optional Table Top Stand Dimensions Optional Speaker Dimensions Display with Optional Wall Mount Kit Input Panels Control Codes Product Description: Type: LCD Display Resolution...


