
NP4000/NP4001 spec sheet
Page 2
...Projection Angle NP06FL NP07ZL NP08ZL NP09ZL NP10ZL Lens Zoom Focus F-number NP06FL NP07ZL NP08ZL NP09ZL NP10ZL Shift Keystone Correction NP4000: 0.7" DMD - IN THE BOX Remote control, batteries, power cord, 6-segment color wheel, user's manual on until the lamp is removed by Texas Instruments NP4000: XGA 1024 x 768 NP4001: WXGA 1280 x 768 NP4000/NP4001: UXGA 1600 x 1200 NP4000... touch image optimization. The lamp is switched off. DLP by Texas Instruments NP4001: 0.65" DMD (DC3)... protects the lamp during this period to projector. 64-step image magnification with detail. ...
...Projection Angle NP06FL NP07ZL NP08ZL NP09ZL NP10ZL Lens Zoom Focus F-number NP06FL NP07ZL NP08ZL NP09ZL NP10ZL Shift Keystone Correction NP4000: 0.7" DMD - IN THE BOX Remote control, batteries, power cord, 6-segment color wheel, user's manual on until the lamp is removed by Texas Instruments NP4000: XGA 1024 x 768 NP4001: WXGA 1280 x 768 NP4000/NP4001: UXGA 1600 x 1200 NP4000... touch image optimization. The lamp is switched off. DLP by Texas Instruments NP4001: 0.65" DMD (DC3)... protects the lamp during this period to projector. 64-step image magnification with detail. ...

NP4000/4001 UM
Page 10
...? ...1 o INTRODUCTION TO THE PROJECTOR 2 Features you'll enjoy:...2 p PART NAMES OF THE PROJECTOR 3 Front-right view ...3 Top View...4 Carrying the Projector...5 Bottom view...6 q TOP FEATURES...PROJECTOR 17 o SELECTING A LOCATION...18 p INSTALLING OR REMOVING THE OPTIONAL LENS 19 Removing the Existing Lens From the Projector... 19 Installing the New Lens ...21 Installing the New Lens Using the anti-theft screw 21 q THROW DISTANCE AND SCREEN SIZE 22 NP4000...THE SUPPLIED POWER CABLE 36 3. PROJECTING AN IMAGE (BASIC OPERATION 37 n TURNING ON THE PROJECTOR ...37 Note on Startup Screen ...
...? ...1 o INTRODUCTION TO THE PROJECTOR 2 Features you'll enjoy:...2 p PART NAMES OF THE PROJECTOR 3 Front-right view ...3 Top View...4 Carrying the Projector...5 Bottom view...6 q TOP FEATURES...PROJECTOR 17 o SELECTING A LOCATION...18 p INSTALLING OR REMOVING THE OPTIONAL LENS 19 Removing the Existing Lens From the Projector... 19 Installing the New Lens ...21 Installing the New Lens Using the anti-theft screw 21 q THROW DISTANCE AND SCREEN SIZE 22 NP4000...THE SUPPLIED POWER CABLE 36 3. PROJECTING AN IMAGE (BASIC OPERATION 37 n TURNING ON THE PROJECTOR ...37 Note on Startup Screen ...
NP4000/4001 UM
Page 52
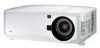
...the picture size, press Menu and select the Adjust menu using ▲or▼. Projecting an Image (Basic Operation) p Adjusting the Picture Position and Picture Size The Picture Position and Picture Size can be adjusted manually from the lens control panel or from the remote control unit. Press the directional key... as required to adjust Picture Position manually. 3. Press ◄or► to select Image Options followed by ▲or▼ to open the Adjust menu. Press Enter. 40 Press Enter ...
...the picture size, press Menu and select the Adjust menu using ▲or▼. Projecting an Image (Basic Operation) p Adjusting the Picture Position and Picture Size The Picture Position and Picture Size can be adjusted manually from the lens control panel or from the remote control unit. Press the directional key... as required to adjust Picture Position manually. 3. Press ◄or► to select Image Options followed by ▲or▼ to open the Adjust menu. Press Enter. 40 Press Enter ...
NP4000/4001 UM
Page 62
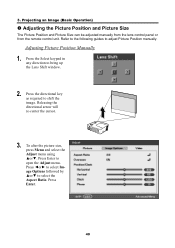
Press the Focus or Zoom button on the projector panel to the projected image. 50 4. Press Exit to return to display the appropriate window. 2. Adjusting by Using the OSD Control Panel 1. Convenient Features p Adjusting the Focus/Zoom Manually The focus and zoom can be adjusted manually from the projector focus/zoom panel or from the remote control unit. Refer to the following guides to adjust the focus and zoom manually. Adjust the focus/zoom using the increase and decrease buttons as required. 3.
Press the Focus or Zoom button on the projector panel to the projected image. 50 4. Press Exit to return to display the appropriate window. 2. Adjusting by Using the OSD Control Panel 1. Convenient Features p Adjusting the Focus/Zoom Manually The focus and zoom can be adjusted manually from the projector focus/zoom panel or from the remote control unit. Refer to the following guides to adjust the focus and zoom manually. Adjust the focus/zoom using the increase and decrease buttons as required. 3.
NP4000/4001 UM
Page 66
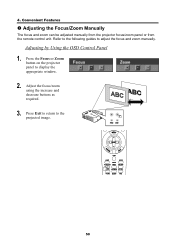
Convenient Features s Adjusting Position/Clock The Position/Clock/Phase and Keystone Correction can be adjusted manually from the projector's control panel or from the remote control unit. Adjusting Position/Clock/Phase by Using the OSD Control Panel 1. Adjust the Horizontal, Vertical, Clock, ..., Clock, or Phase. 3. From the Adjust menu, press ◄or► to select Image Options and scroll using ▲or▼ to the projected image. 54 Press the Menu button to display the Adjust menu. 2. Select the Adjust menu using the select buttons. 4. Refer to the following guides to...
Convenient Features s Adjusting Position/Clock The Position/Clock/Phase and Keystone Correction can be adjusted manually from the projector's control panel or from the remote control unit. Adjusting Position/Clock/Phase by Using the OSD Control Panel 1. Adjust the Horizontal, Vertical, Clock, ..., Clock, or Phase. 3. From the Adjust menu, press ◄or► to select Image Options and scroll using ▲or▼ to the projected image. 54 Press the Menu button to display the Adjust menu. 2. Select the Adjust menu using the select buttons. 4. Refer to the following guides to...
NP4000/4001 UM
Page 96
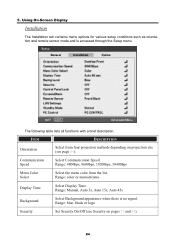
...and is no signal. ITEM DESCRIPTION Orientation Select from the list. Range: blue, black or logo Security Set Security On/Off (see page 85). Range: Manual, Auto 5s, Auto 15s, Auto 45s Background Select Background appearance when there is accessed through the Setup menu. The following table lists all functions with... a brief description. Range: 4800bps, 9600bps, 19200bps, 38400bps Menu Color Select Select the menu color from four projection methods depending on projection site (see Security on pages 57 and 88). 84
...and is no signal. ITEM DESCRIPTION Orientation Select from the list. Range: blue, black or logo Security Set Security On/Off (see page 85). Range: Manual, Auto 5s, Auto 15s, Auto 45s Background Select Background appearance when there is accessed through the Setup menu. The following table lists all functions with... a brief description. Range: 4800bps, 9600bps, 19200bps, 38400bps Menu Color Select Select the menu color from four projection methods depending on projection site (see Security on pages 57 and 88). 84


