
PX Series Specification Brochure
Page 4
... diagonally when the projector cannot be sent to remote locations. Product specifications subject to change. 11/11 ver. 5. ©2011 NEC Display Solutions of -life can be placed parallel or perpendicular to the screen Advanced AccuBlend™ ensures detailed images when non-native ..., power cord, RGB signal cable, lens cap, user's manual on CD-ROM, quick start guide, product registration card, wired and wireless network setup guide, lens anti-theft screw ORDERING MODEL NUMBERS NP-PX700W NP-PX750U NP-PX800X ACCESSORIES NP06FL NP07ZL NP08ZL NP09ZL NP10ZL NP16FL NP17ZL NP18ZL NP19ZL NP20ZL...
... diagonally when the projector cannot be sent to remote locations. Product specifications subject to change. 11/11 ver. 5. ©2011 NEC Display Solutions of -life can be placed parallel or perpendicular to the screen Advanced AccuBlend™ ensures detailed images when non-native ..., power cord, RGB signal cable, lens cap, user's manual on CD-ROM, quick start guide, product registration card, wired and wireless network setup guide, lens anti-theft screw ORDERING MODEL NUMBERS NP-PX700W NP-PX750U NP-PX800X ACCESSORIES NP06FL NP07ZL NP08ZL NP09ZL NP10ZL NP16FL NP17ZL NP18ZL NP19ZL NP20ZL...

Installation Guide
Page 1
Menu selections have settings for each source type. NEC Display Solutions of 12 www.necdisplay.com PX700W/PX750U/PX800X Page 1 of America, Inc. PX700W/PX750U/PX800X Installation Guide Desktop and Ceiling Mount Rev 1.0 Contents Product Description, Lens Specs, ... 20.55"(D) Weight: PX Series: 19.7kg / 43.3 lbs Brightness: PX700W: PX750U: PX800X: 7000 Lumens 7500 Lumens 8000 Lumens Power Consumption: PX Series: 1008W (max) Network Ready, integrated wired and wireless adapter Manual: Lens Shift, Horizontal & Vertical /Zoom/ Focus BTU's: PX Series: Lens Specifications NP06FL: ...
Menu selections have settings for each source type. NEC Display Solutions of 12 www.necdisplay.com PX700W/PX750U/PX800X Page 1 of America, Inc. PX700W/PX750U/PX800X Installation Guide Desktop and Ceiling Mount Rev 1.0 Contents Product Description, Lens Specs, ... 20.55"(D) Weight: PX Series: 19.7kg / 43.3 lbs Brightness: PX700W: PX750U: PX800X: 7000 Lumens 7500 Lumens 8000 Lumens Power Consumption: PX Series: 1008W (max) Network Ready, integrated wired and wireless adapter Manual: Lens Shift, Horizontal & Vertical /Zoom/ Focus BTU's: PX Series: Lens Specifications NP06FL: ...

User Manual
Page 1
indicated on the projector's label is referred to as PX750U, PX700W, and PX800X respectively unless otherwise specified. NP-PX750U, NP-PX750UG, NP-PX700W, NP-PX700WG, NPPX800X, NP-PX800XG • The projector's Model No. Each model is NPPX750U, NP-PX750UG, NP-PX700W, NP-PX700WG, NP-PX800X, and NP-PX800XG respectively. Projector PX750U/PX700W/PX800X User's Manual Model No.
indicated on the projector's label is referred to as PX750U, PX700W, and PX800X respectively unless otherwise specified. NP-PX750U, NP-PX750UG, NP-PX700W, NP-PX700WG, NPPX800X, NP-PX800XG • The projector's Model No. Each model is NPPX750U, NP-PX750UG, NP-PX700W, NP-PX700WG, NP-PX800X, and NP-PX800XG respectively. Projector PX750U/PX700W/PX800X User's Manual Model No.

User Manual
Page 2
...Adobe Systems Incorporated in the United States and/or other matters deemed to change without permission. (2) The contents of this user's manual are trademarks or registered trademarks of their respective holders. and other countries. • Trademark PJLink is a trademark applied for any... questionable points, errors or omissions, please contact us. (4) Notwithstanding article (3), NEC will not be the trademarks or registered trademarks of Crestron Electronics, Inc. • Other product and company names mentioned in this user...
...Adobe Systems Incorporated in the United States and/or other matters deemed to change without permission. (2) The contents of this user's manual are trademarks or registered trademarks of their respective holders. and other countries. • Trademark PJLink is a trademark applied for any... questionable points, errors or omissions, please contact us. (4) Notwithstanding article (3), NEC will not be the trademarks or registered trademarks of Crestron Electronics, Inc. • Other product and company names mentioned in this user...

User Manual
Page 3
... and maintenance of separately from power outlet. WARNING • When the projector is damaged, cooling fluids may be disposed of this manual carefully before using your NEC projector and keep the manual handy for Canada only) This Class B digital apparatus meets all requirements of your local authority and/or ask the shop where...
... and maintenance of separately from power outlet. WARNING • When the projector is damaged, cooling fluids may be disposed of this manual carefully before using your NEC projector and keep the manual handy for Canada only) This Class B digital apparatus meets all requirements of your local authority and/or ask the shop where...

User Manual
Page 4
..., rugs or carpets. • If you to lead, a chemical known to the State of California to the unit EXCEPT those specified by NEC Display Solutions of bodily injury. - WASH HANDS AFTER HANDLING. If this equipment does cause harmful interference to radio or television reception, which the...the limits for use with this equipment. Installation • Do not place the projector in a dusty, smoky or steamy environment. - in this manual. This equipment has been tested and found to Part 15 of the following conditions: - The projector must be installed by one or more information....
..., rugs or carpets. • If you to lead, a chemical known to the State of California to the unit EXCEPT those specified by NEC Display Solutions of bodily injury. - WASH HANDS AFTER HANDLING. If this equipment does cause harmful interference to radio or television reception, which the...the limits for use with this equipment. Installation • Do not place the projector in a dusty, smoky or steamy environment. - in this manual. This equipment has been tested and found to Part 15 of the following conditions: - The projector must be installed by one or more information....

User Manual
Page 6
... cover the power cord with wet hands. Doing so can cause damage to rain or water. - If the projector exhibits a distinct change in this user's manual. - Do not handle the power plug with other cables before shipping the projector. Do not heat the power cord. - If liquid has been spilled into...
... cover the power cord with wet hands. Doing so can cause damage to rain or water. - If the projector exhibits a distinct change in this user's manual. - Do not handle the power plug with other cables before shipping the projector. Do not heat the power cord. - If liquid has been spilled into...

User Manual
Page 10
Introduction...1 1 What's in the Box?...1 Introduction to the Projector...2 Congratulations on Your Purchase of the Projector...2 Features you'll enjoy:...2 About this user's manual...3 Part Names of the Projector...4 Front/Top...4 Rear...5 Control Panel/Indicator Section...6 Terminal Panel Features...7 Part Names of the Remote Control...8 Battery Installation...9 ...
Introduction...1 1 What's in the Box?...1 Introduction to the Projector...2 Congratulations on Your Purchase of the Projector...2 Features you'll enjoy:...2 About this user's manual...3 Part Names of the Projector...4 Front/Top...4 Rear...5 Control Panel/Indicator Section...6 Terminal Panel Features...7 Part Names of the Remote Control...8 Battery Installation...9 ...

User Manual
Page 15
... the projector to ship your projector. 1. Remote control (7N900961) Power cord (US: 79TM1001 for AC 120 V and 79TM1011 for AC 200 V) (EU: 79TM1021) NEC Projector CD-ROM User's manual (PDF) and the utility software (7N951651) • Important Information (For North America: 7N8N1991) (For Other countries than North America: 7N8N1991 and 7N8N2001) •... box contains everything listed. For the types of the dust cap while clutching it difficult to remove the lens mounted on our Web Site: www.nec-display-solutions. Make sure your dealer.
... the projector to ship your projector. 1. Remote control (7N900961) Power cord (US: 79TM1001 for AC 120 V and 79TM1011 for AC 200 V) (EU: 79TM1021) NEC Projector CD-ROM User's manual (PDF) and the utility software (7N951651) • Important Information (For North America: 7N8N1991) (For Other countries than North America: 7N8N1991 and 7N8N2001) •... box contains everything listed. For the types of the dust cap while clutching it difficult to remove the lens mounted on our Web Site: www.nec-display-solutions. Make sure your dealer.

User Manual
Page 17
...Seamless switch function for smoother screen changes when switching the signal (for PX750U only) • Simultaneous display of CO2 emissions and this user's manual The fastest way to get started is used in shared folders on . This may save you time later on a computer connected by -picture...on the on . - At the beginning of each other. When the on-screen menu's standby mode is set in the on the included NEC Projector CD-ROM. 1. Password security: When a password is equipped with the following security functions: - The projector is set to input the ...
...Seamless switch function for smoother screen changes when switching the signal (for PX750U only) • Simultaneous display of CO2 emissions and this user's manual The fastest way to get started is used in shared folders on . This may save you time later on a computer connected by -picture...on the on . - At the beginning of each other. When the on-screen menu's standby mode is set in the on the included NEC Projector CD-ROM. 1. Password security: When a password is equipped with the following security functions: - The projector is set to input the ...

User Manual
Page 42
... Adjusting the Image Using Auto Adjust Optimizing a computer image automatically. (COMPUTER1/COMPUTER2/COMPUTER3) Press the AUTO ADJ. button to adjust [HORIZONTAL], [VERTICAL], [CLOCK], and [PHASE] manually. (→ page 104, 105) 28
... Adjusting the Image Using Auto Adjust Optimizing a computer image automatically. (COMPUTER1/COMPUTER2/COMPUTER3) Press the AUTO ADJ. button to adjust [HORIZONTAL], [VERTICAL], [CLOCK], and [PHASE] manually. (→ page 104, 105) 28

User Manual
Page 74
... 7 Professional Windows 7 Ultimate Windows 7 Enterprise Windows Vista Business Windows Vista Ultimate Windows Vista Enterprise Windows XP Professional with Service Pack 3 (Note) • In this user's manual this feature. • A keyboard is more useful for operating. 3. Convenient Features Using the Projector to Operate Your Computer via a Network [REMOTE DESKTOP] • By...
... 7 Professional Windows 7 Ultimate Windows 7 Enterprise Windows Vista Business Windows Vista Ultimate Windows Vista Enterprise Windows XP Professional with Service Pack 3 (Note) • In this user's manual this feature. • A keyboard is more useful for operating. 3. Convenient Features Using the Projector to Operate Your Computer via a Network [REMOTE DESKTOP] • By...

User Manual
Page 87
...• Up to select a source other than [VIEWER]. NOTE: If you select [OPTIONS] → [SLIDE SETTING] → [PLAY MODE] → [MANUAL], index files will be set for auto playback at intervals specified by using Viewer PPT Converter 3.0 will display the source select screen. If this happens... are displayed. Wait 3 minutes, then connect the power cord, turn on the USB memory is selected for [INTERVAL], the play mode (MANUAL/AUTO) for slides of index file works in the Thumbnail screen. • To select slideshow of whether [INTERVAL] is converted by using ...
...• Up to select a source other than [VIEWER]. NOTE: If you select [OPTIONS] → [SLIDE SETTING] → [PLAY MODE] → [MANUAL], index files will be set for auto playback at intervals specified by using Viewer PPT Converter 3.0 will display the source select screen. If this happens... are displayed. Wait 3 minutes, then connect the power cord, turn on the USB memory is selected for [INTERVAL], the play mode (MANUAL/AUTO) for slides of index file works in the Thumbnail screen. • To select slideshow of whether [INTERVAL] is converted by using ...

User Manual
Page 93
Displays the image in its aspect ratio in the projector's displayable maximum resolution. Specifies interval time when [AUTO] is selected for PLAY MODE. PLAY MODE INTERVAL REPEAT MANUAL AUTO 5 - 300 seconds Check mark TIP • To play . Selects manual play one or more slides, place those files into a folder. 79 Name SCREEN SIZE Options BEST FIT ACTUAL SIZE Description Displays the image with its actual size. Using the Viewer Viewer option settings • SLIDE SETTING Sets still images or slides. 4. Selects auto play. Turns on or off the repeat function.
Displays the image in its aspect ratio in the projector's displayable maximum resolution. Specifies interval time when [AUTO] is selected for PLAY MODE. PLAY MODE INTERVAL REPEAT MANUAL AUTO 5 - 300 seconds Check mark TIP • To play . Selects manual play one or more slides, place those files into a folder. 79 Name SCREEN SIZE Options BEST FIT ACTUAL SIZE Description Displays the image with its actual size. Using the Viewer Viewer option settings • SLIDE SETTING Sets still images or slides. 4. Selects auto play. Turns on or off the repeat function.
User Manual
Page 109
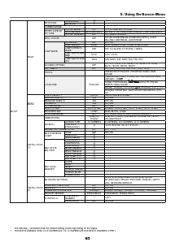
...POLSKI, NEDERLANDS, SUOMI NORSK, TÜRKÇE ROMÂNĂ, HRVATSKA INDONESIA COLOR, MONOCHROME OFF, ON OFF, ON OFF, ON OFF, ON MANUAL, AUTO 5 SEC, AUTO 15 SEC, AUTO 45 SEC BLUE, BLACK, LOGO OFF, 100[H], 500[H], 1000[H], 2000[H], 5000[H] DESKTOP FRONT, CEILING ... ENGLISH MENU SETUP COLOR SELECT SOURCE DISPLAY MESSAGE DISPLAY ID DISPLAY ECO MESSAGE DISPLAY TIME BACKGROUND FILTER MESSAGE ORIENTATION SCREEN TYPE POSITION*1 (PX800X only) GEOMETRIC CORRECTION MODE MULTI-SCREEN CONTRAST COMP. WHITE BALANCE BRIGHTNESS G BRIGHTNESS B UNIFORMITY R UNIFORMITY B STORE MOVE RESET REF....
...POLSKI, NEDERLANDS, SUOMI NORSK, TÜRKÇE ROMÂNĂ, HRVATSKA INDONESIA COLOR, MONOCHROME OFF, ON OFF, ON OFF, ON OFF, ON MANUAL, AUTO 5 SEC, AUTO 15 SEC, AUTO 45 SEC BLUE, BLACK, LOGO OFF, 100[H], 500[H], 1000[H], 2000[H], 5000[H] DESKTOP FRONT, CEILING ... ENGLISH MENU SETUP COLOR SELECT SOURCE DISPLAY MESSAGE DISPLAY ID DISPLAY ECO MESSAGE DISPLAY TIME BACKGROUND FILTER MESSAGE ORIENTATION SCREEN TYPE POSITION*1 (PX800X only) GEOMETRIC CORRECTION MODE MULTI-SCREEN CONTRAST COMP. WHITE BALANCE BRIGHTNESS G BRIGHTNESS B UNIFORMITY R UNIFORMITY B STORE MOVE RESET REF....

User Manual
Page 118
.... (This is evident when part of your computer for RGB signals only. 104 PHASE Use this item to fine tune the computer image or to manually adjust CLOCK and PHASE. 5.
.... (This is evident when part of your computer for RGB signals only. 104 PHASE Use this item to fine tune the computer image or to manually adjust CLOCK and PHASE. 5.

User Manual
Page 124
... to select two modes: PIP and PICTURE BY PICTURE. Using On-Screen Menu 6 Menu Descriptions & Functions [SETUP] [BASIC] Correcting Vertical Keystone Distortion Manually [KEYSTONE] You can correct vertical distortion manually. (→ page 26) TIP: When this item will display its slide bar for [MODE], this option allows you to correct trapezoidal distortion...
... to select two modes: PIP and PICTURE BY PICTURE. Using On-Screen Menu 6 Menu Descriptions & Functions [SETUP] [BASIC] Correcting Vertical Keystone Distortion Manually [KEYSTONE] You can correct vertical distortion manually. (→ page 26) TIP: When this item will display its slide bar for [MODE], this option allows you to correct trapezoidal distortion...

User Manual
Page 129
... factory preset. NOTE: Your setting will display the [ECO MODE] screen. (→ page 33) To close the message, press the EXIT button. The options are [MANUAL], [AUTO 5 SEC], [AUTO 15 SEC], and [AUTO 45 SEC]. Using On-Screen Menu When [OFF] is selected for cleaning the filters. The preset choices are...
... factory preset. NOTE: Your setting will display the [ECO MODE] screen. (→ page 33) To close the message, press the EXIT button. The options are [MANUAL], [AUTO 5 SEC], [AUTO 15 SEC], and [AUTO 45 SEC]. Using On-Screen Menu When [OFF] is selected for cleaning the filters. The preset choices are...

User Manual
Page 135
...OPTIONS(1)] Setting Auto Adjust [AUTO ADJUST] This feature sets the Auto Adjust mode so that the computer signal can be automatically or manually adjusted for this option when using the projector at altitudes approximately 5500 feet/1600 meters or higher. NOTE: Be sure to select the... malfunction. Normally select this option if fine adjustment is selected. FINE Select this option. See the drawing on your right. You can manually optimize the computer signal. MODE Select three modes for fan speed: AUTO, HIGH, and HIGH ALTITUDE. You can automatically make adjustment in...
...OPTIONS(1)] Setting Auto Adjust [AUTO ADJUST] This feature sets the Auto Adjust mode so that the computer signal can be automatically or manually adjusted for this option when using the projector at altitudes approximately 5500 feet/1600 meters or higher. NOTE: Be sure to select the... malfunction. Normally select this option if fine adjustment is selected. FINE Select this option. See the drawing on your right. You can manually optimize the computer signal. MODE Select three modes for fan speed: AUTO, HIGH, and HIGH ALTITUDE. You can automatically make adjustment in...

User Manual
Page 155
...; If you stop setting WPA-EAP or WPA2-EAP. 14. On the thumbnail screen, select a digital certificate (PKCS#12 format file) saved in the "User's Manual" (PDF). • To return to Step 18. 16.
...; If you stop setting WPA-EAP or WPA2-EAP. 14. On the thumbnail screen, select a digital certificate (PKCS#12 format file) saved in the "User's Manual" (PDF). • To return to Step 18. 16.


