
MT850/MT1050/MT1055
Page 1
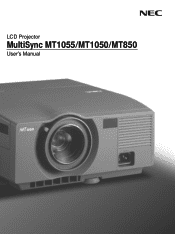
LCD Projector MultiSync MT1055/MT1050/MT850 User's Manual
LCD Projector MultiSync MT1055/MT1050/MT850 User's Manual

MT850/MT1050/MT1055
Page 4
MultiSync MT1055/MT1050/MT850 LCD Projector User's Manual English STATPUOSWER ENTER ON/STAND BY SELECT CANCEL SOURCE MENU AUTO ADJUST USB C CONTROL MOOUUTSE CROIENNMPTOUR PC-CARD AUDIO AUDIO RGOBUTMPOUNTITOR AUDIO RGB INPUT 1 S-VIDEO RGB INPUT 2 L /MONO R VIDEO AC IN E - 1
MultiSync MT1055/MT1050/MT850 LCD Projector User's Manual English STATPUOSWER ENTER ON/STAND BY SELECT CANCEL SOURCE MENU AUTO ADJUST USB C CONTROL MOOUUTSE CROIENNMPTOUR PC-CARD AUDIO AUDIO RGOBUTMPOUNTITOR AUDIO RGB INPUT 1 S-VIDEO RGB INPUT 2 L /MONO R VIDEO AC IN E - 1

MT850/MT1050/MT1055
Page 5
... to remove the plug from that uninsulated voltage within the unit may be installed as possible, and should be read this manual carefully before using your NEC MultiSync MT1055/MT1050/MT850 Projector and keep the manual handy for use with this equipment. If a power cable is located on the left side of the Canadian Interference-Causing...
... to remove the plug from that uninsulated voltage within the unit may be installed as possible, and should be read this manual carefully before using your NEC MultiSync MT1055/MT1050/MT850 Projector and keep the manual handy for use with this equipment. If a power cable is located on the left side of the Canadian Interference-Causing...

MT850/MT1050/MT1055
Page 8
... distortion so that the image is square. • You can choose between video modes depending on your new MultiSync MT1055 and MT1050 (XGA)/ MT850 (SVGA) Projector and describes the features and controls. offers a crisp image with UXGA (1600ן1200) resolution*3....NEC Technologies' exclusive Advanced AccuBlend intelligent pixel blending technology - At the beginning of each section of 50 to ensure proper operation and reduce the risk of the very best projectors available today. In addition, the ceiling must be strong enough to review the user's manual...
... distortion so that the image is square. • You can choose between video modes depending on your new MultiSync MT1055 and MT1050 (XGA)/ MT850 (SVGA) Projector and describes the features and controls. offers a crisp image with UXGA (1600ן1200) resolution*3....NEC Technologies' exclusive Advanced AccuBlend intelligent pixel blending technology - At the beginning of each section of 50 to ensure proper operation and reduce the risk of the very best projectors available today. In addition, the ceiling must be strong enough to review the user's manual...

MT850/MT1050/MT1055
Page 25
...ן3 cable to connect your DVD player to the RGB INPUT connector on the projector and DVD player. NOTE: Refer to your DVD player's owner's manual for more information about your projector and DVD player. 2. Turn off the power to your DVD player's video output requirements,... E - 22 Turn on the projector. To do so, simply: 1. If your projector to a DVD player with component outputs or Video...
...ן3 cable to connect your DVD player to the RGB INPUT connector on the projector and DVD player. NOTE: Refer to your DVD player's owner's manual for more information about your projector and DVD player. 2. Turn off the power to your DVD player's video output requirements,... E - 22 Turn on the projector. To do so, simply: 1. If your projector to a DVD player with component outputs or Video...

MT850/MT1050/MT1055
Page 26
Turn off the power to the Video input on the projector and the VCR or laser disc player. Be careful to keep your VCR or laser disc ...to your audio equipment (if your right and left channel connections correct for more information about your projector. NOTE: Refer to your VCR or laser disc player owner's manual for stereo sound. 3. Connecting Your VCR or Laser Disc Player STATPUOSWER ENTER ON/STAND BY SELECT...: 1. Connect one end of your RCA cable to the video output connector on the back of your projector. Turn on your VCR or laser disc player, connect the other end to the...
Turn off the power to the Video input on the projector and the VCR or laser disc player. Be careful to keep your VCR or laser disc ...to your audio equipment (if your right and left channel connections correct for more information about your projector. NOTE: Refer to your VCR or laser disc player owner's manual for stereo sound. 3. Connecting Your VCR or Laser Disc Player STATPUOSWER ENTER ON/STAND BY SELECT...: 1. Connect one end of your RCA cable to the video output connector on the back of your projector. Turn on your VCR or laser disc player, connect the other end to the...

MT850/MT1050/MT1055
Page 33
...Menu) Basic/Custom Menu Edit Language (English/German/French/Italian/Spanish/Swedish/Japanese) Projector Pointer (Pointer 1-8) Source Display (On/Off) Direct Button Volume Bar (On/Off) Keystone Bar (On/Off) Menu Display Time (Manual/Auto 5 sec/Auto 10 sec/Auto 30 sec) Page 1 Orientation (Desktop ...) Mouse Button(Right Hand/Left Hand) Sensitivity(Fast/Medium/Slow) Page 2 PC Card Viewer Options Show Folder List (On/Off) (Auto Play/Manual Play) Interval (5-300 sec) Capture Options (High Quality/Normal/High Compression) Page 3 Signal Select RGB1 (Auto/RGB/Component) RGB2 (Auto/RGB/Component...
...Menu) Basic/Custom Menu Edit Language (English/German/French/Italian/Spanish/Swedish/Japanese) Projector Pointer (Pointer 1-8) Source Display (On/Off) Direct Button Volume Bar (On/Off) Keystone Bar (On/Off) Menu Display Time (Manual/Auto 5 sec/Auto 10 sec/Auto 30 sec) Page 1 Orientation (Desktop ...) Mouse Button(Right Hand/Left Hand) Sensitivity(Fast/Medium/Slow) Page 2 PC Card Viewer Options Show Folder List (On/Off) (Auto Play/Manual Play) Interval (5-300 sec) Capture Options (High Quality/Normal/High Compression) Page 3 Signal Select RGB1 (Auto/RGB/Component) RGB2 (Auto/RGB/Component...
MT850/MT1050/MT1055
Page 35
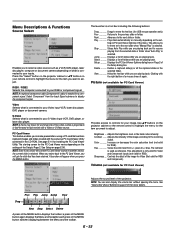
...playing back. Contrast ....... Hue Varies the color level from the selected slide or folder when "Auto Play" is selected. Controls the detail of the projector. NOTE: You can also display the volume bar without opening the menu. See "Volume Bar (Direct Button)"on Page 2 of the Setup's ... of the menu. Menu Descriptions & Functions Source Select Enables you to select a video source such as reference. Play Plays back automatically or manually depending on PC Card Viewer Options of the MENU button displays the toolbar; Adjusts the brightness level or the back raster intensity. See page ...
...playing back. Contrast ....... Hue Varies the color level from the selected slide or folder when "Auto Play" is selected. Controls the detail of the projector. NOTE: You can also display the volume bar without opening the menu. See "Volume Bar (Direct Button)"on Page 2 of the Setup's ... of the menu. Menu Descriptions & Functions Source Select Enables you to select a video source such as reference. Play Plays back automatically or manually depending on PC Card Viewer Options of the MENU button displays the toolbar; Adjusts the brightness level or the back raster intensity. See page ...

MT850/MT1050/MT1055
Page 37
...; buttons to select R, G, or B for the brightness and the contrast. This allows you connect your computer for the first time. The projector automatically reduces or enlarges the current image to fit your image appears to be necessary when you to activate or deactivate the Advanced AccuBlend feature...NOTE: The lower the Noise Reduction level, the better the image quality by way of the screen. White Balance This allows you to manually adjust the image horizontally and vertically, and adjust Clock and Phase. This adjustment is made automatically when the Auto Adjust is off ) ...
...; buttons to select R, G, or B for the brightness and the contrast. This allows you connect your computer for the first time. The projector automatically reduces or enlarges the current image to fit your image appears to be necessary when you to activate or deactivate the Advanced AccuBlend feature...NOTE: The lower the Noise Reduction level, the better the image quality by way of the screen. White Balance This allows you to manually adjust the image horizontally and vertically, and adjust Clock and Phase. This adjustment is made automatically when the Auto Adjust is off ) ...

MT850/MT1050/MT1055
Page 38
... sec .. Changes all adjustments and setting to the factory preset. On You can turn off manually. Off You can customize using KEYSTONE +/- The menu will automatically be reset for all the features. To enable the projector menu operation again, press the PJ button again to select two menu modes: Advanced Menu and...
... sec .. Changes all adjustments and setting to the factory preset. On You can turn off manually. Off You can customize using KEYSTONE +/- The menu will automatically be reset for all the features. To enable the projector menu operation again, press the PJ button again to select two menu modes: Advanced Menu and...

MT850/MT1050/MT1055
Page 39
...rear projection, and ceiling front projection. NOTE: The Auto Play Interval time set on the projector, the slides will start to play automatically. NOTE: The Auto Play and Manual Play options determine the behavior of JPEG a priority. NOTE: If you to select composite... video standards manually. Capture Options: (available for your USB mouse settings. High Compression Gives compression a priority. [Page3] Signal Select RGB1/2: Allows you can select from the pull-down menu. Normally select "Auto" and the projector automatically detects a component signal....
...rear projection, and ceiling front projection. NOTE: The Auto Play Interval time set on the projector, the slides will start to play automatically. NOTE: The Auto Play and Manual Play options determine the behavior of JPEG a priority. NOTE: If you to select composite... video standards manually. Capture Options: (available for your USB mouse settings. High Compression Gives compression a priority. [Page3] Signal Select RGB1/2: Allows you can select from the pull-down menu. Normally select "Auto" and the projector automatically detects a component signal....

MT850/MT1050/MT1055
Page 40
... lamp clock back to select the S-Video signal detection mode. Off User can be in the Projector mode. Saving your change your projector using NEC's Advanced AccuBlend Intelligent Pixel Blending Technology. S-Video Mode Select: This feature is output from the ...remote control. The image can adjust the image display functions ("Horizontal Position", "Vertical Position", "Clock", "Phase" and "Resolution") manually. Power Management: When this button appears a confirmation dialog box. NOTE: When the confirmation message is inserted into standby mode after ...
... lamp clock back to select the S-Video signal detection mode. Off User can be in the Projector mode. Saving your change your projector using NEC's Advanced AccuBlend Intelligent Pixel Blending Technology. S-Video Mode Select: This feature is output from the ...remote control. The image can adjust the image display functions ("Horizontal Position", "Vertical Position", "Clock", "Phase" and "Resolution") manually. Power Management: When this button appears a confirmation dialog box. NOTE: When the confirmation message is inserted into standby mode after ...

MT850/MT1050/MT1055
Page 43
...any specific slide High quality images • High resolution up to 1024ן768 dots(MT850: up . • The eject button pops out once the PC card is fully inserted. Check... that the PC card is fully inserted. It cannot be inserted into indexes playable with the projector. Attempting to use • Presentations can be started immediately simply by capturing the currently displayed image ... as PowerPoint) into the PC card slot in offices, as well as PC card in this manual) to force the PC card into the card slot with a personal computer only. Inserting the...
...any specific slide High quality images • High resolution up to 1024ן768 dots(MT850: up . • The eject button pops out once the PC card is fully inserted. Check... that the PC card is fully inserted. It cannot be inserted into indexes playable with the projector. Attempting to use • Presentations can be started immediately simply by capturing the currently displayed image ... as PowerPoint) into the PC card slot in offices, as well as PC card in this manual) to force the PC card into the card slot with a personal computer only. Inserting the...

MT850/MT1050/MT1055
Page 44
.... Click [Installing the PC Card Viewer Utility 1.0] The setup dialog appears. * Follow the instructions in the dialog box. 1. In this manual it is completed, press the "Cancel" button then follow the instructions in the setup dialog to online help for editing documents, converting them... on uninstalling the PC Card Viewer software, see page E-45. To start the PC Card Viewer software: * Select [Start]-[Programs]-[NEC Projector Tools]-[PC Card Viewer Utility 1.0]. Refer to complete the installation. To start PC Card Viewer PPT Converter: * Select PC Card Viewer PPT...
.... Click [Installing the PC Card Viewer Utility 1.0] The setup dialog appears. * Follow the instructions in the dialog box. 1. In this manual it is completed, press the "Cancel" button then follow the instructions in the setup dialog to online help for editing documents, converting them... on uninstalling the PC Card Viewer software, see page E-45. To start the PC Card Viewer software: * Select [Start]-[Programs]-[NEC Projector Tools]-[PC Card Viewer Utility 1.0]. Refer to complete the installation. To start PC Card Viewer PPT Converter: * Select PC Card Viewer PPT...

MT850/MT1050/MT1055
Page 45
...slides back. Insert the PC card with the side with the right button of a mouse shows it again. Play Plays back automatically or manually depending on the setting on the top. * Press the eject button to make slides directly from the images projected with the right button ... can be displayed on indexes, refer to stop Auto Play while you are playing back. Operating the PC Card Viewer Function from the Projector (playback) This section describes the operation for showing slides of folders. View .......... For details on the list of presentation documents created using...
...slides back. Insert the PC card with the side with the right button of a mouse shows it again. Play Plays back automatically or manually depending on the setting on the top. * Press the eject button to make slides directly from the images projected with the right button ... can be displayed on indexes, refer to stop Auto Play while you are playing back. Operating the PC Card Viewer Function from the Projector (playback) This section describes the operation for showing slides of folders. View .......... For details on the list of presentation documents created using...

MT850/MT1050/MT1055
Page 54
.../MT850 Optical LCD Panel Lens Lamp Image Size Projection Distance 1.3" p-Si TFT active-matrix, 800ן600 dots (MT850) / 1024ן768 dots (MT1055/MT1050) 1.3" p-Si TFT active-matrix with Micro Lens Array (MT1055) Manual zoom, manual focus MT1050/MT850 ...LCD panel may have pixel failures at http://www.nec-pj.com/ The specifications are inherently susceptible to change without notice. We provide information about the MultiSync MT1055/MT1050/MT850 Projector's performance. 6. SPECIFICATIONS This section provides technical information about our projectors...
.../MT850 Optical LCD Panel Lens Lamp Image Size Projection Distance 1.3" p-Si TFT active-matrix, 800ן600 dots (MT850) / 1024ן768 dots (MT1055/MT1050) 1.3" p-Si TFT active-matrix with Micro Lens Array (MT1055) Manual zoom, manual focus MT1050/MT850 ...LCD panel may have pixel failures at http://www.nec-pj.com/ The specifications are inherently susceptible to change without notice. We provide information about the MultiSync MT1055/MT1050/MT850 Projector's performance. 6. SPECIFICATIONS This section provides technical information about our projectors...


