

User Manual
Page 8
... E-7 Getting to Know Your MultiSync LT150/LT85 Projector E-8 Front / Side Features E-8 Attaching the lens cap E-8 Rear / Side Features E-9 Top Features E-10 Terminal Panel Features E-11 Remote Control Features E-12 Remote Control Battery Installation E-13 Operating Range E-13 Remote Control Precautions E-13 Optional Presentation Remote Control (PR50KIT E-14 Remote Control Battery Installation E-16 Remote Control Precautions E-16 Using the...
... E-7 Getting to Know Your MultiSync LT150/LT85 Projector E-8 Front / Side Features E-8 Attaching the lens cap E-8 Rear / Side Features E-9 Top Features E-10 Terminal Panel Features E-11 Remote Control Features E-12 Remote Control Battery Installation E-13 Operating Range E-13 Remote Control Precautions E-13 Optional Presentation Remote Control (PR50KIT E-14 Remote Control Battery Installation E-16 Remote Control Precautions E-16 Using the...
User Manual
Page 9
...NTSC4.43 standard video signals. NTSC4.43: TV standard used in Middle East countries. • The supplied card remote control can be installed by qualified technicians in accordance with NEC technology's Advanced AccuBlend on your source: "normal" for a typical picture, "natural" for NTSC playback on ...100 kHz and a vertical frequency range of the manual you to get started is required. The MultiSync LT150/LT85 enables you to take your new MultiSync LT150 (XGA)/ LT85 (SVGA) Projector and describes the features and controls. This may save you 'll enjoy: • Simple set...
...NTSC4.43 standard video signals. NTSC4.43: TV standard used in Middle East countries. • The supplied card remote control can be installed by qualified technicians in accordance with NEC technology's Advanced AccuBlend on your source: "normal" for a typical picture, "natural" for NTSC playback on ...100 kHz and a vertical frequency range of the manual you to get started is required. The MultiSync LT150/LT85 enables you to take your new MultiSync LT150 (XGA)/ LT85 (SVGA) Projector and describes the features and controls. This may save you 'll enjoy: • Simple set...
User Manual
Page 10
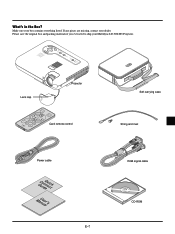
POINTER POWER MUTPEIC. Make sure your dealer. SELECTVol. CANCEL ADAJU. If any pieces are missing, contact your box contains everything listed. CANCEL ENTER SELECT PC CARD ACCESSADJAUUTSTO MENU SOURCE STAONN/D BY POWSETRATUS Projector Lens cap SOURCE MENU MAGNIFY HELP RD-366E ENTER Vol. TO Card remote control Soft carrying case String and rivet Power cable GCuoidneQnuecictk MaUnusaelr's E-7 RGB signal cable CD-ROM Please save the original box and packing materials if you ever need to ship your MultiSync LT150/LT85 Projector. What's in the Box?
POINTER POWER MUTPEIC. Make sure your dealer. SELECTVol. CANCEL ADAJU. If any pieces are missing, contact your box contains everything listed. CANCEL ENTER SELECT PC CARD ACCESSADJAUUTSTO MENU SOURCE STAONN/D BY POWSETRATUS Projector Lens cap SOURCE MENU MAGNIFY HELP RD-366E ENTER Vol. TO Card remote control Soft carrying case String and rivet Power cable GCuoidneQnuecictk MaUnusaelr's E-7 RGB signal cable CD-ROM Please save the original box and packing materials if you ever need to ship your MultiSync LT150/LT85 Projector. What's in the Box?

User Manual
Page 11
Use the rivet to attach the string to the lens hood with the supplied string and rivet 1. Thread the string through the hole on the lens cap and then tie a knot in the string. 2. Attaching the lens cap E-8 Getting to Know Your MultiSync LT150/LT85 Projector Front/ Side Features Controls CANCEL ENTER SELECT PC CARD ACCESSADJAUUTSTO MENU SOURCE STAONN/D BY POWSETRATUS Adjustable Tilt Foot Focus Ring Lens Ventilation (inlet) Adjustable Tilt Foot Button Remote Sensor Lens Cap Attaching the lens cap to the bottom of the lens hood.
Use the rivet to attach the string to the lens hood with the supplied string and rivet 1. Thread the string through the hole on the lens cap and then tie a knot in the string. 2. Attaching the lens cap E-8 Getting to Know Your MultiSync LT150/LT85 Projector Front/ Side Features Controls CANCEL ENTER SELECT PC CARD ACCESSADJAUUTSTO MENU SOURCE STAONN/D BY POWSETRATUS Adjustable Tilt Foot Focus Ring Lens Ventilation (inlet) Adjustable Tilt Foot Button Remote Sensor Lens Cap Attaching the lens cap to the bottom of the lens hood.

User Manual
Page 12
... to Rear Ceiling or Front Ceiling, the fan is automatically fixed at a high speed (high-speed mode). Ventilation (inlet) When the projector orientation is set to keep constant temperature in fan automatically runs at the high-speed mode. This is not a malfunction. E-9 Spacer (...fine-adjust horizontally position Lamp cover Lamp cover screw Rear Foot (not adjustable) NOTE: The projector has an internal temperature sensor. Rear/ Side Features Monaural Speaker (0.5W) AUDIO Remote Sensor POWSETRATUS STOANND/ BY SOURCE RGB S-VIDEO PC CONTROL VIDEO PC CARD ACCESSADAJUUSTOT USB PC CARD...
... to Rear Ceiling or Front Ceiling, the fan is automatically fixed at a high speed (high-speed mode). Ventilation (inlet) When the projector orientation is set to keep constant temperature in fan automatically runs at the high-speed mode. This is not a malfunction. E-9 Spacer (...fine-adjust horizontally position Lamp cover Lamp cover screw Rear Foot (not adjustable) NOTE: The projector has an internal temperature sensor. Rear/ Side Features Monaural Speaker (0.5W) AUDIO Remote Sensor POWSETRATUS STOANND/ BY SOURCE RGB S-VIDEO PC CONTROL VIDEO PC CARD ACCESSADAJUUSTOT USB PC CARD...

User Manual
Page 15
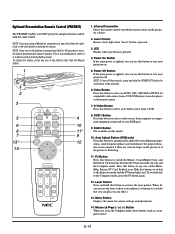
...eight pointers; NOTE: When the menu is displayed, a press of this button is not displayed, these buttons to display one of a selected menu item. Supplied Remote Control 1 12 SOURCE AUTO ADJ. 2 ME CEL 11 NU Vol. MUTE 5 MAGNIFY HELP POWER 6 8 RD-366E 7 9. When the pointer is not... screen center as its center. Select (vwᮤ ᮣ) / Volume (+) (-) Buttons vw: Use these vwᮤ ᮣ buttons move your projector on the screen using the Select button. When no input signal is in the submenu or adjustment screen. 5. Power Button If the power is applied...
...eight pointers; NOTE: When the menu is displayed, a press of this button is not displayed, these buttons to display one of a selected menu item. Supplied Remote Control 1 12 SOURCE AUTO ADJ. 2 ME CEL 11 NU Vol. MUTE 5 MAGNIFY HELP POWER 6 8 RD-366E 7 9. When the pointer is not... screen center as its center. Select (vwᮤ ᮣ) / Volume (+) (-) Buttons vw: Use these vwᮤ ᮣ buttons move your projector on the screen using the Select button. When no input signal is in the submenu or adjustment screen. 5. Power Button If the power is applied...

User Manual
Page 16
...-sight up to a distance of approximately 22 feet (7m) and within a 60-degree angle of the remote sensor. A weak battery will not function if there are objects between the remote control and the remote sensor on the projector or if strong light falls on the battery holder. Remove the transparent insulation tape. 2. Ensure that...
...-sight up to a distance of approximately 22 feet (7m) and within a 60-degree angle of the remote sensor. A weak battery will not function if there are objects between the remote control and the remote sensor on the projector or if strong light falls on the battery holder. Remove the transparent insulation tape. 2. Ensure that...
User Manual
Page 17
...Press and hold the POWER OFF button for various settings and adjustments. 14. Infrared Transmitter Direct the remote control toward the remote sensor on this model. 10. RGB 2 Button Not available on the projector cabinet. 2. Auto Adjust Button (RGB only) Press this button to a red dot that you ...lit red) and the Computer mode. S-Video Button Press this button to turn your NEC projector and presentation control with the same remote. Mouse (vw Button When you can use this button to the Projector mode and the PJ button lights red. Press this button or any one of the ...
...Press and hold the POWER OFF button for various settings and adjustments. 14. Infrared Transmitter Direct the remote control toward the remote sensor on this model. 10. RGB 2 Button Not available on the projector cabinet. 2. Auto Adjust Button (RGB only) Press this button to a red dot that you ...lit red) and the Computer mode. S-Video Button Press this button to turn your NEC projector and presentation control with the same remote. Mouse (vw Button When you can use this button to the Projector mode and the PJ button lights red. Press this button or any one of the ...

User Manual
Page 18
...display a list of the eight pointers; Help Button Provides information about the center of the pointer. Press again to the area you are in the Projector mode, which is magnified about operation and adjustment procedures or the set information for a short period of a selected menu item. NOTE: When the ... indicated by lighting the PJ button: Use this button to change the level of time. E-15 When you want on the cabinet or the card remote control. 17. Picture Mute Button This button turns off the menu. 23. FOLDER PIC-MUTE SLIDE LIST 16 24* 25 26* 27* 24. A...
...display a list of the eight pointers; Help Button Provides information about the center of the pointer. Press again to the area you are in the Projector mode, which is magnified about operation and adjustment procedures or the set information for a short period of a selected menu item. NOTE: When the ... indicated by lighting the PJ button: Use this button to change the level of time. E-15 When you want on the cabinet or the card remote control. 17. Picture Mute Button This button turns off the menu. 23. FOLDER PIC-MUTE SLIDE LIST 16 24* 25 26* 27* 24. A...

User Manual
Page 19
... pointer while it dry immediately. • Avoid excessive heat and humidity. • If you will not be using the remote control for Optional Presentation Remote Control When operating the projector: 2 Remove both old batteries and install new ones (AA). Do not mix different types of batteries or new and old... allows you are pressed within 10 seconds, the light goes out and the Projector mode is pressed, the PJ button lights red to use the Mouse, R-Click/Cancel, and L-Click/Enter buttons as your computer mouse. E-16 Remote Jack Not available on this model. *NOTE: The default is on. &#...
... pointer while it dry immediately. • Avoid excessive heat and humidity. • If you will not be using the remote control for Optional Presentation Remote Control When operating the projector: 2 Remove both old batteries and install new ones (AA). Do not mix different types of batteries or new and old... allows you are pressed within 10 seconds, the light goes out and the Projector mode is pressed, the PJ button lights red to use the Mouse, R-Click/Cancel, and L-Click/Enter buttons as your computer mouse. E-16 Remote Jack Not available on this model. *NOTE: The default is on. &#...
User Manual
Page 20
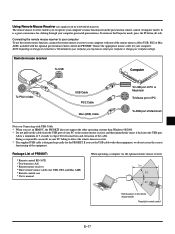
Doing so repeatedly can result in your PC failing to the Projector mode, press the PJ button (lit red). Remote mouse receiver To USB Computer To PS/2 or Mac USB Cable PS/2 Cable Mac (ADB) Cable To USB port of PC or Macintosh ..., you may have to your computer settings. Package List of PR50KIT: * Remote control RD-367E * Two batteries (AA) * Remote mouse receiver * Three remote mouse cables (for the PR50KIT. Using Remote Mouse Receiver (not supplied with the LT150/LT85 projector) The remote mouse receiver enables you to elapse between insertion and extraction of the cable...
Doing so repeatedly can result in your PC failing to the Projector mode, press the PJ button (lit red). Remote mouse receiver To USB Computer To PS/2 or Mac USB Cable PS/2 Cable Mac (ADB) Cable To USB port of PC or Macintosh ..., you may have to your computer settings. Package List of PR50KIT: * Remote control RD-367E * Two batteries (AA) * Remote mouse receiver * Three remote mouse cables (for the PR50KIT. Using Remote Mouse Receiver (not supplied with the LT150/LT85 projector) The remote mouse receiver enables you to elapse between insertion and extraction of the cable...
User Manual
Page 23
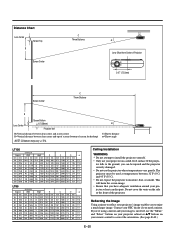
...Do not cover the vents on a solid, level surface. If you to install the projector yourself. • Only use the "Menu" and "Select" buttons on your projector cabinet or vw buttons on your NEC dealer if you need a mirror. Distance Chart Lens Center D Screen Top B Screen Center... 95˚F (35˚C). • Do not expose the projector to correct the orientation. (See page E-40.) E-20 The projector must be injured and the projector severely damaged. • Do not use the projector where temperatures vary greatly. Contact your remote control to moisture, dust, or smoke.
...Do not cover the vents on a solid, level surface. If you to install the projector yourself. • Only use the "Menu" and "Select" buttons on your projector cabinet or vw buttons on your NEC dealer if you need a mirror. Distance Chart Lens Center D Screen Top B Screen Center... 95˚F (35˚C). • Do not expose the projector to correct the orientation. (See page E-40.) E-20 The projector must be injured and the projector severely damaged. • Do not use the projector where temperatures vary greatly. Contact your remote control to moisture, dust, or smoke.

User Manual
Page 24
..., the cables should be output from RGB output unless the notebook PC is recommended that you accidentally hit the POWER button on the remote control, wait 90 seconds and then press the POWER button again to the notebook PC. E-21 It is turned on the power to... m (9.8 feet) or shorter. NOTE: If using with the projector. Wiring Diagram To video, S-video, and audio inputs on the projector. NOTE: * If the screen goes blank while using your remote control, it may be sure to connect between the projector and the notebook PC before turning on after connecting with a notebook...
..., the cables should be output from RGB output unless the notebook PC is recommended that you accidentally hit the POWER button on the remote control, wait 90 seconds and then press the POWER button again to the notebook PC. E-21 It is turned on the power to... m (9.8 feet) or shorter. NOTE: If using with the projector. Wiring Diagram To video, S-video, and audio inputs on the projector. NOTE: * If the screen goes blank while using your remote control, it may be sure to connect between the projector and the notebook PC before turning on after connecting with a notebook...
User Manual
Page 30
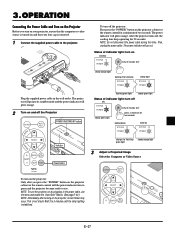
...HELP POWER POWER ON/STAND BY button POWSETRATUS Indicator STOANND/ BY SOURCE RGB Power button RD-366E To turn on the projector: Only after turning on the projector cabinet or the remote control for 90 seconds. flashing green light steady green light Status of indicator light: turn off the...orange. SELECT Vol. 3.OPERATION Connecting the Power Cable and Turn on the Projector Before you press the "POWER" button on the projector cabinet or the remote control will the power indicator turn to green and the projector become ready to use the menu and enable the "Auto Start" feature. ...
...HELP POWER POWER ON/STAND BY button POWSETRATUS Indicator STOANND/ BY SOURCE RGB Power button RD-366E To turn on the projector: Only after turning on the projector cabinet or the remote control for 90 seconds. flashing green light steady green light Status of indicator light: turn off the...orange. SELECT Vol. 3.OPERATION Connecting the Power Cable and Turn on the Projector Before you press the "POWER" button on the projector cabinet or the remote control will the power indicator turn to green and the projector become ready to use the menu and enable the "Auto Start" feature. ...

User Manual
Page 31
... the screen. Rotate the rear foot to make the image square to obtain the best focus. E-28 Press the Source button on the remote control or the projector cabinet to select "Video" (VCR, document camera, or laser disc player), S-Video", "RGB" (computer or DVD with component output...Or press the "Menu" button on the remote control or the cabinet and use the menu to center the image vertically. Lift the front edge of the projector to select your projector on a flat level surface and Ensure that the projector is available, the projector will display a blue background (factory preset)....
... the screen. Rotate the rear foot to make the image square to obtain the best focus. E-28 Press the Source button on the remote control or the projector cabinet to select "Video" (VCR, document camera, or laser disc player), S-Video", "RGB" (computer or DVD with component output...Or press the "Menu" button on the remote control or the cabinet and use the menu to center the image vertically. Lift the front edge of the projector to select your projector on a flat level surface and Ensure that the projector is available, the projector will display a blue background (factory preset)....

User Manual
Page 34
...the picture may get blurred or keystone correction may not be corrected is 45 degrees upward and 15 degrees downward with the projector placed horizontally on the type of the screen longer or shorter so that can enlarge the area you want. SELECT Vol...possible when excessive keystone correction is rectangular. NOTE: The maximum keystone angle that the projected image is used. Correcting Keystone distortion (Optional presentation remote control) Press (+) or (-) to correct keystone (trapezoidal) distortion to 400 percent. Vol. Depending on the ground plane. Press again ...
...the picture may get blurred or keystone correction may not be corrected is 45 degrees upward and 15 degrees downward with the projector placed horizontally on the type of the screen longer or shorter so that can enlarge the area you want. SELECT Vol...possible when excessive keystone correction is rectangular. NOTE: The maximum keystone angle that the projected image is used. Correcting Keystone distortion (Optional presentation remote control) Press (+) or (-) to correct keystone (trapezoidal) distortion to 400 percent. Vol. Depending on the ground plane. Press again ...

User Manual
Page 35
... Custom Menu, select "Basic/Custom Menu" from the Advanced menu to the Basic/Custom Menu. Press the vw buttons on the optional presentation remote control to cancel the Projector mode. 6. NOTE: You can close all menu items will still be added to the bottom of "Basic/Custom Menu" editing. Repeat steps... a check mark on the Menu mode, you can be customized to meet your PC mouse. 2. Using the Menus NOTE: The on the remote control or projector cabinet to display the Advanced Menu or Basic/Custom Menu. Use the Select buttons v or w to highlight your changes will return to the ...
... Custom Menu, select "Basic/Custom Menu" from the Advanced menu to the Basic/Custom Menu. Press the vw buttons on the optional presentation remote control to cancel the Projector mode. 6. NOTE: You can close all menu items will still be added to the bottom of "Basic/Custom Menu" editing. Repeat steps... a check mark on the Menu mode, you can be customized to meet your PC mouse. 2. Using the Menus NOTE: The on the remote control or projector cabinet to display the Advanced Menu or Basic/Custom Menu. Use the Select buttons v or w to highlight your changes will return to the ...

User Manual
Page 38
... (USB mouse only). Slide bar: Indicates settings or the direction of features in a dialog box. Close button: Click to cancel your setting. Selecting on the remote control to the previous menu.
... (USB mouse only). Slide bar: Indicates settings or the direction of features in a dialog box. Close button: Click to cancel your setting. Selecting on the remote control to the previous menu.

User Manual
Page 39
... Brightness .. Contrast ...... Adjusts the sound level of a mouse shows it again. Select ......... Delete ......... Clicking with the right button of the projector. Hue Varies the color level from the Input Signal submenu to display the component signal. The red level is used as a VCR, DVD ...player, DVD player or document camera. Video Selects what is needed for the PC Card Viewer varies depending on the projector cabinet or the remote control to highlight the menu for USB mouse operation only) Prev Returns to the previous slide or folder. See page...
... Brightness .. Contrast ...... Adjusts the sound level of a mouse shows it again. Select ......... Delete ......... Clicking with the right button of the projector. Hue Varies the color level from the Input Signal submenu to display the component signal. The red level is used as a VCR, DVD ...player, DVD player or document camera. Video Selects what is needed for the PC Card Viewer varies depending on the projector cabinet or the remote control to highlight the menu for USB mouse operation only) Prev Returns to the previous slide or folder. See page...

User Manual
Page 43
... Basic/Custom menu includes: Source Select (RGB, Video, S-Video and PC Card Viewer), Picture, Volume, Image Options (Keystone and Color Temperature), Projector Options (Menu and Setup), Tools (Capture, PC Card Files and ChalkBoad) and Help (Contents and Information). The options are : desktop front projection..., ceiling rear projection, desktop rear projection, and ceiling front projection. Keystone Bar: This option turns on the optional remote control. On You can turn off in 30 seconds if no but- The preset choices are pressed within 30 seconds. Auto 5 sec ...
... Basic/Custom menu includes: Source Select (RGB, Video, S-Video and PC Card Viewer), Picture, Volume, Image Options (Keystone and Color Temperature), Projector Options (Menu and Setup), Tools (Capture, PC Card Files and ChalkBoad) and Help (Contents and Information). The options are : desktop front projection..., ceiling rear projection, desktop rear projection, and ceiling front projection. Keystone Bar: This option turns on the optional remote control. On You can turn off in 30 seconds if no but- The preset choices are pressed within 30 seconds. Auto 5 sec ...


