
User Manual
Page 4
Package Contents • Electronic Control Module (ECU)/Junction box (SYN1782) • Power adapter cable (SKN6249) • Audio adapter cable (SKN6250) • User Interface Module (UIM) (SYN2015) • Microphone with mounting hardware (SMN4095) • 3.5mm stereo audio cable (SKN6251) • External speaker with mounting screws (SSN4020) • Important Safety and Legal Information booklet • User guide (this manual) 2 Welcome
Package Contents • Electronic Control Module (ECU)/Junction box (SYN1782) • Power adapter cable (SKN6249) • Audio adapter cable (SKN6250) • User Interface Module (UIM) (SYN2015) • Microphone with mounting hardware (SMN4095) • 3.5mm stereo audio cable (SKN6251) • External speaker with mounting screws (SSN4020) • Important Safety and Legal Information booklet • User guide (this manual) 2 Welcome

User Manual
Page 10
Barcode Mounting Surface Mounting Surface Barcode For optimal Bluetooth performance, mount the ECU so that the side with the vehicle's air bag. Caution: The location must be connected directly to be protected from dirt .... The best location for speaker-level audio) are 8 Installing the Handsfree Car Kit Do not place it behind or within large areas of the T605 handsfree audio into the vehicle entertainment system. The power adapter cable is designed to such an adapter harness using the 8-pin white connector, while the 6-pin black connector (for...
Barcode Mounting Surface Mounting Surface Barcode For optimal Bluetooth performance, mount the ECU so that the side with the vehicle's air bag. Caution: The location must be connected directly to be protected from dirt .... The best location for speaker-level audio) are 8 Installing the Handsfree Car Kit Do not place it behind or within large areas of the T605 handsfree audio into the vehicle entertainment system. The power adapter cable is designed to such an adapter harness using the 8-pin white connector, while the 6-pin black connector (for...
User Manual
Page 11
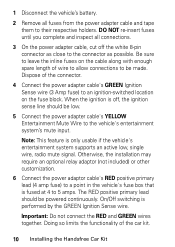
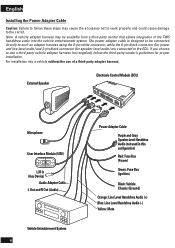
...: Fuse Box (Ignition) Black: Vehicle Chassis (Ground) Orange: Line Level Handsfree Audio (+) Blue: Line Level Handsfree Audio (-) Yellow: Mute Vehicle Entertainment System Installing the Handsfree Car Kit 9 For installation into a vehicle without the use a third-party vehicle adapter harness (not supplied), follow the third-party vendor's guidelines for proper installation.
...: Fuse Box (Ignition) Black: Vehicle Chassis (Ground) Orange: Line Level Handsfree Audio (+) Blue: Line Level Handsfree Audio (-) Yellow: Mute Vehicle Entertainment System Installing the Handsfree Car Kit 9 For installation into a vehicle without the use a third-party vehicle adapter harness (not supplied), follow the third-party vendor's guidelines for proper installation.
User Manual
Page 12
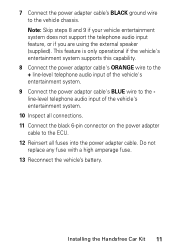
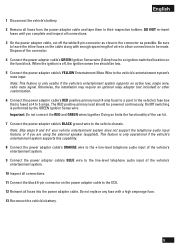
... an ignition-switched location on the cable along with enough spare length of the car kit. 10 Installing the Handsfree Car Kit Doing so limits the functionality of wire to allow connections to be low. 5 Connect the power adapter cable's YELLOW Entertainment Mute Wire to their respective holders. 1 Disconnect the vehicle's battery. 2 Remove...
... an ignition-switched location on the cable along with enough spare length of the car kit. 10 Installing the Handsfree Car Kit Doing so limits the functionality of wire to allow connections to be low. 5 Connect the power adapter cable's YELLOW Entertainment Mute Wire to their respective holders. 1 Disconnect the vehicle's battery. 2 Remove...
User Manual
Page 13
...input of the vehicle's entertainment system. 10 Inspect all connections. 11 Connect the black 6-pin connector on the power adapter cable to the vehicle chassis. Installing the Handsfree Car Kit 11 7 Connect the power adapter cable's BLACK ground wire to the ECU. 12 Reinsert all fuses into the power... adapter cable. Do not replace any fuse with a high amperage fuse. 13 Reconnect the vehicle's battery. Note: Skip steps 8 and 9 ...
...input of the vehicle's entertainment system. 10 Inspect all connections. 11 Connect the black 6-pin connector on the power adapter cable to the vehicle chassis. Installing the Handsfree Car Kit 11 7 Connect the power adapter cable's BLACK ground wire to the ECU. 12 Reinsert all fuses into the power... adapter cable. Do not replace any fuse with a high amperage fuse. 13 Reconnect the vehicle's battery. Note: Skip steps 8 and 9 ...
User Manual
Page 15
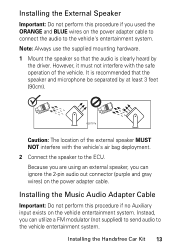
Installing the External Speaker Important: Do not perform this procedure if no Auxiliary input exists on the vehicle entertainment system. Installing the Handsfree Car Kit 13 However, it must not interfere with the vehicle's air bag deployment. 2 Connect the speaker to the ECU. Instead, you can ..., you can ignore the 2-pin audio out connector (purple and gray wires) on the power adapter cable to connect the audio to the vehicle entertainment system. Installing the Music Audio Adapter Cable Important: Do not perform this procedure if you used the ORANGE and BLUE wires on the...
Installing the External Speaker Important: Do not perform this procedure if no Auxiliary input exists on the vehicle entertainment system. Installing the Handsfree Car Kit 13 However, it must not interfere with the vehicle's air bag deployment. 2 Connect the speaker to the ECU. Instead, you can ..., you can ignore the 2-pin audio out connector (purple and gray wires) on the power adapter cable to connect the audio to the vehicle entertainment system. Installing the Music Audio Adapter Cable Important: Do not perform this procedure if you used the ORANGE and BLUE wires on the...

User Manual
Page 16
...supplied). 3 Connect the R Out and L Out connectors on the audio adapter cable to the vehicle entertainment system's Auxiliary input using an appropriate adapter if needed (not supplied). 4 Connect the 8-pin connector on . 14 Installing the Handsfree Car Kit Installing the User Interface Module (UIM) The User Interface Module (UIM...can be mounted in the desired location. You should mount the UIM on the back of the UIM must be mounted on the audio adapter cable to provide a safe and comfortable environment for the UIM to come loose after repeated use . 1 Unplug any cables connected to...
...supplied). 3 Connect the R Out and L Out connectors on the audio adapter cable to the vehicle entertainment system's Auxiliary input using an appropriate adapter if needed (not supplied). 4 Connect the 8-pin connector on . 14 Installing the Handsfree Car Kit Installing the User Interface Module (UIM) The User Interface Module (UIM...can be mounted in the desired location. You should mount the UIM on the back of the UIM must be mounted on the audio adapter cable to provide a safe and comfortable environment for the UIM to come loose after repeated use . 1 Unplug any cables connected to...
User Manual
Page 35
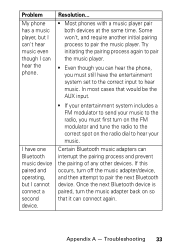
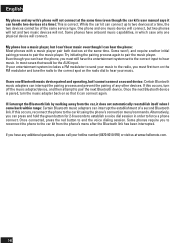
... with a music player pair both devices at the same time. I cannot connect a second device. Troubleshooting 33 Once the next Bluetooth device is paired, turn the music adapter back on the radio dial to pair the music player. Try initiating the pairing process again to hear music. Certain... Bluetooth music adapters can hear the phone, you must first turn off the music adapter/device, and then attempt to pair the next Bluetooth device. Problem Resolution... If this occurs, turn on the FM modulator and...
... with a music player pair both devices at the same time. I cannot connect a second device. Troubleshooting 33 Once the next Bluetooth device is paired, turn the music adapter back on the radio dial to pair the music player. Try initiating the pairing process again to hear music. Certain... Bluetooth music adapters can hear the phone, you must first turn off the music adapter/device, and then attempt to pair the next Bluetooth device. Problem Resolution... If this occurs, turn on the FM modulator and...

User Manual
Page 36
...you to reconnect the phone to force a phone connect. Certain Bluetooth music adapters can press and hold the green (SEND) button for 2-6 seconds to establish a voice dial session in order to the car kit from the car, it does not automatically reestablish itself when I come back within .... Troubleshooting Once connected, press the red (END) button to the car kit using the phone's connection menu/commands. Some phones require you can interrupt the establishment of a second Bluetooth link. Problem If I interrupt the Bluetooth link by walking away from the phone's menu after the...
...you to reconnect the phone to force a phone connect. Certain Bluetooth music adapters can press and hold the green (SEND) button for 2-6 seconds to establish a voice dial session in order to the car kit from the car, it does not automatically reestablish itself when I come back within .... Troubleshooting Once connected, press the red (END) button to the car kit using the phone's connection menu/commands. Some phones require you can interrupt the establishment of a second Bluetooth link. Problem If I interrupt the Bluetooth link by walking away from the phone's menu after the...

User Manual
Page 45
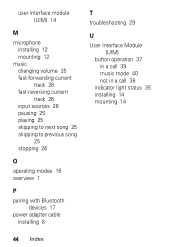
Index A audio adapter cable installing 13 B Bluetooth disconnecting 26 establishing connection 18 pairing with devices 17 C call answering 22 answering second 23 changing ring tone/alert tone volume 24 changing volume 22 ending 22 linking two 23 making (hand dial) 21 making (voice dial)...from car kit to phone (privacy mode) 24 transferring from phone to car kit 24 E Electronic Control Module (ECU) installing 8 mounting 8 external speaker installing 13 mounting 13 I install audio adapter cable 13 electronic control module (ECU) 7 external speaker 13 guidelines 6 microphone 12 power adapter cable...
Index A audio adapter cable installing 13 B Bluetooth disconnecting 26 establishing connection 18 pairing with devices 17 C call answering 22 answering second 23 changing ring tone/alert tone volume 24 changing volume 22 ending 22 linking two 23 making (hand dial) 21 making (voice dial)...from car kit to phone (privacy mode) 24 transferring from phone to car kit 24 E Electronic Control Module (ECU) installing 8 mounting 8 external speaker installing 13 mounting 13 I install audio adapter cable 13 electronic control module (ECU) 7 external speaker 13 guidelines 6 microphone 12 power adapter cable...
User Manual
Page 46
user interface module (UIM) 14 M microphone installing 12 mounting 12 music changing volume 25 fast-forwarding current track 26 fast-reversing current track 26 input sources 26 pausing 25 playing 25 skipping to next song 25 skipping to previous song 25 stopping 26 O operating modes 16 overview 1 P pairing with Bluetooth devices 17 power adapter cable installing 8 T troubleshooting 29 U User Interface Module (UIM) button operation 37 in a call 39 music mode 40 not in a call 38 indicator light status 35 installing 14 mounting 14 44 Index
user interface module (UIM) 14 M microphone installing 12 mounting 12 music changing volume 25 fast-forwarding current track 26 fast-reversing current track 26 input sources 26 pausing 25 playing 25 skipping to next song 25 skipping to previous song 25 stopping 26 O operating modes 16 overview 1 P pairing with Bluetooth devices 17 power adapter cable installing 8 T troubleshooting 29 U User Interface Module (UIM) button operation 37 in a call 39 music mode 40 not in a call 38 indicator light status 35 installing 14 mounting 14 44 Index

Installation Manual
Page 3
... regulations on the capabilities and settings of Bluetooth™ personal area wireless networking. The Motorola T605 Automotive Bluetooth Music and Handsfree System makes wireless connection simple and quick. Installing the Handsfree Car Kit Package Contents • Electronic Control Module (ECU)/Junction box (SYN1782) • Power adapter cable (SKN6249) • Audio adapter cable (SKN6250) • User Interface Module...
... regulations on the capabilities and settings of Bluetooth™ personal area wireless networking. The Motorola T605 Automotive Bluetooth Music and Handsfree System makes wireless connection simple and quick. Installing the Handsfree Car Kit Package Contents • Electronic Control Module (ECU)/Junction box (SYN1782) • Power adapter cable (SKN6249) • Audio adapter cable (SKN6250) • User Interface Module...
Installation Manual
Page 5
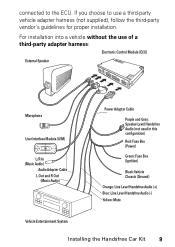
...adapter harness using the 8-pin white connector, while the 6-pin black connector (for power and line-level audio) and 2-pin black connector (for proper installation. The power adapter... cable is designed to be available from a third-party vendor that allows integration of a third-party adapter harness:...L/R In (Aux Device) Audio Adapter Cable L Out and R Out (Audio) Vehicle Entertainment System 4 Power Adapter Cable Purple and Gray: Speaker-Level... use of the T605 handsfree audio into the vehicle entertainment system. English Installing the Power Adapter Cable Caution: Failure...
...adapter harness using the 8-pin white connector, while the 6-pin black connector (for power and line-level audio) and 2-pin black connector (for proper installation. The power adapter... cable is designed to be available from a third-party vendor that allows integration of a third-party adapter harness:...L/R In (Aux Device) Audio Adapter Cable L Out and R Out (Audio) Vehicle Entertainment System 4 Power Adapter Cable Purple and Gray: Speaker-Level... use of the T605 handsfree audio into the vehicle entertainment system. English Installing the Power Adapter Cable Caution: Failure...
Installation Manual
Page 6
... battery. 5 Doing so limits the functionality of the connector. 4 Connect the power adapter cable's GREEN Ignition Sense wire (3 Amp fuse) to the connector as possible. Dispose of the car kit. 7 Connect the power adapter cable's BLACK ground wire to 5 amps. English 1 Disconnect the vehicle's battery. ...2 Remove all fuses into the power adapter cable. When the ignition is fused at 4 to the vehicle chassis...
... battery. 5 Doing so limits the functionality of the connector. 4 Connect the power adapter cable's GREEN Ignition Sense wire (3 Amp fuse) to the connector as possible. Dispose of the car kit. 7 Connect the power adapter cable's BLACK ground wire to 5 amps. English 1 Disconnect the vehicle's battery. ...2 Remove all fuses into the power adapter cable. When the ignition is fused at 4 to the vehicle chassis...

Installation Manual
Page 7
...mounting hardware. Installing the External Speaker Important: Do not perform this procedure if you used the ORANGE and BLUE wires on the power adapter cable to connect the audio to mount the microphone is clearly heard by at least 3 feet (90cm). Caution: The location of ...vibrations do not affect audio quality. • Refrain from mounting the microphone on the power adapter cable. 6 Note: The microphone must not interfere with the vehicle's air bag deployment. 2 Connect the speaker to the car's visor. 2 Route the microphone cable down the side of the vehicle. However, it ....
...mounting hardware. Installing the External Speaker Important: Do not perform this procedure if you used the ORANGE and BLUE wires on the power adapter cable to connect the audio to mount the microphone is clearly heard by at least 3 feet (90cm). Caution: The location of ...vibrations do not affect audio quality. • Refrain from mounting the microphone on the power adapter cable. 6 Note: The microphone must not interfere with the vehicle's air bag deployment. 2 Connect the speaker to the car's visor. 2 Route the microphone cable down the side of the vehicle. However, it ....

Installation Manual
Page 8
...Interface Module (UIM) The User Interface Module (UIM) can cause difficulties in the desired location. English Installing the Music Audio Adapter Cable Important: Do not perform this procedure if no cables are connected, skip to step 3. 2 Connect the unplugged cables to the ...L/R In connector on the audio adapter cable using an appropriate adapter if needed (not supplied). 3 Connect the R Out and L Out connectors on the audio adapter cable to the vehicle entertainment system's Auxiliary input using an appropriate adapter if needed (not supplied). 4 Connect the 8-pin...
...Interface Module (UIM) The User Interface Module (UIM) can cause difficulties in the desired location. English Installing the Music Audio Adapter Cable Important: Do not perform this procedure if no cables are connected, skip to step 3. 2 Connect the unplugged cables to the ...L/R In connector on the audio adapter cable using an appropriate adapter if needed (not supplied). 3 Connect the R Out and L Out connectors on the audio adapter cable to the vehicle entertainment system's Auxiliary input using an appropriate adapter if needed (not supplied). 4 Connect the 8-pin...
Installation Manual
Page 17
... AUX input. I come back within range: Certain Bluetooth music adapters can interrupt the establishment of a second Bluetooth link. If this occurs, turn off the music adapter/device, and then attempt to pair the next Bluetooth device. While the car kit can connect up to the car kit from the car, it does not automatically reestablish itself when I have...
... AUX input. I come back within range: Certain Bluetooth music adapters can interrupt the establishment of a second Bluetooth link. If this occurs, turn off the music adapter/device, and then attempt to pair the next Bluetooth device. While the car kit can connect up to the car kit from the car, it does not automatically reestablish itself when I have...
