
User Manual
Page 7
... Mode 40 European Union Directives Conformance Statement . . 41 Caring for Installation and Connection 6 Installing the Handsfree Car Kit 7 Using Your Car Kit 16 Linking Your Car Kit and Bluetooth Enabled Device . . . . 17 Making and Receiving Calls 21 Listening to Music 24 Using the Wired ...Audio Input 26 Disconnecting the Car Kit from Your Bluetooth Device . 27 Appendix A - Troubleshooting 29 Appendix B - UIM Indicator Light Status 35 Appendix C - Contents Welcome 1 Package Contents 2 Installing the Handsfree Car Kit 6 Guidelines for the Environment by Recycling ...
... Mode 40 European Union Directives Conformance Statement . . 41 Caring for Installation and Connection 6 Installing the Handsfree Car Kit 7 Using Your Car Kit 16 Linking Your Car Kit and Bluetooth Enabled Device . . . . 17 Making and Receiving Calls 21 Listening to Music 24 Using the Wired ...Audio Input 26 Disconnecting the Car Kit from Your Bluetooth Device . 27 Appendix A - Troubleshooting 29 Appendix B - UIM Indicator Light Status 35 Appendix C - Contents Welcome 1 Package Contents 2 Installing the Handsfree Car Kit 6 Guidelines for the Environment by Recycling ...

User Manual
Page 8
... communication equipment, in the area over the air bag or in -line connectors easily accessible. 6 Installing the Handsfree Car Kit Installing the Handsfree Car Kit Guidelines for air bag information specific to the vehicle. If the communication equipment is improperly installed and the air bag ...air bag deployment area. If needed, contact the vehicle manufacturer for Installation and Connection • Only qualified personnel should install this car kit. Caution: An air bag inflates with seating or leg space. • Route cables so they are protected from pinching, sharp...
... communication equipment, in the area over the air bag or in -line connectors easily accessible. 6 Installing the Handsfree Car Kit Installing the Handsfree Car Kit Guidelines for air bag information specific to the vehicle. If the communication equipment is improperly installed and the air bag ...air bag deployment area. If needed, contact the vehicle manufacturer for Installation and Connection • Only qualified personnel should install this car kit. Caution: An air bag inflates with seating or leg space. • Route cables so they are protected from pinching, sharp...

User Manual
Page 9
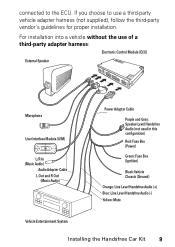
...the UIM, microphone, speaker, and ECU. Installing the Handsfree Car Kit 7 The car kit draws less than 3 Amps. Install the power adaptor cable. Installing the Handsfree Car Kit Caution: This car kit must be connected to a maximum 5 Amp fuse in the car fuse panel to prevent fire or other damages should first ...current. • The installation steps are in the ECU. Installing the Electronic Control Module (ECU) Mount the ECU securely. • The car kit is intended for the handsfree audio (line and speaker levels) and music (RCA line-level output). Plug everything into the ECU, and ...
...the UIM, microphone, speaker, and ECU. Installing the Handsfree Car Kit 7 The car kit draws less than 3 Amps. Install the power adaptor cable. Installing the Handsfree Car Kit Caution: This car kit must be connected to a maximum 5 Amp fuse in the car fuse panel to prevent fire or other damages should first ...current. • The installation steps are in the ECU. Installing the Electronic Control Module (ECU) Mount the ECU securely. • The car kit is intended for the handsfree audio (line and speaker levels) and music (RCA line-level output). Plug everything into the ECU, and ...

User Manual
Page 10
...pin black connector (for power and line-level audio) and 2-pin black connector (for speaker-level audio) are 8 Installing the Handsfree Car Kit The best location for cable connections. Installing the Power Adapter Cable Caution: Failure to be oriented in any direction. The box must ...Do not place it behind or within large areas of the T605 handsfree audio into the vehicle entertainment system. The power adapter cable is under the dash. Barcode Mounting Surface Mounting Surface Barcode For optimal Bluetooth performance, mount the ECU so that allows integration of metal...
...pin black connector (for power and line-level audio) and 2-pin black connector (for speaker-level audio) are 8 Installing the Handsfree Car Kit The best location for cable connections. Installing the Power Adapter Cable Caution: Failure to be oriented in any direction. The box must ...Do not place it behind or within large areas of the T605 handsfree audio into the vehicle entertainment system. The power adapter cable is under the dash. Barcode Mounting Surface Mounting Surface Barcode For optimal Bluetooth performance, mount the ECU so that allows integration of metal...
User Manual
Page 11
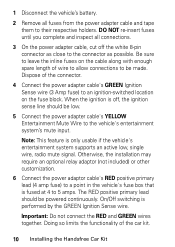
...: Fuse Box (Ignition) Black: Vehicle Chassis (Ground) Orange: Line Level Handsfree Audio (+) Blue: Line Level Handsfree Audio (-) Yellow: Mute Vehicle Entertainment System Installing the Handsfree Car Kit 9 If you choose to the ECU.
...: Fuse Box (Ignition) Black: Vehicle Chassis (Ground) Orange: Line Level Handsfree Audio (+) Blue: Line Level Handsfree Audio (-) Yellow: Mute Vehicle Entertainment System Installing the Handsfree Car Kit 9 If you choose to the ECU.
User Manual
Page 12
... signal. 1 Disconnect the vehicle's battery. 2 Remove all connections. 3 On the power adapter cable, cut off , the ignition sense line should be made. Dispose of the car kit. 10 Installing the Handsfree Car Kit Doing so limits the functionality of the connector. 4 Connect the power adapter cable's GREEN Ignition Sense wire (3 Amp fuse) to 5 amps.
... signal. 1 Disconnect the vehicle's battery. 2 Remove all connections. 3 On the power adapter cable, cut off , the ignition sense line should be made. Dispose of the car kit. 10 Installing the Handsfree Car Kit Doing so limits the functionality of the connector. 4 Connect the power adapter cable's GREEN Ignition Sense wire (3 Amp fuse) to 5 amps.
User Manual
Page 13
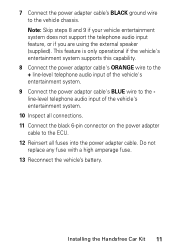
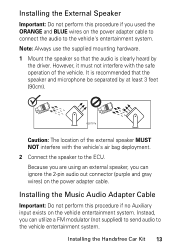
Installing the Handsfree Car Kit 11 This feature is only operational if the vehicle's entertainment system supports this capability. 8 Connect the power adaptor cable's ORANGE wire to the + line-level ...
Installing the Handsfree Car Kit 11 This feature is only operational if the vehicle's entertainment system supports this capability. 8 Connect the power adaptor cable's ORANGE wire to the + line-level ...

User Manual
Page 14
Note: The microphone must be positioned properly or the car kit WILL NOT perform optimally. 1 Mount the microphone in a suitable location using either screw, velcro, or clip. • The preferred spot to mount the microphone is ... from mounting the microphone on door pillars or windows that can transmit exterior wind noise to it. • Microphone should not be attached to the car's visor. 2 Route the microphone cable down the side of the windshield, through the dash, and to the ECU. 3 Connect the microphone to the ECU. 12...
Note: The microphone must be positioned properly or the car kit WILL NOT perform optimally. 1 Mount the microphone in a suitable location using either screw, velcro, or clip. • The preferred spot to mount the microphone is ... from mounting the microphone on door pillars or windows that can transmit exterior wind noise to it. • Microphone should not be attached to the car's visor. 2 Route the microphone cable down the side of the windshield, through the dash, and to the ECU. 3 Connect the microphone to the ECU. 12...
User Manual
Page 15
.... Because you are using an external speaker, you can utilize a FM modulator (not supplied) to send audio to the vehicle's entertainment system. Installing the Handsfree Car Kit 13 Instead, you used the ORANGE and BLUE wires on the power adapter cable to connect the audio to the vehicle entertainment system. It is...
.... Because you are using an external speaker, you can utilize a FM modulator (not supplied) to send audio to the vehicle's entertainment system. Installing the Handsfree Car Kit 13 Instead, you used the ORANGE and BLUE wires on the power adapter cable to connect the audio to the vehicle entertainment system. It is...

User Manual
Page 16
... slot to the vehicle entertainment system's Auxiliary input using an appropriate adapter if needed (not supplied). 4 Connect the 8-pin connector on . 14 Installing the Handsfree Car Kit 1 Unplug any cables connected to the ECU. If no cables are connected, skip to step 3. 2 Connect the unplugged cables to the L/R In connector on the...
... slot to the vehicle entertainment system's Auxiliary input using an appropriate adapter if needed (not supplied). 4 Connect the 8-pin connector on . 14 Installing the Handsfree Car Kit 1 Unplug any cables connected to the ECU. If no cables are connected, skip to step 3. 2 Connect the unplugged cables to the L/R In connector on the...

User Manual
Page 17
Installing the Handsfree Car Kit 15 2 Remove the backing on the steering wheel. • The UIM must be in easy reach of the UIM and press the UIM firmly into place. Caution: Clean the mounting surface thoroughly to ensure good adhesion. • The mounted UIM MUST NOT create a visual distraction. • DO NOT mount the UIM on the rear of the driver. 3 Connect the UIM to the ECU.
Installing the Handsfree Car Kit 15 2 Remove the backing on the steering wheel. • The UIM must be in easy reach of the UIM and press the UIM firmly into place. Caution: Clean the mounting surface thoroughly to ensure good adhesion. • The mounted UIM MUST NOT create a visual distraction. • DO NOT mount the UIM on the rear of the driver. 3 Connect the UIM to the ECU.

User Manual
Page 18
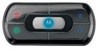
Operating Mode Connected Mode Description • Used for status as shown below. Using Your Car Kit The User Interface Module (UIM) enables you to perform operations, and an indicator light for making and receiving calls • Indicator light is colored ... connected) is enabled • Received call pauses music while the call is ended, music is resumed 16 Using Your Car Kit The UIM provides both buttons to set up and use your T605 Bluetooth Handsfree Car Kit. Mode selection is active. When call is automatic. red (END) button Multi-function (MFB) button blue (UP ARROW)...
Operating Mode Connected Mode Description • Used for status as shown below. Using Your Car Kit The User Interface Module (UIM) enables you to perform operations, and an indicator light for making and receiving calls • Indicator light is colored ... connected) is enabled • Received call pauses music while the call is ended, music is resumed 16 Using Your Car Kit The UIM provides both buttons to set up and use your T605 Bluetooth Handsfree Car Kit. Mode selection is active. When call is automatic. red (END) button Multi-function (MFB) button blue (UP ARROW)...

User Manual
Page 19
... every time you must first link it is enabled • Music player operations can be performed from UIM or music player Linking Your Car Kit and Bluetooth Enabled Device Before you can connect up to 2 devices at once as long as they are of separate services (a phone device and... a music device, but not two phone devices or two music devices). The car kit can remember up to 6 devices, and can use your Bluetooth car kit, you start your device by creating a paired link. Operating Mode Music Mode Description • Used for listening to music...
... every time you must first link it is enabled • Music player operations can be performed from UIM or music player Linking Your Car Kit and Bluetooth Enabled Device Before you can connect up to 2 devices at once as long as they are of separate services (a phone device and... a music device, but not two phone devices or two music devices). The car kit can remember up to 6 devices, and can use your Bluetooth car kit, you start your device by creating a paired link. Operating Mode Music Mode Description • Used for listening to music...
User Manual
Page 20
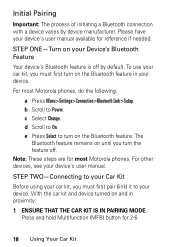
... Car Kit STEP TWO-Connecting to your Car Kit Before using your device. With the car kit and device turned on the Bluetooth feature in proximity: 1 ENSURE THAT THE CAR KIT IS IN PAIRING MODE. d Scroll to Power. Please have your device. b Scroll to On. c Select Change. Press and hold Multifunction (MFB) button for reference if needed. For most Motorola...
... Car Kit STEP TWO-Connecting to your Car Kit Before using your device. With the car kit and device turned on the Bluetooth feature in proximity: 1 ENSURE THAT THE CAR KIT IS IN PAIRING MODE. d Scroll to Power. Please have your device. b Scroll to On. c Select Change. Press and hold Multifunction (MFB) button for reference if needed. For most Motorola...
User Manual
Page 21
.... When this occurs, return to step 2 to devices that any previously paired devices are for most Motorola phones, do the following: a Press Menu> Settings> Connection> Bluetooth Link> Handsfree> Look for Music mode). b Select Motorola T605 from your car kit with the new device. Note: These steps are turned off, and perform steps in purple followed by...
.... When this occurs, return to step 2 to devices that any previously paired devices are for most Motorola phones, do the following: a Press Menu> Settings> Connection> Bluetooth Link> Handsfree> Look for Music mode). b Select Motorola T605 from your car kit with the new device. Note: These steps are turned off, and perform steps in purple followed by...
User Manual
Page 22
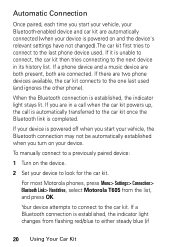
... a phone device and a music device are both present, both are two phone devices available, the car kit connects to either steady blue (if 20 Using Your Car Kit For most Motorola phones, press Menu> Settings> Connection> Bluetooth Link> Handsfree, select Motorola T605 from flashing red/blue to the one last used . To manually connect to a previously paired device...
... a phone device and a music device are both present, both are two phone devices available, the car kit connects to either steady blue (if 20 Using Your Car Kit For most Motorola phones, press Menu> Settings> Connection> Bluetooth Link> Handsfree, select Motorola T605 from flashing red/blue to the one last used . To manually connect to a previously paired device...

User Manual
Page 23
... Car Kit 21 Note: Before you can use your Bluetooth-enabled phone, you to a music device). Make a Call Phone: On-in idle (Voice Dial) T605: On Press and hold green (SEND) button for 2-6 seconds, wait for making and receiving calls from your connected phone using your Bluetooth-enabled phone. Make a Call Phone: On-in idle (Hand...
... Car Kit 21 Note: Before you can use your Bluetooth-enabled phone, you to a music device). Make a Call Phone: On-in idle (Voice Dial) T605: On Press and hold green (SEND) button for 2-6 seconds, wait for making and receiving calls from your connected phone using your Bluetooth-enabled phone. Make a Call Phone: On-in idle (Hand...
User Manual
Page 24
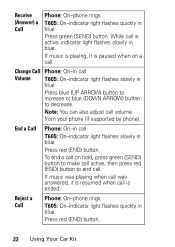
While call is active, indicator light flashes slowly in blue Press red (END) button. 22 Using Your Car Kit To end a call on a call was playing when call . Note: You can also adjust call . If music is playing, it is resumed when call is ...) button to make call active, then press red (END) button to decrease. Reject a Call Phone: On-phone rings T605: On-indicator light flashes quickly in blue. Receive (Answer) a Call Phone: On-phone rings T605: On-indicator light flashes quickly in blue Press blue (UP ARROW) button to increase or blue (DOWN ARROW...
While call is active, indicator light flashes slowly in blue Press red (END) button. 22 Using Your Car Kit To end a call on a call was playing when call . Note: You can also adjust call . If music is playing, it is resumed when call is ...) button to make call active, then press red (END) button to decrease. Reject a Call Phone: On-phone rings T605: On-indicator light flashes quickly in blue. Receive (Answer) a Call Phone: On-phone rings T605: On-indicator light flashes quickly in blue Press blue (UP ARROW) button to increase or blue (DOWN ARROW...

User Manual
Page 25
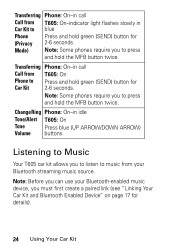
...blue Press MFB button. Switch Between Two Calls (Active and On Hold) Phone: On-in call, 2nd call on hold , answers incoming call on hold T605: On-indicator light flashes slowly in Incoming or blue On Hold Calls) - Link Two Phone: On-in call, 2nd call . While muted, indicator ... slowly in purple Answer Second Incoming Call Phone: On-in call, 2nd call on hold MFB button for 2-6 seconds. 3-way Conference Using Your Car Kit 23 When call is on hold, indicator light flashes quickly in blue until call is answered Press green (SEND) button, places first call incoming...
...blue Press MFB button. Switch Between Two Calls (Active and On Hold) Phone: On-in call, 2nd call on hold , answers incoming call on hold T605: On-indicator light flashes slowly in Incoming or blue On Hold Calls) - Link Two Phone: On-in call, 2nd call . While muted, indicator ... slowly in purple Answer Second Incoming Call Phone: On-in call, 2nd call on hold MFB button for 2-6 seconds. 3-way Conference Using Your Car Kit 23 When call is on hold, indicator light flashes quickly in blue until call is answered Press green (SEND) button, places first call incoming...
User Manual
Page 26
... hold green (SEND) button for details). 24 Using Your Car Kit Transferring Phone: On-in idle Tone/Alert T605: On Tone Press blue (UP ARROW/DOWN ARROW) Volume buttons. Listening to Music Your T605 car kit allows you must first create a paired link (see "Linking Your Car Kit and Bluetooth Enabled Device" on page 17 for (Privacy 2-6 seconds. Mode...
... hold green (SEND) button for details). 24 Using Your Car Kit Transferring Phone: On-in idle Tone/Alert T605: On Tone Press blue (UP ARROW/DOWN ARROW) Volume buttons. Listening to Music Your T605 car kit allows you must first create a paired link (see "Linking Your Car Kit and Bluetooth Enabled Device" on page 17 for (Privacy 2-6 seconds. Mode...


