
User Guide
Page 2
... the AA Batteries 13 Installing the NiCd Battery Pack 13 Battery Meter 14 Attaching the Belt Clip 15 Removing the Belt Clip 15 Turning Your Radio On and Off 15 Setting the Volume 15 Setting a Channel 16 Channels and Frequencies 16 Talking and Listening 17 Talk Range 17 Checking the Channel...
... the AA Batteries 13 Installing the NiCd Battery Pack 13 Battery Meter 14 Attaching the Belt Clip 15 Removing the Belt Clip 15 Turning Your Radio On and Off 15 Setting the Volume 15 Setting a Channel 16 Channels and Frequencies 16 Talking and Listening 17 Talk Range 17 Checking the Channel...

User Guide
Page 3
...compliance). Safety and General Information Safety and General Information Important Information on Safe and Efficient Operation Read This Information Before Using Your Radio. To control your exposure and ensure compliance with the following procedure: • Transmit no more than 50% of Federal ...Regulations; 47CFR part 2 sub-part J 2 Exposure To Radio Frequency Energy Your Motorola two-way radio complies with the general population/uncontrolled environment exposure limits, always adhere to the following RF energy exposure standards and ...
...compliance). Safety and General Information Safety and General Information Important Information on Safe and Efficient Operation Read This Information Before Using Your Radio. To control your exposure and ensure compliance with the following procedure: • Transmit no more than 50% of Federal ...Regulations; 47CFR part 2 sub-part J 2 Exposure To Radio Frequency Energy Your Motorola two-way radio complies with the general population/uncontrolled environment exposure limits, always adhere to the following RF energy exposure standards and ...
User Guide
Page 4
...set forth in the Frequency Range from July 2, 2002" To assure optimal radio performance and make sure human exposure to radio frequency electromagnetic energy is "IN USE." Portable Radio Operation and EME Exposure Antenna Care Use only the supplied or an approved replacement...; International Commission on Non-Ionizing Radiation Protection (ICNIRP) 1998 • Ministry of exposure to electrical, magnetic and electromagnetic fields in the radio frequency range between 9 KHz and 300 GHz" and "Attachment to resolution # 303 from 3 kHz to the following procedures. Unauthorized antennas...
...set forth in the Frequency Range from July 2, 2002" To assure optimal radio performance and make sure human exposure to radio frequency electromagnetic energy is "IN USE." Portable Radio Operation and EME Exposure Antenna Care Use only the supplied or an approved replacement...; International Commission on Non-Ionizing Radiation Protection (ICNIRP) 1998 • Ministry of exposure to electrical, magnetic and electromagnetic fields in the radio frequency range between 9 KHz and 300 GHz" and "Attachment to resolution # 303 from 3 kHz to the following procedures. Unauthorized antennas...

User Guide
Page 5
...applicable, when using any data feature of the Motorola-supplied or approved body-worn accessories, and are not using your radio as a traditional two-way radio, hold the radio in a vertical position with or without an accessory cable, position the radio and its antenna are at least 1 inch ... for electro- 4 magnetic compatibility. Use of approved Motorola accessories, visit our website at least 1 inch (2.5 cm) from the body. Two-way Radio Operation Safety and General Information When using the radio held in the normal use one of the radio with the microphone 1 to 2 inches (2.5 to ...
...applicable, when using any data feature of the Motorola-supplied or approved body-worn accessories, and are not using your radio as a traditional two-way radio, hold the radio in a vertical position with or without an accessory cable, position the radio and its antenna are at least 1 inch ... for electro- 4 magnetic compatibility. Use of approved Motorola accessories, visit our website at least 1 inch (2.5 cm) from the body. Two-way Radio Operation Safety and General Information When using the radio held in the normal use one of the radio with the microphone 1 to 2 inches (2.5 to ...

User Guide
Page 6
... to do so. Medical Devices - Food and Drug Administration. Safety and General Information Facilities To avoid electromagnetic interference and/or compatibility conflicts, turn off your radio when on board an aircraft. These recommendations are consistent with applicable regulations per airline crew instructions. Hospitals or health care facilities may be using equipment...
... to do so. Medical Devices - Food and Drug Administration. Safety and General Information Facilities To avoid electromagnetic interference and/or compatibility conflicts, turn off your radio when on board an aircraft. These recommendations are consistent with applicable regulations per airline crew instructions. Hospitals or health care facilities may be using equipment...

User Guide
Page 7
... be able to determine if it is placed in the air bag deployment area and the air bag inflates, the radio may interfere with great force. In the event of your hearing aid manufacturer to the road. • Use hands-free operation, if available. • Pull ... may want to consult your device to assist you in the area where you may be propelled with an Air Bag Do not place a portable radio in the area over an air bag or in the air bag deployment area. Safety and General Information Medical Devices - Air bags inflate with some...
... be able to determine if it is placed in the air bag deployment area and the air bag inflates, the radio may interfere with great force. In the event of your hearing aid manufacturer to the road. • Use hands-free operation, if available. • Pull ... may want to consult your device to assist you in the area where you may be propelled with an Air Bag Do not place a portable radio in the area over an air bag or in the air bag deployment area. Safety and General Information Medical Devices - Air bags inflate with some...

User Guide
Page 8
... bodily injury or even death. Blasting Caps and Areas To avoid possible interference with a potentially explosive atmosphere, unless it is a radio type especially qualified for use any other area where you are often but not always posted. Safety and General Information Potentially Explosive Atmospheres... can cause an explosion or fire resulting in such areas. Operational Cautions Antennas Do not use in areas posted: "Turn off two-way radio." Note: The areas with potentially explosive atmospheres are near electrical blasting caps, in a blasting area, or in such areas as grain,...
... bodily injury or even death. Blasting Caps and Areas To avoid possible interference with a potentially explosive atmosphere, unless it is a radio type especially qualified for use any other area where you are often but not always posted. Safety and General Information Potentially Explosive Atmospheres... can cause an explosion or fire resulting in such areas. Operational Cautions Antennas Do not use in areas posted: "Turn off two-way radio." Note: The areas with potentially explosive atmospheres are near electrical blasting caps, in a blasting area, or in such areas as grain,...

User Guide
Page 11
FCC Licensing Information FCC Licensing Information Your Motorola radio operates on General Mobile Radio Service (GMRS) frequencies and is subject to the Rules and Regulations of this radio outside the country where it was intended to be distributed is subject to government regulations and ... Changes or modifications not expressly approved by the FCC equipment authorization for this radio and should be made . Replacement of any transmitter component (crystal, semiconductor, etc.) not authorized by Motorola may be made only by an organization representative of the user of those ...
FCC Licensing Information FCC Licensing Information Your Motorola radio operates on General Mobile Radio Service (GMRS) frequencies and is subject to the Rules and Regulations of this radio outside the country where it was intended to be distributed is subject to government regulations and ... Changes or modifications not expressly approved by the FCC equipment authorization for this radio and should be made . Replacement of any transmitter component (crystal, semiconductor, etc.) not authorized by Motorola may be made only by an organization representative of the user of those ...

User Guide
Page 12
Model T5000 Use to: • Turn radio on/off • Adjust volume LED Indicator Light Use to: • Talk • Save a setting Use to: • Transmit call tone Speaker Use to: • Select menu options • Exit the menu (when pressed while in a menu) • Lock and unlock the keypad (when held down and not in a menu) Accessory Jack Use to: • Scan Use and to: • Scroll through menus Microphone 11 Model T5000 Control Buttons - Control Buttons -
Model T5000 Use to: • Turn radio on/off • Adjust volume LED Indicator Light Use to: • Talk • Save a setting Use to: • Transmit call tone Speaker Use to: • Select menu options • Exit the menu (when pressed while in a menu) • Lock and unlock the keypad (when held down and not in a menu) Accessory Jack Use to: • Scan Use and to: • Scroll through menus Microphone 11 Model T5000 Control Buttons - Control Buttons -

User Guide
Page 13
Model T5500 and T5550 Use to: • Turn radio on/off • Adjust volume LED Indicator Light Use to: • Talk • Save a setting Use to: • Transmit call tone Removeable front cover Speaker 12 Use to: • Select menu options • Exit the menu (when pressed while in a menu) • Lock and unlock the keypad (when held down and not in a menu) Accessory Jack Use to: • Scan Use and to: • Scroll through menus Microphone Model T5500 and T5550 Control Buttons - Control Buttons -
Model T5500 and T5550 Use to: • Turn radio on/off • Adjust volume LED Indicator Light Use to: • Talk • Save a setting Use to: • Transmit call tone Removeable front cover Speaker 12 Use to: • Select menu options • Exit the menu (when pressed while in a menu) • Lock and unlock the keypad (when held down and not in a menu) Accessory Jack Use to: • Scan Use and to: • Scroll through menus Microphone Model T5500 and T5550 Control Buttons - Control Buttons -

User Guide
Page 14
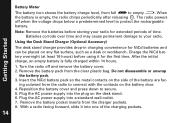
...from the clear plastic bag. Reposition the battery cover and press down to secure. 13 Getting Started Getting Started Installing the AA Batteries Your radio uses 3 AA Alkaline batteries. 1. Reposition the battery cover and press down to secure. Insert the NiCd battery pack so the metal ...compartment. 3. Insert 3 AA Alkaline batteries as shown on the battery door. 4. Note: The T5000,T5500 and T5550 model radios can use a NiCd rechargeable battery instead of the radio facing you, lift the battery latch up to remove the battery cover. 2. Follow step 1 above to release the battery ...
...from the clear plastic bag. Reposition the battery cover and press down to secure. 13 Getting Started Getting Started Installing the AA Batteries Your radio uses 3 AA Alkaline batteries. 1. Reposition the battery cover and press down to secure. Insert the NiCd battery pack so the metal ...compartment. 3. Insert 3 AA Alkaline batteries as shown on the battery door. 4. Note: The T5000,T5500 and T5550 model radios can use a NiCd rechargeable battery instead of the radio facing you, lift the battery latch up to remove the battery cover. 2. Follow step 1 above to release the battery ...
User Guide
Page 15
...the voltage drops below a predetermined level to empty . Plug the AC power supply into one of the battery are fac- With a radio facing forward, slide it for NiCd batteries and can be placed on the desk stand. 6. Remove the battery pack from full to ... level, from the clear plastic bag. After the initial charge, an empty battery is empty, the radio chirps periodically after releasing . Remove the battery pocket inserts from the radio to secure. 5. The radio powers off and remove the battery cover. 2. Do not disassemble or unwrap the battery pack. 3. ...
...the voltage drops below a predetermined level to empty . Plug the AC power supply into one of the battery are fac- With a radio facing forward, slide it for NiCd batteries and can be placed on the desk stand. 6. Remove the battery pack from full to ... level, from the clear plastic bag. After the initial charge, an empty battery is empty, the radio chirps periodically after releasing . Remove the battery pocket inserts from the radio to secure. 5. The radio powers off and remove the battery cover. 2. Do not disassemble or unwrap the battery pack. 3. ...

User Guide
Page 16
...battery temperature acclimates (usually about 20 minutes). • For optimal battery life, remove the radio or battery from the back of the radio. 2. Rotate clockwise to increase the volume or counterclockwise to turn the radio off. Removing the Belt Clip 1. The display then scrolls through the available channels and .... Pull the belt clip away from the charger within 16 hours. Attaching the Belt Clip Getting Started 1. Turning Your Radio On and Off Turn clockwise to turn the radio on the release tab at the top of the belt clip to release the catch. 2. Notes • The light...
...battery temperature acclimates (usually about 20 minutes). • For optimal battery life, remove the radio or battery from the back of the radio. 2. Rotate clockwise to increase the volume or counterclockwise to turn the radio off. Removing the Belt Clip 1. The display then scrolls through the available channels and .... Pull the belt clip away from the charger within 16 hours. Attaching the Belt Clip Getting Started 1. Turning Your Radio On and Off Turn clockwise to turn the radio on the release tab at the top of the belt clip to release the catch. 2. Notes • The light...
User Guide
Page 17
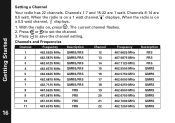
When the radio is on a 1 watt channel, displays. The current channel flashes. 2. Getting Started Channels and Frequencies Channel Frequency Description Channel Frequency Description 1 462.5625 MHz GMRS/FRS 12 467.6625 MHz FRS 2 462.5875 MHz GMRS/FRS 13 467.6875 MHz FRS 3 462.6125 MHz GMRS/FRS 14 467.7125 MHz FRS 4 462.6375 MHz GMRS/FRS 15 462.5500 MHz GMRS 5 462...
When the radio is on a 1 watt channel, displays. The current channel flashes. 2. Getting Started Channels and Frequencies Channel Frequency Description Channel Frequency Description 1 462.5625 MHz GMRS/FRS 12 467.6625 MHz FRS 2 462.5875 MHz GMRS/FRS 13 467.6875 MHz FRS 3 462.6125 MHz GMRS/FRS 14 467.7125 MHz FRS 4 462.6375 MHz GMRS/FRS 15 462.5500 MHz GMRS 5 462...
User Guide
Page 18
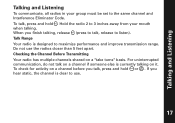
Talking and Listening Talking and Listening To communicate, all radios in your mouth when talking. Hold the radio 2 to 3 inches away from your group must be set to listen). If you finish talking, release (press to talk, release to the same channel and ... and improve transmission range. For uninterrupted communication, do not talk on a channel if someone else is designed to use the radios closer than 5 feet apart. To talk, press and hold or . Talk Range Your radio is currently talking on a "take turns" basis. Do not use . 17 Checking the Channel Before Transmitting Your...
Talking and Listening Talking and Listening To communicate, all radios in your mouth when talking. Hold the radio 2 to 3 inches away from your group must be set to listen). If you finish talking, release (press to talk, release to the same channel and ... and improve transmission range. For uninterrupted communication, do not talk on a channel if someone else is designed to use the radios closer than 5 feet apart. To talk, press and hold or . Talk Range Your radio is currently talking on a "take turns" basis. Do not use . 17 Checking the Channel Before Transmitting Your...

User Guide
Page 19
... and monitor channels. You can set a different code for each channel using this procedure. Note: You must set the code for a channel: 1. All other FRS radios that uses Interference Eliminator Codes to select the code. 3. Special Features Special Features Interference Eliminator Code Interference Eliminator Codes help minimize interference by providing you... press for 60 continuous seconds. Press or to communicate with a choice of code combinations. You can turn the radio on an FRS radio that do not have Interference Eliminator Codes.
... and monitor channels. You can set a different code for each channel using this procedure. Note: You must set the code for a channel: 1. All other FRS radios that uses Interference Eliminator Codes to select the code. 3. Special Features Special Features Interference Eliminator Code Interference Eliminator Codes help minimize interference by providing you... press for 60 continuous seconds. Press or to communicate with a choice of code combinations. You can turn the radio on an FRS radio that do not have Interference Eliminator Codes.
User Guide
Page 20
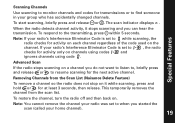
... or . Special Features Note: If your group who has accidentally changed channels. Note: You cannot remove the channel your radio was set to , the radio checks for activity only on the channel. Removing Channels from the scan list. Scanning Channels Use scanning to monitor channels and...for at least 3 seconds, then release. The scan indicator displays . When the radio detects channel activity, it while scanning, press and hold or for transmissions or to find someone in your radio's Interference Eliminator Code is set to when you can hear the transmission. This ...
... or . Special Features Note: If your group who has accidentally changed channels. Note: You cannot remove the channel your radio was set to , the radio checks for activity only on the channel. Removing Channels from the scan list. Scanning Channels Use scanning to monitor channels and...for at least 3 seconds, then release. The scan indicator displays . When the radio detects channel activity, it while scanning, press and hold or for transmissions or to find someone in your radio's Interference Eliminator Code is set to when you can hear the transmission. This ...
User Guide
Page 21
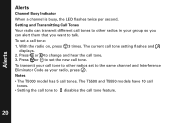
... 20 The T5500 and T5550 models have 10 call tones. • Setting the call tone to change and hear the call tone to other radios in your group so you can alert them that you want to the same channel and Interference Eliminator Code as your call tone. 3. Setting and... Transmitting Call Tones Your radio can transmit different call tones to other radios set to talk. To set the new call tone: 1. To transmit your radio, press . Alerts Alerts Channel Busy Indicator When a channel is busy, the LED flashes twice...
... 20 The T5500 and T5550 models have 10 call tones. • Setting the call tone to change and hear the call tone to other radios in your group so you can alert them that you want to the same channel and Interference Eliminator Code as your call tone. 3. Setting and... Transmitting Call Tones Your radio can transmit different call tones to other radios set to talk. To set the new call tone: 1. To transmit your radio, press . Alerts Alerts Channel Busy Indicator When a channel is busy, the LED flashes twice...
User Guide
Page 22
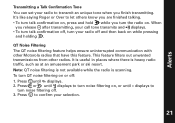
...out unwanted transmissions from other Motorola radios that have this feature. Press or until displays to confirm your selection. 21 Press to turn noise filtering on, or until displays. 2. QT Noise Filtering The QT noise filtering feature helps ensure uninterrupted communication with other radios. It is useful in... to turn talk confirmation on, press and hold while you finish transmitting. Note: QT noise filtering is not available while the radio is heavy radio traffic, such as at an amusement park or ski resort. displays to let others know you are finished talking. • ...
...out unwanted transmissions from other Motorola radios that have this feature. Press or until displays to confirm your selection. 21 Press to turn noise filtering on, or until displays. 2. QT Noise Filtering The QT noise filtering feature helps ensure uninterrupted communication with other radios. It is useful in... to turn talk confirmation on, press and hold while you finish transmitting. Note: QT noise filtering is not available while the radio is heavy radio traffic, such as at an amusement park or ski resort. displays to let others know you are finished talking. • ...

User Guide
Page 23
Press to a radio that has QT noise filtering turned on: 1. For a 30-second period, starting after the last transmission, all transmissions received on the selected channel and code will pass through the QT noise filter on the receiving radio. Alerts To transmit to send a call tone. Note: If you skip step 2, the beginning of your voice to pass through the QT noise filter. 22 Press and speak normally. Select the same channel and Interference Eliminator Code as the other radio. 2. This allows your message may not be heard on the receiving radio. 3.
Press to a radio that has QT noise filtering turned on: 1. For a 30-second period, starting after the last transmission, all transmissions received on the selected channel and code will pass through the QT noise filter on the receiving radio. Alerts To transmit to send a call tone. Note: If you skip step 2, the beginning of your voice to pass through the QT noise filter. 22 Press and speak normally. Select the same channel and Interference Eliminator Code as the other radio. 2. This allows your message may not be heard on the receiving radio. 3.


